
DIY: Key Fob Shell & Switch Button Replacement

Thread Starter
Member
Joined: Apr 2005
Posts: 152
Likes: 0
From: Medford (Boston), MA
'05 C230 kompressor & '08 R350 4Matic
My key shell/case was cracked and one of the buttons did not work so I purchased the following item from eBay: http://www.ebay.com/itm/MERCEDES-A-B-C-E-S-ML-G-CLK-W202-W203-W210-W211-W208-REMOTE-KEY-2-SWITCH-BUTTON/121049746339?rt=nc&_trksid=p2047675.m1851&_trkparms=aid%3D222002%26algo%3DSIC.FIT%26ao%3D1%26asc%3D261%26meid%3D1087346161805426287%26pid%3D100005%26prg%3D1088%26rk%3D1%26rkt%3D5%26sd%3D181053463988%26 ($32.99)
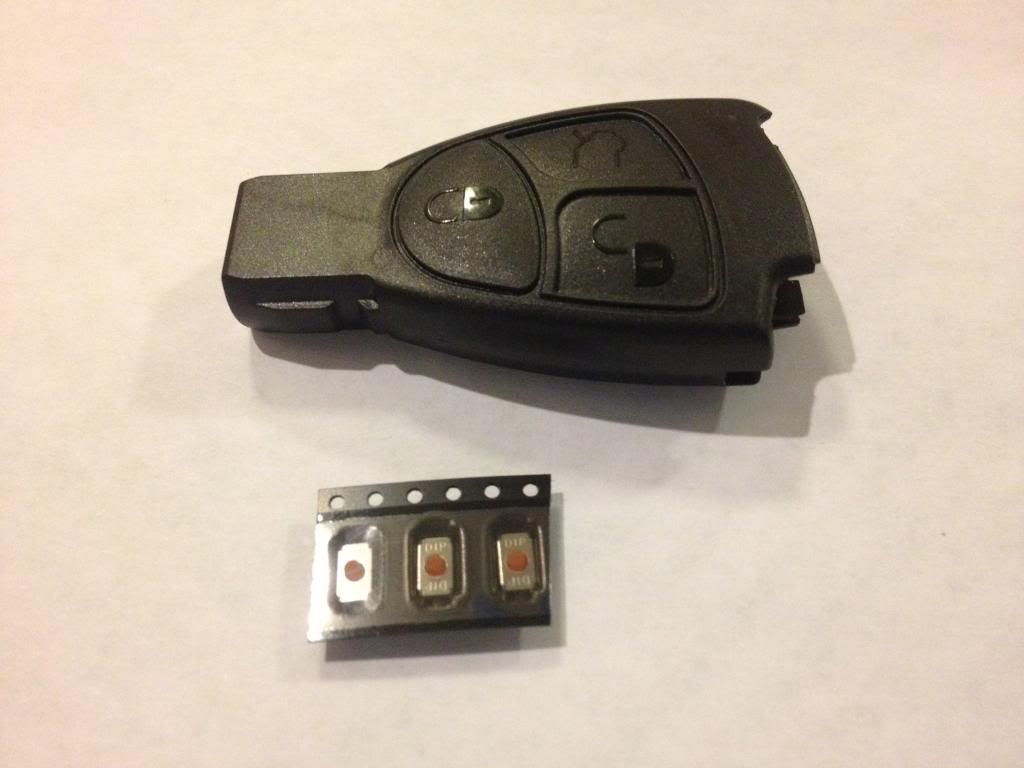
Note: If only the buttons are malfunctioning (i.e. your key shell is fine) then look for an item similar to this: http://www.ebay.com/itm/SWITCH-BUTTON-REMOTE-KEY-MERCEDES-A-B-C-E-S-ML-G-CLK-SLK-W210-W211-W202-W203-/181053463988?pt=Motors_Car_Truck_Parts_Accessories&hash=item2a27a09db4&vxp=mtr ($3.95)
DISCLAIMER: Do this at your own risk. Having that said, I had no previous experience in soldering.
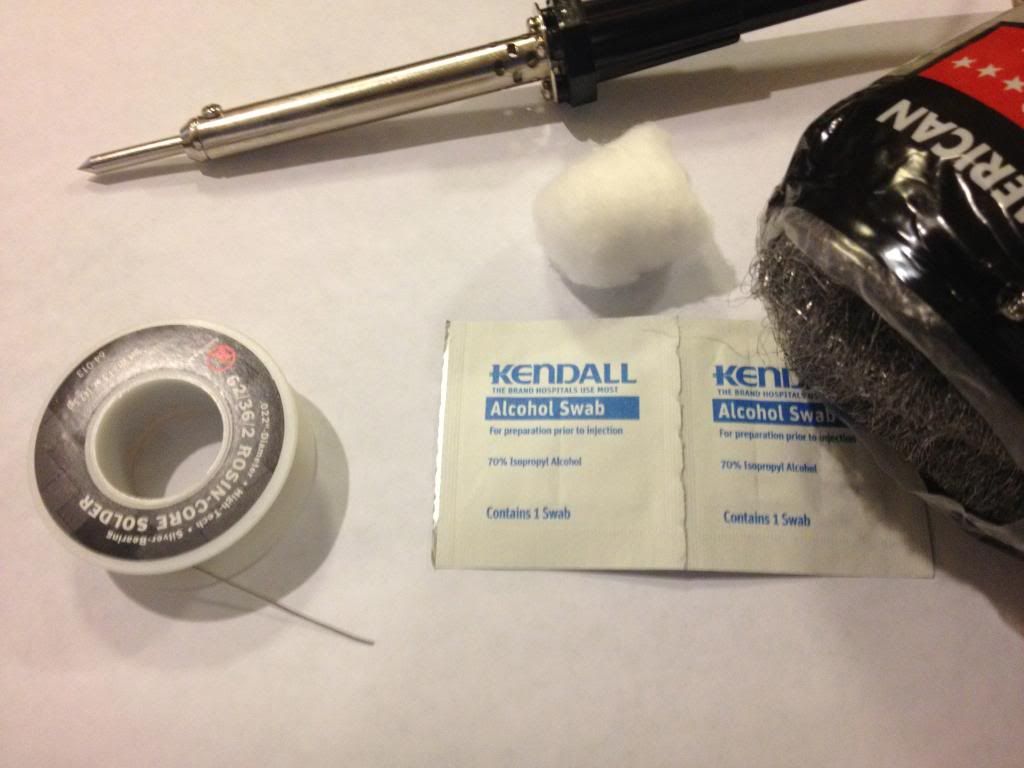
Tools: Plier, precision soldering iron, solder (~63/37 is recommended), cotton or piece of cloth, steel wool or sandpaper, alcohol swab, and latex gloves.
Dismantling procedure:
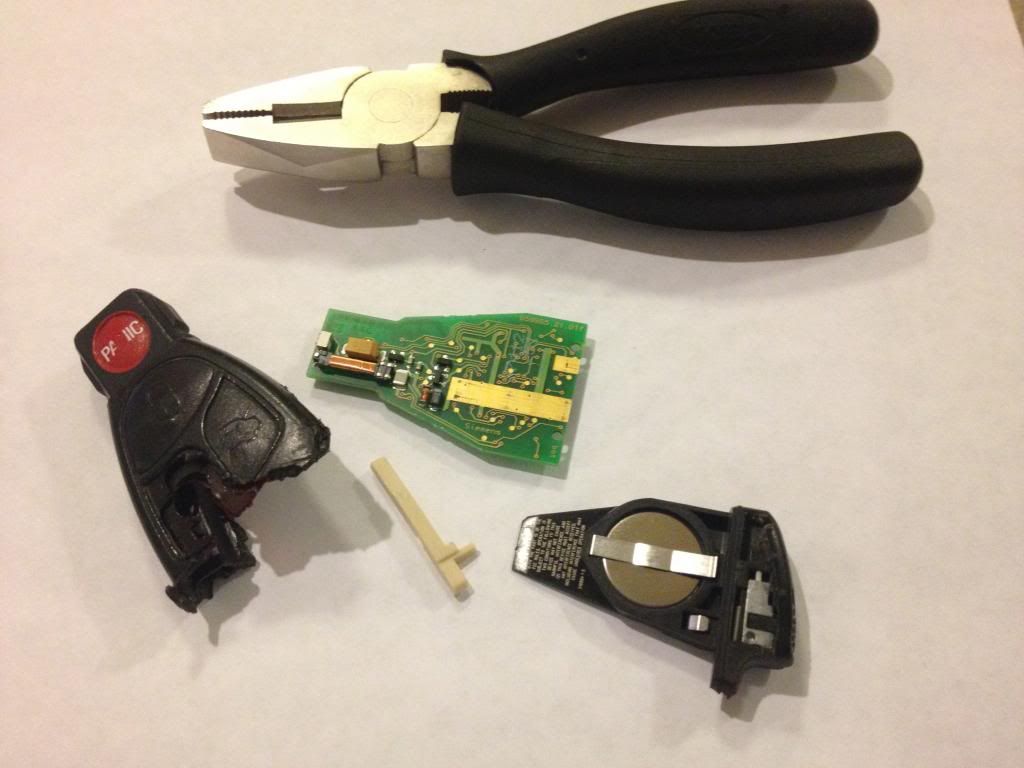
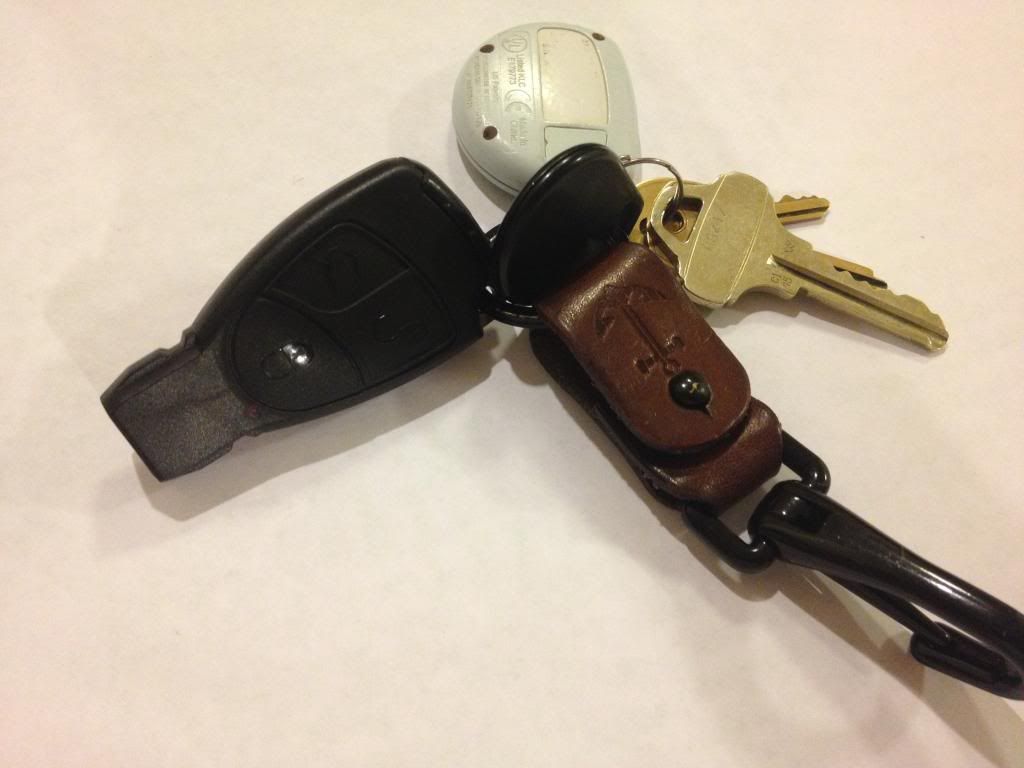
1. Remove your valet key from the key fob's shell.
2. Open the remainder of your key just the way you would when you replace your battery
3. Tap the key shell in order to release the circuit board. If that fails, carefully tear up the case using a plier and make sure you don't damage the circuit. Carefully pry out the long white plastic and it should release the circuit board.
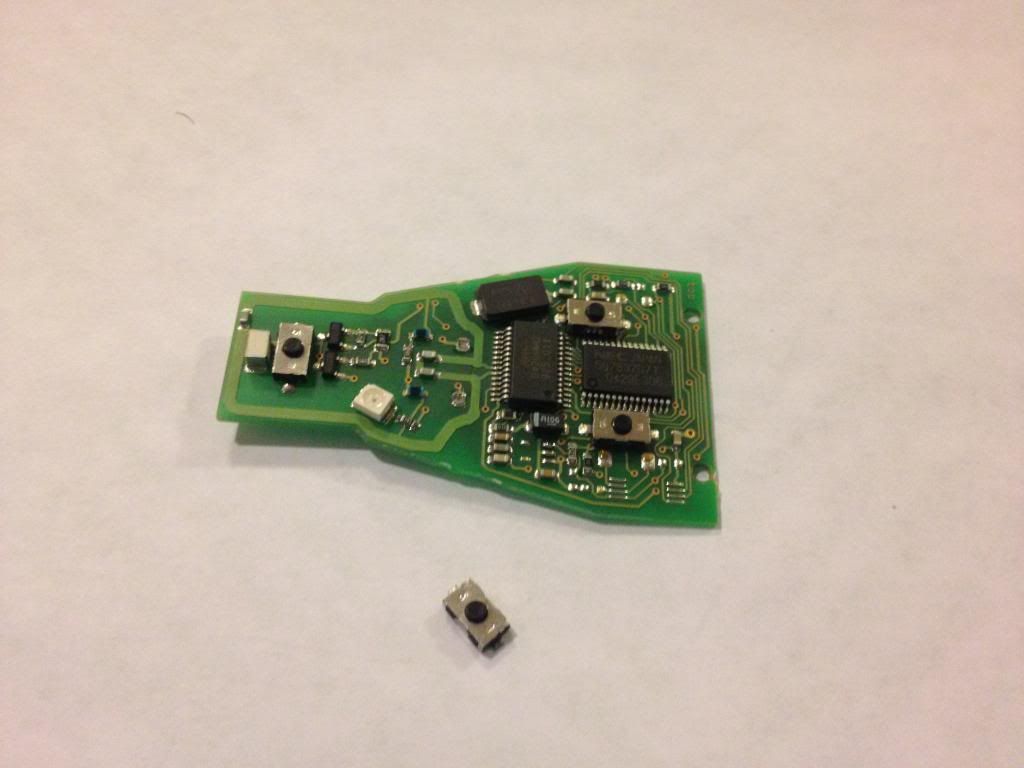
In my case I just had a loose button. I tested it and it seemed clicking identically to the functioning ones and decided to solder it. Instead, I recommend using the new switches provided with the kit.
Soldering procedure:
1. Clean your precision soldering iron with the cloth/cotton.
2. Put on your gloves.
3. Use sandpaper or steel wool to remove the oxidized surfaces from the area that you wish to solder (switch, circuit board, & solder).
4. Use the alcohol swab to remove oil and dirt from those same surfaces.
5. Damp the cloth/cotton and keep it close by (used to remove solder residue from the precision soldering iron)
6. Place the switch on the circuit board.
7. Plug in your precision soldering iron.
8. Heat the work, not the solder. Never bring the iron and solder together. The iron heats the parts to be soldered. With a steady hand, apply the tip of the iron to the work. Then, apply the solder to the work at point of contact.
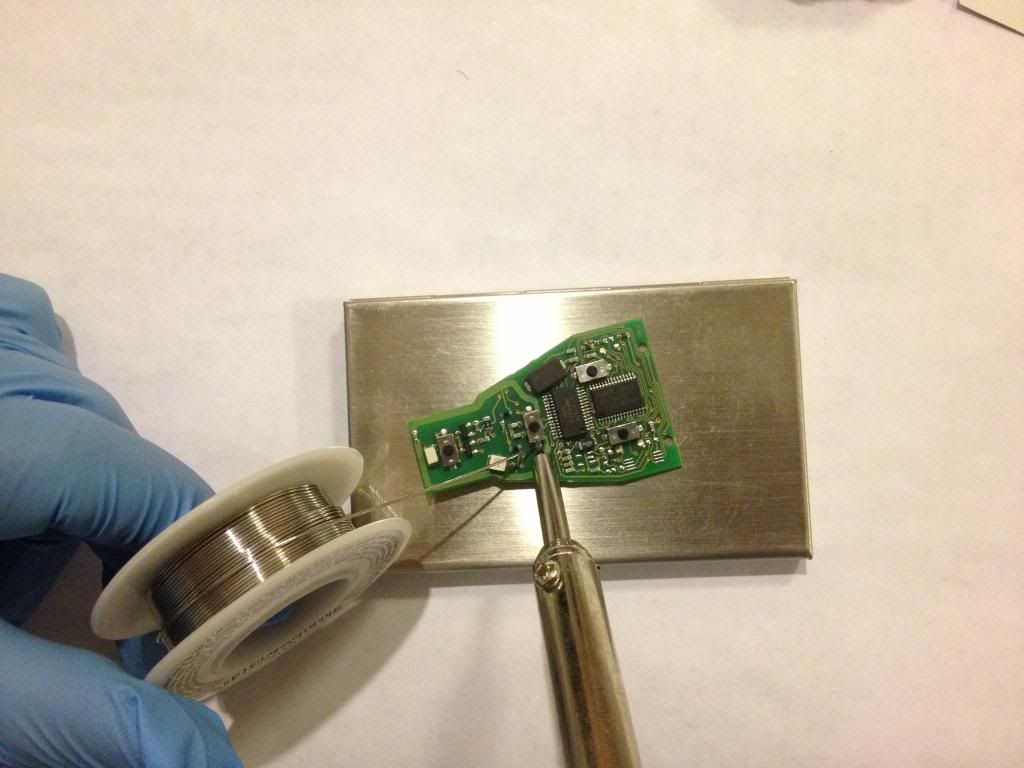
9. Keep testing its temperature by tapping the solder on it every now and then. Once the solder starts to melt, use the solder to join the switch to the board.
10. Don't over solder. Use just enough to make a good connection.
11. Allow iron to cool down. Clean its tip using the damp cloth/cotton. Loosen the tip to prevent freezing (tighten it up again prior to next use).

Re/Assembling procedure:
1. Don't put the long white plastic piece on the board yet.
2. Place the board and the batteries back into their positions.
3. Test the buttons. A red light should flash at the end of the key by the panic button. (works on lock/unlock only)
4. Once you are satisfied, dismantle your key and reassemble it again. This time include the long white plastic piece in order to lock the circuit board in its place.
Note: If only the buttons are malfunctioning (i.e. your key shell is fine) then look for an item similar to this: http://www.ebay.com/itm/SWITCH-BUTTON-REMOTE-KEY-MERCEDES-A-B-C-E-S-ML-G-CLK-SLK-W210-W211-W202-W203-/181053463988?pt=Motors_Car_Truck_Parts_Accessories&hash=item2a27a09db4&vxp=mtr ($3.95)
DISCLAIMER: Do this at your own risk. Having that said, I had no previous experience in soldering.
Tools: Plier, precision soldering iron, solder (~63/37 is recommended), cotton or piece of cloth, steel wool or sandpaper, alcohol swab, and latex gloves.
Dismantling procedure:
1. Remove your valet key from the key fob's shell.
2. Open the remainder of your key just the way you would when you replace your battery
3. Tap the key shell in order to release the circuit board. If that fails, carefully tear up the case using a plier and make sure you don't damage the circuit. Carefully pry out the long white plastic and it should release the circuit board.
In my case I just had a loose button. I tested it and it seemed clicking identically to the functioning ones and decided to solder it. Instead, I recommend using the new switches provided with the kit.
Soldering procedure:
1. Clean your precision soldering iron with the cloth/cotton.
2. Put on your gloves.
3. Use sandpaper or steel wool to remove the oxidized surfaces from the area that you wish to solder (switch, circuit board, & solder).
4. Use the alcohol swab to remove oil and dirt from those same surfaces.
5. Damp the cloth/cotton and keep it close by (used to remove solder residue from the precision soldering iron)
6. Place the switch on the circuit board.
7. Plug in your precision soldering iron.
8. Heat the work, not the solder. Never bring the iron and solder together. The iron heats the parts to be soldered. With a steady hand, apply the tip of the iron to the work. Then, apply the solder to the work at point of contact.
9. Keep testing its temperature by tapping the solder on it every now and then. Once the solder starts to melt, use the solder to join the switch to the board.
10. Don't over solder. Use just enough to make a good connection.
11. Allow iron to cool down. Clean its tip using the damp cloth/cotton. Loosen the tip to prevent freezing (tighten it up again prior to next use).
Re/Assembling procedure:
1. Don't put the long white plastic piece on the board yet.
2. Place the board and the batteries back into their positions.
3. Test the buttons. A red light should flash at the end of the key by the panic button. (works on lock/unlock only)
4. Once you are satisfied, dismantle your key and reassemble it again. This time include the long white plastic piece in order to lock the circuit board in its place.


