When you click on links to various merchants on this site and make a purchase, this can result in this site earning a commission. Affiliate programs and affiliations include, but are not limited to, the eBay Partner Network.
Is that the existing old chain that is in the pictures?
Imho, it looks like there may be a little, if any, chain stretch.
The M271 has cam adjusters. That makes it harder to get "exact" on both marks.
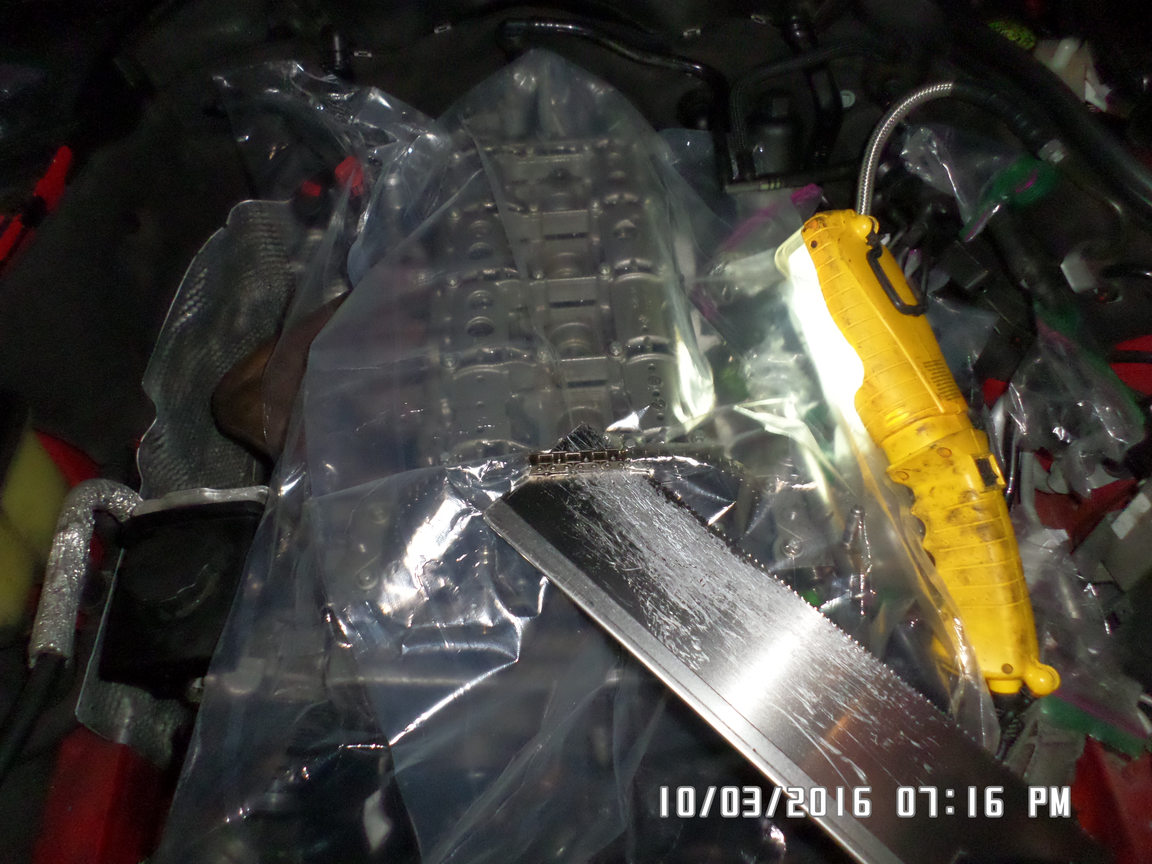
As for cutting the chain, there are a number of ways to do it.
However, if specks of metal get into the engine from cutting the chain, then that could damage the cam(s), and/or lifters, and/or valves.
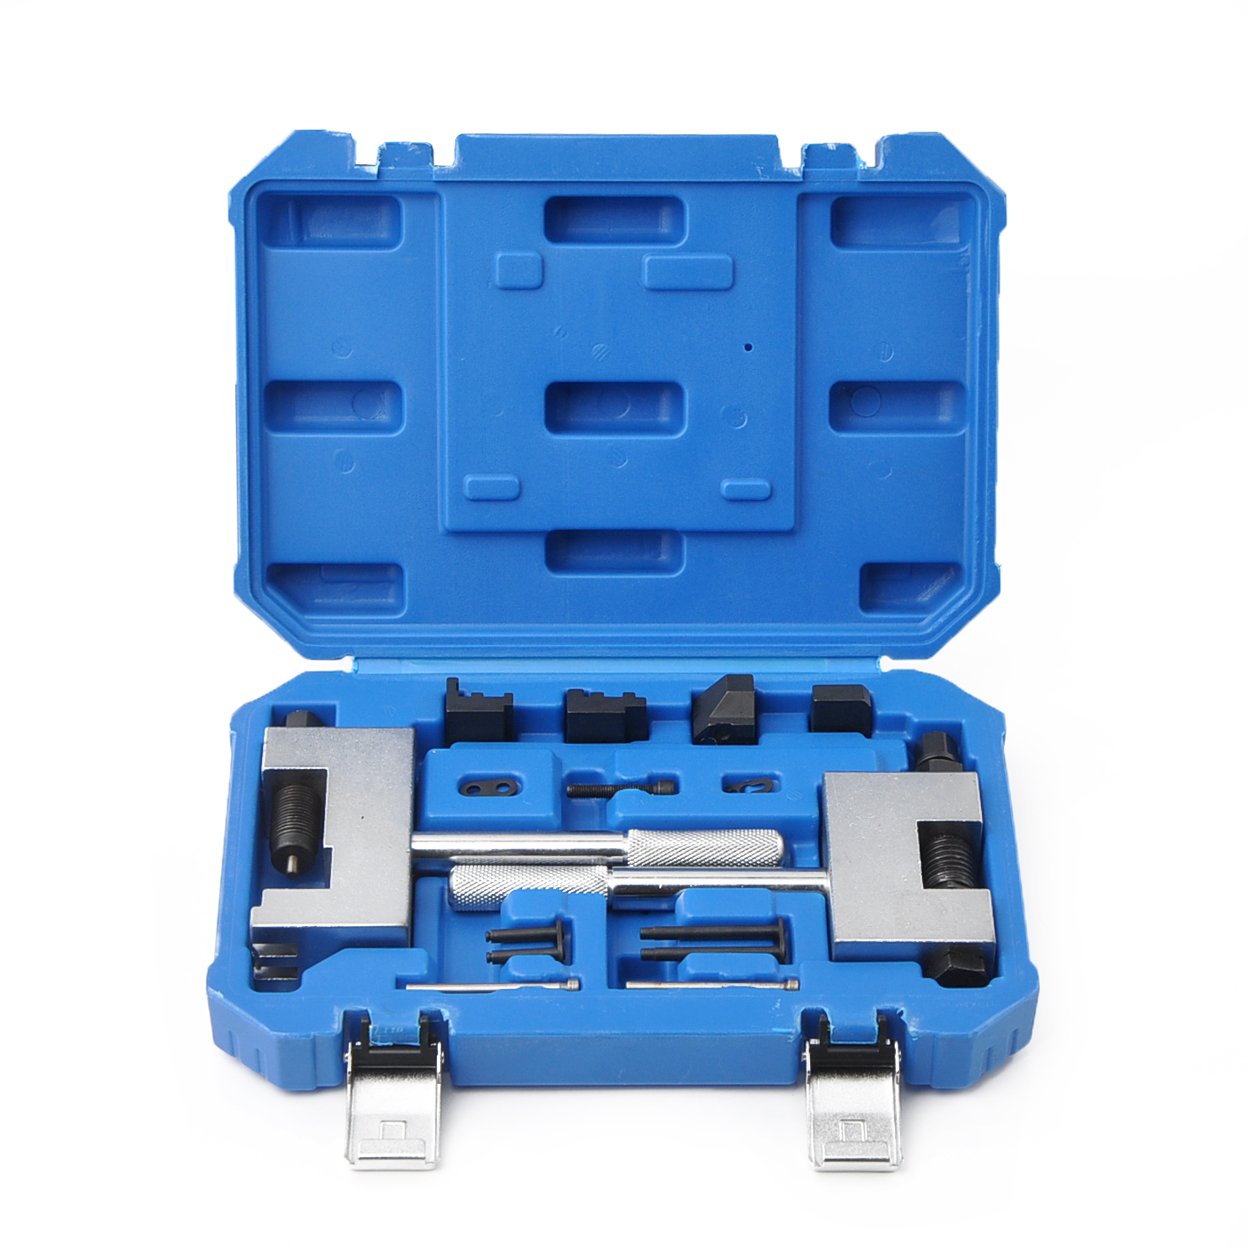
As I've said a few times, imho, a timing chain master-link tool is a must for putting the master link back in.
It's under $100 for the proper tool.
The tools for timing chain master-link, also have a timing chain cutter.
Note that if the timing chain breaks, then the engine is a total loss.
I wasn't sure if the cheap tool would cut the link cleanly, or even cut the link.
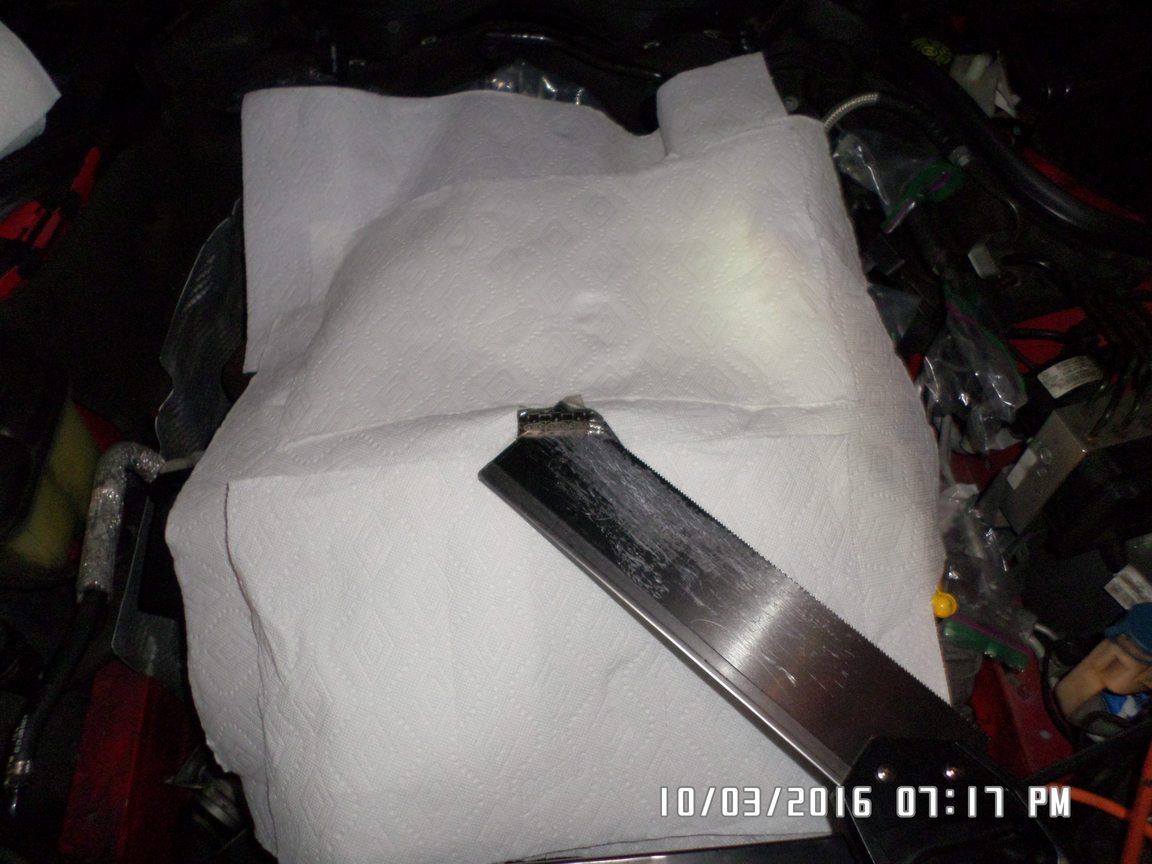
So, I played it safe. I used a cheap ~$1 plastic drop cloth. Then, I lined the top with paper towels. Yea, we're talking about a the super massive cost of ~$1.50, and ~4 mins of my time. :-)
As it was, the cutting tool worked fine. Still, I'm glad that I played it safe.
Imho, at least use paper towels under the cutting tool. That's cheap, easy, and quick to do.
Shops use mechanic towels. But, I'm not going to put dirty oily mechanics towels in my washing machine. :-O
So, I use paper towels, painting rags (I get them at Home Depot), and plastic drop clothes to protect things from shavings/etc.
There are a few threads that show people doing a timing chain R&R.
I, and others, have also uploaded a lot/?all? of the needed documents from WIS.
Please note, beware of fake parts! Hubs, timing chains, crank/cam sensors, etc all have a high number of fakes out there.
When you get your timing chain, get it only from a reliable source. I bought a timing chain directly from a MB dealership. I also got a IWIS chain from Pelican.
I did not see or feel any difference.
But, that does not mean that there isn't any difference. My guess is that the MB chain goes through more quality checks. It's also possible that MB gets chains made from metals that test higher up in the initial metal quality testing. There are many things that a manufacturer or buyer can specify.
I see that Amazon now sells the timing chain tools that I bought: https://www.ebay.com/itm/Mercedes-W2...-/132105314735
Timing Chain Change Vehicle Motor Niet Tools Rivets Riveted Mercedes W203 W212
Price: $89.99
The one I bought was from ebay_. It has the same description. However, they are showing that they don't have any in stock to sell.
=================
Features:
Timing chains separating and riveting tool set
Special tool set allows a clean separation, easy pulling and precise riveting timing chains
old timing chain is drawn using the new chain, this often eliminates disassembly of the control chain case
suitable for duplex timing chains, for most Mercedes-Benz models
Application:
Mercedes OEM tools 112589096300 , 602589003900 , 602589023300 602589024000 , 602589056300 , 60258905630
Set consisting of:
1 x parting tool, drive about 13 mm hexagon
1 x riveting tool, drive about 13 mm hexagon
2 x Replacement temple, diameter 4 � 50 mm length
1 x mounting member consisting of chain lock, latch and lock
2 x chain guides
2 x Plungers
=================
Thanks mate for replying and yes that is the old chain you see.Main reason why I decided to change the chain is because when I am stopped at the lights, it will misfire unless I put it in Neutral. You mention that it cam adjusters, so would I leave the cam as is and the engine will auto adjust or manually move it?
I do have that kit already, I bought the cam holder tool and the chain link tool already just never gotten around to it.
I bought a complete kit including the chain guides, but I am not sure how would I get the chain around the bottom sprocket. Did you just remove the bottom sprocket and the guides then placed in the new chain on the guides? Or do you just thread it though and connect it to the old one?
I am a little bit confused with how I link it around the bottom sprocket
First, are you in America, or is your engine the ~193HP version?
That's important, because the American M271 engine has the most boost, and hence HP. The M271 has a "self draining" oil catch can. That setup is border-line okay for the lower HP and lower boost engines. But, for the American version, it's really lacking. Therefore, the intake valves get coated with even more oil. That results in poor sealing of the intake valves. That results in mis-fires.
Fwiw, all supercharged and turbocharged engines have the above problem. What's important for the owner, is how long will the engine last, before buildup on the intake valves cause misfires. As with many engines as complex as the M271, there are a ton of variables. The type of oil, how often are oil changes, the driving habits, the weather/temperature, and a million more variables.
My point is that it sounds like the misfire is more likely caused by carbon/oil build up on the intake valves. But, it could also be a bad spark plug, a bad coil, or a bad injector.
I suggest swapping the the spark plug and coil with another cylinder. That's easy and quick. Then, see if the misfire stays or moves with the coil and spark plug.
I doubt that it's a fuel injector. Again, you can swap those.
If after doing the above, the misfire stays with the cylinder, then *I* saw it's time for a compression test.
Please, do it the right way. Not the screwed up way that is described about ~90% of the time. You need to do a dry and a wet compression test. For wet, spray WD-40 into the cylinder through the spark plug hole. Spray for ~2-4 seconds. The exact time isn't critical. Just do more that a super quick spray, and don't sit there for 10+ seconds drowning the cylinder.
The compression test is one of the best ways to see a poorly sealing valve. But, it does not always show a bad valve.
An air leak-down test is better. I checked, MB says it's okay to warm up the engine, then carefully remove the spark plugs. That's important, since a leak-down test on a cold engine just shows that the person is a newbie doing that test. I know all too well. I thought that a leak-down test on a cold engine would still show something useful. Uhm, nope - nothing remotely close to having any value at all. :-P
For removing/installing the timing chain.
NOTE: You, and imho others, should remove the chain tensioner first.
Otherwise, the tensioner would have to be held in the fully retracted position by a long screwdriver, or something else. And, it's very easy to put too much sideways force on the tensioner resulting in a tensioner that doesn't fully work.
Some mechanics have done it many times. So, they have the "touch" and they know their own little secrets for pushing the tensioner in, without damaging the tensioner.
To remove the old chain:
You tie a strong string around one end of the chain near the alternator(passenger side). The string should be "very long". Lets say ~6 feet.
You then let the string-end of the chain to droop into the timing cover area. You then slowly pull up on the chain from the driver side. If the chain gets caught on the bottom sprocket, allow some of the chain to go back into the timing cover area. At worse, you may have to do a very light shake of the chain.
It's not too hard.
To install the new chain:
To put the new chain in, connect the string that is tied to the old timing chain, then lightly pull the string from the alternator side. Again, it it gets caught, drop the chain a little, and may a very light shake.
Btw, when I say that the tool "cuts the timing chain", the tool actually pushes out a pin. These chain use the rivet style pins. So, when pushing out a pin, there's a chance that some of the squashed/peened end that is being pushed in, will have metal from the end of the pin break off. Again, you don't want that metal to end up in the oil by falling through the inside of the timing cover.
Also, for camshaft alignment, you're looking at the machined portion on the cam. You want the longer and wider grove on the outside of the cam adjuster. They maybe exactly the same, I don't remember. And, MB specifies that longer and wider grove.
Yes, once the engine starts to run, the cam adjusters will align the cams as they are commanded. By advancing and retarding the cam, the engine can (retarded)get better gas mileage & lower smog emission, through having the cam advanced and resulting in more HP.
Around the 3min part of the following youtube, Cody talks about how the alignment won't be 100%, because of the cam adjusters.
03-05 mercedes c230 1.8 timing marks
Cody the Car Guy
Last, I replaced the guides that I could with the timing cover still on. My guides had very little wear. My guess is that as long as there were reasonable oil changes, the guides wil be fine.
I also replaced the timing chain tensioner. I figure better safe than sorry. And, I had to remove the old one anyways.
Note: The tensioner is behind a black plastic plug that is besides the alternator. Just drive a screwdriver into the old one, and pop it out. That's similar to how many of us remove freeze plugs from an engine block (to have the block hot bathed, before having the block machined).
Btw, if an intake valve with carbon build-up is the problem, there are a number of ways to fix that.
Seafoam is the cheapest. I'm not a fan of seafoam. But, if someone is planning on keeping the car for only ~20K-30K miles, it might be a cost effective method.
Many dealers, and some shops, can now do intake valve blasting from where the intake manifold connects to the head.
Or, you can replace the head, or get the existing head rebuilt.
Oops, I forgot to include the following links that better describe how to remove and install a master link with rivet-style pins. (Fwiw, some lower power chains may use C/E-clips to hold the pin).
Mercedes SLR McLaren 722 S Is Extremely Rare Example Modified by McLaren
Slideshow: A one-of-one U.S.-spec Mercedes-Benz SLR McLaren Roadster became even rarer after a factory-backed transformation at McLaren's headquarters.