When you click on links to various merchants on this site and make a purchase, this can result in this site earning a commission. Affiliate programs and affiliations include, but are not limited to, the eBay Partner Network.
So it looks like nobody seems to have posted a DIY for the W203 anywhere online. Hopefully this helps a bunch of you. This is for the 722.6 (5 speed automatic) RWD vehicles. Those with a manual transmission will probably need to do some minor disassembly differently for the front disc. 4Matic is quite different overall, so this guide may not apply too much.
The coupe and sedans should be identical. Not sure about the AMG (C32, C55) models, so once again, do your homework.
Supposedly the flex discs (giubos) can last some 300k km or more, but at 250k I found that the rear one had cracks around the fasteners/sleeves. Upon further inspection, sure enough, the front one (attached to the transmission) was also need of replacement. I heard that the front disc wears faster than the rear disc, and in my case it was certainly true - the front disc was in worse shape than the rear. In other words, when the rear disc starts to show the telltale signs of wear (cracking etc.), replace both discs. My car is about to turn 20, so I'm sure time is also a factor for the various rubber components degrading.
***Disclaimer*** Everything here is to the best of my knowledge. I cannot and do not guarantee 100% accuracy. If something is incorrect, please post or DM me and I'll fix the post.
Parts:
2x 000-411-00-00 flex disc (giubo) repair kit. This kit comes with a disc, and all the fasteners and washers/nuts required. In fact, it comes with extra fasteners. Be sure to use the correct ones. More on this later.
The flex disc itself is PN 210-411-04-15 aka SGF GAD-136. Some aftermarket places sell the same disc, but for something this critical I went through the dealer. Not worth running the risk of counterfeit parts. There are horror stories out there of people buying cheap aftermarket discs just to have them tear apart or explode after only a few weeks.
Flex disc
The other problem with buying just the disc from an aftermarket supplier is that one then needs to source the correct associated bolts, washers, and nuts. Just because a fastener has the right dimensions, doesn’t mean it’s made of the correct material. To be honest it's easiest to just buy the dealership kit.
MB flex disc kit fasteners
002-989-00-51-10 long life grease. This is the same alien green stuff used on the wheel bearings. A tube from the dealer contains 150g, and the bearing on each end of the driveshaft only requires 6g each. Personally I used much less.
Tools:
8mm, 13mm, 16mm sockets
3", 6" extensions
T60 socket
E12 socket
18mm open end wrench (required). A 18mm box wrench can be used on the front disc, but not for 3 of 6 fasteners on the rear disc.
Bottle jack or some other apparatus for holding up the transmission while the support is removed
Pickle fork - for popping the flex discs off the transmission/driveshaft/differential. A pry bar may also work, though personally I'd recommend the pickle fork.
Mallet or hammer for whacking pickle fork
Penetrating oil if the flex disc sleeves are really stuck
4x jack stands + jacks, or some way to raise entire vehicle
Masking tape + marker or some other way to mark the various drivetrain bits (critical for balancing purposes)
Optional:
Wood pieces for raising car, raising bottle jack etc.
Corrugated cardboard for protecting sheet metal from metal tools (risk of contact while removing disc fasteners) - a few small pieces will do the job
Last edited by slammer111; 07-06-2023 at 03:31 AM.
If you have a hoist, lucky you. For the rest of us, you'll want to raise the car some 40cm at least. Just make sure you can crawl underneath the vehicle comfortably, and most importantly, safely.
Ramps will only work on the front. The big one with this job is that at least one rear wheel must be able to spin in the air.
For this job, turn off any automatic lights, leave the car in N (key cannot be removed while in this state), and disengage the parking brake.
Personally I stacked some pieces of 2x4s to form some cribbing blocks, Jenga style. I then took turns raising each end of the car 1-2 layers at a time until the desired height was reached.
Cribbing blocks
Step 2 - Remove heat shields
Remove the 2 rearmost panels and wiggle them out. Use a 8mm socket to loosen all the fasteners. This is required to gain access to the intermediate bearing.
Step 3 - Loosen intermediate bearing support fasteners
The good news is that the bearing brace fasteners only have to be loosened. Many people were wondering if the entire bearing and driveshaft have to be dropped. The answer is No.
The intermediate bearing is actually held in place by friction, both against the driveshaft and against the body. This makes sense, since the inner race is attached to the driveshaft with an interference fit. It's not going anywhere.
Intermediate bearing support
Use the E12 socket, and loosen the fasteners. Personally I used 3 full turns. Test to make sure the bearing can "jiggle" around by pushing the driveshaft upwards by the bearing. Remember that the point is not to drop the entire brace. We just want the driveshaft to be able to slide around (lengthwise, both directions) on the support while doing this job.
Last edited by slammer111; 06-30-2023 at 05:31 AM.
If doing this job without a hoist, a tiny bottle jack and some pieces of wood work great here.
First remove the bottom 2x 13mm fasteners on the bottom transmission mount (attached to the crossmember (bone shaped piece)). Then use the bottle jack and raise the transmission just enough so that the mount just lifts off the crossmember.
Lift the transmission at the edge of the pan, towards the back of the car.
Bottle jack supporting transmission
Step 5 - Remove transmission mount, supports
Remove the 2x 16mm fasteners fastening the mount to the transmission housing. While you're at it, might as well inspect the mount and replace if necessary.
Remove the crossmember by removing the 6x 16mm fasteners.
The crossmember has a "notch" on each end. The notch is towards the front of the car. To be honest, I'm not sure if the notch actually does anything, since the part looks pretty symmetrical to me.
At this point I would wedge some pieces of cardboard between the insulation and body, with some cardboard sticking out where a wrench may smack the body. Don't want to damage the paint.
Last edited by slammer111; 06-27-2023 at 06:25 AM.
***Warning*** this section has a lot of critical steps. There are many ways to potentially botch the job. Read carefully.
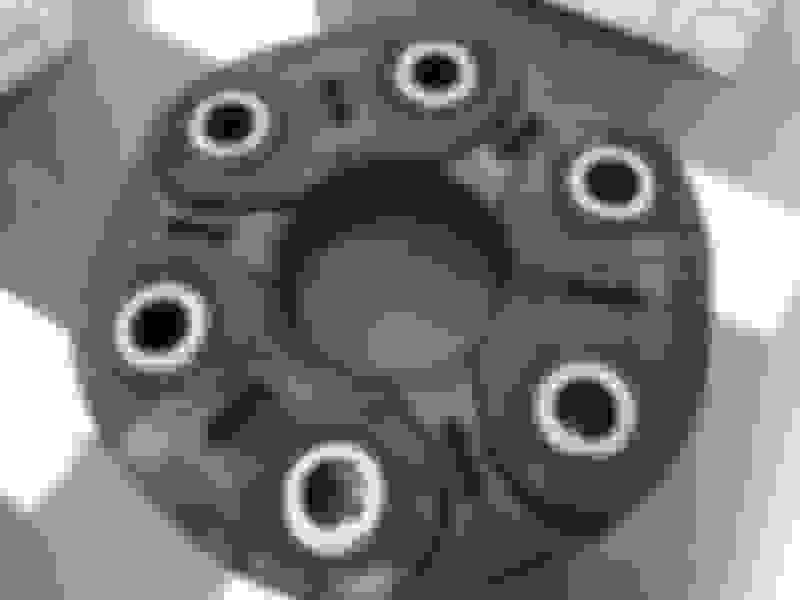
1) The flex discs alternate between "thick" and "thin" sections. This is by design, as the disc needs more reinforcement when the car is moving forward as opposed to backwards. See 1st post for photo.
2) When looking towards the front of the car, the drivetrain spins clockwise when the car is moving forward. Knowing this, the discs must be installed such that the transmission "pulls" the driveshaft via the thick sections for the front disc, and the driveshaft "pulls" the spinny differential part for the rear disc, using the thicker section of the discs. The 6 sleeves on the disc alternate sides in terms of protruding out of the disc (just hold one in your hand and it'll be obvious). Just make sure each sleeve protrusion fits/matches with a corresponding indentation in the transmission/drivetrain/ differential and the orientation will be correct.
3) On my car, the markings and logos on the flex discs face away from the driveshaft for both front and rear. In other words, the markings are towards the front of the car on the front disc, and towards the rear of the car on the rear disc. I'm not sure if this makes a difference, but in any case I wasn't about to find out.
4) Use masking tape or a marker to mark the driveshaft, flex disc, and transmssion/differential spinny part. The idea is to make sure the driveshaft is installed in the same original orientation/rotation as the transmission/differential spinny parts. Once again, I can't imagine this making much of a difference (the only "balanced" part is the driveshaft), but can't go wrong if one simply matches the orientation of the old parts.
5) Even though each flex disc uses 6 bolts, the kit comes with 9. 6 of them have a 60mm shank length (ie not including the head), while 3 of them are 54mm long. On my car (W203 coupe, automatic, non 4Matic) all 6 required bolts are 60mm for both discs. Open the bags of fasteners and identify and remove all the (3x per bag) 54mm long bolts. Toss them or hide them away from the work area. FYI all the bolts in the kits are M12.
6) For both the front and rear discs, the bolts are installed moving away from the driveshaft. The front bolts are installed with the tips pointing towards the transmission, and the rear bolts are installed pointing towards the differential.
7) Take a very good look at where the washers go. The rule to remember is that the washers always touch the flex disc, and never go between the flex disc and transmission/differential spinny parts. What this means is that the washers alternate sides as you go around the shaft. In the photo below, notice how the bolt being worked on has a washer against the bolt head (touching the disc), but the adjacent ones don't. For the adjacent ones, the washer is on the other end (ie between the disc and nut, not visible in photo).
Washer always touches the flex disc
Also notice that the bolts alternate between fastening the flex disc to the driveshaft, and fastening the flex disc to the transmission. A given bolt will never fasten both the driveshaft and the transmission/differerential.
8) The nuts in the factory kits have a flat side and a rounded (chamfered?) side. The rounded side faces away from the bolt heads.
***
With all of that out of the way, we can now remove the front disc. Use the T60 bit, and the 18mm wrench on the other side.
The pry bar and pickle fork are your best friend. Each disc has 6 metal sleeves that stick out, alternating sides. These seat into each of the spinny parts. Pop out all 6 sleeves. Some may be rusted or seized up real good. Use penetrating oil if needed. Personally I found this part to be the most difficult part of the job.
Once the flex disc is loosened and all 6 sleeves have been "popped out", use the pry bar and force the driveshaft lengthwise towards the other end. The idea is to "compress" the driveshaft, such that it pops out of the bearing between the driveshaft and transmission. Hopefully you didn't forget to loosen the central bearing support.
Clean the driveshaft bearing (there's a bearing where the middle hole of the flex disc is located), and add grease. The official instructions say to add 6g, but I wasn't sure where to smear the stuff. Also 6g seemed like an awful lot. In any case, I squeezed some grease into the driveshaft end hole, as well as around the OD of the "shaft" that the drivetrain pops onto. Good enough.
Driveshaft bearing at transmission end
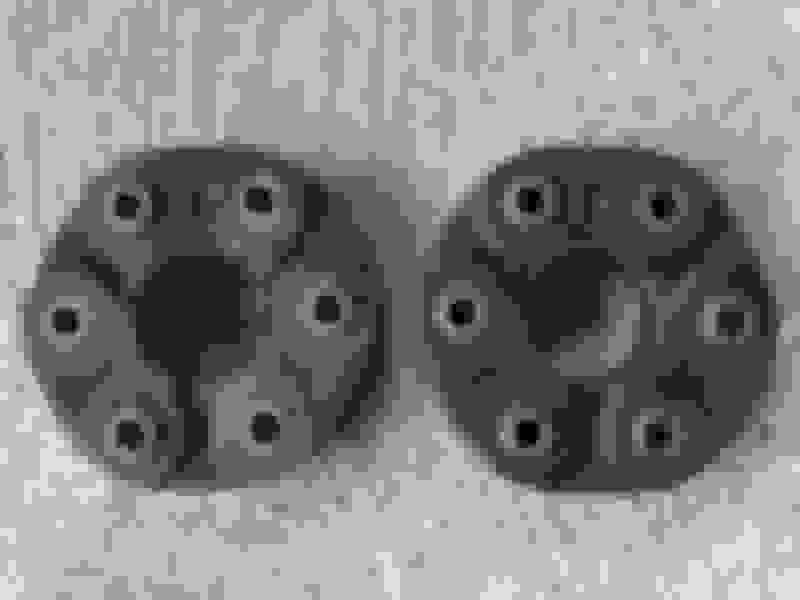
Below are my old and new front flex discs. Notice the cracks around the metal sleeves on the old one, as well as the severe discolouration - that is not dirt. The rubber surface was also full of cracks, especially around the sides.
Old and new front flex discs
Below are the old and new rear discs. Same deal.
Old and new rear flex discs
Last edited by slammer111; 11-03-2023 at 04:39 AM.
Personally I used a 6 point star pattern to eliminate any chances of introducing some additional stress on the disc. Pick a fastener as #1, then tighten in the order 1-4-6-3-5-2. Make sure the metal sleeves are all seated properly.
Disc (6x) fastener torque - 60Nm
Supposedly the sleeves can twist when being tightened, but honestly I saw no evidence of this after the job was done. Tighten the nut 90% of the way, then turn the box wrench against the torque wrench until the torque wrench clicks. I imagine the purpose of the washers is to prevent any twist from being introduced into the sleeves. Also the sleeves fit very tightly (interference fit) into the seats on the transmission/drivetrain/differential.
FYI from reading online it seems that BMW (eg E46) seem to have the problem with the twisting sleeves, but their OEM setups also don't use washers.
Step 8 - Reinstall crossmember, transmission mount
Transmission mount (16mm) fastener to transmssion - 50Nm. Don't forget the grounding cable on the L fastener.
Transmssion mount (13mm) fastener to crossmember (bone shaped piece) - 30Nm
Step 9 - Remove/install rear flex disc
The procedure is pretty much identical to the front disc, with the exception that nothing needs to be removed beforehand. Also there isn't enough clearance to use a 18mm box wrench on 3 of the 6 nuts. Use an open wrench.
Rear flex disc
Disc (6x) fastener torque - 60Nm
Step 10 - Tighten intermediate bearing support fasteners
E12 fastener torque - 30Nm
Step 11 - Replace heat shields
8mm fastener torque - nice and snug. No need to go crazy. They're not load bearing.
Step 12 - Lower car, test drive
Congrats, you're now done. Enjoy the nice smooth drivetrain for the next few decades.
Last edited by slammer111; 09-09-2023 at 04:53 AM.
Thanks for the post Slammer, your timing was impeccable! I just received my W203 flex disc kit's this past Friday. Just waiting for a good day to tackle the project. Anyhow, much appreciated.
Flex disc job completed...however, this led to another discovery. While working underneath my car, I noticed an excessive amount of oil on my transmission housing. Confirmed the vacuum pump was leaking. Nonetheless, after a quick search in the W203 forum, I found detailed instructions on how to replace the pump. Not only that, being that I was working in that confined area between the engine block and firewall. I thought it would be best and replace the oil cooler water pipe too (another DIY found). Bottom line, thanks to the contributions from ALL of you (especially Slammer and Konigstiger), I was able to successfully complete all the jobs.
Last edited by rodrigra94; 08-19-2023 at 04:03 PM.
Glad to hear you got the flex disc job done, as well as the vacuum pump, and the rear coolant pipe. Just curious, how many km for your flex discs, and how were their conditions?
The car is a few miles short 126000 miles, original owner...bought it in the fall of 2004. As to condition of the discs, they both had a number of small cracks, with a few up to 1/4-inch in length. Additionally, they looked like they were in the initial stages of dry rotting (Texas heat probably a key contributor).
Will definitely consider replacing the other pipes and differential oil. Thanks again for all the feedback/input throughout the years. Take care.
 06-25-2023, 03:09 AM
 Hopefully this helps a bunch of you. This is for the 722.6 (5 speed automatic) RWD vehicles. Those with a manual transmission will probably need to do some minor disassembly differently for the front disc. 4Matic is quite different overall, so this guide may not apply too much.