
Using the Centered Camera Location DIY, Where do you run camera cable after mounting?

Thread Starter
MBWorld Fanatic!
Joined: Aug 2007
Posts: 1,914
Likes: 5
LOADED 08' C350 & 14' GLK-350 Diamond White (P1, MM, AMG Pkg, Ln Trkng, Htd Sts, Keylss Go)
Using the Centered Camera Location DIY, Where do you run camera cable after mounting?
I bolted the bracket to the car as seen in this picture, this is where I am right now:
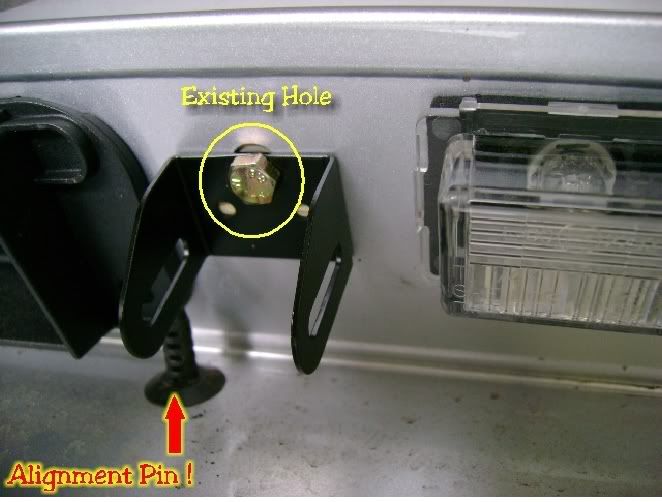
Now... Where the heck do I run the camera cable???
I thought I could put it through the hole that I exposed when I took off the handle lid, but I just put a bolt through that hole...
Where is everybody running the cord from the camera after you attach through the mount? Are you putting it through the license plate light hole???
I hate when DIY's leave out these steps, cause major delays in the installation process while people try to macguyver things instead of the sure fire way for success...
Last edited by rb23lb; Oct 22, 2009 at 05:48 PM.
Senior Member
Joined: Sep 2007
Posts: 402
Likes: 3
From: Jet City, USA
'08 W204.081; M 272.948 KE30; Colour Code#792
Holy s#!t are you still installing this? LOL
DIYs are meant to help things along... not to hand-hold you. Kinda disrespectful when you diss on someone's DIY when it has helped so many people.
Fuzzy Logic... that's what gets you through the difficult DIY parts.
DIYs are meant to help things along... not to hand-hold you. Kinda disrespectful when you diss on someone's DIY when it has helped so many people.
Fuzzy Logic... that's what gets you through the difficult DIY parts.
Member
Joined: Oct 2008
Posts: 186
Likes: 1
From: Bay Shore, NY
2009 C300 4Matic Sport P2/MM/Steel Gray
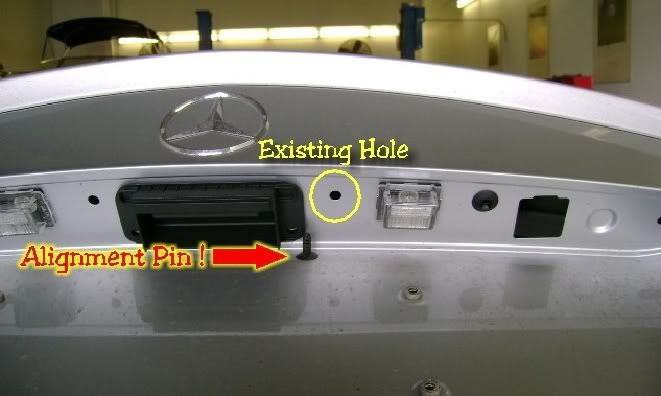
look over to the right, there should be another hole that you can run the wire into. Its basicly the hole they use for the 'non' centered installation, thats where i ran my wire
(image is vaders)
Look at the big square hole on the right. just run the wire in there, try not to pinch any wires when putting the other plastic piece back on, cut/file things down a little if you have to, plastic is easy to work with, if i remember correctly I think I cut small notches in the plastic just to ensure no wires were being pinched, I did this at multiple steps, probably not necessary but I don't want my camera to stop working in a few years
also, great DIY rick!
Last edited by cbcharlie; Oct 22, 2009 at 09:03 PM.
Thread Starter
MBWorld Fanatic!
Joined: Aug 2007
Posts: 1,914
Likes: 5
LOADED 08' C350 & 14' GLK-350 Diamond White (P1, MM, AMG Pkg, Ln Trkng, Htd Sts, Keylss Go)
your DIY was extremely helpful... i guess for a 24 yr old with no experience in his first time doing such a project, i tend to be more on the side of hand holding if something is left out...
for instance, no diy says to notch the plastic to avoid pinching the wires like the helpful post above says... so then me, being the amateur i am, once i see wires are getting pinched, i think "wait, there is no way that it goes in that hole because someone in the DIY would have said something if the wires were pinched"... but i guess i assume wrong and should just use my head and fill in the blanks....
full step by step instructions are so much easier though and I love not having to think


