When you click on links to various merchants on this site and make a purchase, this can result in this site earning a commission. Affiliate programs and affiliations include, but are not limited to, the eBay Partner Network.
Hey brother, I just installed the same kit. Question, when did you order your kit? I ask because DMP is mailing out a new kit that enables one to change the color and Brightness utilizing the mirror control buttons. In the new kit, the OBD Powers up the center console and footwell lights. If you received the old kit- Dmp will send you new harness. Hope that helps.
How would you be able to control the lights via Mirror Control Buttons? I have the kit and installed it with no issues at all but I use the steering wheel buttons to change colors/brightness.
@OP Contact DMP for possibly a new OBD Module. I know your issue is different but when I got everything contacted and disconnected my Negative Battery Terminal for a different reason, the Ambient Lighting stopped working. I contacted DMP and they were aware of the issue and said that they would send me a new module that will fix that issue and still work if I disconnected the Negative terminal again.
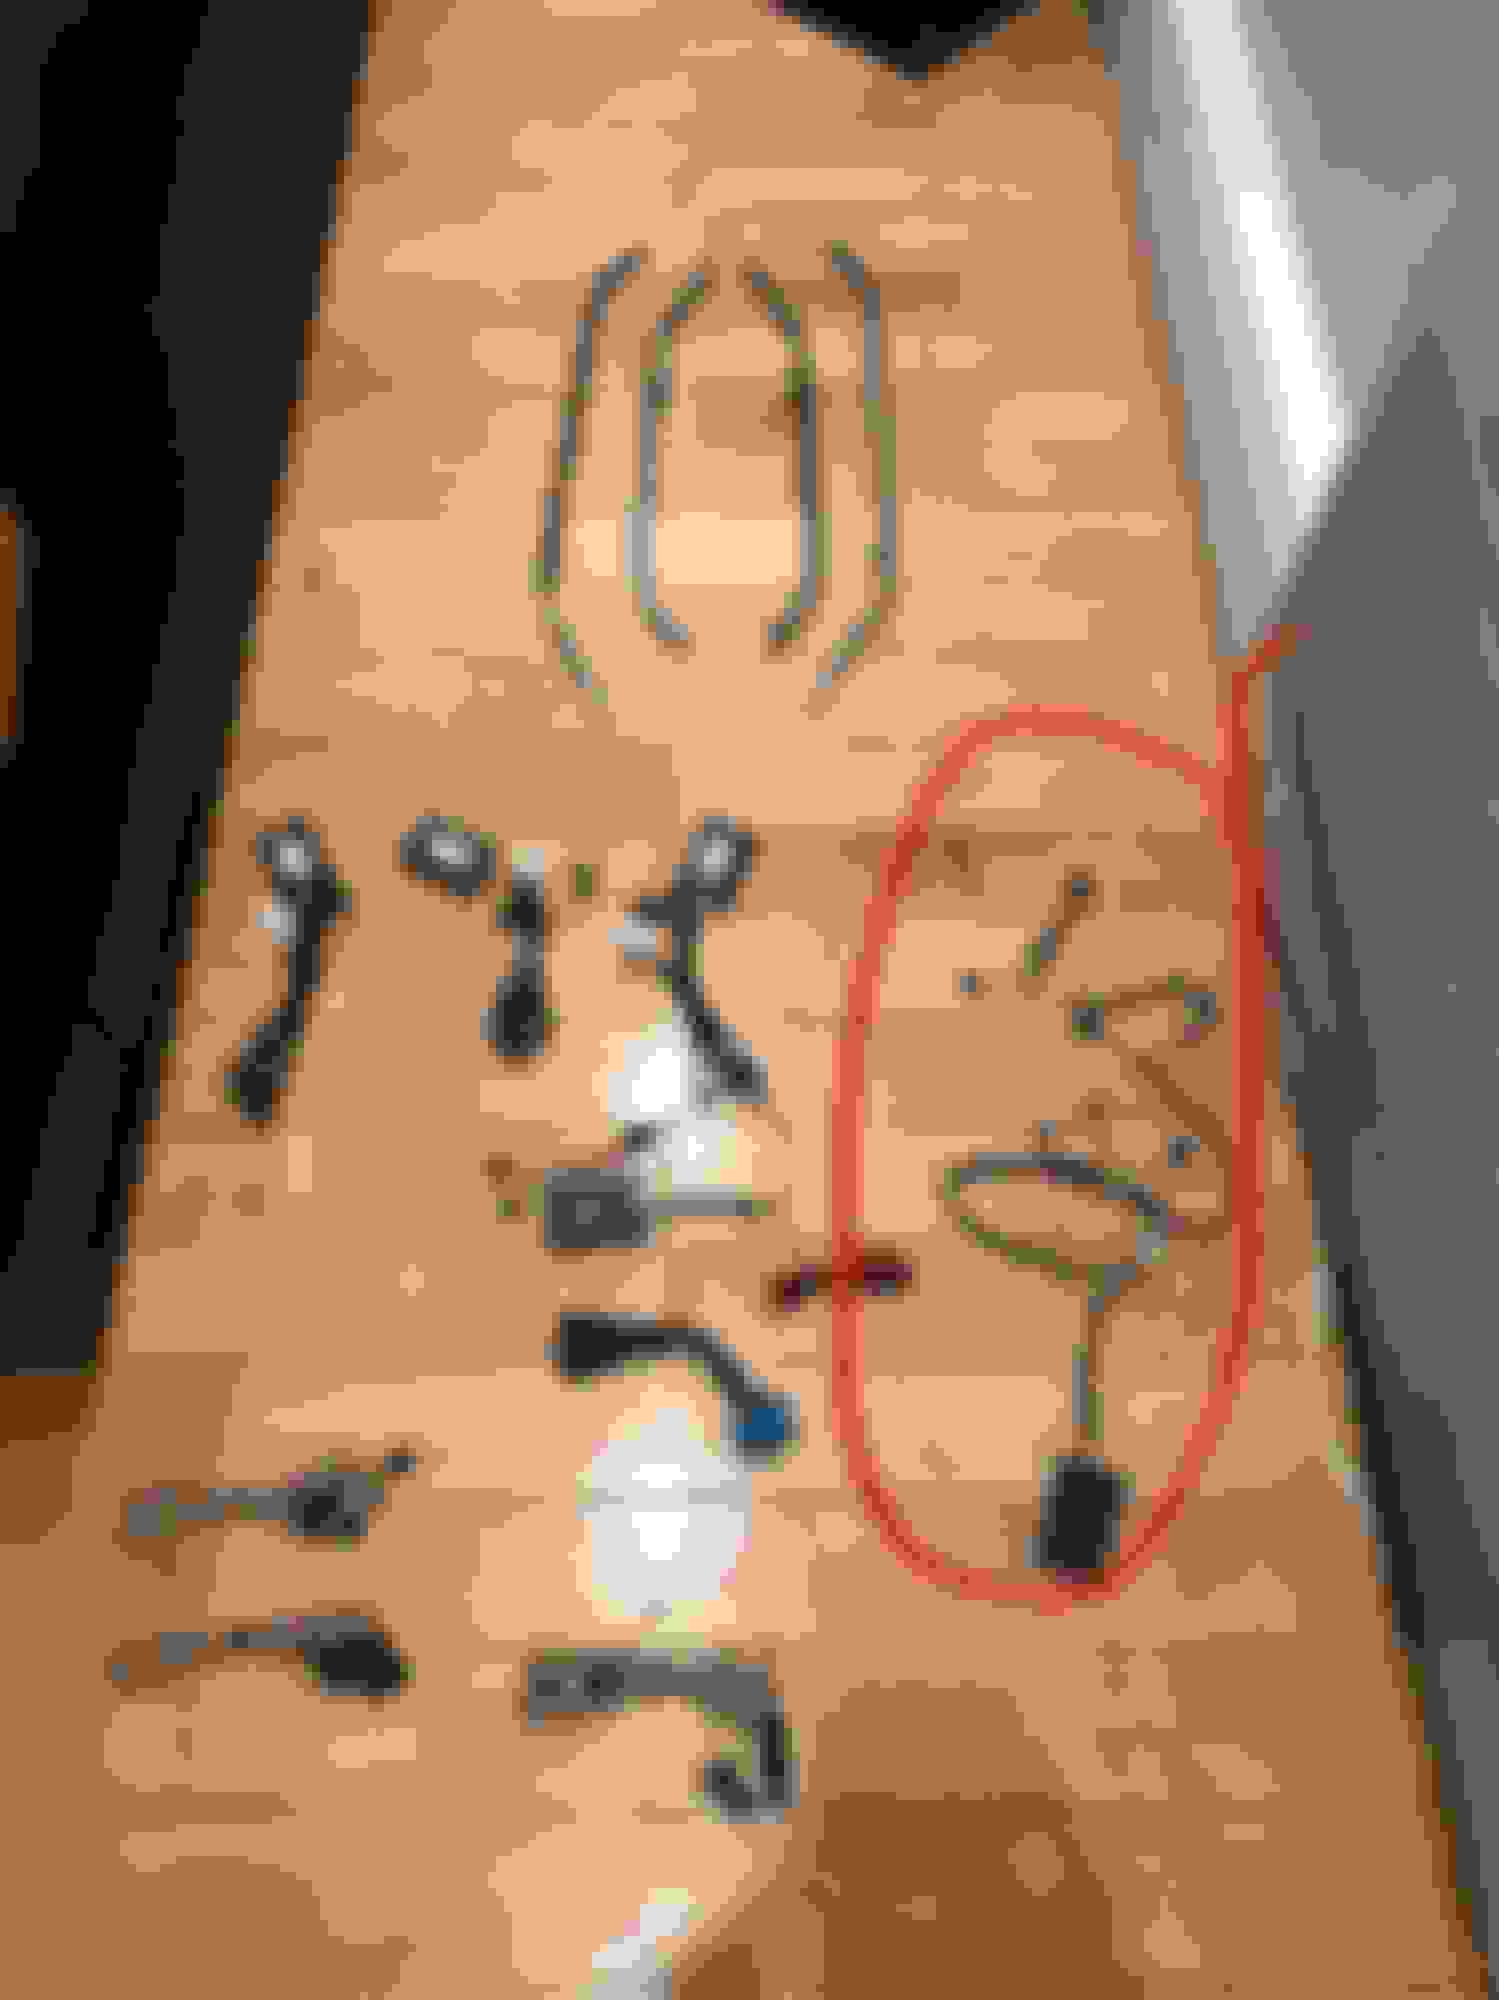
DMP�s current kit is designed to enable users to activate the ambient lighting by utilizing the up & down (change colors) left & right (brightness) buttons on the mirror control panel. The main harness in this case is not the OBD PLUG but what you see circled in the attached photo. I installed this door first as per DMP instructions. Everything works beautifully and I�ve since ordered additional parts to add to my kit. Kit installed 🙌 Circled in red is DMP�s new main harness that attached to the drivers side door mirror control panel.
So in your case, do you still use the ODB Plug/Module? I ask because I see it in your picture so I assume you still have to have it plugged in to give it power.
My kit that I installed via DMP looks identical to your kit though I believe all my door wiring had that White connector tip to plug into the existing port. I however haven't tried the Mirror buttons to see if they do anything (Change colors/brightness), but I doubt mine would work if its not the correct wiring.
My kit still includes the OBD which powers up the center console and the footwell lights. If your kit looks different than mine you most likely have the older kit which would work with the steering wheel controls. Have you installed your kit yet ?
Yes sir! Installed and running perfectly! But I will add that they advertise the kit as 64 Colors but I've basically seen maybe 6-8 colors. Not really complaining just because I keep my color at Blue but they should really fix that.
I will also add for whoever is watching Flexx's video to install it themselves, to properly install the OBD Module, you can pull down the bottom panel of the Driver Seat, remove the OEM OBD, replace it with the DMP OBD and lock it in place, then connect the OEM OBD to the other end of the DMP OBD Connector.
This method will give you a proper clean look rather than having the DMP OBD connector dangling by your feet potentially causing you to kick it and breaking the connector.
Got an update everyone.
Cilo is on the money about this being the new kit controlled by the side mirror panel. FYI, I ordered the kit in November 2020 and car has no original ambient light feature.
So that's figured out. However, I'm still troubleshooting with DMP where I can't match up the same colors on the doors to everything else. Attached image of green doors with red interior.
Also is it possible to turn off all the lights? Turning brightness all the way down only turns off doors.
Here is the picture of what it looks like. Clearly, I didn't do a good job of securing the wires cause the OEM Footwell cable is dangling lol. But it looks super clean compared to how I had it before. Wish I had a before picture, but lets just say I zipped tied the DMP OBD cable to the plastic bottom while I had the other end connected to the Port.
I'd be interested to see how DMP would reply if i asked for the newer control method hmmmm..
2017c300-
I just checked if I could completely turn off the lights via mirror panel and yes, it's possible. Perhaps DMP can sort that and your light synchronization problem. If you reach out to DMP now you should get a quick response being that its normal business hours now in Malaysia. On another note, I recently ordered the vents and rear seat strips. Yours came out great. Well done !! I hope to receive my lights by next week. Wish me luck. Please feel free to update us regarding your lighting issues.
Last edited by Cilo C Class; 12-02-2020 at 06:55 AM.
Got an update everyone.
Cilo is on the money about this being the new kit controlled by the side mirror panel. FYI, I ordered the kit in November 2020 and car has no original ambient light feature.
So that's figured out. However, I'm still troubleshooting with DMP where I can't match up the same colors on the doors to everything else. Attached image of green doors with red interior.
Also is it possible to turn off all the lights? Turning brightness all the way down only turns off doors.
[QUOTE=Kush Desai;8215331]Here is the picture of what it looks like. Clearly, I didn't do a good job of securing the wires cause the OEM Footwell cable is dangling lol. But it looks super clean compared to how I had it before. Wish I had a before picture, but lets just say I zipped tied the DMP OBD cable to the plastic bottom while I had the other end connected to the Port
Update : Kush D - I took your mod advice and rewired my OBD as you indicated in your post. GENIUS!! It came out perfect. Thanks again 🙌
Just completed this mod, it looks sweet! I'll post some tips since the kit has changed from the Flexx video and DMP didn't include instructions (they are quick to respond on whatsapp though).
1. Before you start, if you are considering changing/upgrading the door trim panel (to carbon fiber, wood, etc.) in the future, now would be the time to do it! The time involved in removing the door panels/clips and hot gluing the new strip in is not trivial.
2. The newer kit has a driver-side module with a 3-wire passthrough, this taps into the mirror switch. There's a good thread showing how it comes out, you do need some pry tools to protect the surrounding leather: https://mbworld.org/forums/c-class-w...ml#post7876418
You can identify the other modules (passenger vs rears) using google translate.
3. The panel wiring is straightforward, but box placement is a bit tricky especially on the driver panel. I ended up sticking it right between the plugs on the main wiring harness. You might want to test with cheap double-sided tape and make sure the panel sits right before using the good velcro ones included in the kit.
4. The console is straightforward, but the wiring to the foot panel lights is a little tricky. Keep as much of the wiring 'below' the plastic so when you slide the console back on it doesn't mash any of the wires/harnesses. Then use a long wire-tie to help fish the lights through the bottom of the console to the footwells.
5. For the footwell lights, you need to pull down the plastic panels to fish the light in from behind and hide all the wiring. On the driver side, it's just 2 torx20 screws. On the passenger side, its 1 screw and 2 clips that release with pressure. On the driver's side, while you have it down do the ODB swap. Remove the 2 torx screws and then the plug has a harness that slides sideways once you release the little side clips.
Overall I'd say it's a medium difficultly mod just based on the amount of time spent on the panels.
How Many OBD Connectors/Modules Did DMP Send With Your Kit?
Originally Posted by Kush Desai
Yes sir! Installed and running perfectly! But I will add that they advertise the kit as 64 Colors but I've basically seen maybe 6-8 colors. Not really complaining just because I keep my color at Blue but they should really fix that.
I will also add for whoever is watching Flexx's video to install it themselves, to properly install the OBD Module, you can pull down the bottom panel of the Driver Seat, remove the OEM OBD, replace it with the DMP OBD and lock it in place, then connect the OEM OBD to the other end of the DMP OBD Connector.
This method will give you a proper clean look rather than having the DMP OBD connector dangling by your feet potentially causing you to kick it and breaking the connector.
How many OBD connectors/modules did DMP send with your kit? I purchased the basic kit (center console, doors, and bottom panels), with the front trim, air vents, and speaker covers. My install team is having problems installing it; they think I was sent a few OBD connectors/modules short.
Great instructions! How many OBD modules did your come with? And did your car already have illuminated lighting?
You should have only 1 OBD module that gets connected to your OBD port.
But each door should have its own little black box, which I guess you can call it a module.
I only did the footwell, center and door lighting but for your front air vents, you should have additional connectors availble for you to connect those air vent lights to that main OBD Harness. You should take a look at Flexx's videos on youtube. He does a pretty good job explaining how everything gets connected and does a walk through on how to install everything.
Ok, I did look at all of Flexx's video before I purchased the kit, he's how I found the kit. I purchased the basic kit with the front trim, air vents, and speaker covers. I sent Flexx's videos and the DMP product to a local shop and he said he could do it. Once they tried to install it, they said the driver side lights didn't work, and I was missing the main OBD main harness. I've contacted "Thomas" at DMP, and waiting on his response.
Thank you for the timely response, I will keep you updated!
Do you have any pictures of what the contents of the package you got? Because I know that they updated their wiring where now the lights are controlled by using the mirror buttons instead of the steering wheel buttons. Do you know which kit you got? Mirror buttons or Steering Wheel buttons?
Do you have any pictures of what the contents of the package you got? Because I know that they updated their wiring where now the lights are controlled by using the mirror buttons instead of the steering wheel buttons. Do you know which kit you got? Mirror buttons or Steering Wheel buttons?
I'm waiting on DMP's response. It's just about to hit business hours over in Indonesia so I'll see what they tell me. And then I'll upload pics of what I got.
I'm waiting on DMP's response. It's just about to hit business hours over in Indonesia so I'll see what they tell me. And then I'll upload pics of what I got.
The newer kits using the mirror switch are causing a lot of confusion on Flexx's YT page. The issue appears to be the "brain" of the system is now the driver-door/mirror module, not the ODB module. Thus, if you try to test it like he does with the ODB module alone, nothing will light up (I learned this the hard way, thinking I had a bad kit as well). Start with the driver door, if that doesn't light up then it's possibly defective.
It's a great kit once you get it going. My only gripe is their ODB port had a different configuration (weird plastic tab in the middle) so I couldn't use it as a true passthrough. No big inconvenience though, simply unplug for reading codes or dealer visits.
 11-29-2020, 09:38 PM