
DIY $1 Leaking Door Actuator Fix

Thread Starter
Super Member
Joined: Aug 2009
Posts: 998
Likes: 70
From: Oakland
W210 DRFT BNZ
DIY $1 Leaking Door Actuator Fix
Symptoms:
The solution in my case was very simple. I am letting the pictures do the talking.
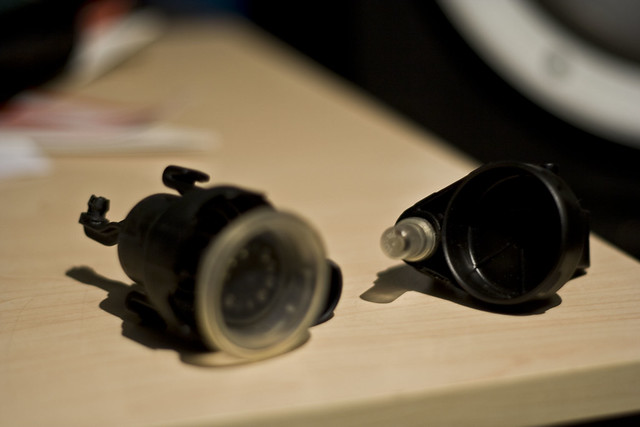
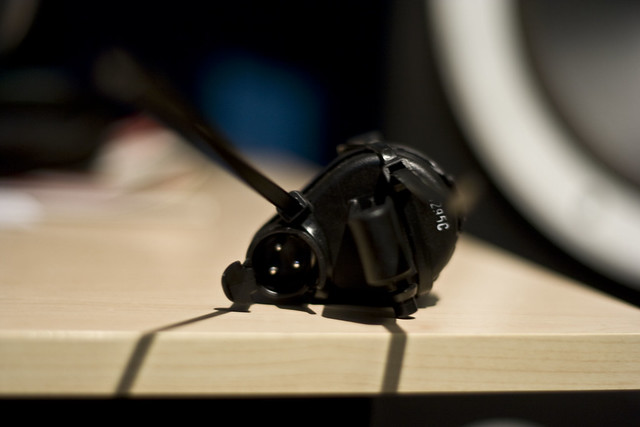
You can see I have the alarm version of the door actuator. You can also see how they are meant to be disassembled into 2 pieces and you can see the main chamber membrane.
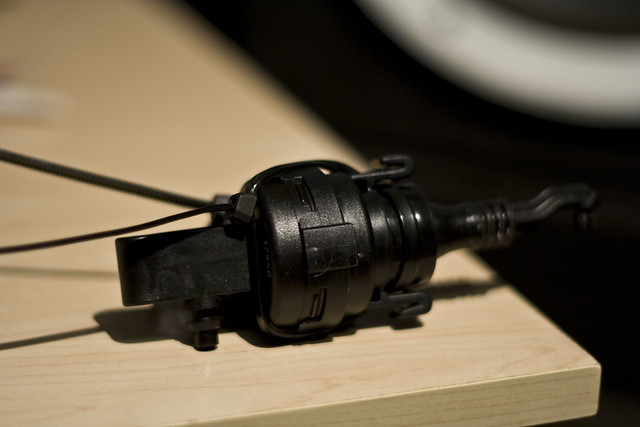
Here you can see the 'good side' and how it comes together. Pay attention to how it would 'clip' and 'click' together.
However, the other side has the tab pieces broken off and needless to say, this poses a problem when something is supposed to be air-tight. Looking at the damage and seeing the inside of the door, this may have something to do with slamming the door repeated, I wouldn't know. I got the car like this.
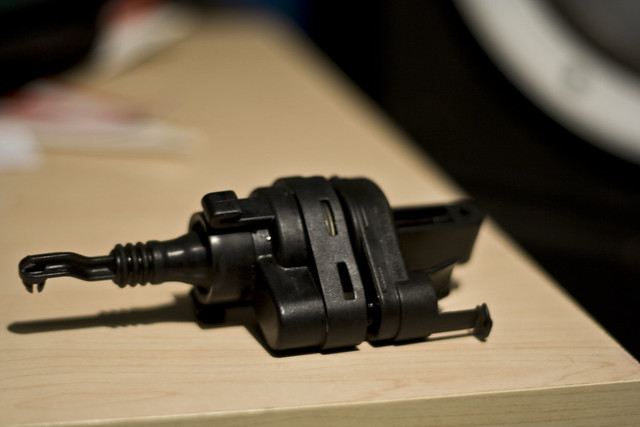
The brilliant, obvious and simple solution.
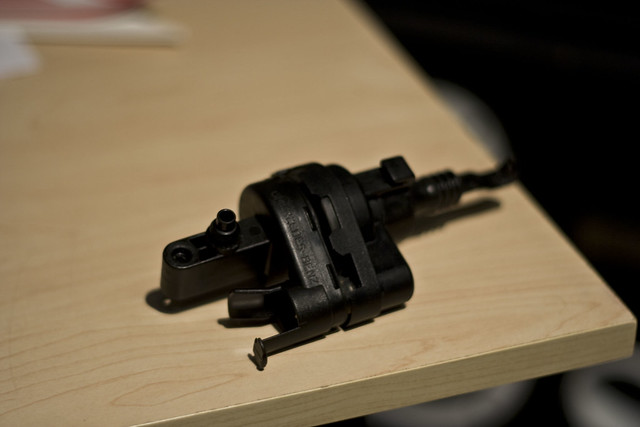
Another angle.
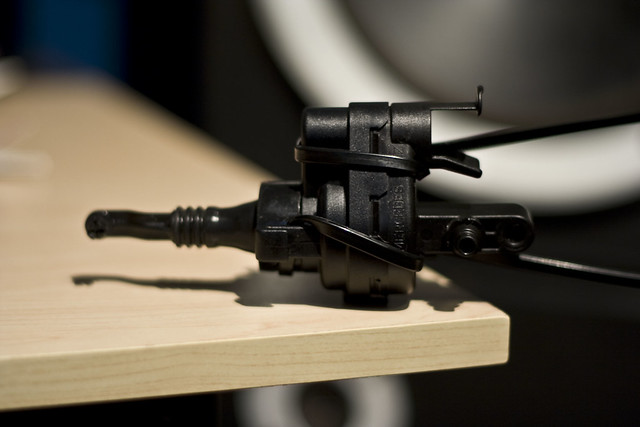
Third angle.
- one of the doors won't central lock\unlock
- a hissing noise can be heard from the said door
The solution in my case was very simple. I am letting the pictures do the talking.
You can see I have the alarm version of the door actuator. You can also see how they are meant to be disassembled into 2 pieces and you can see the main chamber membrane.
Here you can see the 'good side' and how it comes together. Pay attention to how it would 'clip' and 'click' together.
However, the other side has the tab pieces broken off and needless to say, this poses a problem when something is supposed to be air-tight. Looking at the damage and seeing the inside of the door, this may have something to do with slamming the door repeated, I wouldn't know. I got the car like this.
The brilliant, obvious and simple solution.
Another angle.
Third angle.
Last edited by jumph4x; Aug 19, 2010 at 11:23 PM.


Newbie
Joined: Aug 2010
Posts: 10
Likes: 0
From: Tempe, AZ
1995 c36 AMG
Thank you so much. Your timing is impeccable, I just had the door apart not one week ago to try and figure out the unlocking problem for the drivers side door. Have the exact issue you described (wont unlock, when try to unlock hear a hissing sound) and am about to try your solution. I am so happy I rated this thread 5, if there was a rep system on this forum I'd have rep+ you too.
I outta go start taking apart that door now before it gets too hot to work on it (it's already 99F outside and it's only 10:30.)
Will report back with my results.
Edit: Got the door actuator out, it was a bit of a fight there aren't very big openings into the innards of the door, it's pretty tricky unless you have carnie hands. Most of the tabs are broken around the back rounded off part and that's where the air leak is, so the problem with the locks is certainly is consistent with this thread. At this point with the door completely disassembled I realized that I probably don't have any zip ties. I tried to use a heavy duty rubber band instead, I hooked up the actuator the the two lines to test it before putting it back in the door and it worked, but you could still hear an air leak in the back, so I wasn't sure it would work in the door.
I'll never know though because in an epic battle to get it back in the door the rubber band got cut up and busted by the door and door opening/locking mechanism. At this point it was about 104F outside and I just wanted to get back inside where it was 78 so I kinda rushed putting the door back together and did a really half-assed job since I figure I'll just have to take it apart again to fix the actuator right, but now the door wont even lock cause I didn't take the time to line up the parts of the locking mechanism completely right.
I took a few pics when I was taking the door apart and fighting the actuator down to the bottom where there was a hole big enough for my talon-sized hands to get it out of the door (getting a big enough opening to get pliers in to get the actuator detached from the lock was by far the trickiest part). I'll get them up in a bit and they may enlighten anyone else who has to do this repair, or any other repairs involving the locks/door release. The keyhole on the drivers side doesn't work as well and I'll try and fix that when I fix the actuator the right way since I'll have that taken apart anyways.
Last edited by T-cles; Aug 20, 2010 at 05:23 PM.
Thread Starter
Super Member
Joined: Aug 2009
Posts: 998
Likes: 70
From: Oakland
W210 DRFT BNZ
Well thanks haha.
I am actual six foot three, and my hands are as far from small as it gets. The trick is to use a bent coolant hose separator tool.
I have the Bentley manual for this car, if you need any help, I can scan some pages.
However, the easiest way by far is to use that little opening and slide the tool down and out through it. After unhooking it at the top. The unhooking part is done with the said tool and pliers.
Not easy, you're right. But the entire job took me about 2 hours from start to finish.
Newbie
Joined: Aug 2010
Posts: 10
Likes: 0
From: Tempe, AZ
1995 c36 AMG
Finally I got everything back in correct today where all the functions of the door handle/locks fit together right, I was worried that my fix for the door actuator might not have been good enough because I could still hear a hiss on the unlock when I tested it, but I didn't really see how I could do a better job without using glue so I went ahead and installed it.
I am happy to report that another car's automatic locks now fully work on all doors thanks to this thread, I guess even though some air still leaks it is clamped enough to build the necessary pressure to unlock the door. I don't have access to the pictures I took of my zip-tied actuator right now, but I need to post them later when I'm back home because the area where the tabs where broken on mine was a bit different; all around the curved back end instead of on the side, so the arrangement of my zip-ties was a bit different. I dedicated a tie entirely to providing a place to secure the tie that actually clamped it shut since there really is no good spot on that back curved end to attach a tie and have it pull at the best angle. A zip-tie attached connecting the two side tab-hooks on the top piece, by going around the curved back part provided that place to attach my tie on the top part of the actuator. Just a tip for anyone doing this fix who had damage more in that area.
I am happy to report that another car's automatic locks now fully work on all doors thanks to this thread, I guess even though some air still leaks it is clamped enough to build the necessary pressure to unlock the door. I don't have access to the pictures I took of my zip-tied actuator right now, but I need to post them later when I'm back home because the area where the tabs where broken on mine was a bit different; all around the curved back end instead of on the side, so the arrangement of my zip-ties was a bit different. I dedicated a tie entirely to providing a place to secure the tie that actually clamped it shut since there really is no good spot on that back curved end to attach a tie and have it pull at the best angle. A zip-tie attached connecting the two side tab-hooks on the top piece, by going around the curved back part provided that place to attach my tie on the top part of the actuator. Just a tip for anyone doing this fix who had damage more in that area.


