
Dealer drilled holes in my new car!!!
 08-04-2009, 01:14 PM
#51
MBWorld Fanatic!
That must have been the same suit the dealer was talking about. He just mentioned that they lost a case and that is why the front plate holder goes on. It wasn't a dealbreaker for me since I felt I got a good deal on the car.
Desmo, have you removed the holder and see if they only drilled four "clean" holes?
Desmo, have you removed the holder and see if they only drilled four "clean" holes?
Last edited by Sincity; 08-04-2009 at 01:17 PM.
 08-04-2009, 01:44 PM
#52
MBWorld Fanatic!
Join Date: Jul 2009
Location: FL
Posts: 1,103
Likes: 0
Received 0 Likes
on
0 Posts
'09 C63 AMG
 Do you have a pic of your car with these black hole plugs on the front bumper?
08-04-2009, 02:45 PM
Do you have a pic of your car with these black hole plugs on the front bumper?
08-04-2009, 02:45 PM
#54
MBWorld Fanatic!
Ditto to what Zoink said. However, the 3/16" plugs only come in black like you stated. It is slightly textured so you will need to scuff/sand it down before painting. I had some almost-dry paint that needed to be thinned to be used. Just had enough paint to get a close match. The clear coat glosses it up. It is a good thing that the plugs are small enough that you can get away with brushing the touchup paint vs. spraying it.
OT-I just noticed Zoink has been on this board almost as long as I have.
OT-I just noticed Zoink has been on this board almost as long as I have.
Last edited by Sincity; 08-04-2009 at 02:52 PM.
08-04-2009, 02:49 PM
#55
Member
Thread Starter
That must have been the same suit the dealer was talking about. He just mentioned that they lost a case and that is why the front plate holder goes on. It wasn't a dealbreaker for me since I felt I got a good deal on the car.
Desmo, have you removed the holder and see if they only drilled four "clean" holes?
Desmo, have you removed the holder and see if they only drilled four "clean" holes?
I have ordered a German plate and also spoke with Cory at Kleemann who says he can get me an OEM European spec front bumper bracket for the license.
If this doesn't end up looking good I spoke with the owner of a local bumper repair called Recon PDR who says he can restore the bumper to factory finish. They clear coat multiple times use flexible filler (so it won't crack or get brittle) and guarantee the Standox paint color matching and work for life. He says he does this on CA bought cars like twice a month here. It will cost $325 and they can come to your place if you like. They seem to have a pretty good reputation.
I also spoke with Fletcher Jones MB and they have someone come in Mon and Fri to repair bumpers. The service guy said you won't be able to tell there were ever holes when they finish. They also charge in the $300 range.
Both of these options don't require the bumper to be removed and completely re-sprayed either.
08-04-2009, 03:01 PM
#56
MBWorld Fanatic!
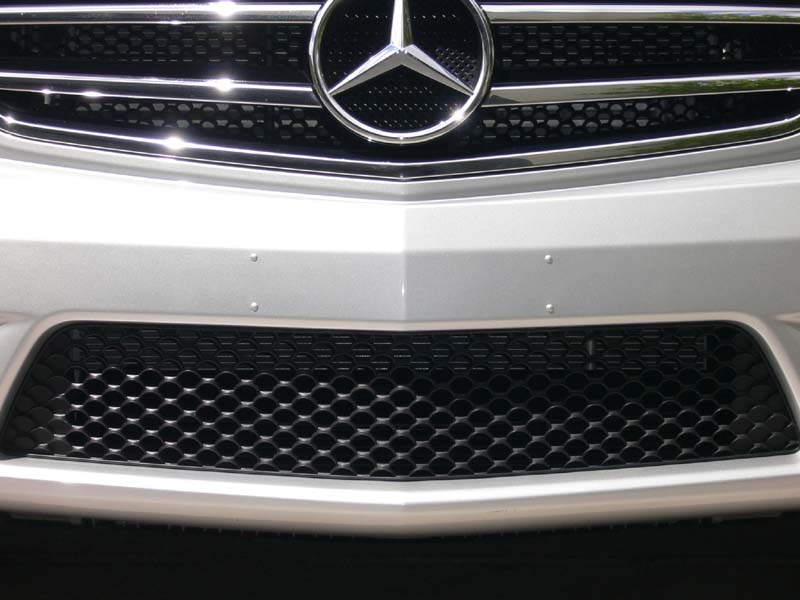
Desmo, I will be posting pics up later when I get home. The screws they used, luckilly, are small. When using the 3/16" plugs, you will still need to enlarge the hole slightly to fit the plugs.
Moparrbust is correct about bumper repairs. To do it right, you need to remove the bumper and all attached parts, repair/patch, spot color as needed (small repair area) and completely clear coat the entire bumper. You can get away by partially refinishing a bumper using a blending solution or reducer to melt the clear if the shop gurantees the job. But in this economic enviroment, this shop may not be around next year to redo it if needed. PM me with your tele # and I'll explain it.
Moparrbust is correct about bumper repairs. To do it right, you need to remove the bumper and all attached parts, repair/patch, spot color as needed (small repair area) and completely clear coat the entire bumper. You can get away by partially refinishing a bumper using a blending solution or reducer to melt the clear if the shop gurantees the job. But in this economic enviroment, this shop may not be around next year to redo it if needed. PM me with your tele # and I'll explain it.
08-04-2009, 03:23 PM
#57
MBWorld Fanatic!
08-04-2009, 03:23 PM
#58
Member
Thread Starter
Desmo, I will be posting pics up later when I get home. The screws they used, luckilly, are small. When using the 3/16" plugs, you will still need to enlarge the hole slightly to fit the plugs.
Moparrbust is correct about bumper repairs. To do it right, you need to remove the bumper and all attached parts, repair/patch, spot color as needed (small repair area) and completely clear coat the entire bumper. You can get away by partially refinishing a bumper using a blending solution or reducer to melt the clear if the shop gurantees the job. But in this economic enviroment, this shop may not be around next year to redo it if needed. PM me with your tele # and I'll explain it.
Moparrbust is correct about bumper repairs. To do it right, you need to remove the bumper and all attached parts, repair/patch, spot color as needed (small repair area) and completely clear coat the entire bumper. You can get away by partially refinishing a bumper using a blending solution or reducer to melt the clear if the shop gurantees the job. But in this economic enviroment, this shop may not be around next year to redo it if needed. PM me with your tele # and I'll explain it.
I also called Exoticar Paintworks which is the body shop FJ uses and they quoted me around $550 which included removal of the bumper and completely respraying it.
08-04-2009, 03:51 PM
#59
MBWorld Fanatic!
Didn't get your PM. If you are going the Exoticar route, I would have them remove the yellow side markers and fill it in for a clean "Euro" look.
Last edited by Sincity; 08-04-2009 at 03:53 PM.
08-04-2009, 03:54 PM
#60
MBWorld Fanatic!
Join Date: Jul 2009
Location: FL
Posts: 1,103
Likes: 0
Received 0 Likes
on
0 Posts
'09 C63 AMG
Hmmm...I think I will wait for my Euro plate to arrive and try that with the black plastic frame/bracket to see if it works with the angled front bumper. If not, then I will either leave the glossy black caps (w/ screws in the holes) I currently have on now or fill the holes with the black plugs (which I guess I would sand, apply MB black touch up paint, and clear coat as Sincity & zoink suggested) then. Man, what a PITA. 
08-04-2009, 04:01 PM
#61
Member
Thread Starter
Ya that would be nice but I'm sure the price would double. Those guys didn't sound like straight shooters to me when I spoke to them.

 08-04-2009, 05:44 PM
#64
Member
Thread Starter
Wow, looks great!
How did you match the Itidium Silver Metalic paint? Did you get so touch up paint from the dealer? Did you use clear coat as well on the plugs?
Finally how did you secure them in place? With epoxy?
Nicely done. Did you get your windows tinted already? Who did you use?
Last edited by desmo996; 08-04-2009 at 05:55 PM.
08-04-2009, 06:09 PM
#65
MBWorld Fanatic!
Thanks Desmo. Now you can save your money. I had some leftover Benz Brilliant Silver that I mixed with BMW's Steel Gray to get a match since I didn't buy touchup paint from the dealer. I used to build a lot of models as a kid and you sometimes had to improvise on color. Since the paint was old, I had to thin it and painted on several coats and wet sanded the last coat to get smooth base and sprayed DupliColor clear. If you have fresh paint, you could skip the wet sand and follow the directions below. Just go out and buy the touchup paint from the dealer.
Here is the step-by-step:
1) Get plugs
2) Scuff the plugs with either red scour pad or 1000 grit sandpaper.
3) Buy plastic primer @ Lowes and spray 1-2 coats. This stuff comes clear.
4) Buy grey or white primer and spray 2 coats to cover the black plastic. Black colored cars do not need grey/white primer (skip 4 and go to 5).
5) Brush on 2-3 coats of color (let dry between coats). On the 3rd coat, use "dry brush" technique which is a modeling painting technique if you are using a metallic color. The purpose is to even out the metallic flakes and give it a matte finish prior to clear coating. To do that, wet brush with a little paint and brush on a piece of paper till there is hardly any paint left. Then paint the platsic part. This will give a dull even color for the metallic base color coat.
6) Buy DupliColor clear (avail at auto supply stores) and spray on 4-5 coats. Let dry between coats.
7) Drill hole to size. Slowly step up one size larger till you get a hole that is a little tighter than the plug.
8) Press newly painted plugs in. No need to glue.
You could probably get away using the clear that comes with the touchup paint set from the dealer since the part is so small and you probably would not be able to see the brush strokes. I elected to spray so I can get a smooth even surface. I was going to airbrush the color, but I got lazy and wanted to see the results on brushing before deciding on airbrushing.
Last edited by Sincity; 08-04-2009 at 11:40 PM. Reason: Revised instructions
08-04-2009, 10:20 PM
#68
MBWorld Fanatic!
It will be very hard to 3m double tape a euro plate to the C63 bumper due to its curvature/angle in the middle (i tried it without success). He can use those same holes to screw the plate frame and it will hold on just fine. He can order an original frame and plate holder directly from germany thru ebay like i did.
08-04-2009, 11:11 PM
#69
MBWorld Fanatic!
Join Date: Jul 2009
Location: FL
Posts: 1,103
Likes: 0
Received 0 Likes
on
0 Posts
'09 C63 AMG
08-04-2009, 11:23 PM
#70
Senior Member
Join Date: Jul 2009
Location: Latitude 26.1695, Longitude -80.0997
Posts: 475
Likes: 0
Received 0 Likes
on
0 Posts
my wife wild, but she loves every minute of it.
Nice job, with the added benefit that you have taken away the aim-point for cops with laser speed guns, which are coming into wider use. If you are in a state that uses them, a front plate is almost like putting a bullseye target on your car. YMMV
Thanks Desmo. Now you can save your money. I had some leftover Benz Brilliant Silver that I mixed with BMW's Steel Gray to get a match since I didn't buy touchup paint from the dealer. I used to build a lot of models as a kid and you sometimes had to improvise on color. Since the paint was old, I had to thin it and painted on several coats and wet sanded the last coat to get smooth base and sprayed DupliColor clear. If you have fresh paint, you could skip the wet sand and follow the directions below. Just go out and buy the touchup paint from the dealer.
Here is the step-by-step:
1) Get plugs
2) Scuff the plugs with either red scour pad or 1000 grit sandpaper.
3) Buy plastic primer @ Lowes and spray 1-2 coats. This stuff comes clear.
4) Buy grey or white primer and spray 2 coats to cover the black plastic. Black colored cars do not need grey/white primer (skip 3 and go to 5).
5) Brush on 2-3 coats of color (let dry between coats). On the 3rd coat, use "dry brush" technique which is a modeling painting technique if you are using a metallic color. The purpose it to even out the metallic flakes and give it a matte finish prior to clear coating. To do that, wet brush with a little paint and brush on a piece of paper till there is hardly any paint left. Then paint the platsic part. This will give a dull even color for the metallic base color coat.
6) Buy DupliColor clear (avail at auto supply stores) and spray on 4-5 coats. Let dry between coats.
7) Drill hole to size. Slowly step up one size larger till you get a hole that is a little tighter than the plug.
8) Press newly painted plugs in. No need to glue.
You could probably get away using the clear that comes with the touchup paint set from the dealer since the part is so small and you probably would not be able to see the brush strokes. I elected to spray so I can get a smooth even surface. I was going to airbrush the color, but I got lazy and wanted to see the results on brushing before deciding on airbrushing.
08-05-2009, 12:08 AM
#72
Member
Thread Starter
Does 3M tape do any damage to the car's paint/finish if down the line you decide to take the plate off? Is it safe to use on the auto exteriors?
Also did you use an OEM European license plate bracket/frame or did you buy it with the license plate (the kind with hinges that opens up and you put plate inside)?
Do you have any photos of your car with the Euro plates on here in the forum? I would love to see how your set up looks.
Last edited by desmo996; 08-05-2009 at 12:36 AM.
08-14-2009, 03:04 PM
#73
MBWorld Fanatic!
Join Date: Jul 2009
Location: FL
Posts: 1,103
Likes: 0
Received 0 Likes
on
0 Posts
'09 C63 AMG
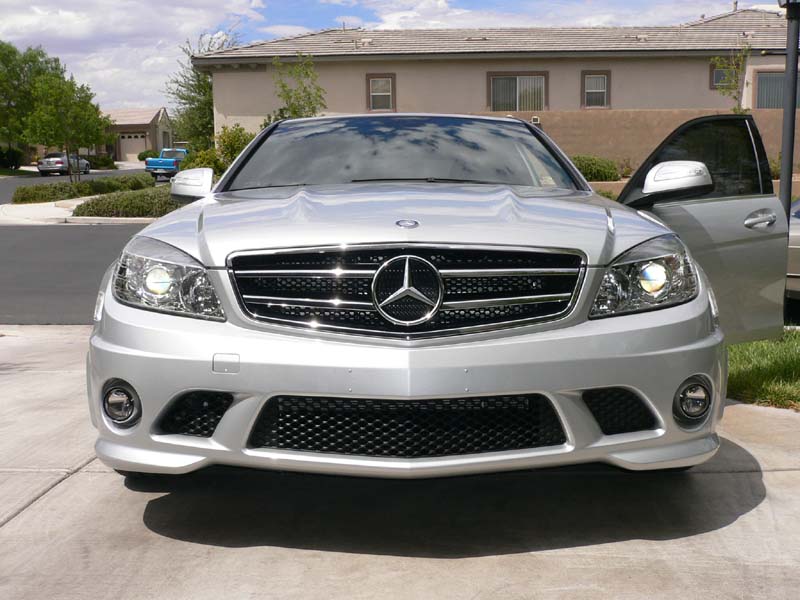
Ok, so I received my Euro plate (pic below  ), but I couldn't attach it with the supplied plastic frame (even though I used a hair dryer to bend the plastic frame to the contours of the angled front bumper; it just wouldn't stay closed to house the Euro plate securely.
So, I decided to use the super strength 3M Scotch double sided tape to secure the Euro plate to the bumper (with the plate bent in the middle to mold to the angled front bumper). I'm sure it's going to stay there without a problem as I used the same 3M double sided tape to secure the rear lip spoiler to my previous BMW 335i and never had any issues.
At least you can't see any holes (or plug caps) in the front bumper now.
), but I couldn't attach it with the supplied plastic frame (even though I used a hair dryer to bend the plastic frame to the contours of the angled front bumper; it just wouldn't stay closed to house the Euro plate securely. So, I decided to use the super strength 3M Scotch double sided tape to secure the Euro plate to the bumper (with the plate bent in the middle to mold to the angled front bumper). I'm sure it's going to stay there without a problem as I used the same 3M double sided tape to secure the rear lip spoiler to my previous BMW 335i and never had any issues.
At least you can't see any holes (or plug caps) in the front bumper now.
Last edited by sflgator; 08-14-2009 at 04:04 PM.
08-14-2009, 04:59 PM
#74
Member
Thread Starter
Ok, so I received my Euro plate (pic below ), but I couldn't attach it with the supplied plastic frame (even though I used a hair dryer to bend the plastic frame to the contours of the angled front bumper; it just wouldn't stay closed to house the Euro plate securely.
So, I decided to use the super strength 3M Scotch double sided tape to secure the Euro plate to the bumper (with the plate bent in the middle to mold to the angled front bumper). I'm sure it's going to stay there without a problem as I used the same 3M double sided tape to secure the rear lip spoiler to my previous BMW 335i and never had any issues.
At least you can't see any holes (or plug caps) in the front bumper now.
), but I couldn't attach it with the supplied plastic frame (even though I used a hair dryer to bend the plastic frame to the contours of the angled front bumper; it just wouldn't stay closed to house the Euro plate securely. So, I decided to use the super strength 3M Scotch double sided tape to secure the Euro plate to the bumper (with the plate bent in the middle to mold to the angled front bumper). I'm sure it's going to stay there without a problem as I used the same 3M double sided tape to secure the rear lip spoiler to my previous BMW 335i and never had any issues.
At least you can't see any holes (or plug caps) in the front bumper now.
I went through a big ordeal with the Euro plates. I ordered one and it looked great. Then I got stopped by a cop (car was still not registered at that point) who saw the plate and told me to get rid of it. In NV if your car has a way to display a plate in the front then it has to be a NV plate otherwise you can just use 1 plate.
So without the euro plate option I decided to have the dealer repair the holes which is happening today. They told me they have someone who does this and the end result will look new. I'm keeping my fingers crossed.....


