

 06-08-2015, 03:20 PM
Last edit by: IB Advertising
See related guides and technical advice from our community experts:
Browse all: Exterior Guides
- Mercedes-Benz C-Class: How to Install Rear Diffuser
Step by step instructions for do-it-yourself repairs
Browse all: Exterior Guides

DIY: carbon fiber diffuser install
10-29-2009, 11:07 PM
#1
Member
Thread Starter

DIY: carbon fiber diffuser install
There have been plenty of threads on the installation of a carbon fiber rear diffuser for the C63 AMG, and plenty of descriptions , but none w/ sufficient pics for me to really get the message home so I decided to add some pics and this DIY. imo, this is a high-yield exterior mod b/c it abolishes black plastic parts on the exterior (so ubiquitous on lesser cars) and adds that "exotic" touch of carbon fiber. I think, when everything is visualized this actually is a simple mod. Thanks to Neal, James, charleszai, qship5, azn_C300, et al for all the guidance.
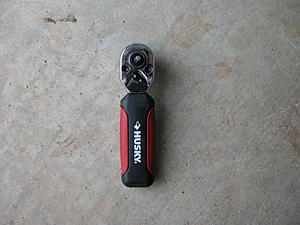
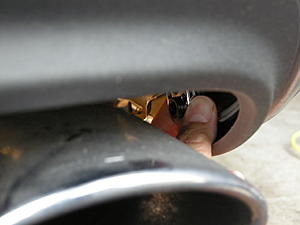
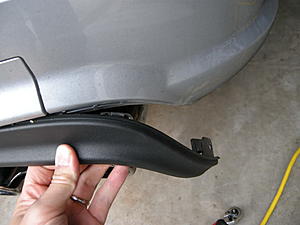
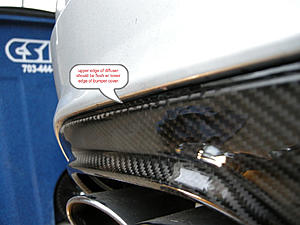
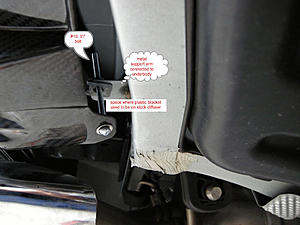
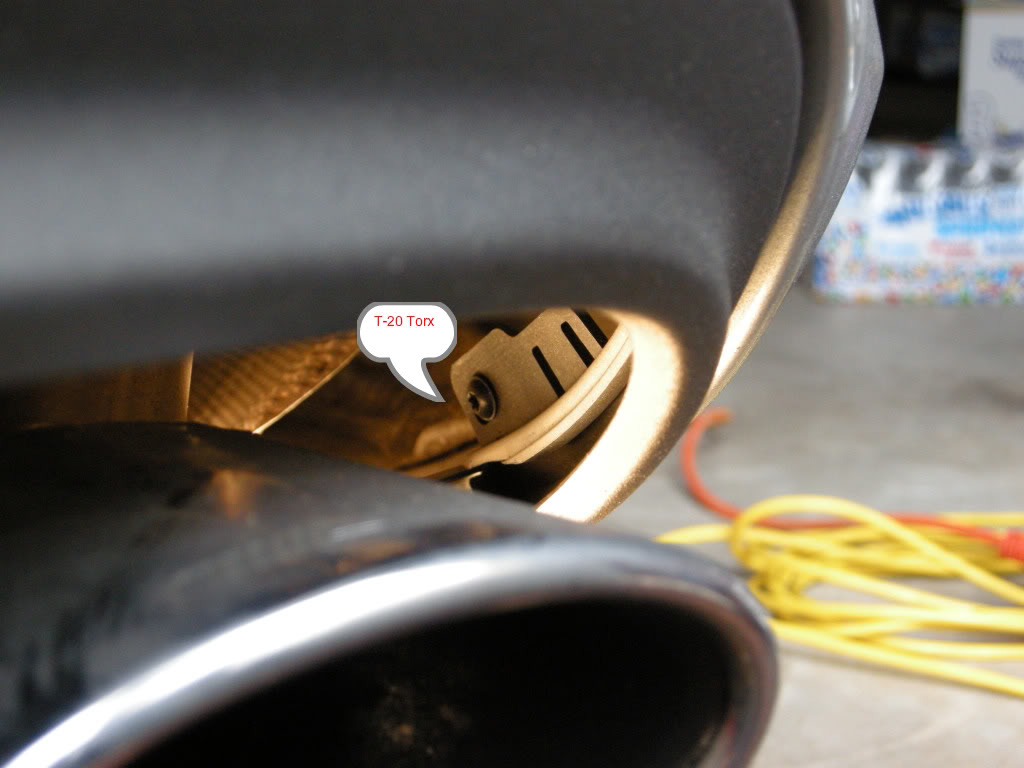
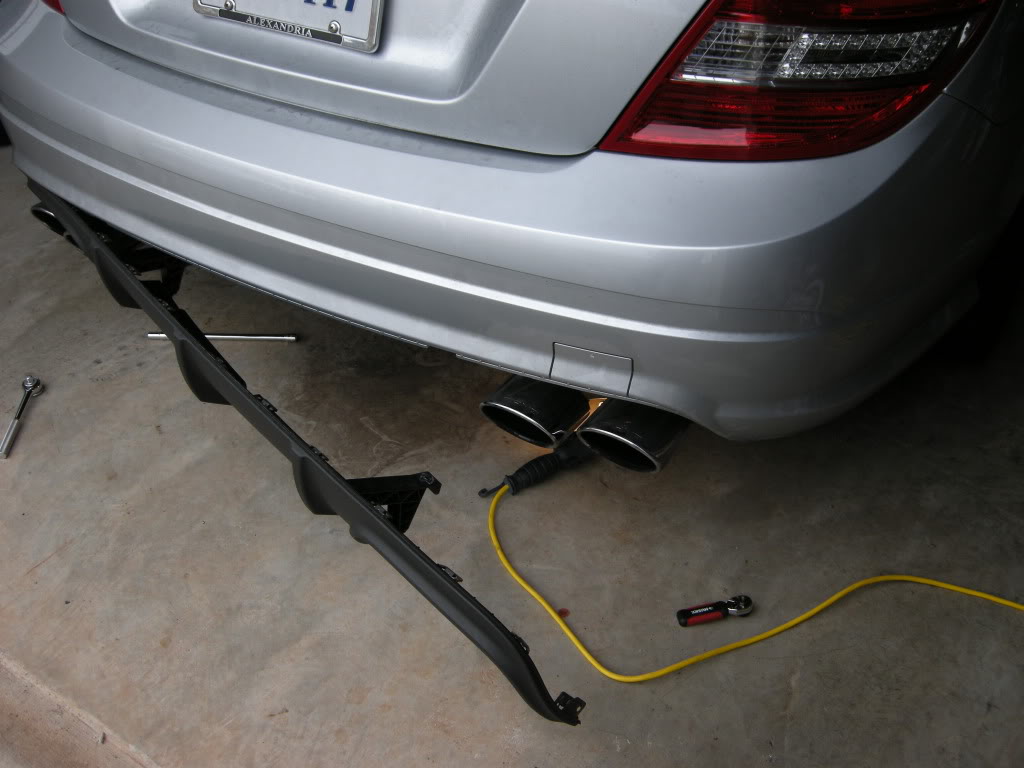
On each side, there is a Torx screw that connects the diffuser's tabs to the inner surface of the bumper cover; this area is lateral to each exhaust tip:

Use a very small ratchet and T-20 Torx bit for this screw. My approach was to slip the ratchet from below and holding/turning the head of the ratchet to loosen the screw as there was not enough room to hold the handle of the ratchet. It will help to hold the bumper down and out to give you more room to work.
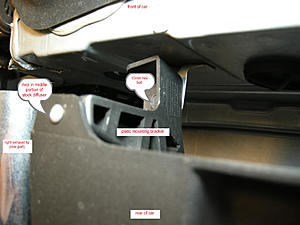
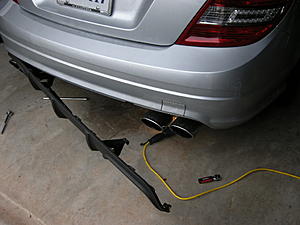
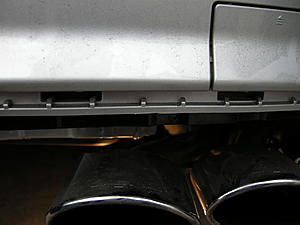
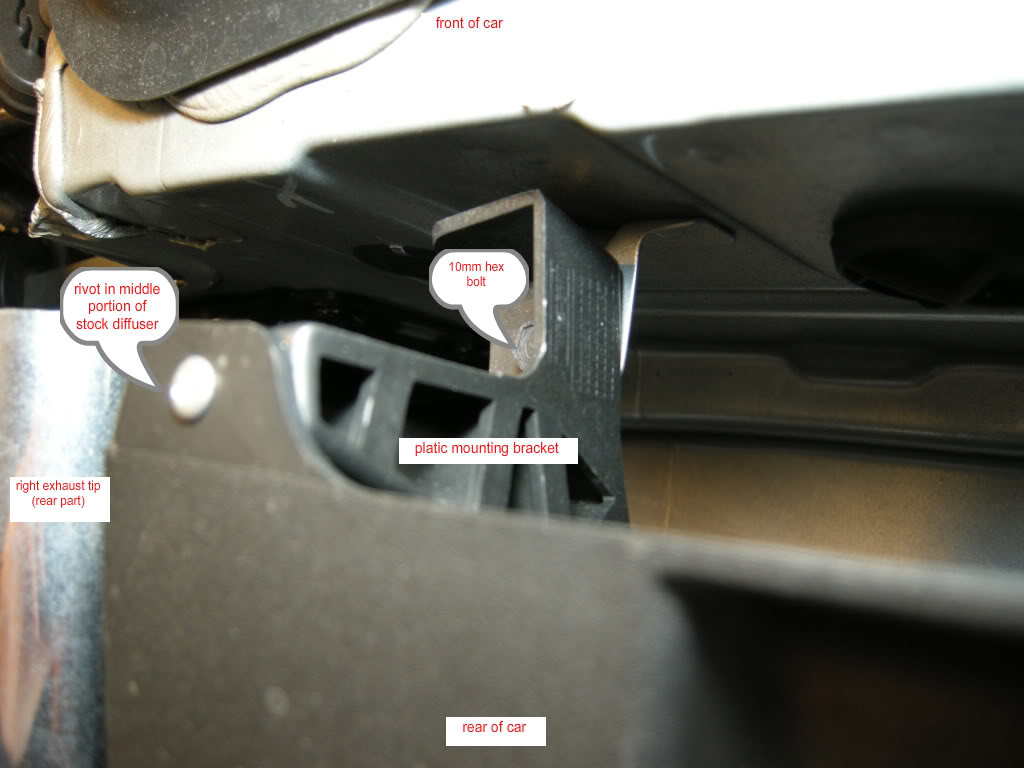
Here is a picture of the diffuser removed to show you the two middle plastic brackets that are rivoted (not screwed) to the diffuser. These brackets bridge the gap b/w the middle part of the diffuser and the metal arm supports on the underbody ie this is another point of attachment on the diffuser.
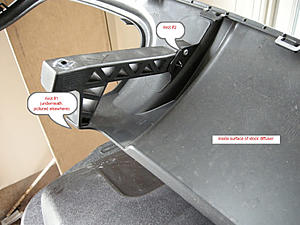
Remove the hex bolt from each plastic bracket (located medial to the exhaust tips and under the car) w/ a long 10mm socket. Note: these are not the rivots that attach the diffuser to the brackets, leave those on.
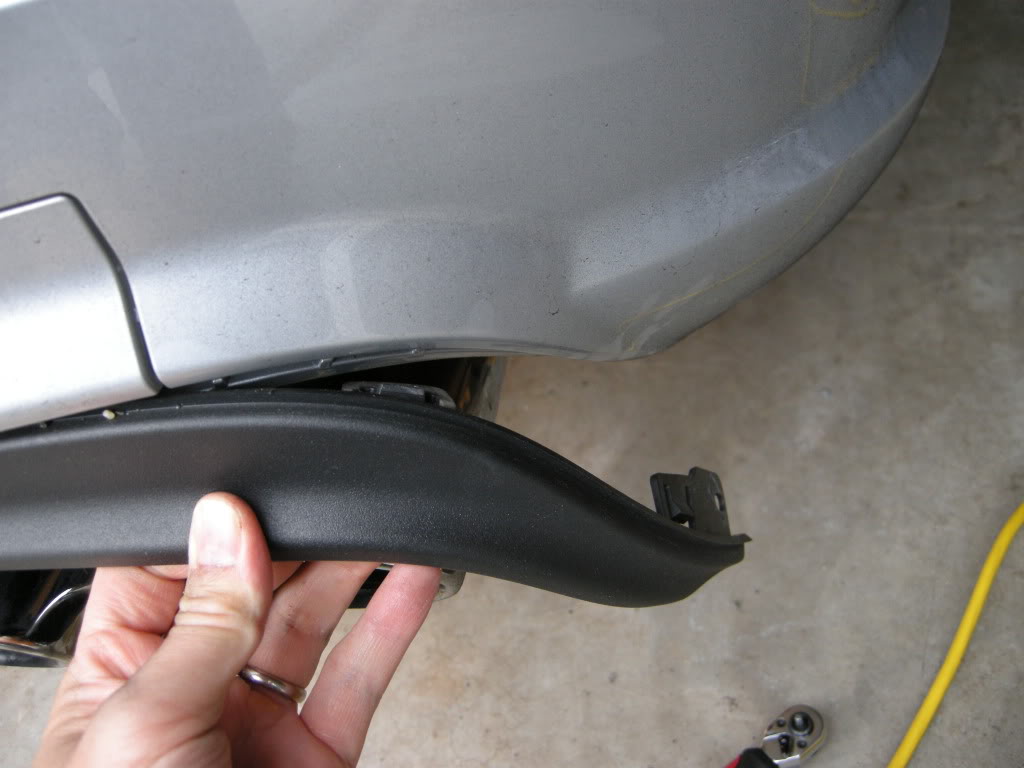
Once you've removed the screws above on the left and right, everything should be looser for you to start slowly pulling out the diffuser. There are a bunch of tabs on the upper border of the diffuser that have to be pulled out of their spaces in the bumper cover. This is not too difficult, just pull slowly from one side to the other, with some force.
Note the 2 rivots on each plastic bracket (pics above) -- you can either remove these by drilling, sawing, wedging, etc. and reuse them (with new screws) on the CF diffuser to reattach to the support arms under the car OR you can just leave them intact on the stock diffuser and not mess w/ the rivots. I chose the latter option.
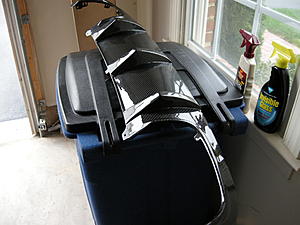
Now for the install -- first let's appreciate the carbon fiber:

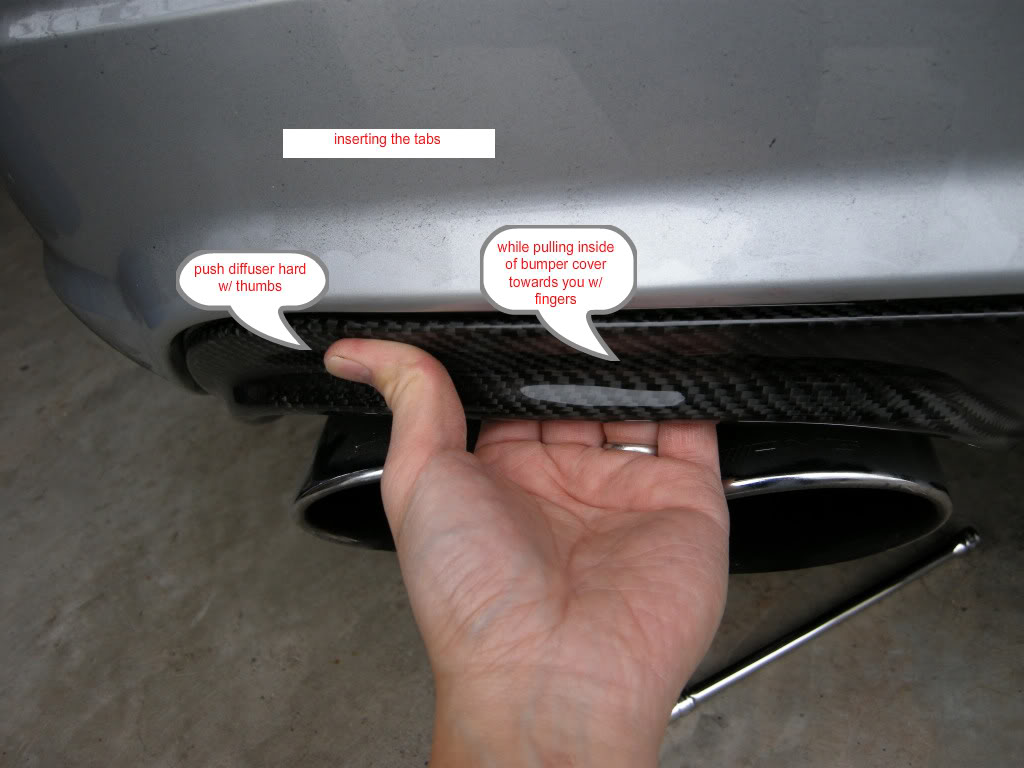
As per the instructions, and other's advice, put a good amount of grease on the upper edge of the whole CF diffuser and on all surfaces of the tabs. This will make the install 100x easier and, if not done, is likely the main reason anyone would have a hard time with this (other than not having four arms/hands).
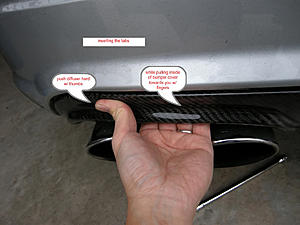
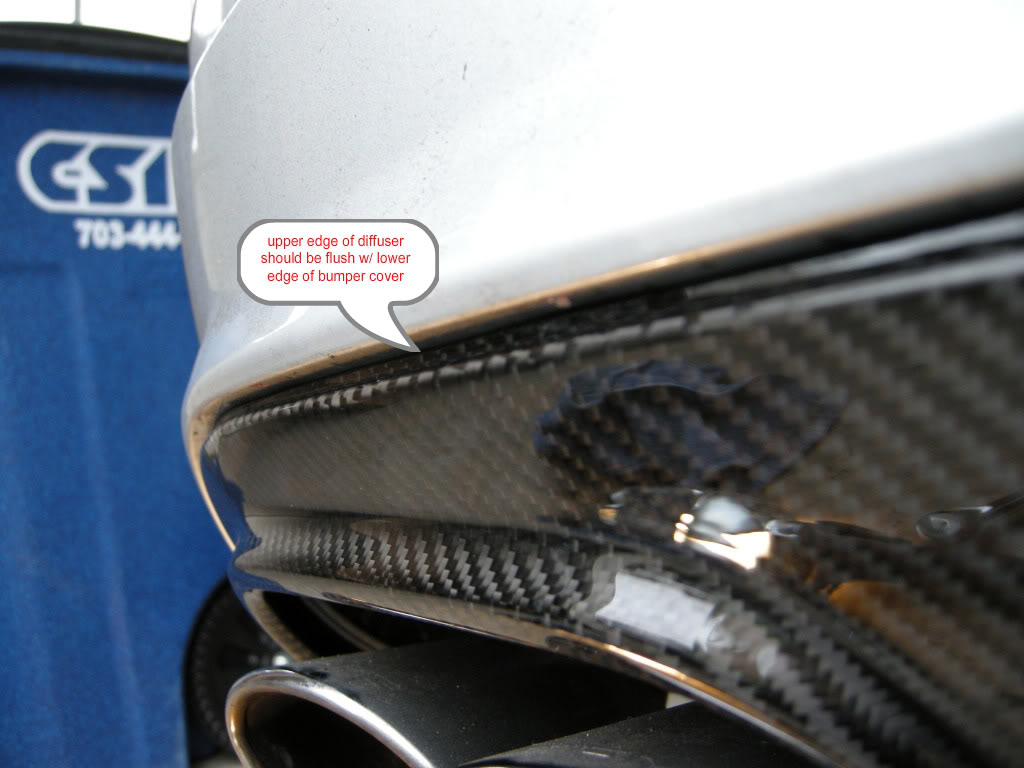
Line up the diffuser and insert, and push in each tab, one-at-a-time, starting from one end. Use your fingers to pull out the bumper cover towards the tabs w/c you are pushing in w/ your thumbs. When you think each tab is in, PUSH EVEN MORE. A few things will let you know the tabs are in: 1) you'll feel/hear a little "pop" 2) the upper edge of that part of the diffuser should be flush w/ the bumper 3) the outermost tabs of the diffuser should line up w/ the inside tabs of the bumper cover (the part just lateral to the exhaust tips).
Work your way across the left side of the bumper slowly. Once you get to the middle third of the diffuser, you should have a friend hold the left and middle part of the diffuser firmly in place while you continue to insert the rest of the tabs on the right side of the diffuser. This is the best way as you will find that the left tabs will slip out as you are putting the right ones in if no one is there to keep them in place (ie the CF diffuser is less flexible than the stock one).
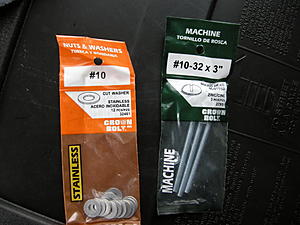
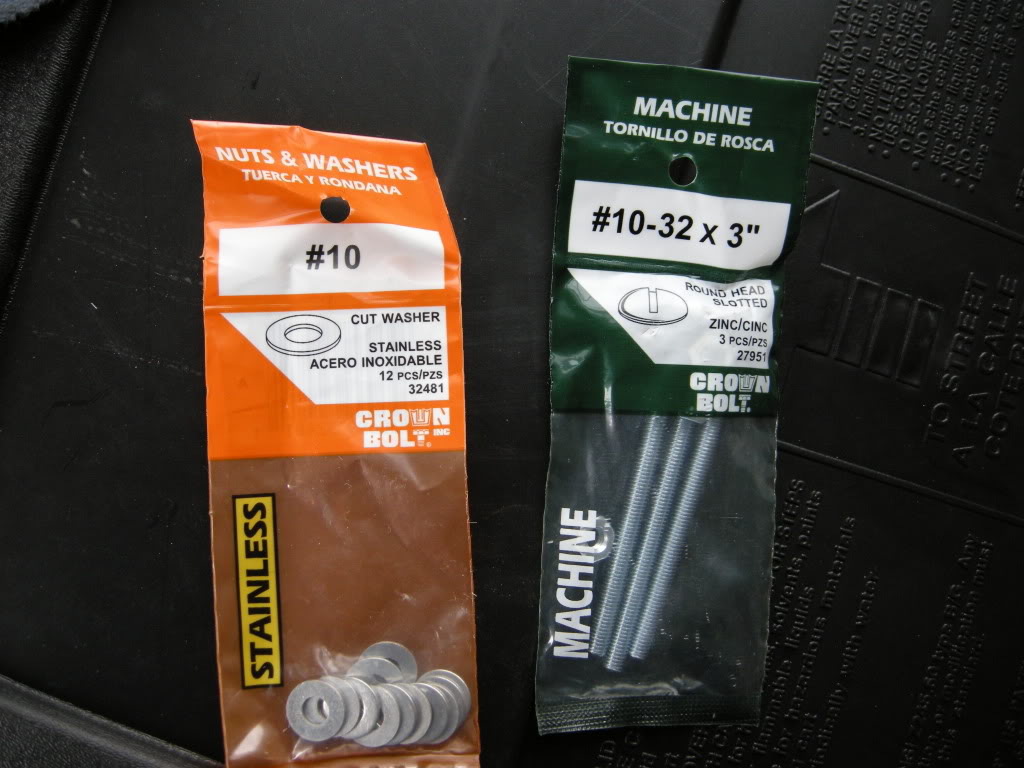
Finally, you have to get under the diffuser/car and use these bolts and washers (from Home Depot, or similar) to attach the middle portion of the diffuser to the metal support arms of the underbody. This is the nifty alternative to transplanting the plastic brackets discussed above (thanks charleszai!). WARNING: you need to have pretty skinny hands to get the nut/washer on top of the metal support arm to secure the bolts, hence a 3" long bolt is good b/c you have to bend your fingers less to do this.
I was not concerned of the empty space bridged by the bolts as tightening the bolts flexes the diffuser upwards and 1) creates the necessary tension to keep the nut tight and 2) keeps the leading edge of the diffuser tucked up and out of the airflow ie the fin should be the lowest part of the diffuser.
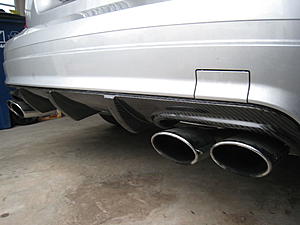
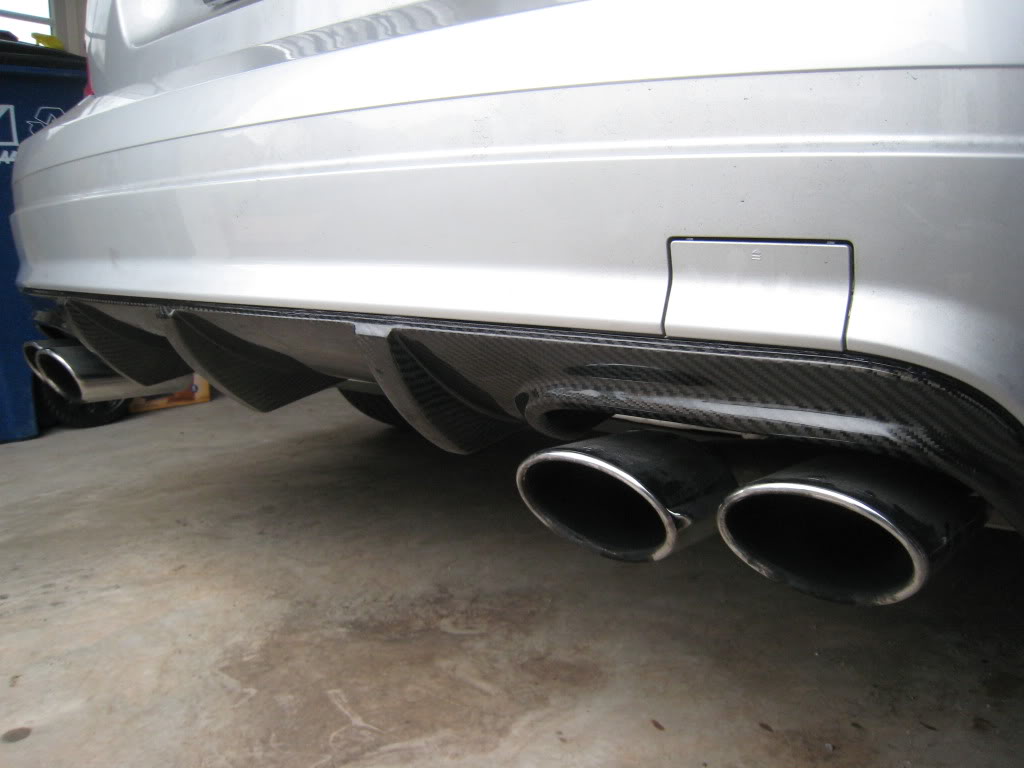
Finished product = GLORY! Time: 30 minutes w/o rushing.

On each side, there is a Torx screw that connects the diffuser's tabs to the inner surface of the bumper cover; this area is lateral to each exhaust tip:
Use a very small ratchet and T-20 Torx bit for this screw. My approach was to slip the ratchet from below and holding/turning the head of the ratchet to loosen the screw as there was not enough room to hold the handle of the ratchet. It will help to hold the bumper down and out to give you more room to work.


Here is a picture of the diffuser removed to show you the two middle plastic brackets that are rivoted (not screwed) to the diffuser. These brackets bridge the gap b/w the middle part of the diffuser and the metal arm supports on the underbody ie this is another point of attachment on the diffuser.

Remove the hex bolt from each plastic bracket (located medial to the exhaust tips and under the car) w/ a long 10mm socket. Note: these are not the rivots that attach the diffuser to the brackets, leave those on.
Once you've removed the screws above on the left and right, everything should be looser for you to start slowly pulling out the diffuser. There are a bunch of tabs on the upper border of the diffuser that have to be pulled out of their spaces in the bumper cover. This is not too difficult, just pull slowly from one side to the other, with some force.
Note the 2 rivots on each plastic bracket (pics above) -- you can either remove these by drilling, sawing, wedging, etc. and reuse them (with new screws) on the CF diffuser to reattach to the support arms under the car OR you can just leave them intact on the stock diffuser and not mess w/ the rivots. I chose the latter option.
Now for the install -- first let's appreciate the carbon fiber:


As per the instructions, and other's advice, put a good amount of grease on the upper edge of the whole CF diffuser and on all surfaces of the tabs. This will make the install 100x easier and, if not done, is likely the main reason anyone would have a hard time with this (other than not having four arms/hands).
Line up the diffuser and insert, and push in each tab, one-at-a-time, starting from one end. Use your fingers to pull out the bumper cover towards the tabs w/c you are pushing in w/ your thumbs. When you think each tab is in, PUSH EVEN MORE. A few things will let you know the tabs are in: 1) you'll feel/hear a little "pop" 2) the upper edge of that part of the diffuser should be flush w/ the bumper 3) the outermost tabs of the diffuser should line up w/ the inside tabs of the bumper cover (the part just lateral to the exhaust tips).
Work your way across the left side of the bumper slowly. Once you get to the middle third of the diffuser, you should have a friend hold the left and middle part of the diffuser firmly in place while you continue to insert the rest of the tabs on the right side of the diffuser. This is the best way as you will find that the left tabs will slip out as you are putting the right ones in if no one is there to keep them in place (ie the CF diffuser is less flexible than the stock one).

Finally, you have to get under the diffuser/car and use these bolts and washers (from Home Depot, or similar) to attach the middle portion of the diffuser to the metal support arms of the underbody. This is the nifty alternative to transplanting the plastic brackets discussed above (thanks charleszai!). WARNING: you need to have pretty skinny hands to get the nut/washer on top of the metal support arm to secure the bolts, hence a 3" long bolt is good b/c you have to bend your fingers less to do this.
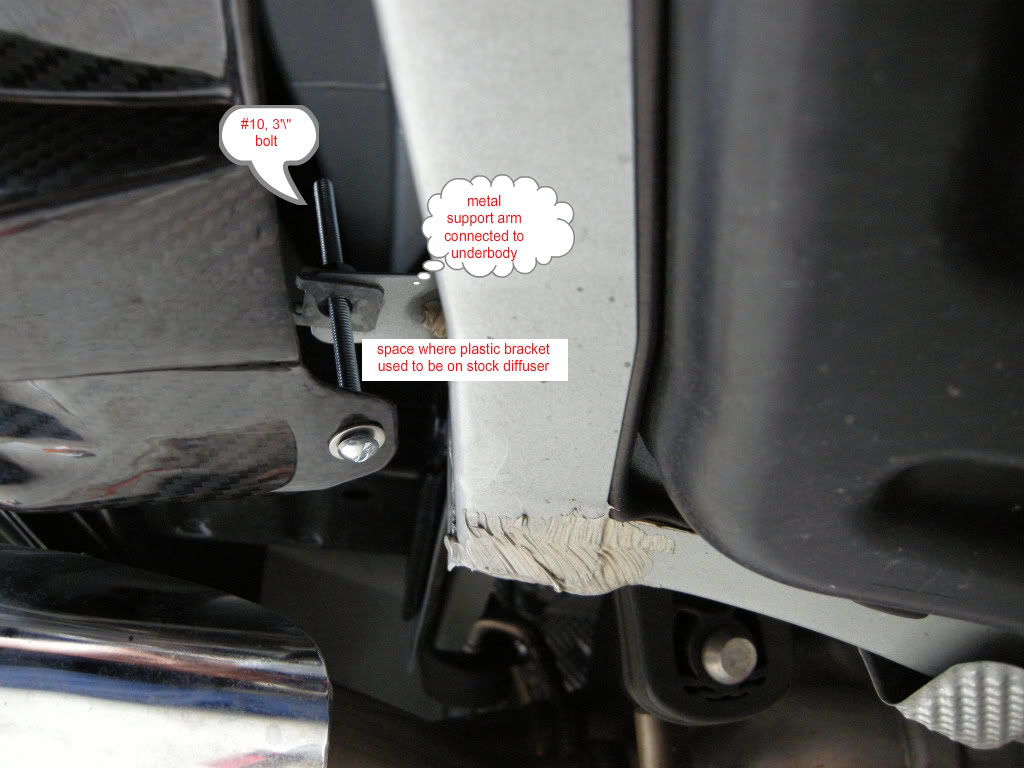
I was not concerned of the empty space bridged by the bolts as tightening the bolts flexes the diffuser upwards and 1) creates the necessary tension to keep the nut tight and 2) keeps the leading edge of the diffuser tucked up and out of the airflow ie the fin should be the lowest part of the diffuser.
Finished product = GLORY! Time: 30 minutes w/o rushing.

Last edited by dockt; 10-29-2009 at 11:15 PM.

The following users liked this post:
dustinN (01-26-2021)


Trending Topics
10-30-2009, 06:58 AM
#9
Member
Thread Starter
 10-31-2009, 05:07 AM
#14
Junior Member
Join Date: Jan 2009
Posts: 38
Likes: 0
Received 0 Likes
on
0 Posts
08 C63
10-31-2009, 12:07 PM
#16
Member
Thread Starter
07-06-2010, 09:03 PM
#17
Member

Join Date: Sep 2009
Location: Westchester, New York
Posts: 124
Likes: 0
Received 0 Likes
on
0 Posts
09 C63
I know this is an old thread but I am going to be changing my diffuser tomorrow and was wondering if there were any problems not using the bracket. Its just that the bracket connects in to spots and I want to make sure its done right and dosent rip off when i get up to higher speeds .
.
.
07-06-2010, 11:56 PM
#19
MBWorld Fanatic!

I know this is an old thread but I am going to be changing my diffuser tomorrow and was wondering if there were any problems not using the bracket. Its just that the bracket connects in to spots and I want to make sure its done right and dosent rip off when i get up to higher speeds.
.
07-07-2010, 08:51 AM
#20
Member
Thread Starter
Agree w/ above. The tabs along the bumper are tight and don't forget the little bolts on the corners. If you are concerned with the long bolts/nuts coming off, I guess you could use some Loctite. I've had no problems w/ the above method -- refer to the last paragraph in my DIY for reasons. Good luck!
07-07-2010, 11:11 AM
#21
Member
Join Date: Sep 2009
Location: Westchester, New York
Posts: 124
Likes: 0
Received 0 Likes
on
0 Posts
09 C63
Thanks guys for the help, I figured it would be fine since it says make sure that it's above the rest of the undercarriage. I just wanted to make sure before I did the install. I cant wait to get home and put it on.
 07-07-2010, 08:43 PM
#23
Member

Join Date: Sep 2009
Location: Buena Park, CA
Posts: 111
Likes: 0
Received 0 Likes
on
0 Posts
C63
THANK YOU for taking the time to A.) post clear photos that are in focus, B.) not use MS Paint to draw lines.
Best DIY I've seen in a very long time -- informative, clear and coherent. You just helped convince me to buy that same CF Diffuser.
Best DIY I've seen in a very long time -- informative, clear and coherent. You just helped convince me to buy that same CF Diffuser.
07-07-2010, 10:36 PM
#24
MBWorld Fanatic!
Join Date: Aug 2005
Location: Maryland
Posts: 1,308
Likes: 0
Received 1 Like
on
1 Post
2011 GLK350, 2010 ML350, 2008 C63 AMG
dockt - maybe i'll ask you to do mine if i end up getting a CF diffuser since you're in NOVA.
which CF diffuser did you get?
which CF diffuser did you get?
Last edited by gsrjc; 07-07-2010 at 10:45 PM.
07-08-2010, 07:31 AM
#25
Member
Thread Starter
Hey thanks! Your reason B was funny -- I just used whatever the pic hosting app offered (not really a "cloud" message person myself).


