


 Jun 9, 2015, 01:10 PM
Last edit by: IB Advertising
See related guides and technical advice from our community experts:
Browse all: Interior Guides
- Mercedes-Benz C-Class: How to Install Amplifier
Step by step instructions for do-it-yourself repairs
Browse all: Interior Guides

DIY: C63 external sub/amp installation

Thread Starter
Super Member


Joined: Nov 2013
Posts: 825
Likes: 114
From: Eufaula, Al/Georgetown, GA
W213 E63S Wagon, W204 C63 P30(RIP), WK1 Grand Cherokee SRT8(RIP)
DIY: C63 external sub/amp installation
I am new here to the AMG boards(coming from the Jeep SRT8 world) but I have always figured when you join a community start off by providing something beneficial. Little background, Director of a Court system in Georgia for the last 4yrs and I have owned/operated a custom car/stereo shop for around 20yrs so I’ve been around the audio block for a while now. I did lots of searching on multiple boards trying to find info on adding an external sub/amp combo to these cars and what I found was either very vague or outright inaccurate so I decided to take on the task as a DIY writeup for you guys to use as you see fit(installing an amp/sub in the C63 is VERY simple and should take no time at all).
This DIY will consist of 3 separate parts that all tie into the same issue:
Part 1 will be amp location/mounting the amp and where/how to tap into the factory subwoofer source signal
Part 2 will be installation of a TRUE bass knob(trust me, you will love this!!!)
Part 3 will be some very minor mods to the plastic pans under the trunk carpet that will allow you to install 12” subs WITHOUT losing every last inch of your trunk!!!
Part 1…the amp and hooking it up
(this will also apply if you are installing a self-contained sub system like an Infinity BassLink or the PowerBass Powered series)
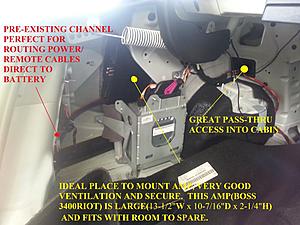
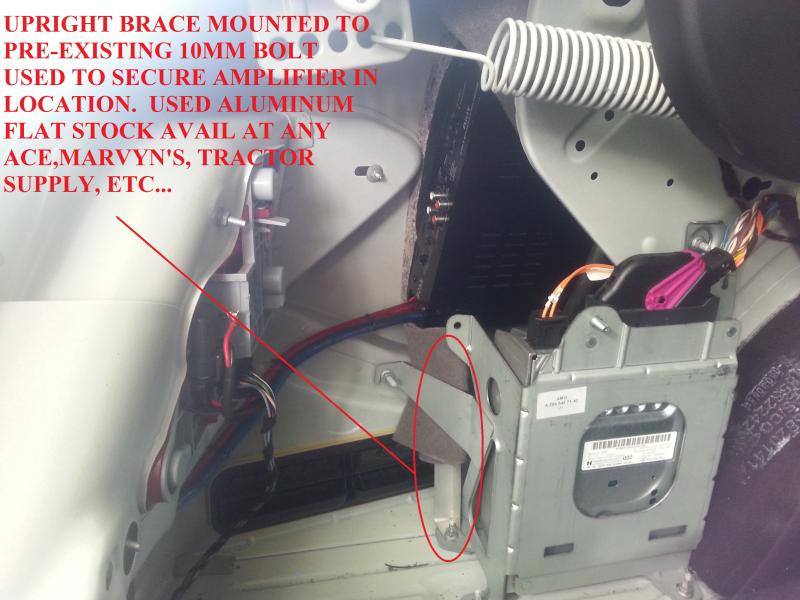
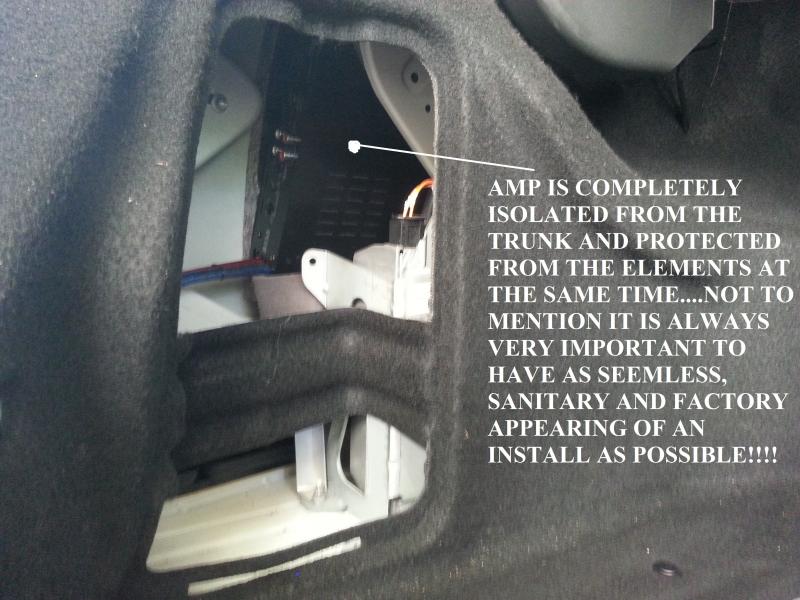
In the left rear of the trunk behind the carpet panel you will find room to mount most capable sub amps(no a JL 1000/1 will not fit but most decent sub amps should)….the amp I currently run is the Boss Riot 3400d…now I know that Boss used to be pawn shop audio but I promise you that this amplifier is ungodly strong and crystal clear. It puts out an honest 1990wrms@1ohm when fed 13v which is MORE than enough power for nearly any pair of subs you would care to install…and it’s $99 most places online!!!
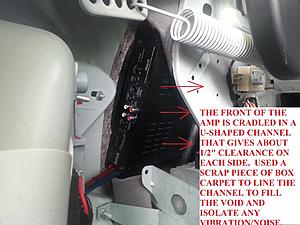
The front of this hidden compartment is sort of a U-shaped channel where the wheelwell arch comes through. This makes it ideal to slide the front of your amp into as it will cradle the amp but not block ventilation. Before you slide the front of the amp in you need to line this cubby hole with something like speaker box carpet or the like. The reason for doing this is 2 fold. A)it will help to create a snug fit for the amp to rest in and B) it will eliminate any possibility of noise or rattling the amp might make due to metal on metal contact.

To secure the amp I made a very simple brace out of some aluminum flat stock that mounts to a preexisting bolt in the floor and to the amp mount. This setup is very rigid and the amp should not have any ability to move or vibrate. Also, if you look at the amp you can see a 1” thick layer of Jute padding behind it. This is already there, I did not add it. This Jute also helps to secure the amp in place but take note that I mounted the amp with the bottom of amp facing in towards trunk….this is so that the amp can breathe!!! If mounted the other way the Jute would block the ventilation holes and the amp would possibly overheat.
[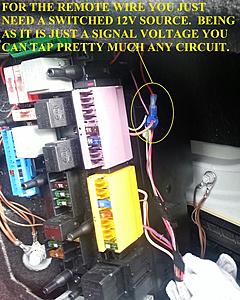
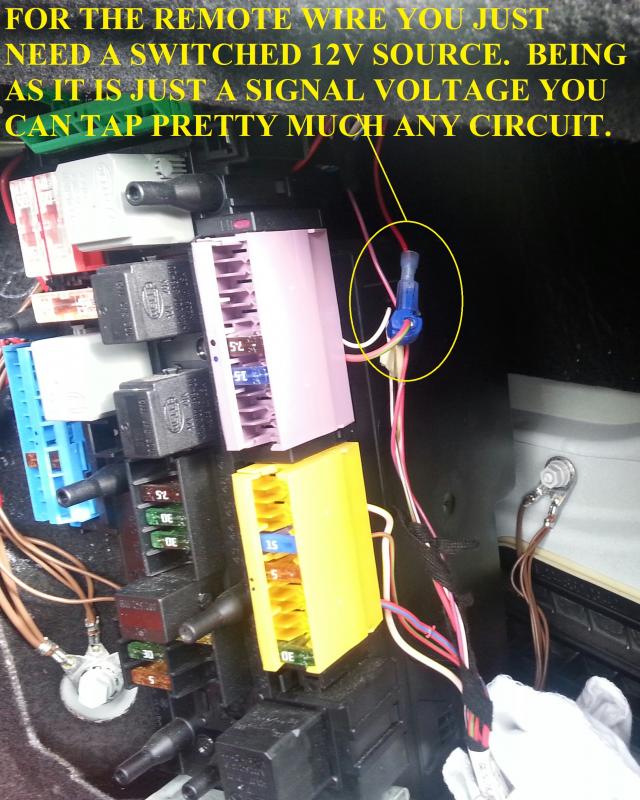
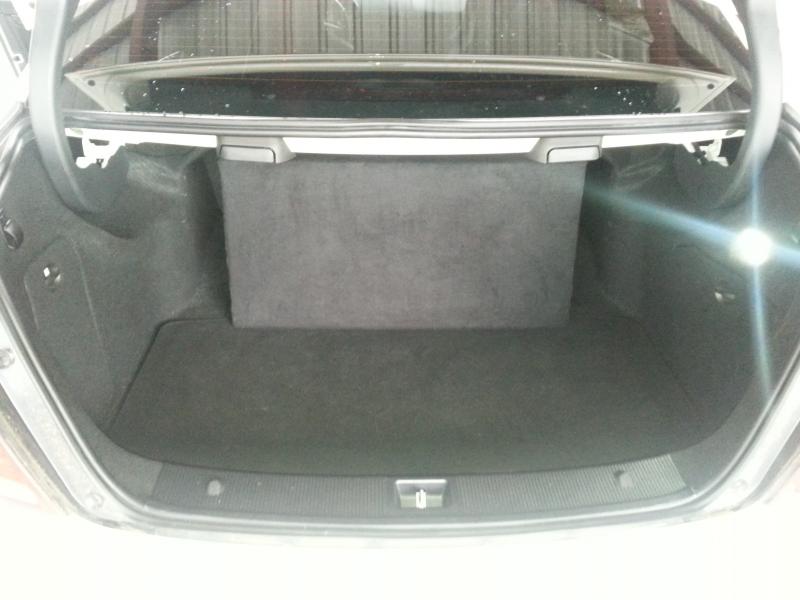
As you saw in the 1st picture there is a channel that runs across the rear of the trunk that is perfect for routing the Bat+/Bat- and Remote wires through in order to get them where they need to be. The +/- are self-explanatory but the Remote wire needs a brief explanation. The Remote wire does not actually “power” anything, it is just used as a signal for the amp to know when to turn on. Being that it doesn’t draw any current you can tap the Remote into any of the switched 12v sources in the rear fuse panel. The one you can see I just connected with a T-Tap but could have used an Add-A-Fuse just as well.
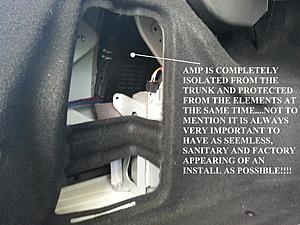
As you can see, once you get it installed everything looks just like it should…invisible!
Tapping into the factory subwoofer signal
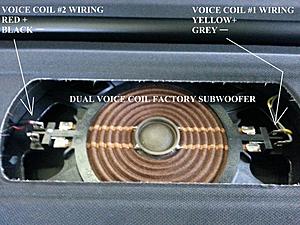
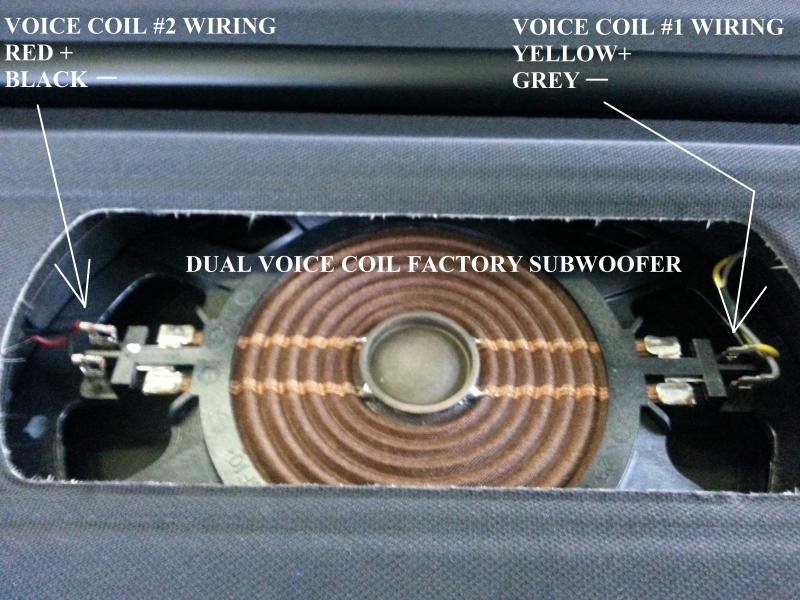
Above is a picture of the factory installed subwoofer underneath the mesh cover in the rear deck. As you can see it is a dual voice coil subwoofer, this is great for our purposes. What is not great is that people have been trying to get at these red/black and yellow/grey wires and can’t find them ANYWHERE!!! I even saw where one guy pulled the cover and actually soldered on wires to the sub itself to grab the signal…now, it worked and I applaud his effort but there must be an easier way, right?
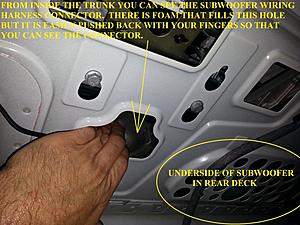
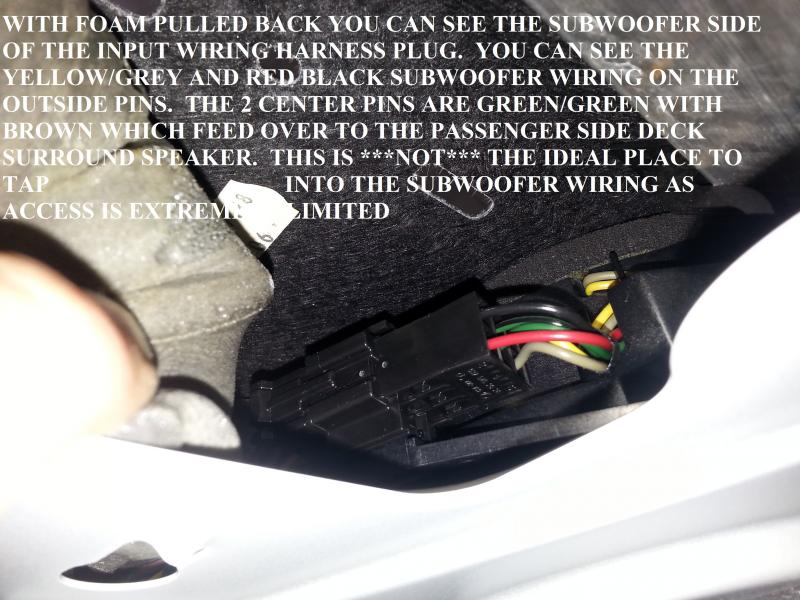
Looking up from inside the trunk you will see this odd shaped hole with some foam visible inside….take a flashlight and push the foam aside and guess what you find???
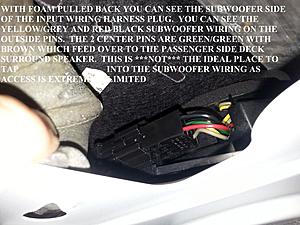
That’s right, there is our elusive red/black and yellow/grey subwoofer signals that we want SOOOOO BADLY…..problem is, there is ZERO room to get inside this cubby to tap them, but wait it gets better….
]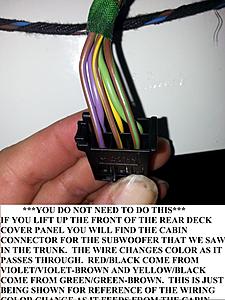
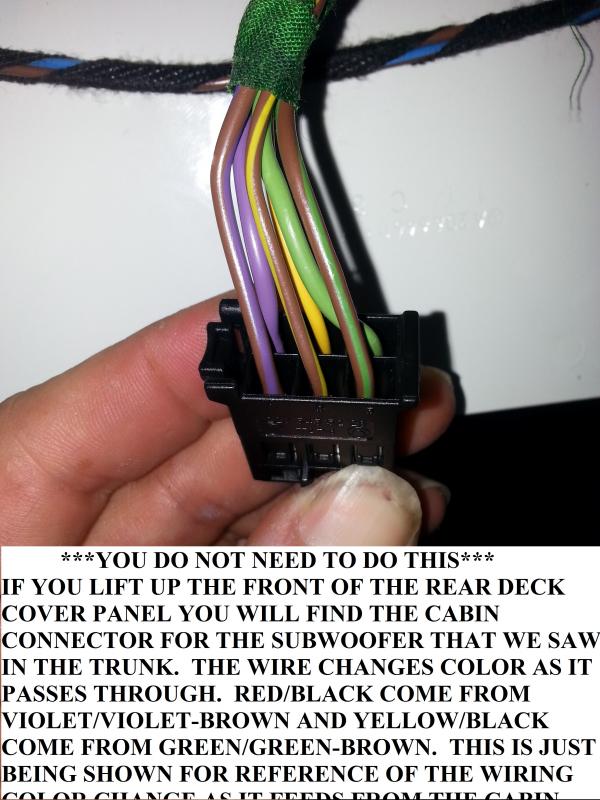
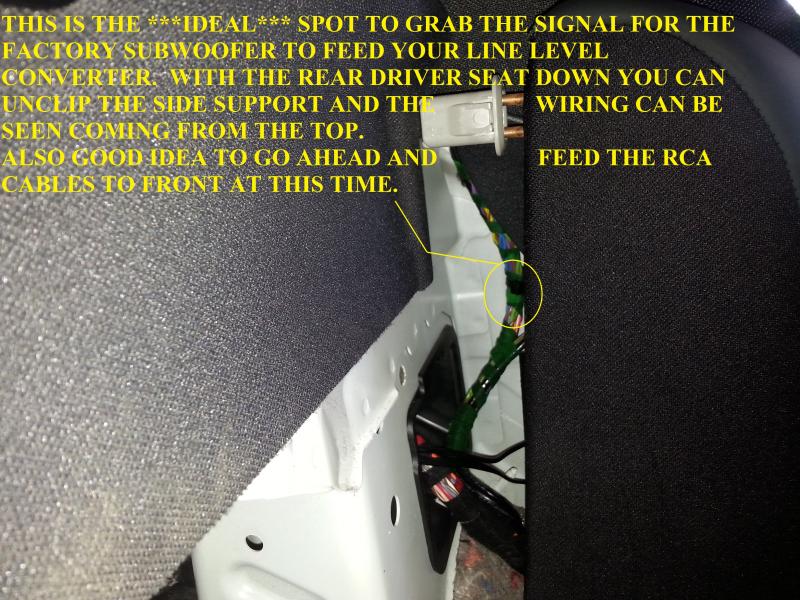
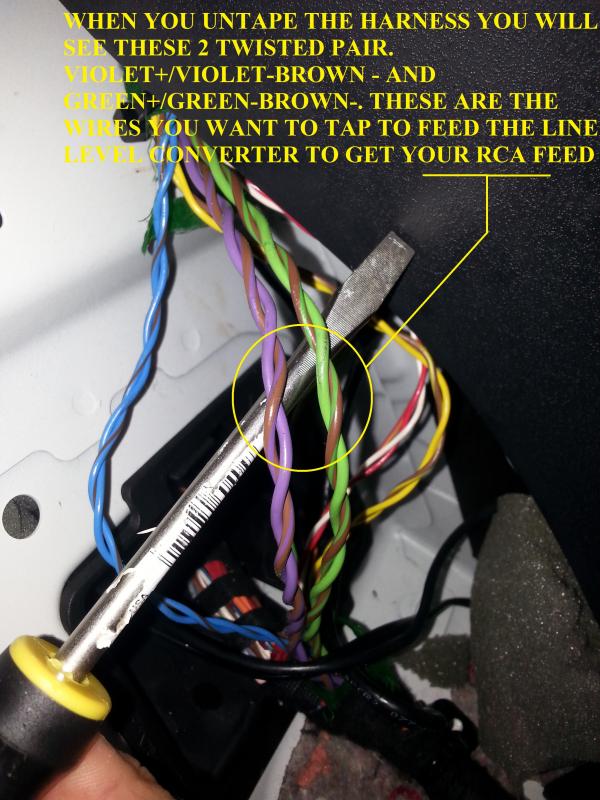
If you remove all the clips and go through the effort to do so you can lift the rear deck cover and find THIS…..this is the front of the plug that we could see from inside the trunk…notice anything different??? The red/black and yellow/grey subwoofer signal wires that we have been chasing are now violet/violet-brown and green/green-brown!!!! If you were to trace these wires over to the driver’s side support cushion you will find this…

Now that you have seen these wires, and that they can be accessed without doing ANYTHING other than popping loose the side support cushion it means that you DO NOT HAVE TO DO ANY OF THE ABOVE STEPS TO TAP INTO THE SUBWOOFER SIGNAL!!!!! Here they are, laid out in full glory, waiting for you to use them as you may!!!
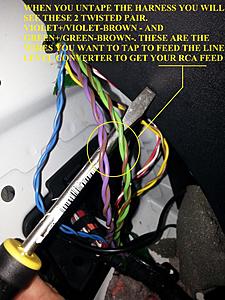
Once you take off the tape all you have to do is splice into them(I like the blue T-Taps because they are less invasive and keep you from completely cutting the wire) and run the new wiring to your Line Level Converter(the place where you will tap the subwoofer signal is actually right at the trunk wiring passthrough so you just have to pull the wires through it and on to your component)
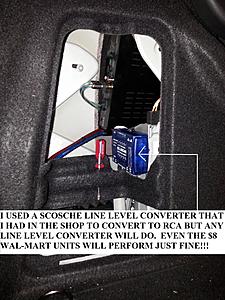
I used this Scosche Line Level Converter just because I had it already unboxed in the shop. I hear all the time about CleanSweeps and other expensive components but if you are JUST adding a sub channel and not trying to change the factory signal then even the cheapest of Wal-Mart LOCs will work just fine. If your amp has high level inputs then you technically don’t need a converter but in all honesty I think they have more clarity when the input signal is already reduced.
Well at this point you have got Bat+/Bat-, Remote and Subwoofer signal handled so you have all of the mandatory pieces of the puzzle in place and can now get your system playing with some bottom end!!! Wasn’t even that hard now was it?
This DIY will consist of 3 separate parts that all tie into the same issue:
Part 1 will be amp location/mounting the amp and where/how to tap into the factory subwoofer source signal
Part 2 will be installation of a TRUE bass knob(trust me, you will love this!!!)
Part 3 will be some very minor mods to the plastic pans under the trunk carpet that will allow you to install 12” subs WITHOUT losing every last inch of your trunk!!!
Part 1…the amp and hooking it up
(this will also apply if you are installing a self-contained sub system like an Infinity BassLink or the PowerBass Powered series)

In the left rear of the trunk behind the carpet panel you will find room to mount most capable sub amps(no a JL 1000/1 will not fit but most decent sub amps should)….the amp I currently run is the Boss Riot 3400d…now I know that Boss used to be pawn shop audio but I promise you that this amplifier is ungodly strong and crystal clear. It puts out an honest 1990wrms@1ohm when fed 13v which is MORE than enough power for nearly any pair of subs you would care to install…and it’s $99 most places online!!!

The front of this hidden compartment is sort of a U-shaped channel where the wheelwell arch comes through. This makes it ideal to slide the front of your amp into as it will cradle the amp but not block ventilation. Before you slide the front of the amp in you need to line this cubby hole with something like speaker box carpet or the like. The reason for doing this is 2 fold. A)it will help to create a snug fit for the amp to rest in and B) it will eliminate any possibility of noise or rattling the amp might make due to metal on metal contact.
To secure the amp I made a very simple brace out of some aluminum flat stock that mounts to a preexisting bolt in the floor and to the amp mount. This setup is very rigid and the amp should not have any ability to move or vibrate. Also, if you look at the amp you can see a 1” thick layer of Jute padding behind it. This is already there, I did not add it. This Jute also helps to secure the amp in place but take note that I mounted the amp with the bottom of amp facing in towards trunk….this is so that the amp can breathe!!! If mounted the other way the Jute would block the ventilation holes and the amp would possibly overheat.
[
As you saw in the 1st picture there is a channel that runs across the rear of the trunk that is perfect for routing the Bat+/Bat- and Remote wires through in order to get them where they need to be. The +/- are self-explanatory but the Remote wire needs a brief explanation. The Remote wire does not actually “power” anything, it is just used as a signal for the amp to know when to turn on. Being that it doesn’t draw any current you can tap the Remote into any of the switched 12v sources in the rear fuse panel. The one you can see I just connected with a T-Tap but could have used an Add-A-Fuse just as well.
As you can see, once you get it installed everything looks just like it should…invisible!
Tapping into the factory subwoofer signal
Above is a picture of the factory installed subwoofer underneath the mesh cover in the rear deck. As you can see it is a dual voice coil subwoofer, this is great for our purposes. What is not great is that people have been trying to get at these red/black and yellow/grey wires and can’t find them ANYWHERE!!! I even saw where one guy pulled the cover and actually soldered on wires to the sub itself to grab the signal…now, it worked and I applaud his effort but there must be an easier way, right?

Looking up from inside the trunk you will see this odd shaped hole with some foam visible inside….take a flashlight and push the foam aside and guess what you find???
That’s right, there is our elusive red/black and yellow/grey subwoofer signals that we want SOOOOO BADLY…..problem is, there is ZERO room to get inside this cubby to tap them, but wait it gets better….
]
If you remove all the clips and go through the effort to do so you can lift the rear deck cover and find THIS…..this is the front of the plug that we could see from inside the trunk…notice anything different??? The red/black and yellow/grey subwoofer signal wires that we have been chasing are now violet/violet-brown and green/green-brown!!!! If you were to trace these wires over to the driver’s side support cushion you will find this…
Now that you have seen these wires, and that they can be accessed without doing ANYTHING other than popping loose the side support cushion it means that you DO NOT HAVE TO DO ANY OF THE ABOVE STEPS TO TAP INTO THE SUBWOOFER SIGNAL!!!!! Here they are, laid out in full glory, waiting for you to use them as you may!!!
Once you take off the tape all you have to do is splice into them(I like the blue T-Taps because they are less invasive and keep you from completely cutting the wire) and run the new wiring to your Line Level Converter(the place where you will tap the subwoofer signal is actually right at the trunk wiring passthrough so you just have to pull the wires through it and on to your component)

I used this Scosche Line Level Converter just because I had it already unboxed in the shop. I hear all the time about CleanSweeps and other expensive components but if you are JUST adding a sub channel and not trying to change the factory signal then even the cheapest of Wal-Mart LOCs will work just fine. If your amp has high level inputs then you technically don’t need a converter but in all honesty I think they have more clarity when the input signal is already reduced.
Well at this point you have got Bat+/Bat-, Remote and Subwoofer signal handled so you have all of the mandatory pieces of the puzzle in place and can now get your system playing with some bottom end!!! Wasn’t even that hard now was it?
Last edited by jptaylor; Sep 8, 2014 at 07:58 PM.
Thread Starter
Super Member
Joined: Nov 2013
Posts: 825
Likes: 114
From: Eufaula, Al/Georgetown, GA
W213 E63S Wagon, W204 C63 P30(RIP), WK1 Grand Cherokee SRT8(RIP)
The vast majority of "bass kn0bs" that come with amps actually have the capability of creating damaging conditions for the amp/subs and the electrical system of your vehicle. By and large the "bass kn0bs" override the amps onboard gain/level adjustment and allow you to adjust the gain remotely. This is a problem!!! Ideally what you want to do is set up the amp for maximum, non-distorted performance for the system it's installed in and then leave it alone. Well, there is a way to do this and it's simple, inexpensive and looks great(who wants one of those bass know boxes screwed into the knee panel of their car anyway?)
http://www.onlinecarstereo.com/CarAu...s/PAC_LC-1.jpg
Meet the PAC LC-1
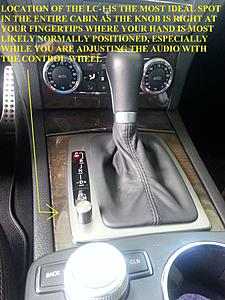
Here is how it is IDEAL for use as a TRUE bass kn0b. What this component does is mount IN-LINE with your RCA cables between your Line Level Converter and your amp. Once you get the setup installed you will turn the LC-1 to full volume and then go to the trunk and set the gain/level on your amp just as you would any other system. Once you get your amp set up for maximum performance, close up the access panel and walk away without fear. Why? Because what you have just done is set up the amp PERMANENTLY where it needs to be. Let's say you have the volume on the Radio at 75% and you REALLY want to feel the subs kick in so you crank the LC-1's knob to say 50%...unlike most other bass kn0bs where you would have just adjusted your amps output to 50% of its total, with the LC-1 you just increased the amps output to 50% of where you set it ON THE AMP ITSELF...all the LC-1 does is modulate the voltage flow through the RCA cables, nothing more. This means that no matter what you do to the LC-1's knob, you cannot achieve more output from the amp that what you have it set for on the amp itself. I use these in every system I build.

This picture is from the 1st DIY but it provides you with a visual of the ideal time/place to go ahead and route your RCA cables to the front. On a side note...there is a little bit of a cheat that you can use here to save you some time, space and money. Most of the amps used are going to be Mono sub amps, so why are we sending both channels to the amp? Well, we want both sided of the bass track but there is a way to cheat here. when you come out of the Line Level Converter use an RCA splitter, 2 males into 1 female(this puts both channels on the same RCA cable)...Route your RCA cable to the front but when you get to the LC-1 you will only plug the one RCA(the feed) into the LC-1's input...now plug the other RCA cable into the matching LC-1 output and return to the trunk...use another RCA splitter, 2male into 1female, and plug the return RCA cable into the splitter and then both males on the splitter into the L/R inputs on the amp...now you have gotten both channels from the LOC, through the LC-1 and back to the amp using only 1 RCA cable.....
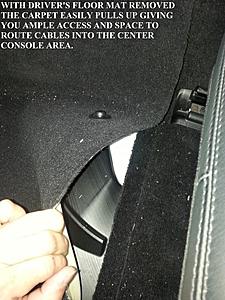
routing the cables from the rear under the door trim is a no brainer but fortunately for us our footwell carpet is a 2pc design, making this process easy as pie.
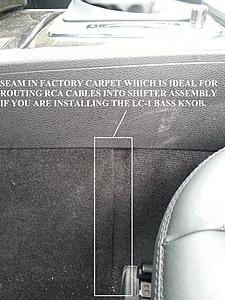
this is where the seam comes up under the center console/shifter plate assembly. The RCA cables will easily push inside of this seam and inside the shifter opening if guided from above. Not a problem.
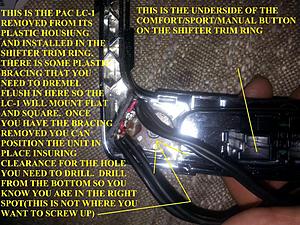
with the shifter trim piece in your hand you will see that there is room underneath for you to mount the LC-1...NOW, you will have to take the LC-1 out of its housing but it is NO BIG DEAL and takes about 10sec to accomplish. There is a little bit of plastic support that needs to be dremeled out so it can mount flush but again it takes about 1min and is not hard at all. When you get ready to drill the hole for the knob's post mark your hole and drill from the bottom, that way you can see that the LC-1 is clearing the sides of the trim piece.
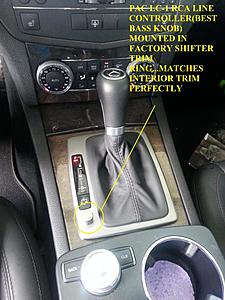
Put it back together and this is what you have...
It is transparent, it blends in with the factory controls and equipment and no one would ever know that M-B themselves didn't put it there!!!!
http://www.onlinecarstereo.com/CarAu...s/PAC_LC-1.jpg
Meet the PAC LC-1
Here is how it is IDEAL for use as a TRUE bass kn0b. What this component does is mount IN-LINE with your RCA cables between your Line Level Converter and your amp. Once you get the setup installed you will turn the LC-1 to full volume and then go to the trunk and set the gain/level on your amp just as you would any other system. Once you get your amp set up for maximum performance, close up the access panel and walk away without fear. Why? Because what you have just done is set up the amp PERMANENTLY where it needs to be. Let's say you have the volume on the Radio at 75% and you REALLY want to feel the subs kick in so you crank the LC-1's knob to say 50%...unlike most other bass kn0bs where you would have just adjusted your amps output to 50% of its total, with the LC-1 you just increased the amps output to 50% of where you set it ON THE AMP ITSELF...all the LC-1 does is modulate the voltage flow through the RCA cables, nothing more. This means that no matter what you do to the LC-1's knob, you cannot achieve more output from the amp that what you have it set for on the amp itself. I use these in every system I build.

This picture is from the 1st DIY but it provides you with a visual of the ideal time/place to go ahead and route your RCA cables to the front. On a side note...there is a little bit of a cheat that you can use here to save you some time, space and money. Most of the amps used are going to be Mono sub amps, so why are we sending both channels to the amp? Well, we want both sided of the bass track but there is a way to cheat here. when you come out of the Line Level Converter use an RCA splitter, 2 males into 1 female(this puts both channels on the same RCA cable)...Route your RCA cable to the front but when you get to the LC-1 you will only plug the one RCA(the feed) into the LC-1's input...now plug the other RCA cable into the matching LC-1 output and return to the trunk...use another RCA splitter, 2male into 1female, and plug the return RCA cable into the splitter and then both males on the splitter into the L/R inputs on the amp...now you have gotten both channels from the LOC, through the LC-1 and back to the amp using only 1 RCA cable.....

routing the cables from the rear under the door trim is a no brainer but fortunately for us our footwell carpet is a 2pc design, making this process easy as pie.

this is where the seam comes up under the center console/shifter plate assembly. The RCA cables will easily push inside of this seam and inside the shifter opening if guided from above. Not a problem.

with the shifter trim piece in your hand you will see that there is room underneath for you to mount the LC-1...NOW, you will have to take the LC-1 out of its housing but it is NO BIG DEAL and takes about 10sec to accomplish. There is a little bit of plastic support that needs to be dremeled out so it can mount flush but again it takes about 1min and is not hard at all. When you get ready to drill the hole for the knob's post mark your hole and drill from the bottom, that way you can see that the LC-1 is clearing the sides of the trim piece.

Put it back together and this is what you have...

It is transparent, it blends in with the factory controls and equipment and no one would ever know that M-B themselves didn't put it there!!!!
Last edited by jptaylor; Sep 8, 2014 at 08:36 PM.
Thread Starter
Super Member
Joined: Nov 2013
Posts: 825
Likes: 114
From: Eufaula, Al/Georgetown, GA
W213 E63S Wagon, W204 C63 P30(RIP), WK1 Grand Cherokee SRT8(RIP)
Part 3 Minor mods so you can fit 12s without losing your whole trunk
the way the trunk/passthrough area in our cars is made there is really no way to "fit" 12" subs without having to drop back into the trunk to fit the enclosure...the area between the floor and the underside of the rear deck is TOO NARROW to house 12s in an upright position..the clearance between the floor and the deck is only 13 1/2" which can't accommodate a 12" enclosure with an upright face...with just a few simple mods you can easily fit 12s in the passthrough thus saving ALL of your trunk space for, you know, stuff.
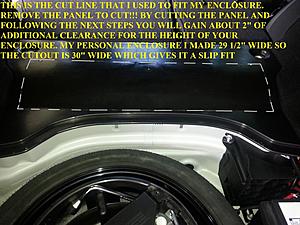
under the carpet you will find that there is a sloped plastic panel floor creating a "false bottom" to the front area of the trunk. By taking into consideration your end goals you can determine what width enclosure you will want to use. With this width figure in mind you can remove the top panel, mark the center line and cut out the width dimension of your enclosure plus 1/2".
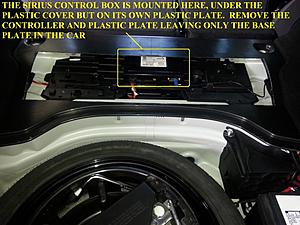
with the top cover removed you will find that the floor is actually 3 layers, the top cover, the middle layer, and the floor panel. The middle panel is the one visible here and is where the Sirius controller mounts.
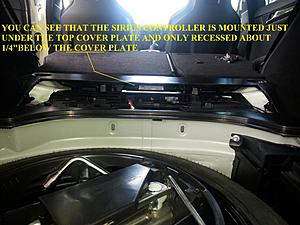
there is ZERO room between the Sirius controller and the top cover/false floor
here you can see that the Sirius controller is the only component even in the vicinity of this false floor setup.
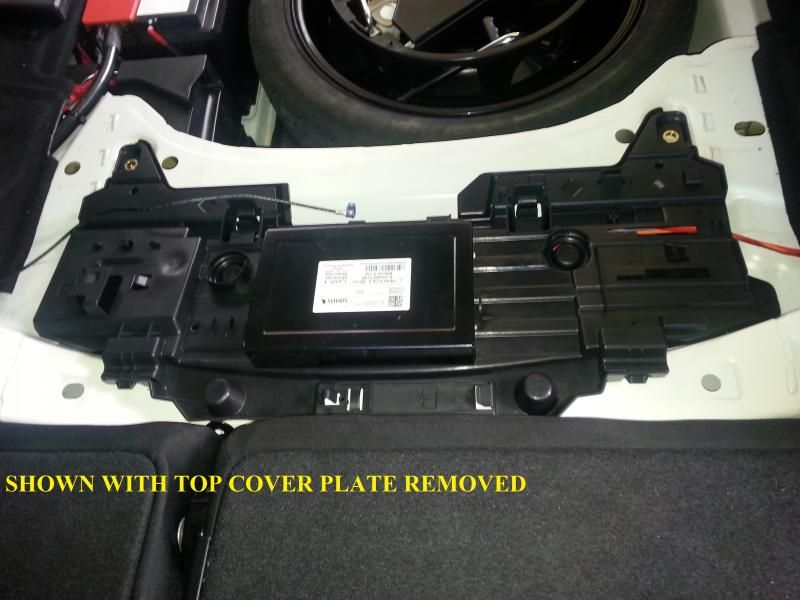
After unplugging the Sirius unit the middle panel pops out after depressing quick release tabs.
once the middle panel is out you will find that the Sirius controller is held in place by 3 10mm nuts attached to studs made into the bottom of the controller.
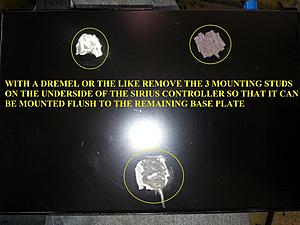
the 3 studs on the bottom of the controller are brass and very soft...dremel makes VERY quick work of them and they are gone and the bottom is flush!!! at this point apply a little double sided foam tape.
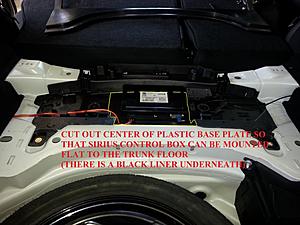
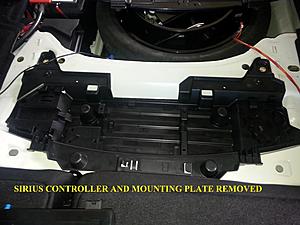
trim the area outlined in this pic and you will be able to still mount the bottom plate to the trunk floor pan and also have a place for the Sirius controller to mount to the trunk floor pan with the double sided tape.
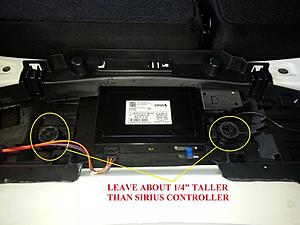
cut these two "towers" down but only until they are about 1/4" taller than the mounted Sirius controller, these "towers will ensure that nothing comes in contact with the controller.
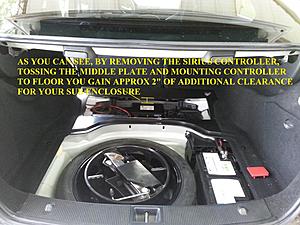
as you can see you now have an additional 2" of height clearance which is PLENTY of room to fit 12" subs in an upright, forward facing position...and JUST as importantly, now the enclosure can be located at least 10" forward of where was previously possible.

here is a front shot of the subs/enclosure with the seats down of course. The enclosure is 29 1/2"w x 15"H x 13"TD/17"BD. Subs are db Drive K5 12s and they sound amazing as this enclosure is about perfect for the space they are looking for. These subs have a LOT of excursion so the face of the box is back about 2" from where the seatbacks would contact the speaker surrounds when in the upright and locked position.

and here is the money shot for me. as you can see I have PLENTY of unobstructed, useable space left in the trunk and just as important is the fact that you CANNOT see ANY part of the additional equipment...it is 100% out of sight/out of mind and I can assure you that it sounds amazing. no matter what the audio volume is set at the LC-1 makes it a breeze to tune the bass to match the music.
Hope this helps some of you DIyers...enjoy guys
the way the trunk/passthrough area in our cars is made there is really no way to "fit" 12" subs without having to drop back into the trunk to fit the enclosure...the area between the floor and the underside of the rear deck is TOO NARROW to house 12s in an upright position..the clearance between the floor and the deck is only 13 1/2" which can't accommodate a 12" enclosure with an upright face...with just a few simple mods you can easily fit 12s in the passthrough thus saving ALL of your trunk space for, you know, stuff.
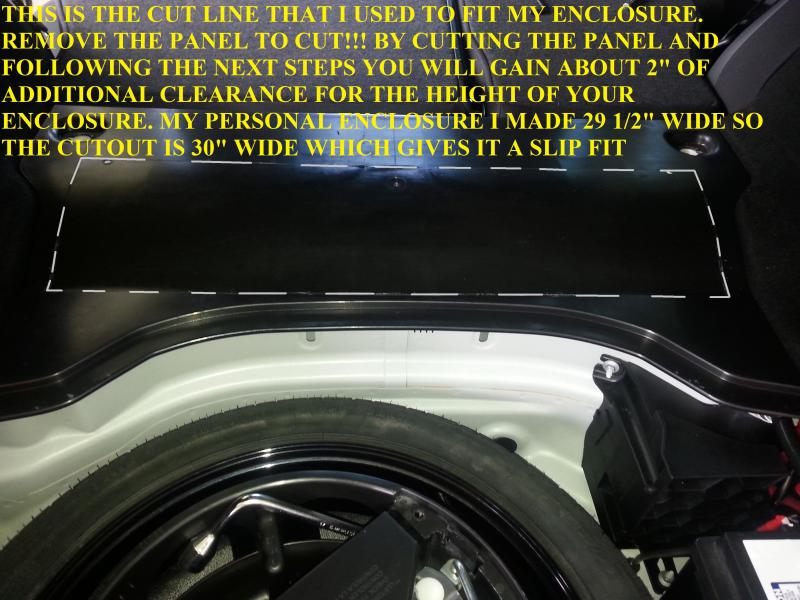
under the carpet you will find that there is a sloped plastic panel floor creating a "false bottom" to the front area of the trunk. By taking into consideration your end goals you can determine what width enclosure you will want to use. With this width figure in mind you can remove the top panel, mark the center line and cut out the width dimension of your enclosure plus 1/2".

with the top cover removed you will find that the floor is actually 3 layers, the top cover, the middle layer, and the floor panel. The middle panel is the one visible here and is where the Sirius controller mounts.

there is ZERO room between the Sirius controller and the top cover/false floor

here you can see that the Sirius controller is the only component even in the vicinity of this false floor setup.

After unplugging the Sirius unit the middle panel pops out after depressing quick release tabs.
once the middle panel is out you will find that the Sirius controller is held in place by 3 10mm nuts attached to studs made into the bottom of the controller.
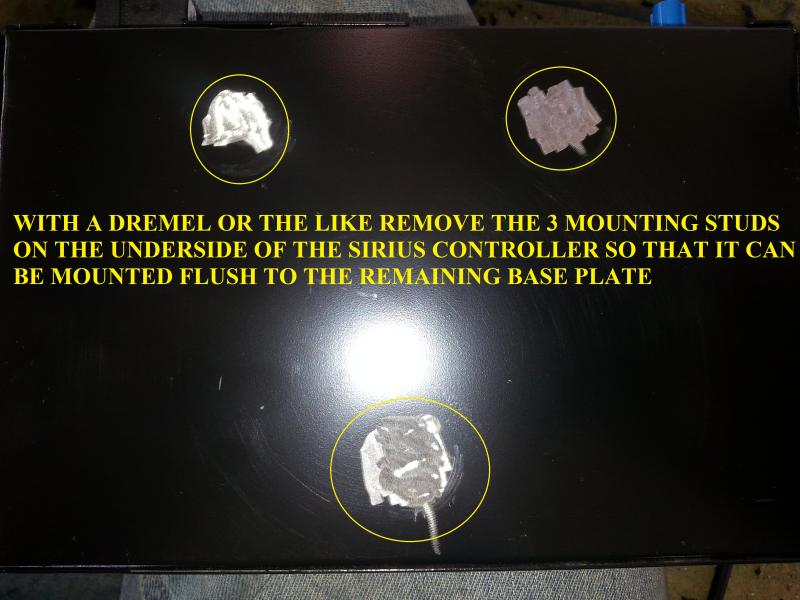
the 3 studs on the bottom of the controller are brass and very soft...dremel makes VERY quick work of them and they are gone and the bottom is flush!!! at this point apply a little double sided foam tape.

trim the area outlined in this pic and you will be able to still mount the bottom plate to the trunk floor pan and also have a place for the Sirius controller to mount to the trunk floor pan with the double sided tape.
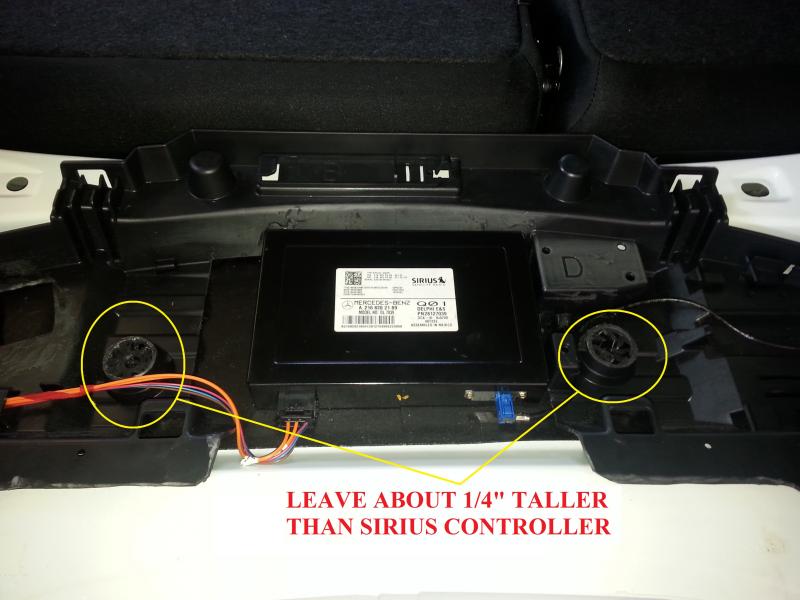
cut these two "towers" down but only until they are about 1/4" taller than the mounted Sirius controller, these "towers will ensure that nothing comes in contact with the controller.
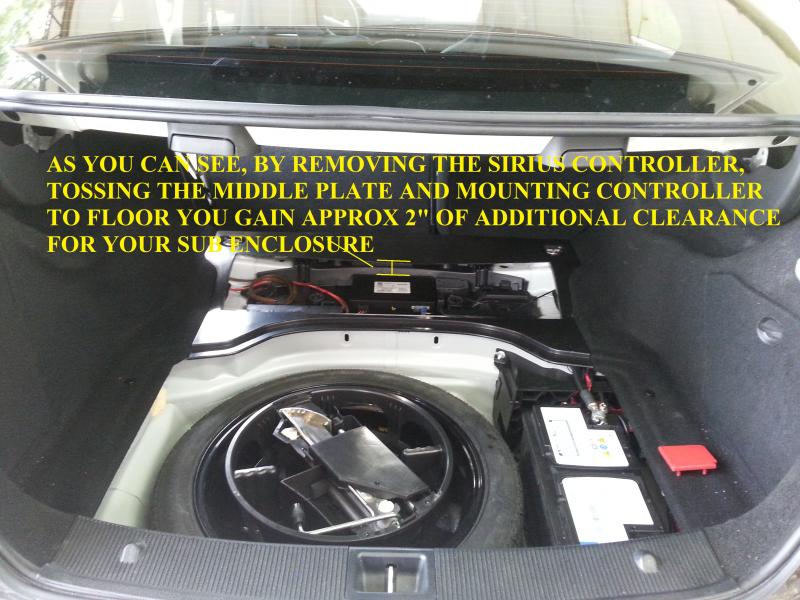
as you can see you now have an additional 2" of height clearance which is PLENTY of room to fit 12" subs in an upright, forward facing position...and JUST as importantly, now the enclosure can be located at least 10" forward of where was previously possible.

here is a front shot of the subs/enclosure with the seats down of course. The enclosure is 29 1/2"w x 15"H x 13"TD/17"BD. Subs are db Drive K5 12s and they sound amazing as this enclosure is about perfect for the space they are looking for. These subs have a LOT of excursion so the face of the box is back about 2" from where the seatbacks would contact the speaker surrounds when in the upright and locked position.
and here is the money shot for me. as you can see I have PLENTY of unobstructed, useable space left in the trunk and just as important is the fact that you CANNOT see ANY part of the additional equipment...it is 100% out of sight/out of mind and I can assure you that it sounds amazing. no matter what the audio volume is set at the LC-1 makes it a breeze to tune the bass to match the music.
Hope this helps some of you DIyers...enjoy guys
Last edited by jptaylor; Sep 8, 2014 at 09:22 PM.
Trending Topics
Thread Starter
Super Member
Joined: Nov 2013
Posts: 825
Likes: 114
From: Eufaula, Al/Georgetown, GA
W213 E63S Wagon, W204 C63 P30(RIP), WK1 Grand Cherokee SRT8(RIP)
You would be MUCH happier with the Focal unit if you can find it...and the Focal unit will fit nicely up inside the passthrough area
MB World Stories
The Best of Mercedes & AMG

Manual Mercedes? 6 Times Sindelfingen Let Drivers Have All The Fun
Verdad Gallardo
Mercedes SLR McLaren 722 S Is Extremely Rare Example Modified by McLaren
Verdad Gallardo
8 Classic Boxy Mercedes Designs That Have Aged Like Fine Wine
Verdad Gallardo
Flawlessly Restored Mercedes 190E Evo II Heads to Auction
Verdad Gallardo
Electric Mercedes C-Class Unveiled: 11 Things You Need to Know
Verdad Gallardo
Mercedes EQS Gets A Major Update: Everything You Need to Know
Verdad Gallardo
5 Underrated Mercedes-Benz Models That Don't Get the Love They Deserve
Verdad Gallardo
Mercedes 300D Has Pushed Well Past 1 Million Miles and It Ain't Stopping
Verdad Gallardo
10 Most Reliable Mercedes-Benz Models You Can Buy Used
Verdad Gallardo
Thread Starter
Super Member
Joined: Nov 2013
Posts: 825
Likes: 114
From: Eufaula, Al/Georgetown, GA
W213 E63S Wagon, W204 C63 P30(RIP), WK1 Grand Cherokee SRT8(RIP)
It was very enlightening to see you guys with the DIY genes....locally to me the mb, bmw, audi crowd will ONLY take their cars to a dealer, glad to see you guys ready to dive in.....that being said just glad I could help or encourage


