DIY W204 C63 Engine Mount Install by East Coast Euro
#1
Former Vendor of MBWorld
Thread Starter
DIY W204 C63 Engine Mount Install by East Coast Euro

We were asked by several people for instructions on how to install our new billet/poly engine mounts so we decided to put a DIY together. Whether you are replacing with OEM mounts or our mounts, this should help guide you through the process of installing new engine mounts on a W204 C63. Let us know if you have any questions!
Installing new engine mounts for W204 C63:
Disclaimer: Please consult a professional to complete this task if you do not feel comfortable undertaking it, as it does involve technical automotive experience. There are multiple ways to get this job done; we are providing one that works well for us. We are not responsible for any misuse or misunderstanding of this guide. It is just that: a guide, written as theoretical advice only.
Using a lift is highly recommended.
Step 1: Pop the hood and disconnect the battery (once the car is already on the lift or in the location where the work will be performed). This step prevents any accidental contact to live wires connected to the alternator and starter on the passenger side.
Step 2: Raise the car. Make sure the car is secure and use jack stands if attempting this job on the floor.
Step 3: Remove 8mm bolts that hold the three undertrays under the car. Refer to picture for bolt locations (circled in red).
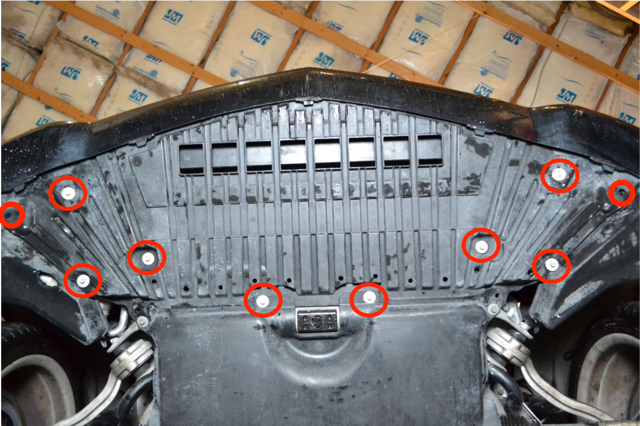
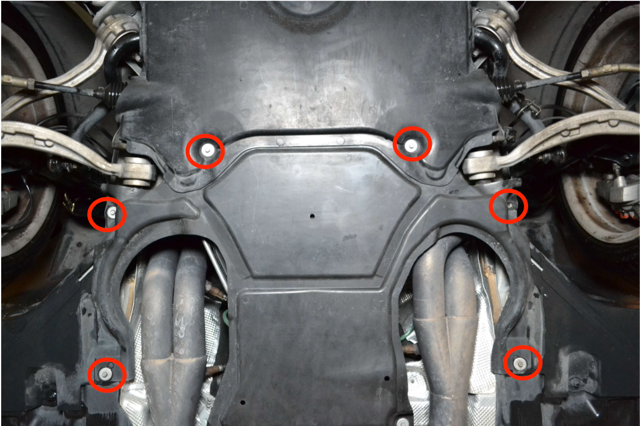
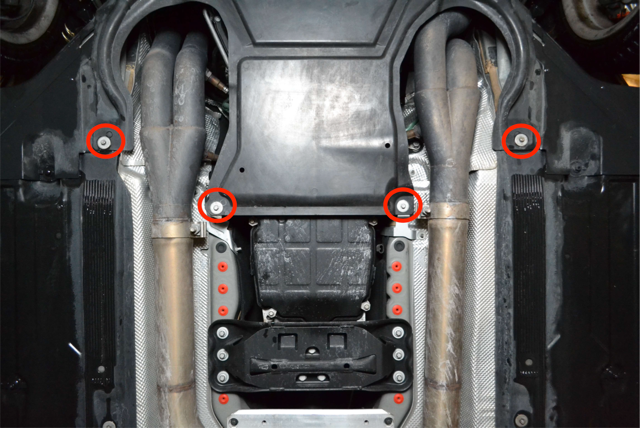
Step 4: Remove the two 13mm bolts (per mount) that hold the engine mounts in on the bottom.
Step 5: Unbolt the steering column with E12 socket (see pic below). Push the top portion of the column up towards the steering wheel until the two pieces separate. DO NOT turn the column (top or bottom) once they are separate and DO NOT pull the upper portion of the column down out of the steering wheel. Doing so may result in your steering wheel being misaligned when putting the car back together and you will have to re-align it to get your steering wheel straight.
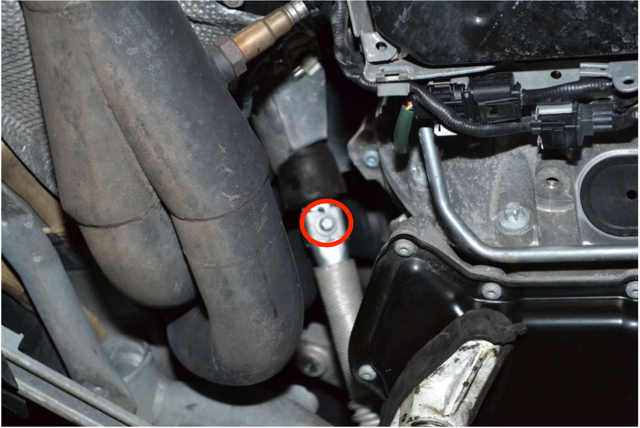
Step 6: Disconnect power steering rack connector located on driver’s side (pictured below) by pressing the tabs on the side and pulling away.
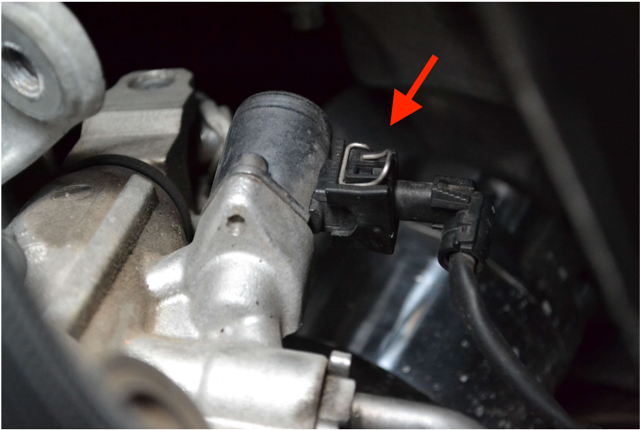
Step 7: Unbolt the power steering rack and remove the plate it sits on. It is held on with 18mm bolts and nuts. See pic below for locations of the bolts/nuts that need to be removed. Be careful when doing this – once the last nut and bolt are removed, the rack will drop some and the plate will be completely loose. Support the plate when removing the last nut/bolt so it does not fall onto the ground. This step allows for more room to remove the mounts. Another option is removing the exhaust, but we find the described method to be quicker.

Step 8: On top of the engine mounts there are 16mm bolts that must be removed. Remove the 16mm bolt from one side. The engine mount heat shield will be loose once the bolt is removed and you can then take the shield out as well.
Step 9: Now you can raise the side of the engine you are working on by using an adjustable jack stand (one you can raise the engine with) with a soft pad on top to prevent any damage. Raise the motor until you have enough clearance to pull the mount out. If you do not have enough room to raise the motor up for some reason, proceed to step 9a.
Step 9a: Remove the engine mount bracket from the engine by removing four E12 bolts that secure it to the engine block (two are shown in pic and two are above where red circles are). THE ENGINE MUST BE SUPPORTED WHEN YOU DO THIS. This will allow for plenty of room to remove the mount.
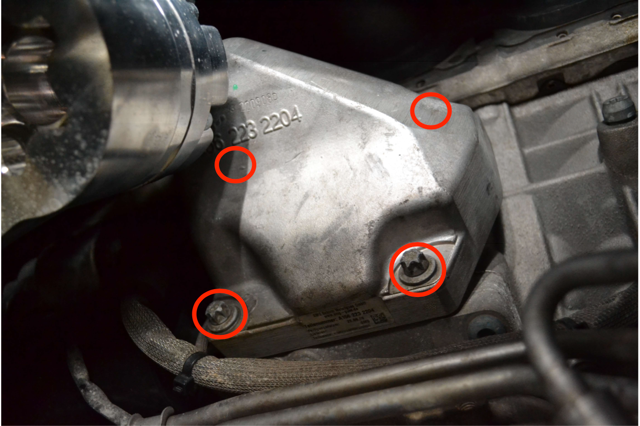
Step 10: Put new mount in by placing the locating tabs on the bottom of the mount into the recesses in the sub-frame. If installing ECE billet/poly engine mounts you will notice that the locating tabs are shorter to make for an easier install. The overall mount is also 10mm shorter in height which provides a lower center of gravity, more clearance for the exhaust under the body, and easier install. Then slowly let the engine down making sure the pin on top of the mount aligns with the recess in the engine mount bracket arm. Place the heat shield back above the engine mount bracket and put the top 16mm bolt back in. Sometimes it is easier to get the bolt on the top started before letting the engine all the way down. Once the engine is down off the stand, install the two lower 13mm bolts.
Step 11: Repeat steps 8-10 on the other side.
Step 12: Place power steering rack back into its location and reinstall the plate on bottom with the 18mm bolts/nuts. Reconnect power steering connector.
Step 13: Slide the top steering column piece down into the bottom piece of the steering column. These two pieces have to be aligned for them to slide in. Once the bolt hole is lined up, install the E12 bolt that was removed.
Step 14: Reinstall the undertray panels with the 8mm bolts that were removed.
Step 15: Let the car back down once everything is cleared from under the car and reconnect the battery.
Step 16: Enjoy your new engine mounts!
The following 13 users liked this post by East Coast Euro:
AbsoluteGr8est (01-11-2020),
AMG3.2 (06-03-2018),
BLKROKT (04-06-2018),
Celicasaur (02-25-2018),
doncmleon (06-30-2020),
and 8 others liked this post.
The following users liked this post:
AbsoluteGr8est (01-11-2020)
#4
MBWorld Fanatic!
Join Date: Jun 2008
Location: Los Angeles
Posts: 8,053
Received 2,827 Likes
on
1,670 Posts
2012 P31 C63 Coupe Trackrat, 2019 GLE63S Coupe Beast
What’s the best point for jacking/supporting the engine?
#5
Former Vendor of MBWorld
Thread Starter
You're welcome!
Don't have a good pic handy but the black pan towards the back. Place jack with something soft (ours has soft rubber on the end) on one side. Then when done working on that side move it to the other.
Trending Topics
#9
Junior Member
Quick question, about how many miles do most w204s swap motor mounts. Im at about 60k on my c63 and i think mine are just about ready to be swapped after feeling light taps on my brake pedal
#10
MBWorld Fanatic!
Mine lasted 70k. Kind of depends on driving conditions and use. Harder use and bumpier roads wear them out more
#11
Former Vendor of MBWorld
Thread Starter
It's very dependant on driving style and power level. Many people don't realize their mounts are bad until they are completely broken into two pieces.
#12
MBWorld Fanatic!
Step 9: Now you can raise the side of the engine you are working on by using an adjustable jack stand (one you can raise the engine with) with a soft pad on top to prevent any damage. Raise the motor until you have enough clearance to pull the mount out. If you do not have enough room to raise the motor up for some reason, proceed to step 9a.
#13
Super Member
That's the way I did it. Plank of wood + jack on the oil pan, no issues
My mounts were showing signs of wear around 100k and fully gave out a few thousand km more at the track one day. Passenger side mount tore open and then collapsed
So far I've put about 30,000 hard km on these ECE mounts and they're still going strong
My mounts were showing signs of wear around 100k and fully gave out a few thousand km more at the track one day. Passenger side mount tore open and then collapsed
So far I've put about 30,000 hard km on these ECE mounts and they're still going strong
#14
Former Vendor of MBWorld
Thread Starter
Yes with something soft like a plank of wood.
Exactly 👍
Excellent! Continue to enjoy them and let us know if we can help with anything.
That's the way I did it. Plank of wood + jack on the oil pan, no issues
My mounts were showing signs of wear around 100k and fully gave out a few thousand km more at the track one day. Passenger side mount tore open and then collapsed
So far I've put about 30,000 hard km on these ECE mounts and they're still going strong
My mounts were showing signs of wear around 100k and fully gave out a few thousand km more at the track one day. Passenger side mount tore open and then collapsed
So far I've put about 30,000 hard km on these ECE mounts and they're still going strong
Excellent! Continue to enjoy them and let us know if we can help with anything.
#15
MBWorld Fanatic!
That's the way I did it. Plank of wood + jack on the oil pan, no issues
My mounts were showing signs of wear around 100k and fully gave out a few thousand km more at the track one day. Passenger side mount tore open and then collapsed
So far I've put about 30,000 hard km on these ECE mounts and they're still going strong
My mounts were showing signs of wear around 100k and fully gave out a few thousand km more at the track one day. Passenger side mount tore open and then collapsed
So far I've put about 30,000 hard km on these ECE mounts and they're still going strong

145k km on mine with some ECE mounts on the way. Vibrations started a couple months back (left turns under load), figured I could leave it til spring. Yeah...nope, keeps getting worse lol.
#16
Junior Member
I'm getting ready to do this job this weekend. I've read a few of the DIY for this but it's not clear to me if you reach the 16mm bolts from the underside of the engine reaching up or get to them from the topside reaching down. I looked in the engine bay earlier and it looked like a tight fit from the top, not even sure I could get my hands down to the driver's side one. Thanks in advance for any recommendations. I have the "special" tool and a 16mm stubby ratcheting wrench inbound so should have everything I need. local indy wanted $1500 to do this which is nuts.
Marco
Marco
#17
Senior Member
Join Date: Aug 2014
Location: SoCal - OC
Posts: 266
Received 35 Likes
on
25 Posts
2004 CL55, 2003 SL55 and 2009 G55
I'm getting ready to do this job this weekend. I've read a few of the DIY for this but it's not clear to me if you reach the 16mm bolts from the underside of the engine reaching up or get to them from the topside reaching down. I looked in the engine bay earlier and it looked like a tight fit from the top, not even sure I could get my hands down to the driver's side one. Thanks in advance for any recommendations. I have the "special" tool and a 16mm stubby ratcheting wrench inbound so should have everything I need. local indy wanted $1500 to do this which is nuts.
Marco
Marco
Take your time it should take you under 4 hours using floor jack ramps in my garage. Second time around I did in under 3 that’s getting tools ready, removing things to prep, work, reinstalling parts and clean up.
Try and have fun with it.
Mick
The following users liked this post:
glhansenjr (11-04-2020)
#18
Former Vendor of MBWorld
Thread Starter
I'm getting ready to do this job this weekend. I've read a few of the DIY for this but it's not clear to me if you reach the 16mm bolts from the underside of the engine reaching up or get to them from the topside reaching down. I looked in the engine bay earlier and it looked like a tight fit from the top, not even sure I could get my hands down to the driver's side one. Thanks in advance for any recommendations. I have the "special" tool and a 16mm stubby ratcheting wrench inbound so should have everything I need. local indy wanted $1500 to do this which is nuts.
Marco
Marco
It can be done from the top or the bottom. The top allows you to get a ratchet onto the special tool with extensions. The bottom you can just use the special tool and turn it (this requires more arm strength or a pry bar and a block of wood). Both get the job done, it's more of a preference thing.
#19
Super Member
Join Date: Mar 2019
Location: Bondi Beach , Australia
Posts: 514
Received 125 Likes
on
111 Posts
2013 W204 C63 AMG P31 Estate wagon
Hi Marco,
It can be done from the top or the bottom. The top allows you to get a ratchet onto the special tool with extensions. The bottom you can just use the special tool and turn it (this requires more arm strength or a pry bar and a block of wood). Both get the job done, it's more of a preference thing.
It can be done from the top or the bottom. The top allows you to get a ratchet onto the special tool with extensions. The bottom you can just use the special tool and turn it (this requires more arm strength or a pry bar and a block of wood). Both get the job done, it's more of a preference thing.
Pic would be nice.
Most probably be looking to do mine within the next year.
Thanks.
#20
Former Vendor of MBWorld
Thread Starter
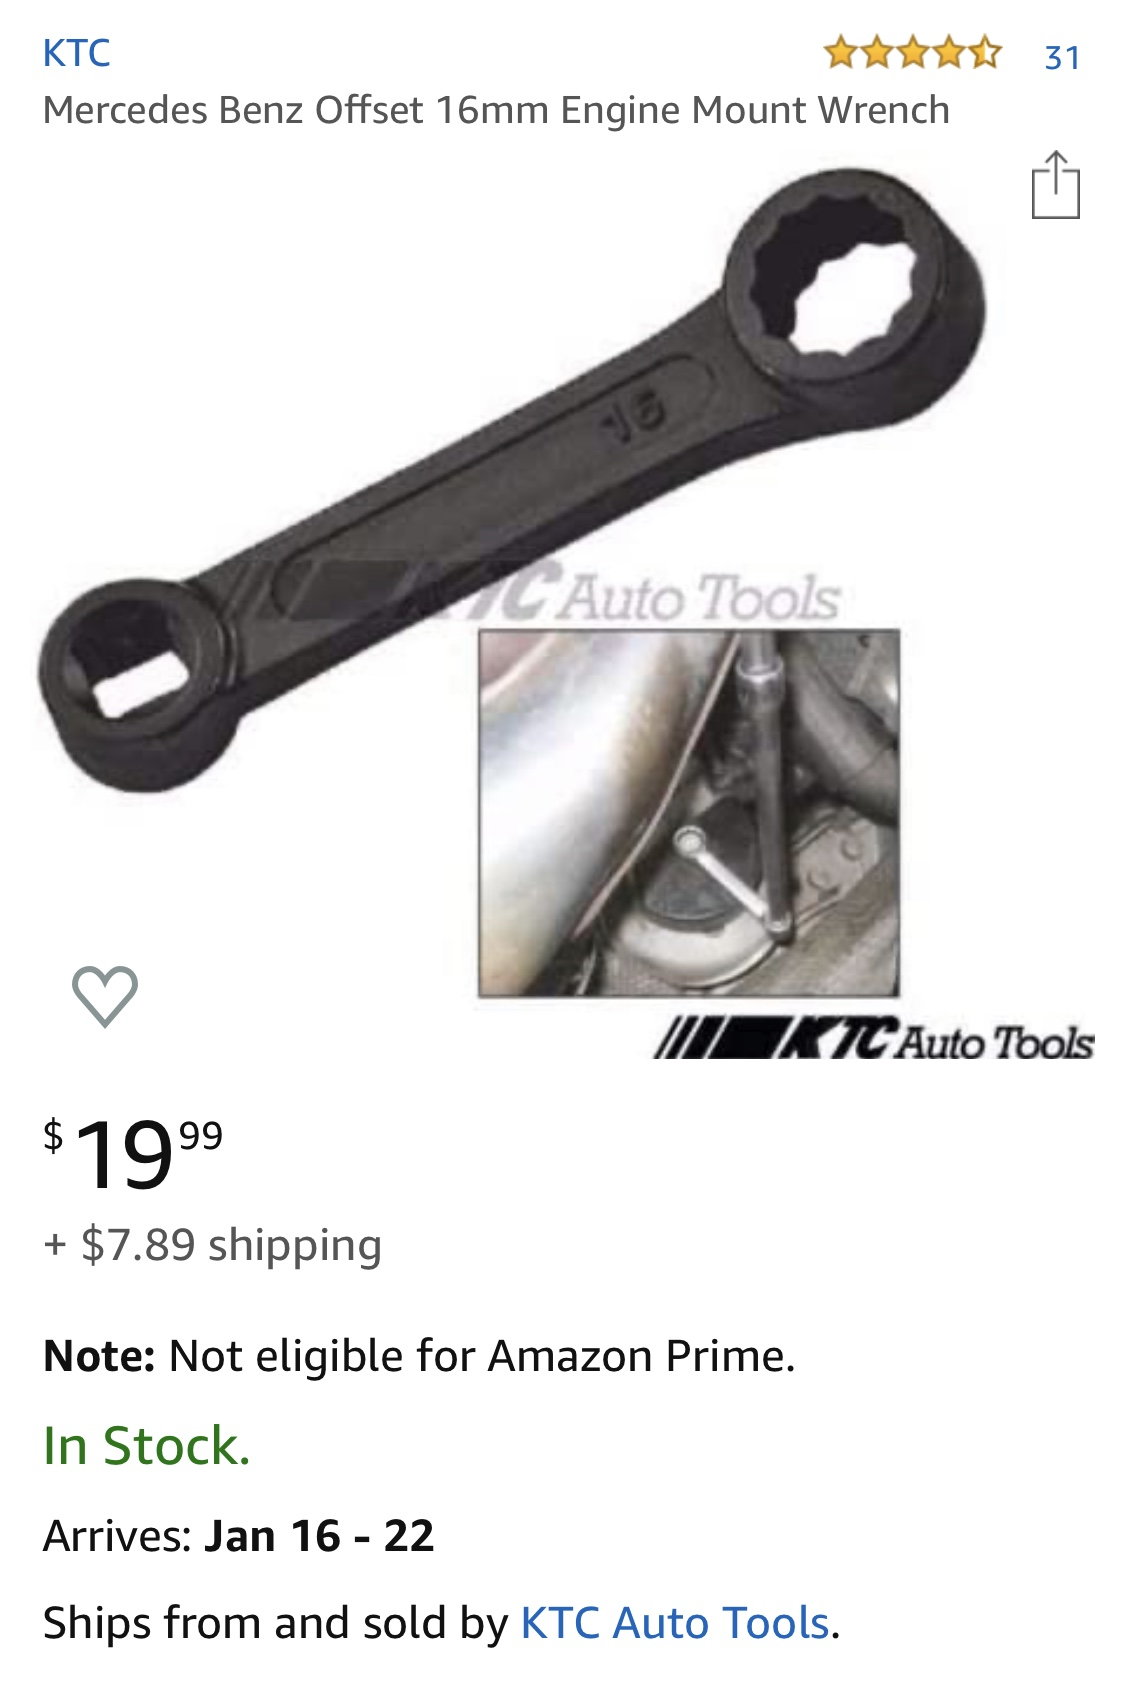
There is an offset short 16mm torque adapter. It is used for the top bolt on the engine mounts. A short 16mm wrench also works but the offset of the specialty tool makes it seat on the bolt better and allows the use of a ratchet as well.
#21
MBWorld Fanatic!
Join Date: Jun 2008
Location: Los Angeles
Posts: 8,053
Received 2,827 Likes
on
1,670 Posts
2012 P31 C63 Coupe Trackrat, 2019 GLE63S Coupe Beast
The following 3 users liked this post by BLKROKT:
The following users liked this post:
BLKROKT (11-04-2020)
#24
Member
Great post. What kind of jack did you use to support the engine?
Also, torque specs or snug?
Also, torque specs or snug?
Last edited by glhansenjr; 05-25-2020 at 02:51 AM.
#25
I just did this job on my car. This was a very difficult job for me. I’ve done a pretty good amount of work on cars and this was the toughest. There is just no room to work. The connector that gets unplugged from the steering rack was so frozen I pulled the male end straight out of the solenoid along with the female end. The 18mm bolts were so tight I had to buy a brand new impact wrench to get them off. I finished the job but I will never attempt it again. I usually like to try things once myself before I pay someone else to do it but had I known I woulda let the shop do it. All that being said I did successfully complete it thanks to this DIY.
The following users liked this post:
Snowhite63 (06-28-2020)


