When you click on links to various merchants on this site and make a purchase, this can result in this site earning a commission. Affiliate programs and affiliations include, but are not limited to, the eBay Partner Network.
My 2021 CLA250 didn't come with an illuminated star. I saw a few other cars with it and liked the way it looked, so I decided to buy the parts and install it myself. I bought them from a MB dealer on eBay. It was sold as a kit for the W177 A220, but the same part numbers are used for the C118 CLA250. The kit includes the illuminated star, and a wiring harness:
C118 W177 Illuminated Star Kit
Part Numbers:
Illuminated Star: A1778174000
Wiring Harness: A2478206903
Preparation:
The illuminated star comes in two pieces and has to be assembled. It only goes together one way - match up the tabs and snap them together. While the wiring harness has a crimped contact on the positive red wire, I could not figure out how to insert it into the fuse block. It looks different from the other fuse contacts that are already in place. Instead of messing with it, I cut off the contact and bought an Add-a-Circuit with mini fuse holder, which worked just fine. The wiring harness also comes with a 5-amp mini fuse, which I used. This was the only adjustment I made, everything else went fairly smoothly.
Removing the existing star
Looking at the illuminated star, it's obvious that it is rotated clockwise to lock in place, and thus removing it should be rotated counter-clockwise. However, the locking mechanism needs to be released by pressing in two tabs in the back, which is impossible to access without removing the whole bumper. Taking a leap of faith, I used a plastic spudger made for opening cellphone cases to push into the seam along the bottom edge of the existing star and it popped loose the clips there. I just had to carefully work my way around the star until all the clips popped free. Remember to wipe down the star and surrounding area so as to minimize scratches from dirt/sand.
Removing existing star
Loosening the bumper
There may be other ways to fish the wire, but this made it easier for me. Remove the seven torx screws holding down the black plastic flap part of the bumper, and the two 10mm screws holding the bumper to the front quarter panels. Put some blue tape on the quarter panel edge to avoid scratching while the bumper is loose:
Fishing the wire
This wasn't obvious to me at first, but I saw that the existing cable for the adaptive cruise radar module goes upwards so I figured that's where the wiring harness for the illuminated star must go as well. Using a snake-cam, I saw that there is an opening for running wires just above the opening for the star. I ran the snake cam up this opening and tilted it to the driver's side and eventually, it emerged from the gap revealed by loosening the black plastic flaps of the bumper. I then taped the wiring harness to my snake-cam and pull it back through. After that, I laid the wiring harness under the black plastic flaps, roughly along the line indicated in the picture below. I think originally, the cable is supposed to be run alongside the hood release cable because the harness kit came with wire clips that seem to have been designed for this. However, I find that hiding it under the black plastic flap looks cleaner.
Electrical connections
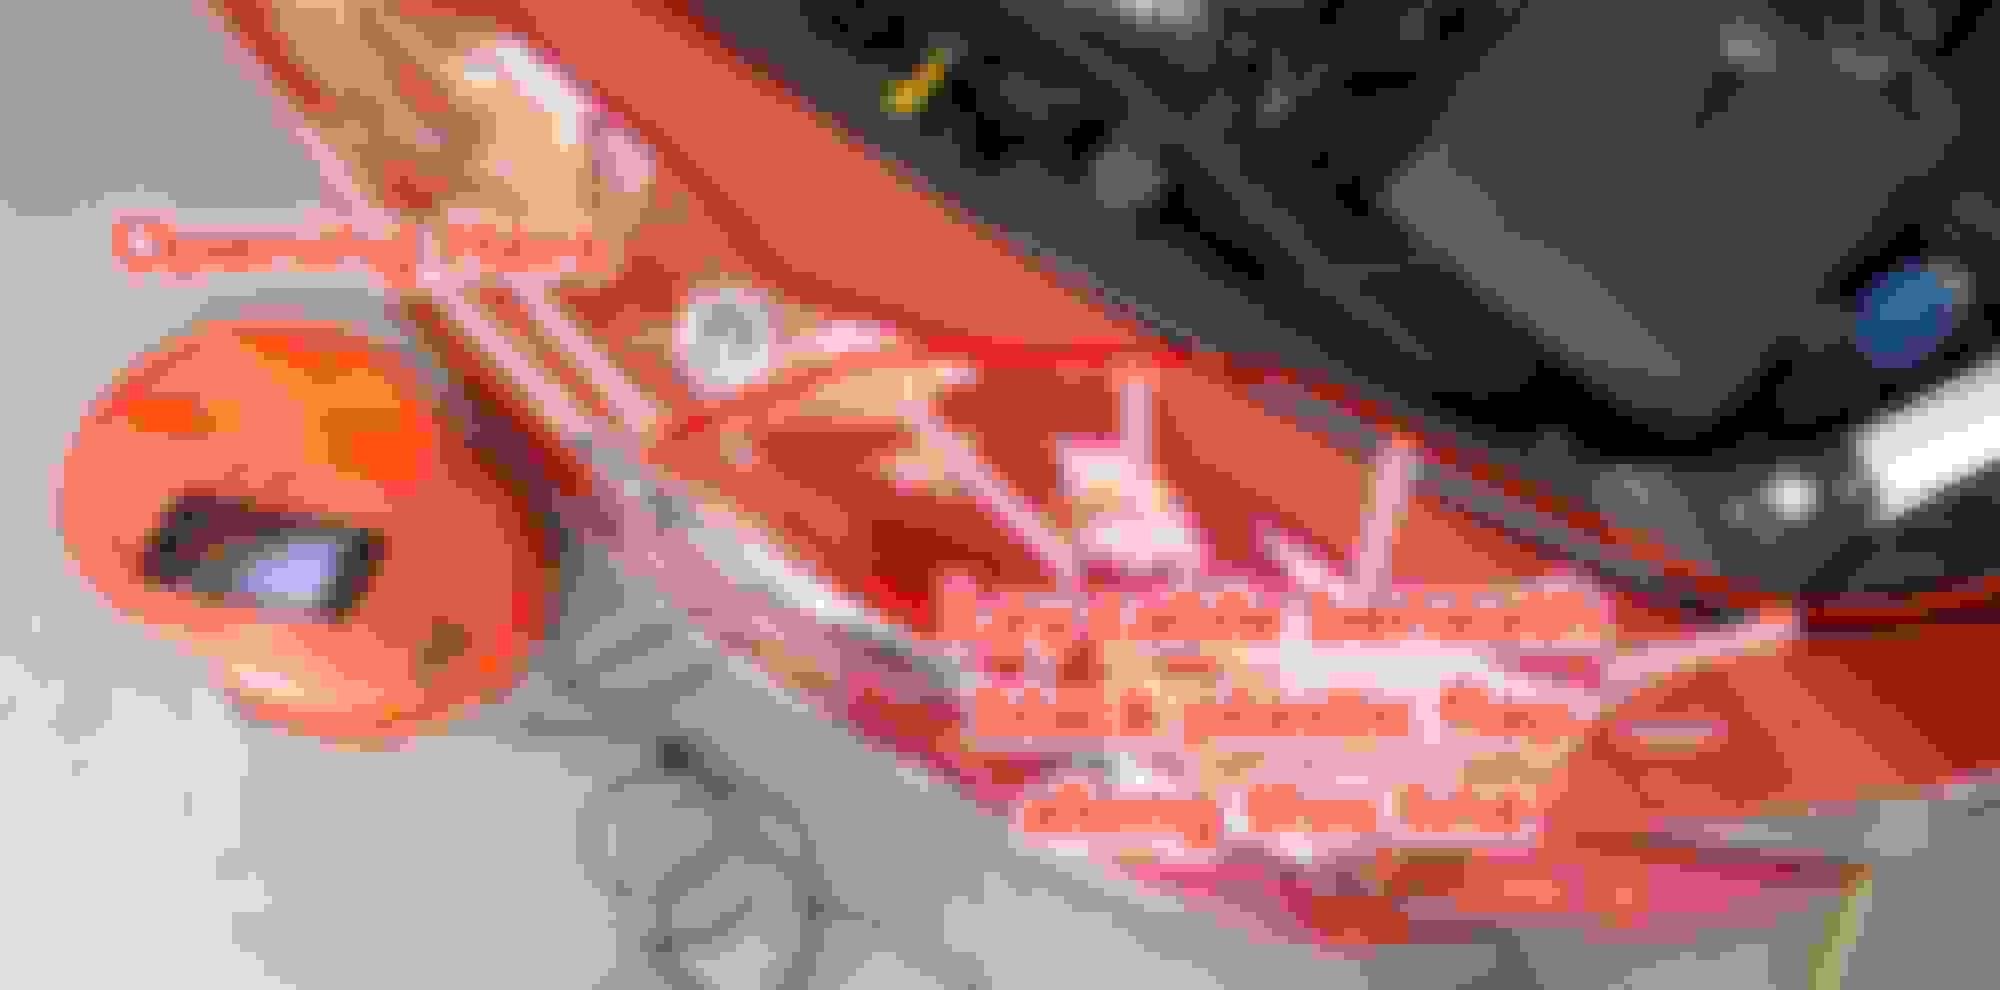
The illuminated star is supposed to turn on whenever the car is running, and fuse location 67 fits that purpose and was blank in my car. I was drawn to it immediately because it's a mini sized fuse location, matching the 5-amp mini sized fuse supplied with the wiring harness. Again, the wiring harness has a fuse holder contact crimped on, but it's very difficult to try and maneuver it to insert it into the bottom of the fuse block at position 67. Also, I looked at the other fuse holder contacts already installed and they looked different from this one. Instead of trying to mess with it, I just cut it off and crimped on a mini Add-a-Circuit fuse holder and plugged it into position 67. The wiring harness comes with a grommet, and I guess you are supposed to drill a hole (roughly 1/2 inch?) on the fuse box, feed the red wire though, and push the grommet in place. I didn't do that. Instead, I fed the red wire through an existing small drain hole on the bottom of the fuse box and then crimped on the Add-a-Circuit. The black ground wire was routed around the side of the fuse box towards the back where I bolted it to an existing nut that threads onto a metal stud from the strut tower. I see other installs where they put the ground cable on the jumper cable clamp point next to the fuse box, but I feel that my location is superior and is much neater.
Mounting the illuminated star
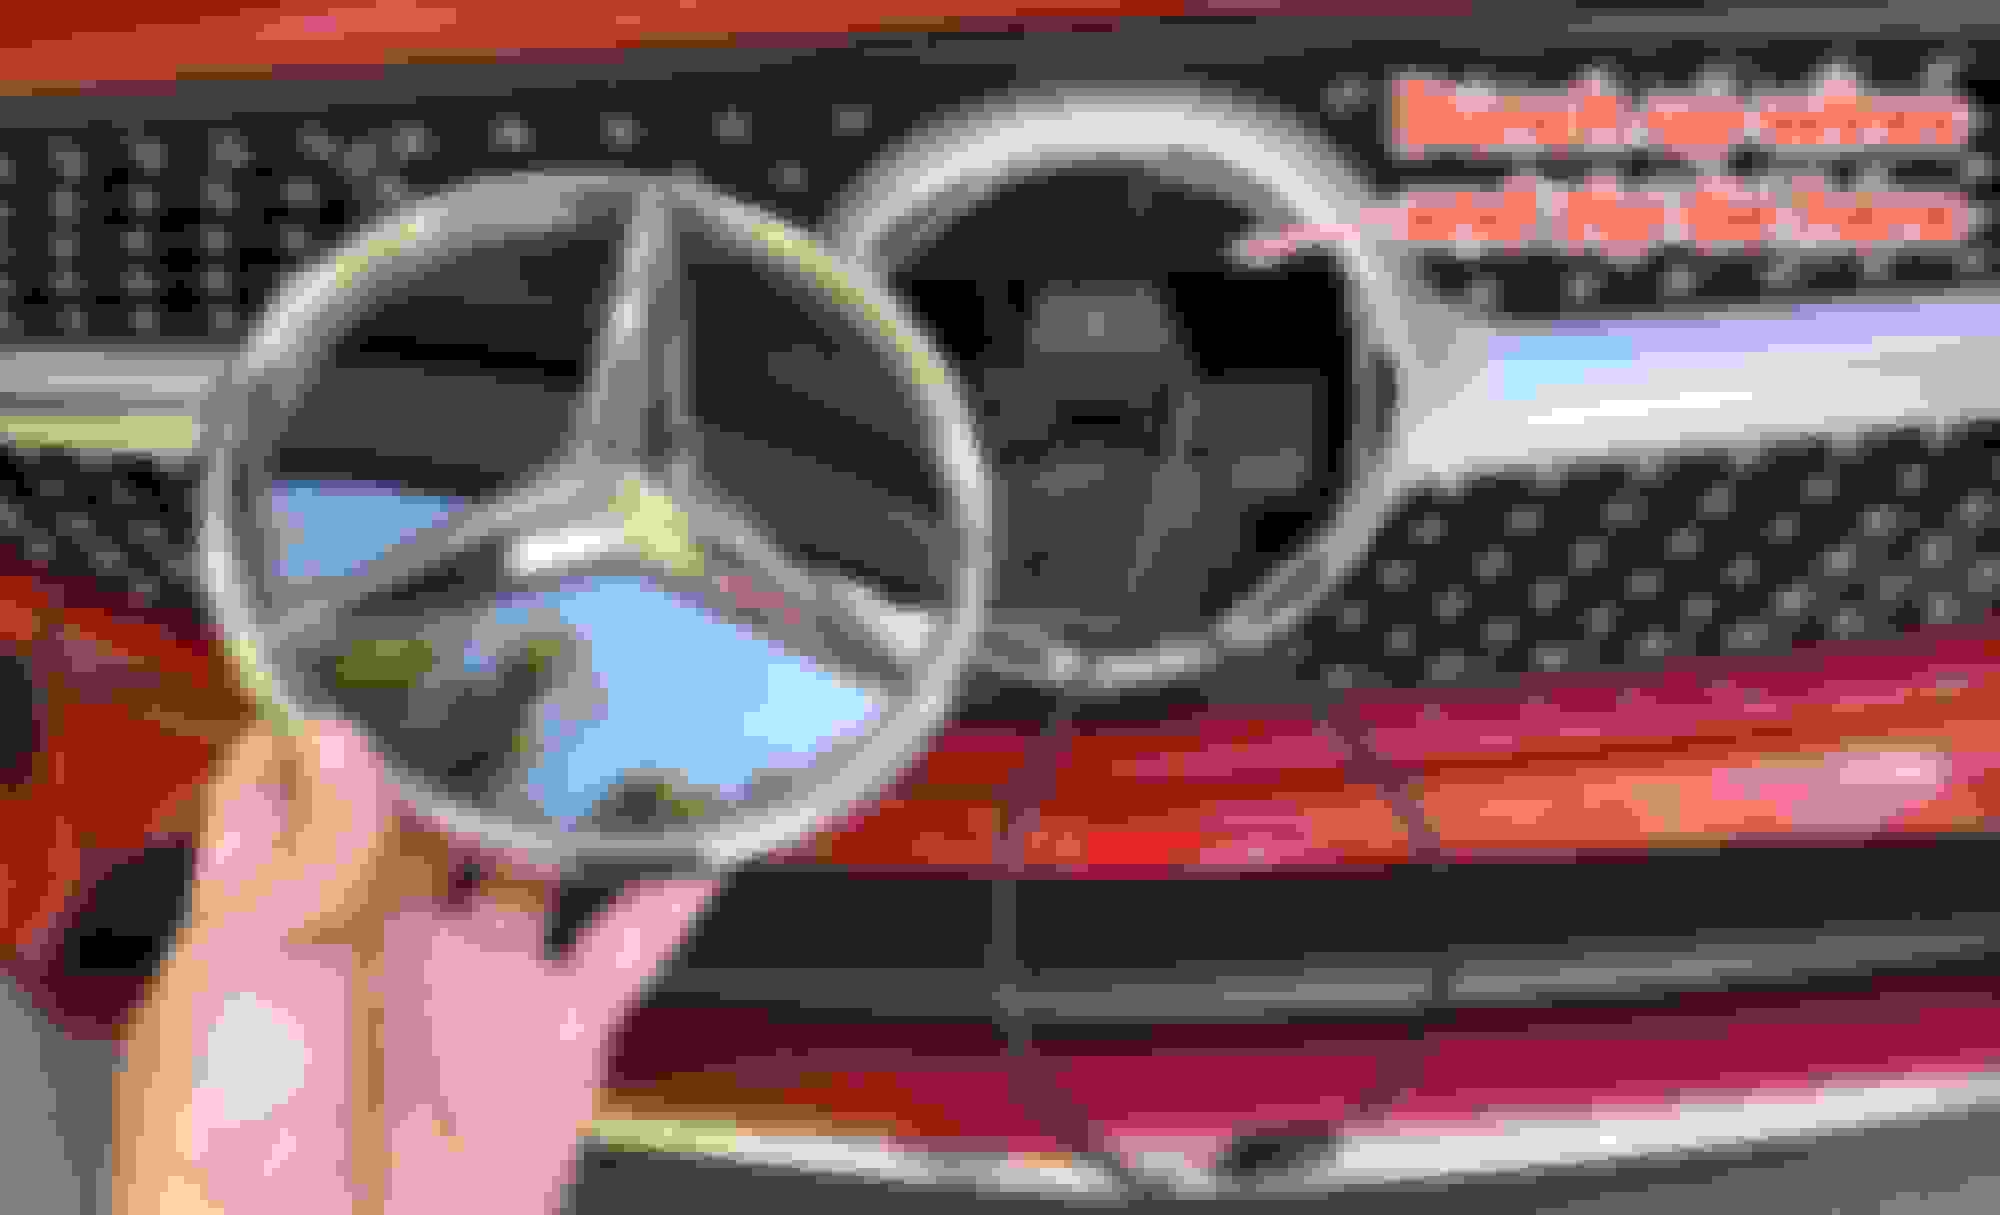
Now is a good time to turn the car on and confirm that the illuminated star works as expected. I bunched up a few inches of the illuminated star wiring and zip-tied it neatly to the location shown in the picture. I was careful not to allow any wire to 1) droop in front of the radar module, and 2) to become visible through the grill, such as from the side. After zip tying the excess cable neatly and confirming that the wire is not visible, I put the star in place and rotated it clockwise firmly until it locked in place with a snap.
Finishing up
Working backward: Close up the fuse box; remove the blue tape from the fender edges, and install the two 10mm screws - do these before the Torx screws to minimize stress. Then reinstall the seven Torx screws - try to push the bumper in place so that the screws match up to the circular scratch marks from their initial mounting. Do a final check, and make sure all your tools are removed from under the hood before closing it.
Final thoughts:
I believe there is an instruction sheet that MB provides dealers for installing this. No doubt those instructions would have shown how to more properly install the illuminated star, especially with regards to the fuse box details. The above is just what I decided to do for my car, it's not a recommendation on how to do your installation. Hope someone finds this useful.
Thanks for this detailed write up. In my 2021 CLA45 fuse diagram, this one is marked as "Motor Diesel" and there is already an existing fuse in place. I'm planning on tapping this fuse (split existing and the Illuminated Star fuse).
Do you know from your personal experience if that will be ok?
My 2021 CLA250 didn't come with an illuminated star. I saw a few other cars with it and liked the way it looked, so I decided to buy the parts and install it myself. I bought them from a MB dealer on eBay. It was sold as a kit for the W177 A220, but the same part numbers are used for the C118 CLA250. The kit includes the illuminated star, and a wiring harness:
C118 W177 Illuminated Star Kit
Part Numbers:
Illuminated Star: A1778174000
Wiring Harness: A2478206903
Preparation:
The illuminated star comes in two pieces and has to be assembled. It only goes together one way - match up the tabs and snap them together. While the wiring harness has a crimped contact on the positive red wire, I could not figure out how to insert it into the fuse block. It looks different from the other fuse contacts that are already in place. Instead of messing with it, I cut off the contact and bought an Add-a-Circuit with mini fuse holder, which worked just fine. The wiring harness also comes with a 5-amp mini fuse, which I used. This was the only adjustment I made, everything else went fairly smoothly.
Removing the existing star
Looking at the illuminated star, it's obvious that it is rotated clockwise to lock in place, and thus removing it should be rotated counter-clockwise. However, the locking mechanism needs to be released by pressing in two tabs in the back, which is impossible to access without removing the whole bumper. Taking a leap of faith, I used a plastic spudger made for opening cellphone cases to push into the seam along the bottom edge of the existing star and it popped loose the clips there. I just had to carefully work my way around the star until all the clips popped free. Remember to wipe down the star and surrounding area so as to minimize scratches from dirt/sand.
Removing existing star
Loosening the bumper
There may be other ways to fish the wire, but this made it easier for me. Remove the seven torx screws holding down the black plastic flap part of the bumper, and the two 10mm screws holding the bumper to the front quarter panels. Put some blue tape on the quarter panel edge to avoid scratching while the bumper is loose:
Fishing the wire
This wasn't obvious to me at first, but I saw that the existing cable for the adaptive cruise radar module goes upwards so I figured that's where the wiring harness for the illuminated star must go as well. Using a snake-cam, I saw that there is an opening for running wires just above the opening for the star. I ran the snake cam up this opening and tilted it to the driver's side and eventually, it emerged from the gap revealed by loosening the black plastic flaps of the bumper. I then taped the wiring harness to my snake-cam and pull it back through. After that, I laid the wiring harness under the black plastic flaps, roughly along the line indicated in the picture below. I think originally, the cable is supposed to be run alongside the hood release cable because the harness kit came with wire clips that seem to have been designed for this. However, I find that hiding it under the black plastic flap looks cleaner.
Electrical connections
The illuminated star is supposed to turn on whenever the car is running, and fuse location 67 fits that purpose and was blank in my car. I was drawn to it immediately because it's a mini sized fuse location, matching the 5-amp mini sized fuse supplied with the wiring harness. Again, the wiring harness has a fuse holder contact crimped on, but it's very difficult to try and maneuver it to insert it into the bottom of the fuse block at position 67. Also, I looked at the other fuse holder contacts already installed and they looked different from this one. Instead of trying to mess with it, I just cut it off and crimped on a mini Add-a-Circuit fuse holder and plugged it into position 67. The wiring harness comes with a grommet, and I guess you are supposed to drill a hole (roughly 1/2 inch?) on the fuse box, feed the red wire though, and push the grommet in place. I didn't do that. Instead, I fed the red wire through an existing small drain hole on the bottom of the fuse box and then crimped on the Add-a-Circuit. The black ground wire was routed around the side of the fuse box towards the back where I bolted it to an existing nut that threads onto a metal stud from the strut tower. I see other installs where they put the ground cable on the jumper cable clamp point next to the fuse box, but I feel that my location is superior and is much neater.
Mounting the illuminated star
Now is a good time to turn the car on and confirm that the illuminated star works as expected. I bunched up a few inches of the illuminated star wiring and zip-tied it neatly to the location shown in the picture. I was careful not to allow any wire to 1) droop in front of the radar module, and 2) to become visible through the grill, such as from the side. After zip tying the excess cable neatly and confirming that the wire is not visible, I put the star in place and rotated it clockwise firmly until it locked in place with a snap.
Finishing up
Working backward: Close up the fuse box; remove the blue tape from the fender edges, and install the two 10mm screws - do these before the Torx screws to minimize stress. Then reinstall the seven Torx screws - try to push the bumper in place so that the screws match up to the circular scratch marks from their initial mounting. Do a final check, and make sure all your tools are removed from under the hood before closing it.
Final thoughts:
I believe there is an instruction sheet that MB provides dealers for installing this. No doubt those instructions would have shown how to more properly install the illuminated star, especially with regards to the fuse box details. The above is just what I decided to do for my car, it's not a recommendation on how to do your installation. Hope someone finds this useful.
It worked on my 2021 CLA 45 AMG! Thanks again for this amazing and detailed write up!
Mercedes SLR McLaren 722 S Is Extremely Rare Example Modified by McLaren
Slideshow: A one-of-one U.S.-spec Mercedes-Benz SLR McLaren Roadster became even rarer after a factory-backed transformation at McLaren's headquarters.