
CRANKSHAFT POSITION SENSOR LOCATION???
Thread Starter
Member
Joined: Feb 2008
Posts: 236
Likes: 1
From: New York City
'14 E550
CRANKSHAFT POSITION SENSOR LOCATION???
Hey MB'ers. I recently found out that I have to replace my crankshaft position sensor due to my car throwing the P0335 code. I've searched and found out its a pretty easy procedure that I can do. Only prob is that I have no idea where it's located in our engine bays  . Any help is greatly appreciated. Thanks Fellas.
. Any help is greatly appreciated. Thanks Fellas.

Junior Member
Joined: Dec 2009
Posts: 38
Likes: 2
From: Georgia, USA
2008 GL320 CDI, 2007 E320, 2005 Passat TDI
Hey Waz,
When I replace mine a couple weeks ago I used a 1/4 inch socket (1/4 inch drive with approx 14" extension). The bolt is actually requires a T-8 (Torx 8) SOCKET which I'd never seen until I had removed the bolt. I had Torx drivers (all male) which are ratchet driven but not "sockets." Anyway, if you lack the Torx socket like I did, a 1/4" socket works well.
/Sparticus
Thread Starter
Member
Joined: Feb 2008
Posts: 236
Likes: 1
From: New York City
'14 E550
Hey Waz,
When I replace mine a couple weeks ago I used a 1/4 inch socket (1/4 inch drive with approx 14" extension). The bolt is actually requires a T-8 (Torx 8) SOCKET which I'd never seen until I had removed the bolt. I had Torx drivers (all male) which are ratchet driven but not "sockets." Anyway, if you lack the Torx socket like I did, a 1/4" socket works well.
/Sparticus
When I replace mine a couple weeks ago I used a 1/4 inch socket (1/4 inch drive with approx 14" extension). The bolt is actually requires a T-8 (Torx 8) SOCKET which I'd never seen until I had removed the bolt. I had Torx drivers (all male) which are ratchet driven but not "sockets." Anyway, if you lack the Torx socket like I did, a 1/4" socket works well.
/Sparticus
Super Member
Joined: Nov 2007
Posts: 655
Likes: 1
I drive the racism out of BadDebt. ;)
-remove your airbox
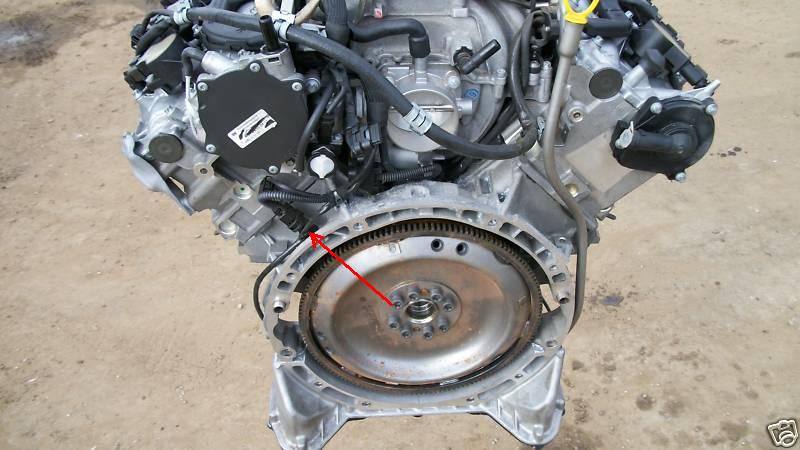
-look on the drivers side, behind the valve cover there is a 1 black wire at the bottom just above the tranny, its kinda cramp in that area, so a mirror is handy...grab it and trace it to the back of the motor...you wil need a socket, a 6" extention and a 1/4 ratchet, i forgot what size the torx socket size is...
-To make the DIY easier, i temp-disconnect the fuel line, and removed the driverside valve cover so i can access the plug. Its deep in there so its gonna need lots of patients and small hands.
- If you remove the fuel line and the valve cover, this DIY should take you about 1/2 hr.....if you do not remove the items, it will take you a few hrs plus shredded arms..haha
Junior Member
Joined: Dec 2009
Posts: 38
Likes: 2
From: Georgia, USA
2008 GL320 CDI, 2007 E320, 2005 Passat TDI
its kinda hard to explain but i will try to explain my best,
-remove your airbox
-look on the drivers side, behind the valve cover there is a 1 black wire at the bottom just above the tranny, its kinda cramp in that area, so a mirror is handy...grab it and trace it to the back of the motor...you wil need a socket, a 6" extention and a 1/4 ratchet, i forgot what size the torx socket size is...
-To make the DIY easier, i temp-disconnect the fuel line, and removed the driverside valve cover so i can access the plug. Its deep in there so its gonna need lots of patients and small hands.
- If you remove the fuel line and the valve cover, this DIY should take you about 1/2 hr.....if you do not remove the items, it will take you a few hrs plus shredded arms..haha
/Spart
Trending Topics
MB World Stories
The Best of Mercedes & AMG

7 Craziest Things AMG Gas Ever Built
Verdad Gallardo
New Electric Mercedes-AMG GT 4-Door Coupe Unveiled: 10 Things You Need to Know
Verdad Gallardo
6 Mercedes Models That Did NOT Age Well (But Are Somehow Still Cool)
Verdad Gallardo
Manual Mercedes? 6 Times Sindelfingen Let Drivers Have All The Fun
Verdad Gallardo
Mercedes SLR McLaren 722 S Is Extremely Rare Example Modified by McLaren
Verdad Gallardo
8 Classic Boxy Mercedes Designs That Have Aged Like Fine Wine
Verdad Gallardo
Flawlessly Restored Mercedes 190E Evo II Heads to Auction
Verdad Gallardo
Electric Mercedes C-Class Unveiled: 11 Things You Need to Know
Verdad Gallardo
Mercedes EQS Gets A Major Update: Everything You Need to Know
Verdad Gallardo
Thread Starter
Member
Joined: Feb 2008
Posts: 236
Likes: 1
From: New York City
'14 E550
Well I got my CPS sensor and im having a tough time getting the defective CPS out. It's such a pain in the *** to get back there and unscrew the damn bolt. Any ideas on how to make the job easier ??
Junior Member
Joined: Dec 2009
Posts: 38
Likes: 2
From: Georgia, USA
2008 GL320 CDI, 2007 E320, 2005 Passat TDI
What I did...
-cold engine
-removed airbox
-padded the top of the engine with a movers pad/blanket
-got several 1/4 inch ratchet extensions within reach
-climbed on top of engine so I could put both arms down into area where CPS lives. Right & left hands touching CPS...working by 'feel' (the traditional "bimanual technique")
-for my engine it took a 2 extensions to give the right length to let me put the ratchet on and have room to swing the handle. One guy posted on another thread he used something like a 14 or 16 inch extension but that would NOT have worked for my situation. I think I cobbled a 4 + 6 inch extensions. Getting the 1/4 inch socket to seat onto the bolt's head is the trick.
-having a magnet-on-a-stick and a mirror-on-a-stick help for when you drop things (sockets, extensions, BOLTS - YIKES) or want a better view of the terrain.
Since doing my CPS I've seen these cheesy little ratchet handles that are basically a nurled *** with a ratcheting mechanism in the center. They sell them at Tractor supply, Northern Tool, and (gasp) Harbor Freight. Picture a 2.5 inch dia wheel or knob with a 1/4 inch ratchet drive in the center. When I saw that I pictured being able to stick a short (like 2 inch) extension on there and using it to turn the CPS bolt. I bought one and will use it "next time." Anyway this is the gimmicky little tool they sell near the end of the isle or by the check out. I'm starting to think it may be VERY useful when you have small bolts in places with NO ROOM to swing a regular ratchet handle.
It may also help to use the right words as you struggle with this &%@#ing job

/S
Thread Starter
Member
Joined: Feb 2008
Posts: 236
Likes: 1
From: New York City
'14 E550
Hey, I feel for you. It took me a coupla tries to get mine out.
What I did...
-cold engine
-removed airbox
-padded the top of the engine with a movers pad/blanket
-got several 1/4 inch ratchet extensions within reach
-climbed on top of engine so I could put both arms down into area where CPS lives. Right & left hands touching CPS...working by 'feel' (the traditional "bimanual technique")
-for my engine it took a 2 extensions to give the right length to let me put the ratchet on and have room to swing the handle. One guy posted on another thread he used something like a 14 or 16 inch extension but that would NOT have worked for my situation. I think I cobbled a 4 + 6 inch extensions. Getting the 1/4 inch socket to seat onto the bolt's head is the trick.
-having a magnet-on-a-stick and a mirror-on-a-stick help for when you drop things (sockets, extensions, BOLTS - YIKES) or want a better view of the terrain.
Since doing my CPS I've seen these cheesy little ratchet handles that are basically a nurled *** with a ratcheting mechanism in the center. They sell them at Tractor supply, Northern Tool, and (gasp) Harbor Freight. Picture a 2.5 inch dia wheel or knob with a 1/4 inch ratchet drive in the center. When I saw that I pictured being able to stick a short (like 2 inch) extension on there and using it to turn the CPS bolt. I bought one and will use it "next time." Anyway this is the gimmicky little tool they sell near the end of the isle or by the check out. I'm starting to think it may be VERY useful when you have small bolts in places with NO ROOM to swing a regular ratchet handle.
It may also help to use the right words as you struggle with this &%@#ing job
/S

Newbie
Joined: May 2013
Posts: 9
Likes: 0
CLK500
Crankshaft Position Sensor Dealer vs Auto-part purchase
Hello All,
I have a MB CLK500 and my crankshaft position sensor went bad now I called different dealers and all of them have different prices, the cheapest one I found was $150 dollars. Now I called also a few auto-parts around the area and the have a crankshaft position sensor for a CLK500 for the amount of 65 dollars. now my question is the following: Do I have to buy the crankshaft sensor via my VIN number? I really don't want to pay a lot of money for a part which I can buy cheaper if its the same part at an auto-part.
Best,
Mel

MBworld Guru
Joined: Dec 2009
Posts: 10,782
Likes: 1,011
NO LONGER ACTIVE
Try parts.com - they might be less than the dealer, but they ship OEM parts from dealers. If nothing else, take the parts.com price to your local dealer's parts counter and ask them to match it. I would not buy a generic Chinese part.
Member


Joined: Sep 2014
Posts: 176
Likes: 6
From: Sarasota area, FL
Current: 2020 E450 with self-driving capability
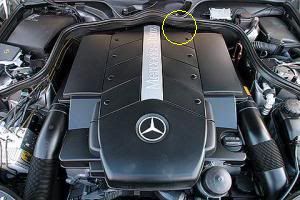
Thanks for all the tips here. I'm reading both the sedan and coupe forums for advice. My biggest problem has been finding the damn thing, so I thought I'd repeat something posted on the w203 forum. If you, like I did, take out the MAF sensor and housing, you'll see that there's an electrical connector directly below that housing. That is NOT the CPS. Look lower and to the right and there it is.
I've got my old one out but dropped the d*mn screw on the new one, so I'll wait til the am to go find the thing.
I've got my old one out but dropped the d*mn screw on the new one, so I'll wait til the am to go find the thing.

Super Member

Joined: Feb 2008
Posts: 699
Likes: 44
From: PA
09 CLK550
Lol, I hate dropping screws. Even worse is when they don't fall out the bottom. This tool has been an awesome addition http://www.harborfreight.com/15-lb-c...ool-95933.html
I am still missing a T30 torx bit somewhere in the engine bay. Never found it.
I am still missing a T30 torx bit somewhere in the engine bay. Never found it.
Member
Joined: Sep 2014
Posts: 176
Likes: 6
From: Sarasota area, FL
Current: 2020 E450 with self-driving capability
Lol, I hate dropping screws. Even worse is when they don't fall out the bottom. This tool has been an awesome addition http://www.harborfreight.com/15-lb-c...ool-95933.html
I am still missing a T30 torx bit somewhere in the engine bay. Never found it.
I am still missing a T30 torx bit somewhere in the engine bay. Never found it.
I found it after about two hours of looking. It had ricocheted behind the heat shield alongside the left front wheel, and somehow managed to be WAY up high (from my perspective under the car). I was terrified that it had somehow dropped into the hole for the CPS, so it was quite a relief to find it.
Member
Joined: Sep 2014
Posts: 176
Likes: 6
From: Sarasota area, FL
Current: 2020 E450 with self-driving capability
Also, by the way, I had read somewhere a suggestion to put in the CPS and screw together (at the same time). I was trying that method, which I decided was impossible. What ultimately DID work was to tape the screw head to the torx bit. I also ended up taping all of the extensions/universal joint together as well, because they kept coming apart while I was fishing the contraption into position.

Junior Member
Joined: Jun 2014
Posts: 38
Likes: 0
From: Seattle
2005 CLK 320
Kudo to those that did this in 30 mins, it took me hours. In the end I had to remove the valve cover box to get access. Surprisingly I had no issues with putting it back in. This is a real pain in the *** job.

Newbie
Joined: Dec 2018
Posts: 14
Likes: 0
From: On the roam
2011 C300 4matic
Stuck removing crank position sensor 2011 C300 4matic
I read all the DIY's, and tried to remove the crank position sensor. The hoses are a little different on my 2011 C300 4matic as compared to pictures.
Its very difficult to remove the connector let alone get a E8 torx socket on the bolt. is it actually e8 or e10?
The driver side valve cover looks much longer on my engine perhaps because of the mfg date 02/11 or that its a Canadian car?
Would you recommend removing the valve cover to give me access? Will that large overhanging section come off with the valve cover - its hard to see if its worth it to remove.
Any tips are appreciated. I have a crank no start situation and need help! thx
MBworld Guru
Joined: Dec 2009
Posts: 10,782
Likes: 1,011
NO LONGER ACTIVE
I read all the DIY's, and tried to remove the crank position sensor. The hoses are a little different on my 2011 C300 4matic as compared to pictures.
Its very difficult to remove the connector let alone get a E8 torx socket on the bolt. is it actually e8 or e10?
The driver side valve cover looks much longer on my engine perhaps because of the mfg date 02/11 or that its a Canadian car?
Would you recommend removing the valve cover to give me access? Will that large overhanging section come off with the valve cover - its hard to see if its worth it to remove.
Any tips are appreciated. I have a crank no start situation and need help! thx
Its very difficult to remove the connector let alone get a E8 torx socket on the bolt. is it actually e8 or e10?
The driver side valve cover looks much longer on my engine perhaps because of the mfg date 02/11 or that its a Canadian car?
Would you recommend removing the valve cover to give me access? Will that large overhanging section come off with the valve cover - its hard to see if its worth it to remove.
Any tips are appreciated. I have a crank no start situation and need help! thx
Newbie
Joined: Dec 2018
Posts: 14
Likes: 0
From: On the roam
2011 C300 4matic
Rudeney. Agreed, this thread was the closest match to my nightmare problem removing the crank position sensor on the W204, after days of searching globally.
I find the material on this forum is very high quality, much better than some of the youtube videos on this subject lacking details.
Ok, so I should not remove the valve cover - thanks for the feedback. Any other suggestions are very welcome.
I find the material on this forum is very high quality, much better than some of the youtube videos on this subject lacking details.
Ok, so I should not remove the valve cover - thanks for the feedback. Any other suggestions are very welcome.
Newbie
Joined: Dec 2018
Posts: 14
Likes: 0
From: On the roam
2011 C300 4matic
Rodney: Yes the MAF and right angle boot and connected hoses were already removed. The problem I see (and feel) is the crankshaft position sensor appears to be fastened with a torx screw not a torx bolt. i.e. the materials I read said I would need an E8 torx (female) socket, and I am surprised now I need a torx bit. It is opposite.
Not sure which size bit I need as I barely can get my hand down along the firewall on the driver's side to get a solid fit and not strip the screw head. Maybe that firewall/baffle section can be removed?
Not sure which size bit I need as I barely can get my hand down along the firewall on the driver's side to get a solid fit and not strip the screw head. Maybe that firewall/baffle section can be removed?