


 -
-
LED Cluster Mod Write-UP Finally!

Thread Starter
Senior Member
Joined: Oct 2012
Posts: 335
Likes: 3
From: Lodi, CA
2001 CLK55 AMG
LED Cluster Mod Write-UP Finally!
Alright folks, I promised this write-up a long time ago, and I apologize for the long wait, but here it is finally:
First, you have to think about what color you want to accomplish, If you want a cool white look, great, if you want stock-ish but sharper and brighter, you want warm white, you can go blue, red, aqua blue, purple, etc... You need to buy a roll of adhesive strip led's.... You need a soldering iron, solder, and wire. You need the skill to solder, a pair of scissors as well, and a small amount of heat shrink tubing. You also need to know how to take the cluster apart.
Here is a link to the LED's that you will need: http://www.ebay.com/itm/3528-Led-strip-light-cool-white-300SMD-flexible-bar-lamp-DC-12V-5M-nonwaterproof-/201144239354?pt=US_Car_Lighting&hash=item2ed52184fa
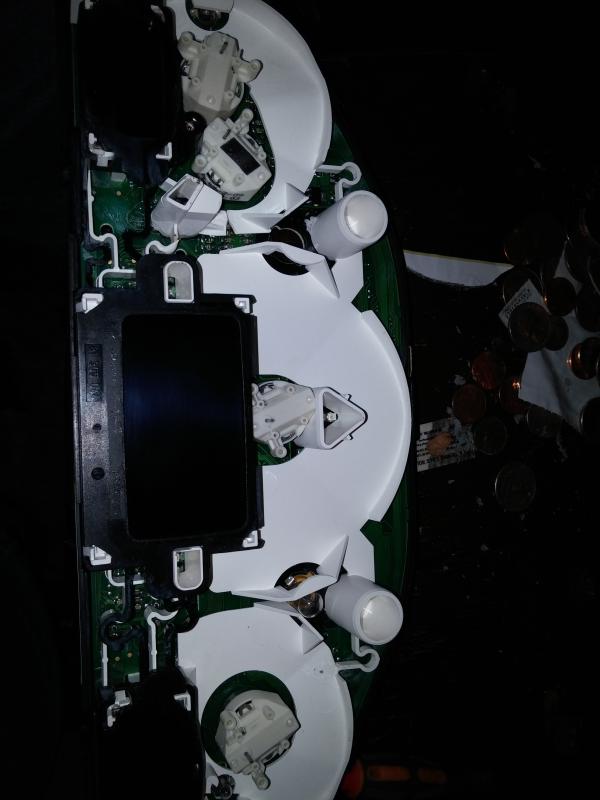
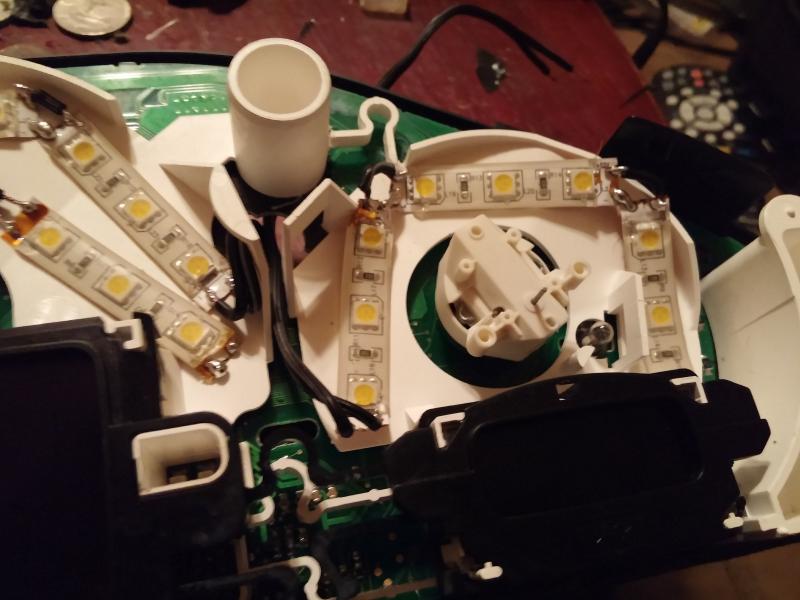
First, remove the cluster, there are many ways to do this, the easiest is just to grab the cluster on one side and pull out, then the other side, and wiggle back and forth a few times and it will pop out. You can reach behind and press the tabs and slide them back and they will pop out of the cluster. I would remove the power side first, which is your right hand side. Do the same for the left. you can then slide the cluster, tilt upward and slide to the right and out of the dash. You can take a flat head screwdriver and free all 4 tabs holding the front portion of the cluster to the back. You will be left with the gauge faces and needles exposed. You do not need to break the cluster too far down, but you do need to remove the needles, and the clear portion of the cluster with the faces attached... To remove the needles, it is easiest to turn the Tachometer and speedometer counter-clockwise until the don't spin freely, then continue to twist and pull upward at the same time, they will quickly come free from the cluster. The Gas Gauge will be the same process but clockwise, the temp will be counter-clockwise. Now you will carefully remove the portion of the speedometer face that surrounds the center multi-function display, by slowly and carefully lifting, it is adhered, so slowly and carefully is the key. Once this is released, you can remove the clear plastic portion with the gauge faces attached. You can do this by lifting it while pressing outward on the black tabs attached to the back outermost portion of the cluster. It will easily lift out. This is as far as you need to break down the cluster.. It will look like this:
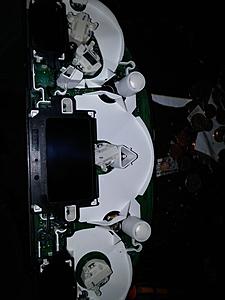
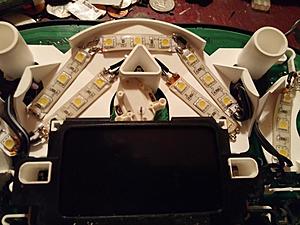
These are the areas you will be working in:
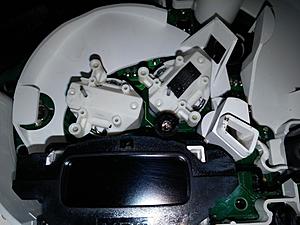
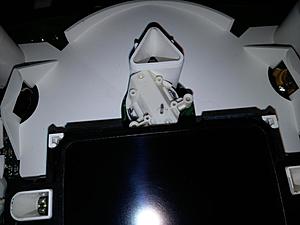
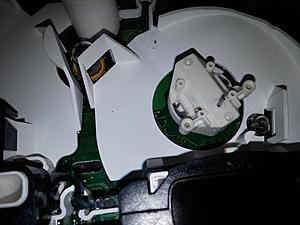
You will need to cut the LED strips into sections, they are made to be cut into sections, you will see the lines to do this. There is a clear membrane over the led's to make them waterproof, you will need to remove this at the ends by using your fingernail to pry the membrane away from the ribbon cable with the led's attached. Now, You will take your solder and soldering iron and place a bead of solder on the contact points... Carefully be conscious of the positive and negative sides and always make sure you are keeping all the polarity consistent. You will want to use solder to jump a few of the connections just using a solder bridge, and wire for others, you can refer to these pictures to see how I did it:

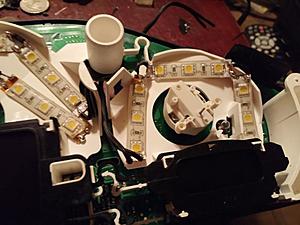
Now, you will want to route the connect the positive wires together and solder them, then solder them to one positive and one negative per side, basically half and half it, as you will be using the original illumination sockets to get power. Remove the bulbs from the sockets, you can twist them counter clockwise from the back of the cluster, they are yellow with an "s" on the back. Route the cable through the holes the original bulb socket holes, now, apply solder to the bare stripped portion of the wires, place one on each side of the socket, and solder them to the yellow bulb socket receptacles, as shown here:

Remove the green illumination bulbs for the Tachometer, and Gas / Temp Gauges and keep in case you wish to return to stock.. Slide the cable and yellow receptacles back towards the board and twist back in... Take the extra wire and silp under the white plastic and the circuit board. You're now done... I would take the cluster and test in the vehicle at this point. Once you know it works, start reassembling the cluster by pressing the clear plastic portion back in place, press the needles back to the unit, not hard, there needs to be a gap or they will drag. To reset the needles to the correct postion connect the cluster back to the dash, and turn the key on, then off, spin (carefully) the needles counter clockwise until you can set them to the resting 0 position for each gauge (fuel will be the exception again being clockwise) and test again by turning the key on, then off, check to see that they rest at 0 again. Now remove the cluster again and place the front facia back on the cluster and snap it back into place, the hardest part will be getting the faces for the warning lights back in place.
You should now end up with this:

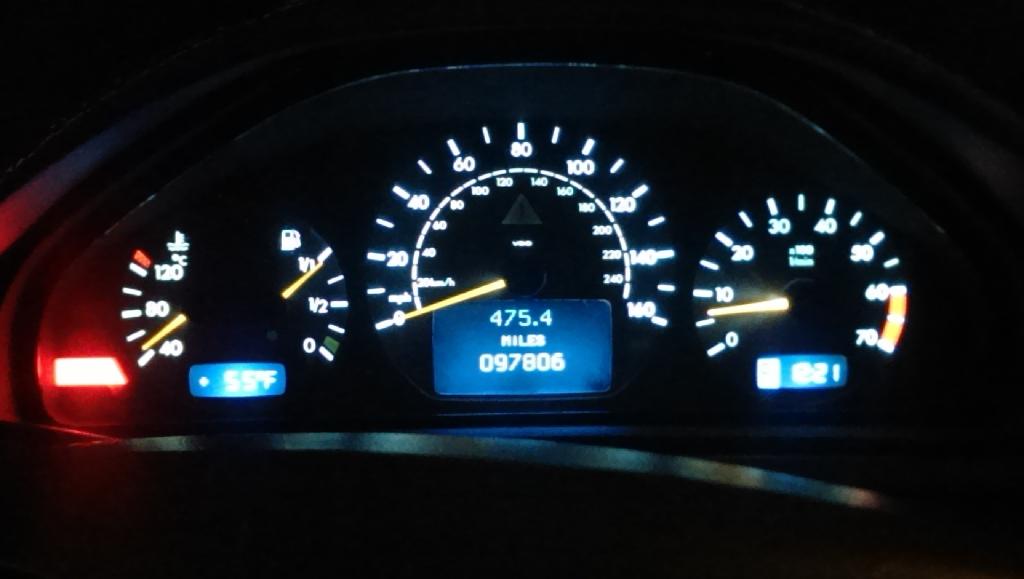
Or if you chose to go with cool white:

Here's a quick youtube video of my finished product.
I know there will be quiestions... Bring Em....
Take Care Folks,
Scott
First, you have to think about what color you want to accomplish, If you want a cool white look, great, if you want stock-ish but sharper and brighter, you want warm white, you can go blue, red, aqua blue, purple, etc... You need to buy a roll of adhesive strip led's.... You need a soldering iron, solder, and wire. You need the skill to solder, a pair of scissors as well, and a small amount of heat shrink tubing. You also need to know how to take the cluster apart.
Here is a link to the LED's that you will need: http://www.ebay.com/itm/3528-Led-strip-light-cool-white-300SMD-flexible-bar-lamp-DC-12V-5M-nonwaterproof-/201144239354?pt=US_Car_Lighting&hash=item2ed52184fa
First, remove the cluster, there are many ways to do this, the easiest is just to grab the cluster on one side and pull out, then the other side, and wiggle back and forth a few times and it will pop out. You can reach behind and press the tabs and slide them back and they will pop out of the cluster. I would remove the power side first, which is your right hand side. Do the same for the left. you can then slide the cluster, tilt upward and slide to the right and out of the dash. You can take a flat head screwdriver and free all 4 tabs holding the front portion of the cluster to the back. You will be left with the gauge faces and needles exposed. You do not need to break the cluster too far down, but you do need to remove the needles, and the clear portion of the cluster with the faces attached... To remove the needles, it is easiest to turn the Tachometer and speedometer counter-clockwise until the don't spin freely, then continue to twist and pull upward at the same time, they will quickly come free from the cluster. The Gas Gauge will be the same process but clockwise, the temp will be counter-clockwise. Now you will carefully remove the portion of the speedometer face that surrounds the center multi-function display, by slowly and carefully lifting, it is adhered, so slowly and carefully is the key. Once this is released, you can remove the clear plastic portion with the gauge faces attached. You can do this by lifting it while pressing outward on the black tabs attached to the back outermost portion of the cluster. It will easily lift out. This is as far as you need to break down the cluster.. It will look like this:
These are the areas you will be working in:


You will need to cut the LED strips into sections, they are made to be cut into sections, you will see the lines to do this. There is a clear membrane over the led's to make them waterproof, you will need to remove this at the ends by using your fingernail to pry the membrane away from the ribbon cable with the led's attached. Now, You will take your solder and soldering iron and place a bead of solder on the contact points... Carefully be conscious of the positive and negative sides and always make sure you are keeping all the polarity consistent. You will want to use solder to jump a few of the connections just using a solder bridge, and wire for others, you can refer to these pictures to see how I did it:

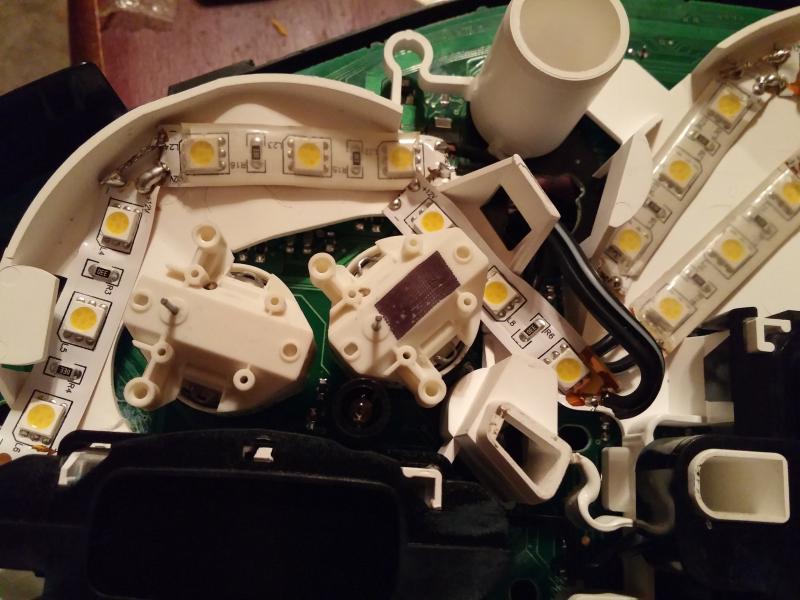
Now, you will want to route the connect the positive wires together and solder them, then solder them to one positive and one negative per side, basically half and half it, as you will be using the original illumination sockets to get power. Remove the bulbs from the sockets, you can twist them counter clockwise from the back of the cluster, they are yellow with an "s" on the back. Route the cable through the holes the original bulb socket holes, now, apply solder to the bare stripped portion of the wires, place one on each side of the socket, and solder them to the yellow bulb socket receptacles, as shown here:

Remove the green illumination bulbs for the Tachometer, and Gas / Temp Gauges and keep in case you wish to return to stock.. Slide the cable and yellow receptacles back towards the board and twist back in... Take the extra wire and silp under the white plastic and the circuit board. You're now done... I would take the cluster and test in the vehicle at this point. Once you know it works, start reassembling the cluster by pressing the clear plastic portion back in place, press the needles back to the unit, not hard, there needs to be a gap or they will drag. To reset the needles to the correct postion connect the cluster back to the dash, and turn the key on, then off, spin (carefully) the needles counter clockwise until you can set them to the resting 0 position for each gauge (fuel will be the exception again being clockwise) and test again by turning the key on, then off, check to see that they rest at 0 again. Now remove the cluster again and place the front facia back on the cluster and snap it back into place, the hardest part will be getting the faces for the warning lights back in place.
You should now end up with this:
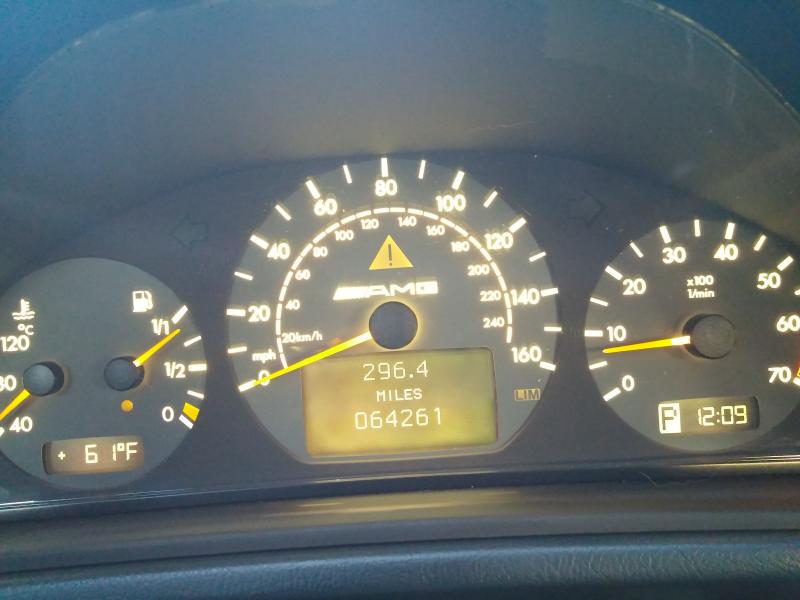
Or if you chose to go with cool white:
Here's a quick youtube video of my finished product.
I know there will be quiestions... Bring Em....
Take Care Folks,
Scott
Thread Starter
Senior Member
Joined: Oct 2012
Posts: 335
Likes: 3
From: Lodi, CA
2001 CLK55 AMG
Thanks fellas! When I first did this a year ago, everyone was begging for a write-up... Now not too many seem interested..... I do think I am going to change back to cool white LED's next week.... I liked the clean white/blueish I had the first time.
Thread Starter
Senior Member
Joined: Oct 2012
Posts: 335
Likes: 3
From: Lodi, CA
2001 CLK55 AMG
Ok Guys... I changed to cool white. I also pulled the filters out of the displays and made custom white filters tonight because I wanted a full matching setup. I changed my needle color from orange to white... I have a little more touch-up work to do but I'm VERY happy with the results. I added more led's to the speedo, and it looks amazing. I will post some pics of the new setup as soon as I tweak a little more, should be up by tonight. The cost was very minimal, but the results were amazing... I think my total investment is about $16 at this point. Stay tuned... I'm also going to pull the climate control and change the display to match, as long as I can work out keeping the button illumination the same, I'm not up for changing the entire interior illumination at this point, but that may come in the future. It's been a labor of love, but the sharpness is fantastic. Stay tuned, I also have some more video to post on the process.
Thread Starter
Senior Member
Joined: Oct 2012
Posts: 335
Likes: 3
From: Lodi, CA
2001 CLK55 AMG
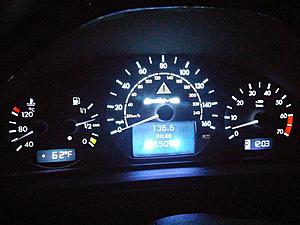
Finished.... I am displeased with the AMG logo... Only spotty part of the install, but I have the fix, just need to apply it... Also going to put a small layer of tint on the center display behind the screen as I want it to be a bit less bright. FYI, I created my own filters for the displays from clear plastic and removed the Blue Filters, this created more of a White-ish display in person... Otherwise, super happy, very crisp.


Trending Topics
MB World Stories
The Best of Mercedes & AMG

Manual Mercedes? 6 Times Sindelfingen Let Drivers Have All The Fun
Verdad Gallardo
Mercedes SLR McLaren 722 S Is Extremely Rare Example Modified by McLaren
Verdad Gallardo
8 Classic Boxy Mercedes Designs That Have Aged Like Fine Wine
Verdad Gallardo
Flawlessly Restored Mercedes 190E Evo II Heads to Auction
Verdad Gallardo
Electric Mercedes C-Class Unveiled: 11 Things You Need to Know
Verdad Gallardo
Mercedes EQS Gets A Major Update: Everything You Need to Know
Verdad Gallardo
5 Underrated Mercedes-Benz Models That Don't Get the Love They Deserve
Verdad Gallardo
Mercedes 300D Has Pushed Well Past 1 Million Miles and It Ain't Stopping
Verdad Gallardo
10 Most Reliable Mercedes-Benz Models You Can Buy Used
Verdad Gallardo
Thread Starter
Senior Member
Joined: Oct 2012
Posts: 335
Likes: 3
From: Lodi, CA
2001 CLK55 AMG
Thanks man, I plan on taking a picture with a better camera this weekend, I'm also going to take a new approach to the center display lighting and add a resistor for the desired brightness.... I also plan to build a diffuser for the AMG logo, either that or I was thinking of doing that in a different color... Possibly Aqua Blue, or possibly red... I've been thinking about having a full-on tune placed in the software of the TCU for more aggressive shifting under the W setting, and adding paddles, in that case I would add a switching mechanism to change the whole cluster from white to red Illumination... I've also been thing about adding a relay to the backlighting which would provide full brightness with the 3 bottom displays (upon door opening, and key-on, then have them dim when the headlamps are turned on) just some ideas... You going to be around this weekend? Was planning on calling you about your project.


Thread Starter
Senior Member
Joined: Oct 2012
Posts: 335
Likes: 3
From: Lodi, CA
2001 CLK55 AMG
If you can find it in two's that would be cool... Unfortunately this product has to be kept in groups of three due to the resistors being included in the strip.

Thread Starter
Senior Member
Joined: Oct 2012
Posts: 335
Likes: 3
From: Lodi, CA
2001 CLK55 AMG
MBWorld Fanatic!


Joined: Oct 2012
Posts: 1,427
Likes: 100
From: Florida
2002 CLK 55 AMG cabriolet Eurocharged
I love it, Did a mod on my W124 with blue LED and it makes for an interesting cluster.
The resistors are for make current LED with 3, To cut one off we would re calc the resistance value to mod.
With LED it is understood that increasing the resistance will reduce the voltage. = no light. Reducing the LED count with the proper R should work fine.
Add the voltage of the LED normally 5 = 12v and the work on the stock rheostat for W124. the W208 has a push button dimmer and not sure of the affect in lumen s.
I can come up with the formula if Scott does not have.
Thanks for posting,
Cheers
MBWorld Fanatic!
Joined: Oct 2012
Posts: 1,427
Likes: 100
From: Florida
2002 CLK 55 AMG cabriolet Eurocharged
Looking again @ the LED strip, There is a surface mount resistor for each diode.
Cutting one diode loose with the resistor should yield the proper fitment of 2 LED without modifying anything.
Cheers Gator
Cutting one diode loose with the resistor should yield the proper fitment of 2 LED without modifying anything.
Cheers Gator
Senior Member
Joined: Jun 2013
Posts: 287
Likes: 5
From: New Hampshire
Magma Red W208 55 AMG, W203 C230 Kompressor Sedan 6speed M/T, W220 S500
Genius! Very subtle and good looking mod!


