When you click on links to various merchants on this site and make a purchase, this can result in this site earning a commission. Affiliate programs and affiliations include, but are not limited to, the eBay Partner Network.
2012 c350 coupe 4matic, 1994 Toyota Supra twin turbo
Detailing My '94 Toyota Supra TT
Hi everyone. Wanted to share my pictures of my detailing job on my Supra. It's not a Benz, but it's my other pride and joy. I focused on 'paint correction' for this thread. By no means is this thread about me boasting my skills or whatever. It is simply me showing the average person what techniques they can use, product suggestions and results. Back in the day, I have detailed professionally for about 6 years for Acura, Toyota, Lexus and a few side jobs. I don't consider myself the best nor knows it all, but I do take pride in what I do and I love learning from other detailers.
Little bit about my car first. It is a stock 1994 Supra Twin Turbo C-spec. The paint is the original, single stage black paint. Single stage paints are thin, fragile, soft and prone to oxidation. How do you tell if your paint is single stage or dual stage? You can either speed polish a test spot and if there is paint transfer on your pad = most likely single stage. Or use a paint thickness meter. Typical factory dual paints will measure between 4.0mils and 6.0mils thick with the clear coat generally measuring between 1.5 and 2.2mils thick. Single stage however, is often below or close to 4.0mils (I could be wrong). Mine gave an average of 3-4.3mils all around.
*IMPORTANT* single stage = use the least aggressive products possible. I repeat, least aggressive.
So on with the show:
1. Cleaning / decontaminating
I didn't take any pictures of this as it's pretty self explanatory. The steps I used were in this order:
a) Spraying of IronFX on panels where road debris contacts most.
b) Foam wash --> let soak --> rinse off
c) Soap wash using two bucket system.
d) Clay bar + clay lubricant (or clay mitt if condition of car is not so bad).
e) Soap wash using two bucket system.
f) Blow dry using Detailer Pro's Turbo Car Dryer.
2. Rejuvenation
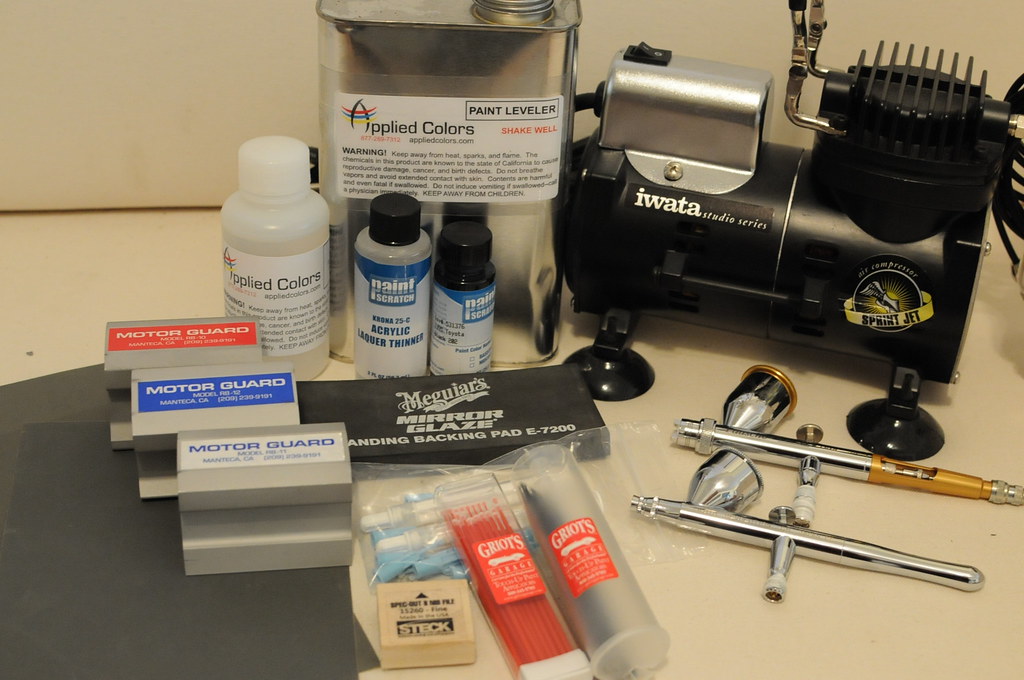
Products: Meguiars #7 Show Car Glaze, White Microfiber weave cloth, Pinnacle Clay Lubricant spray, Gold Plush microfiber cloth, Pinnacle Souveran Carnuba Wax, Griots 3" Red Polishing pad + hand pad holder, Chinchilla Microfiber buffing cloth.
Purpose of this step is to use the natural oils in the product to bring back out the original shine in the paint and remove oxidation, if any. I chose to use Meguiars #7 because it is a non-abrasive glaze and conditioner. Note: use this product generously as saturation is key to this step. I used one whole bottle for the car. Product was applied by hand using a microfiber cloth. I went over the whole car twice. Product was then let soaking for 24hrs. Skip this step if your paint is dual stage as it is not required.
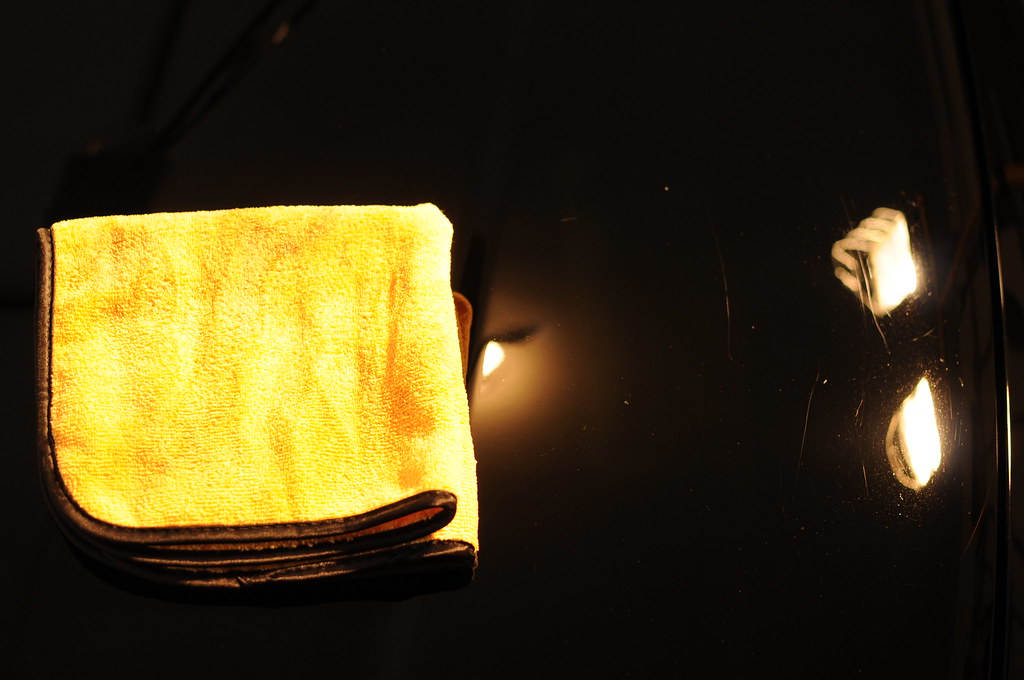
After 24hrs. Notice the color being transferred onto the cloth. Part of the color you see is the color of the #7. The other part of the color is the dirt / oxidation coming off and out of the paint:
Removal of Meguiars #7. This product is a PITA to remove!! Clay lubricant spray really helps! The black is shiny, but it's far from great (hood shot):
Sealing in the #7 with Pinnacle carnuba wax. This step is not necessary but I think it does aid to the job to bring out that shine:
After wax removal. Still needs a lot of work (fender shot):
I didn't take too many pictures of this step as I was too focused on finding and filling in all the paint chips/scratches, then sanding them down flush to the surface. I made a separate batch of paint (not shown) consisting of 20% clear, few drops of shine and about 1/2oz of paint.
The Griots paint touch up kit is great to get exactly into the paint chip. Anything smaller, a toothpick will do the job. The key here is to not over-fill the paint chip but rather to cover the exposed area using a dabbing motion. I used tiny pieces 2500 grit sand paper to lightly sand inside the chip area first to remove any sharp or raised edges. Once the paint is settled and cured (I let it cure for 24hrs), it is time to move on to your clear coat for that added protection. This time, I over filled the paint chips to form a tiny bump over the chips. Then let cure.
These tiny bumps are now filed away using a fine nib file. You don't need any pressure for this step. Just glide it over the bump gently and let the file do its job. Once filed down, I lightly sanded the area with 2500 grit sand paper to remove any hard scratches the file may have left and to further make the area flush. *IMPORTANT* Single stage = do not use aggressive grit sandpapers, unless you really have to!
Some samples of where I sanded. It was mostly with the front hood and front fenders. This was after nib file... 2500grit... 3000grit:
I used the airbrush for inside the engine bay in the areas where the hood prop comes in contact with the hood and front support. The paint in these areas faded away from 21 years of propping open the hood. Once dried, I laid a piece of protection film in the areas to avoid future paint damage.
4. Polish - Stage 1
Products: Sonax Profiline Nano Polish, 3.5"-6.5" orange Lake Country CCS/Griots/Hex Logic cutting pads, Griots DA polisher, Meguairs DA polisher, Super Plush microfiber cloth.
Before starting panel by panel, I did a test spot first to see which was the least aggressive pad I can use that removes both swirls and the 2500grit sanding marks. I wanted to use the lighter cut white pad but it couldn't take out majority of the sand marks. The orange pad worked well. I chose to use the Sonax polish as it was a light-moderate polish with a really nice gloss finish. Product is very easy to use and even easier to wipe off with minimal effort. Speed setting 5 to 6 with overlapping motions working 2' x 2' sections at a time. Buff off using microfiber cloth.
2012 c350 coupe 4matic, 1994 Toyota Supra twin turbo
5. Polish - Stage 2
Products: Wolfgang Finishing Glaze, 3/6, 3.5"-6.5" green Lake Country CCS/Hex Logic light cutting pads, Griots DA polisher, Meguairs DA polisher, new Super Plush microfiber cloth.
This is a mild abrasive glaze with light cutting properties that will remove any swirls left from stage 1. Speed setting 5 with overlapping motions working 2' x 2' sections at a time. Buff off using microfiber cloth afterwards. Normally I would use the softer blue polishing pad but for this application, I used the green to remove the light-moderate swirl marks left from stage 1.
6. Polish - Stage 3
Products: Sonax Paint Cleaner, 3/6, 3.5"-6.5" blue Lake Country CCS polishing pads, Griots DA polisher, Meguairs DA polisher, new Super Plush microfiber cloth.
Purpose of this step is to clean off any leftover residues from all the previous steps while improving that high gloss shine. Product is on the watery side so I spread the product on speed 1 first then turned up to speed setting 3 with overlapping motions working 2' x 2' sections at a time. Buff off using microfiber cloth afterwards.
7. Polish - Stage 4
Products: Pinnacle Souveran Carnuba Wax, 6.5" gold jewel Lake Country CCS polishing pads, Griots DA polisher, Chinchilla Microfiber buffing cloth.
This is the final polishing step. Purpose of this step is to seal in all of the above. Speed setting 3 with overlapping motions working 2' x 2' sections at a time. Waxed the whole car first then buffed off using microfiber cloth.
What sand marks?? (those white specks is dust by the way)
8. Armour up!
Products: Sonax Polymer Net Shield, Griots 3" Red Polishing pad + hand pad holder, new Chinchilla Microfiber buffing cloth.
This pretty much adds an invisible protection layer to your paint that repels dirt and water. It says it'll last 6 months... guess we'll see. Apply this product directly on polishing pad and apply it one panel at a time. Spread evenly and buff off.
Finished results (after window polishing, rubber/plastic rejuvenation, tire dressing). It didn't come out perfect as there were still some deep scratches and swirls in some panels that I had missed. Paint matching wasn't perfect either as it's hard to get an exact match to a 21 year old paint job. Overall I'm happy with it and tired!
So that's pretty much it. I hope it is informative and helpful for some of you. Feel free to leave any comments, suggestions, advice or your own preferred techniques and products used. Would love to hear about the latter.
Next job, paint chip spot repair + paint protection film on my '12 C350 coupe. Stay tuned.
2012 c350 coupe 4matic, 1994 Toyota Supra twin turbo
Just wanted to share a new product with everyone. It's called Sonus Ion Paint Coating. I wanted to compare this product on my daily driver vs. the Sonax Polymer Net Shield on my Supra. The results were unbelievable! Much better than the one I used on the Supra. It leaves a very silky smooth feel on the paint and the shine is very deep. It literally feels like running your hands over ice. Product says it will last up to a year. This $30 bottle now replaces my $120 Carnuba wax! Best of all, it's the easiest product I've used and buffed off.
Took some pictures but they do justice to the product.
Some pictures of spot repair. Sorry I forgot to take the after pictures:
On a Lexus I detailed yesterday. Note: there is no wax used on the Lexus, only used Sonax Paint Cleaner prior to Sonus paint coating:
Mercedes SLR McLaren 722 S Is Extremely Rare Example Modified by McLaren
Slideshow: A one-of-one U.S.-spec Mercedes-Benz SLR McLaren Roadster became even rarer after a factory-backed transformation at McLaren's headquarters.