


Auto dimming mirror
Thread Starter
Member
Joined: May 2005
Posts: 151
Likes: 3
From: Atlanta, Ga
'16 E350 �07 S550 �21 GLE580
Auto dimming mirror
Taking my inspiration from 2phast, I installed a auto dimming mirror that came out of a 2001 w210. I test fitted it as 2phast had done in his 500E but my OCD wouldn't allow me to live with the gap and ill fit of the stock w210 mirror so I put in the time to modify my stock mount to hold the new mirror. Luckily the 94 and 95 W124 had an (ugly) auto dimming mirror as an option so the aluminum mount in the headliner already had a route for the wiring. It took about an hour to modify the mirror and get it installed.
This mirror has the homelink controls which allow me to turn on my outdoor flood lights and living room lamps as I pull up to the house. It also has ambient lighting which is nice.
This mirror has the homelink controls which allow me to turn on my outdoor flood lights and living room lamps as I pull up to the house. It also has ambient lighting which is nice.
Member
Joined: Aug 2004
Posts: 126
Likes: 3
W124, W220 S500 4matic, W140 S500, CLS55 AMG
Looks great! How much work was involved to modify the mount? From your pics it looks like you just had to enlarge the back cover opening. Do you have any pics taken during the mount swap?
Last edited by forcedawd; Jan 12, 2009 at 10:51 AM.
MBWorld Fanatic!
Joined: Mar 2005
Posts: 2,647
Likes: 8
Youngtimer
wow, good job man! i wanted to do this a while ago and then just kind of forgot about it...
so that black thing stuck on the back of the mirror with the wire is part of the homelink setup, or a sensor for the autodimming?
so that black thing stuck on the back of the mirror with the wire is part of the homelink setup, or a sensor for the autodimming?
Thread Starter
Member
Joined: May 2005
Posts: 151
Likes: 3
From: Atlanta, Ga
'16 E350 �07 S550 �21 GLE580
The only thing I had to do to the w210 mirror was to remove it from its original mount, very easy the ball popped right out. Then I cut the w210 ball off the mount with a dremel, took about two minutes. Then I removed the ball off the w124 mount, no cutting it just unscrews. Next pull back the black rubber coating on the 124 mount to expose the medal. Since the 124 mirror's ball attaches in the back and the 210 mirror mounts from the top you need to cut off the bottom curve of the 124 mount with a dremel or saw. Most of the w124 mount has a path to run the wires you just need to drill a small hole in the bottom part of the mount so that wires can make it into the new mirror. Next mount the 210 ball that you cut off onto the 124 mount, I used putty epoxy, it was set in 20 minutes. Finely pull the black rubber coating down pop the ball on the mirror and wire it up. The large hole in the top of the 210 mirror is factory, the stock ball is attached to a large shaft that the wires ran through.
It may seem like a lot of steps but altogether it took about an hour and it looks like it came from the factory.
Thread Starter
Member
Joined: May 2005
Posts: 151
Likes: 3
From: Atlanta, Ga
'16 E350 �07 S550 �21 GLE580
The black thing is actually attached to the windshield and is the rain sensor for the windshield wiper. It looks like it is part of the mirror in those pics, but its not. The homelink and auto dimming sensors are all self contained in the mirror.
Here are some pics that show it more clearly.
Last edited by vanwiek; Jan 12, 2009 at 02:18 PM. Reason: spelling
Thread Starter
Member
Joined: May 2005
Posts: 151
Likes: 3
From: Atlanta, Ga
'16 E350 �07 S550 �21 GLE580
Trending Topics
MBWorld Fanatic!


Joined: Nov 2001
Posts: 3,861
Likes: 3
From: Jacksonville Florida
209/W210 Estate /W211 modded by MBENZNL
Should have installed a 140 Mirror with the Bose center channel and home link
Oh and the Mirror is FULL Power....Have to run a harness for the speaker and the mirror then a Mirror control switch....Then to wire it to the memory switch on the drivers door...NO More Mirror adjustment
Oh and the Mirror is FULL Power....Have to run a harness for the speaker and the mirror then a Mirror control switch....Then to wire it to the memory switch on the drivers door...NO More Mirror adjustment
MB World Stories
The Best of Mercedes & AMG

Dubai Tuner Gives the Mercedes G-Class An Entirely New Look
Verdad Gallardo
Six Gift Ideas Your AMG Loving Dad or Grad Will Cherish

7 Craziest Things AMG Gas Ever Built
Verdad Gallardo
New Electric Mercedes-AMG GT 4-Door Coupe Unveiled: 10 Things You Need to Know
Verdad Gallardo
6 Mercedes Models That Did NOT Age Well (But Are Somehow Still Cool)
Verdad Gallardo
Manual Mercedes? 6 Times Sindelfingen Let Drivers Have All The Fun
Verdad Gallardo
Mercedes SLR McLaren 722 S Is Extremely Rare Example Modified by McLaren
Verdad Gallardo
8 Classic Boxy Mercedes Designs That Have Aged Like Fine Wine
Verdad Gallardo
Flawlessly Restored Mercedes 190E Evo II Heads to Auction
Verdad GallardoMBWorld Fanatic!
Joined: Nov 2001
Posts: 1,213
Likes: 5
From: Kirkland, WA
500E Signal Rot
A few notes...
Not all W124 mirrors have ***** that unscrew, found this out by disecting several mirrors (and none of the W201's have removable *****).
That said, this is not a simple procedure, plus your range of motion is limited without cutting much of the rear cover on the auto dimming mirror.
The main issue is that the W124 stalk is curved at the end and designed to mount to the back of the mirror, where as the auto dimming mirror has a straight stalk and mounts from the top, so you have to enlarge this opening to accomadate the curved W124 stalk.
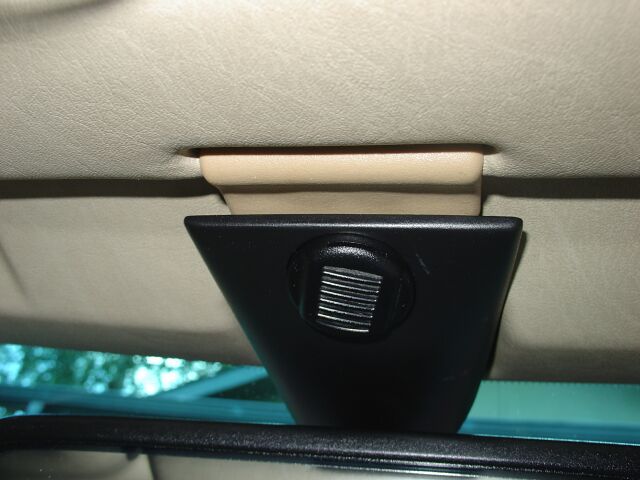
Obivously, this can be done, as Vanwiek has shown, but I wasn't happy with the looks or limited range of adjustment, so I scraped mine. I found the gap left over by the factory auto dimming mirror mount was perfect to add the center sun visor to, so it looks much better.
Not all W124 mirrors have ***** that unscrew, found this out by disecting several mirrors (and none of the W201's have removable *****).
That said, this is not a simple procedure, plus your range of motion is limited without cutting much of the rear cover on the auto dimming mirror.
The main issue is that the W124 stalk is curved at the end and designed to mount to the back of the mirror, where as the auto dimming mirror has a straight stalk and mounts from the top, so you have to enlarge this opening to accomadate the curved W124 stalk.
Obivously, this can be done, as Vanwiek has shown, but I wasn't happy with the looks or limited range of adjustment, so I scraped mine. I found the gap left over by the factory auto dimming mirror mount was perfect to add the center sun visor to, so it looks much better.
Last edited by 2PHAST; Jan 12, 2009 at 08:08 PM.
Thread Starter
Member
Joined: May 2005
Posts: 151
Likes: 3
From: Atlanta, Ga
'16 E350 �07 S550 �21 GLE580
I didn't even open the case of the new mirror.
I found this project to be one of the most simple modifications I've made to the car.
2phast, Does your center sun visor rest flush against the headliner or does it rest against the dome lamp? You site doesn't show a zoomed out photo of the finished project.
Here are some photos that show the greater range of motion that this setup afford you.
Thread Starter
Member
Joined: May 2005
Posts: 151
Likes: 3
From: Atlanta, Ga
'16 E350 �07 S550 �21 GLE580
Should have installed a 140 Mirror with the Bose center channel and home link
Oh and the Mirror is FULL Power....Have to run a harness for the speaker and the mirror then a Mirror control switch....Then to wire it to the memory switch on the drivers door...NO More Mirror adjustment
Oh and the Mirror is FULL Power....Have to run a harness for the speaker and the mirror then a Mirror control switch....Then to wire it to the memory switch on the drivers door...NO More Mirror adjustment
MBWorld Fanatic!
Joined: Nov 2001
Posts: 1,213
Likes: 5
From: Kirkland, WA
500E Signal Rot
I see, you cut the curved stalk, guess I missed that part of your post. I hope your epoxy holds long term, I probably wouldn't feel too good about that attachment process, I think tig welding the ball onto the stalk would be a more long term and reliable solution, if I find the time, I might try your approach.
My center sun visor sits flush against the headliner, its pressure it into the gap left by the mirror. Had to modify the sunvisor a little to get it to sit flush against the headliner though.
My center sun visor sits flush against the headliner, its pressure it into the gap left by the mirror. Had to modify the sunvisor a little to get it to sit flush against the headliner though.
Thread Starter
Member
Joined: May 2005
Posts: 151
Likes: 3
From: Atlanta, Ga
'16 E350 �07 S550 �21 GLE580
I had concerns about using the epoxy over welding also. I've used this particular epoxy a lot over the years and it has never failed me, but if it does fail I will have it welded as you suggest.
Thread Starter
Member
Joined: May 2005
Posts: 151
Likes: 3
From: Atlanta, Ga
'16 E350 �07 S550 �21 GLE580
Just an update. It's been a year since I installed the mirror and the epoxy has done the job. Haven't had any issue with it. Of course after posting this I'll go out to the car to find the rear view mirror hanging by it's wires...... 


