


project help

Thread Starter
MBWorld Fanatic!
Joined: Feb 2003
Posts: 5,622
Likes: 1
From: Los Angeles, Ca
Sean's Sister--
raymond i put it in the oven to reheat some of the old glue but when i closed it and applied the glue it open up a little bit and then now i can't do anything about it........but its not that bad....i was able to put more glue in the cracks though.......i used permatex perma oxy high strength epoxy.....even the guy at the store said this should be enough
what you think?
what you think?
MBWorld Fanatic!


Joined: Jan 2004
Posts: 5,943
Likes: 178
From: Seattle WA
99 E320
how i closed up:
- reheated housing
- pressed lens into groove as much as I could
- turn whole thing over on bed and put my body weight onto the backside
and kept the weight on for a minute or so.....while german shepherd jumped
around and licked my face...but i couldn't swat him
- walla
the reason i suggested sealant vs adhesive or epoxy or glue is that you may
need to reopen to perform rotational adjustment or some such. on the chance
that you say "uh oh" or 'whoops' after your flame on, it'll be easier to scrape
off RTV silicone vs glue/epoxy/adhesive.
if, however, you're sure that your alignment is spot on, then yes, adhesive
may be just fine.
p.s. never go by word of store vendor for things such as these projects
unless they've done this sort of mod before. they're simply talking end
result, and not the project in perspective
Last edited by raymond g-; Apr 7, 2006 at 05:18 PM.
Thread Starter
MBWorld Fanatic!
Joined: Feb 2003
Posts: 5,622
Likes: 1
From: Los Angeles, Ca
Sean's Sister--
Originally Posted by raymond g-
how i closed up:
- reheated housing
- pressed lens into groove as much as I could
- turn whole thing over on bed and put my body weight onto the backside
and kept the weight on for a minute or so.....while german shepherd jumped
around and licked my face...but i couldn't swat him
- walla
the reason i suggested sealant vs adhesive or epoxy or glue is that you may
need to reopen to perform rotational adjustment or some such. on the chance
that you say "uh oh" or 'whoops' after your flame on, it'll be easier to scrape
off RTV silicone vs glue/epoxy/adhesive.
if, however, you're sure that your alignment is spot on, then yes, adhesive
may be just fine.
p.s. never go by word of store vendor for things such as these projects
unless they've done this sort of mod before. they're simply talking end
result, and not the project in perspective
- reheated housing
- pressed lens into groove as much as I could
- turn whole thing over on bed and put my body weight onto the backside
and kept the weight on for a minute or so.....while german shepherd jumped
around and licked my face...but i couldn't swat him
- walla
the reason i suggested sealant vs adhesive or epoxy or glue is that you may
need to reopen to perform rotational adjustment or some such. on the chance
that you say "uh oh" or 'whoops' after your flame on, it'll be easier to scrape
off RTV silicone vs glue/epoxy/adhesive.
if, however, you're sure that your alignment is spot on, then yes, adhesive
may be just fine.
p.s. never go by word of store vendor for things such as these projects
unless they've done this sort of mod before. they're simply talking end
result, and not the project in perspective
well i already did one of them in the expoxy.......but i'm going to buy some of that rtv silcione tommrow, where did you buy it from??
MBWorld Fanatic!
Joined: Apr 2003
Posts: 1,464
Likes: 9
From: SoCal OC
S, GL, Escalade ESV, my shoes
Originally Posted by Alexbenz
i used permatex perma oxy high strength epoxy.....even the guy at the store said this should be enough
I often use Sillicon-2 (black on is the best), or glass sealant. You can always reheat the light, and these would come up easilty.
Thread Starter
MBWorld Fanatic!
Joined: Feb 2003
Posts: 5,622
Likes: 1
From: Los Angeles, Ca
Sean's Sister--
Originally Posted by zam2000
Oh oh, never use any sort of epoxy. Since if thing don't look right (projector tilt, shroud don't stay straight....), and you have to open up the headlight again, it would be very hard (or impossible) to open up once you already applied epoxy on it.
I often use Sillicon-2 (black on is the best), or glass sealant. You can always reheat the light, and these would come up easilty.
I often use Sillicon-2 (black on is the best), or glass sealant. You can always reheat the light, and these would come up easilty.
i'm going to buy glass sealant today after i get out of work......
huy i'll call you basically when i'm done with sealing up both lights.....
thanks guys
Thread Starter
MBWorld Fanatic!
Joined: Feb 2003
Posts: 5,622
Likes: 1
From: Los Angeles, Ca
Sean's Sister--
well one headlights sealed with half expoxy and the other half glass sealant......one thing left to do is cut into the back side of the headlight cover and drill a hole to the ballast wires and seal it up with some rubber so nothing can get in the back way..........the other headlight was mounted and i had to cut into the shroud and then glue it to the projector....such a mess and hard to do without a garage.......it looks alright but we'll see how it turns out.....i can always buy another pair and have huy hook it up maybe
anyways i'm guessing by tommrow i'll rather it up and huy i'm gonna call you up to meet with you about getting it wired up
anyways i'm guessing by tommrow i'll rather it up and huy i'm gonna call you up to meet with you about getting it wired up
MB World Stories
The Best of Mercedes & AMG

8 Oddball Mercedes Ideas That Actually Made it to Production
Verdad Gallardo
Dubai Tuner Gives the Mercedes G-Class An Entirely New Look
Verdad Gallardo
Six Gift Ideas Your AMG Loving Dad or Grad Will Cherish

7 Craziest Things AMG Gas Ever Built
Verdad Gallardo
New Electric Mercedes-AMG GT 4-Door Coupe Unveiled: 10 Things You Need to Know
Verdad Gallardo
6 Mercedes Models That Did NOT Age Well (But Are Somehow Still Cool)
Verdad Gallardo
Manual Mercedes? 6 Times Sindelfingen Let Drivers Have All The Fun
Verdad Gallardo
Mercedes SLR McLaren 722 S Is Extremely Rare Example Modified by McLaren
Verdad Gallardo
8 Classic Boxy Mercedes Designs That Have Aged Like Fine Wine
Verdad Gallardo
Thread Starter
MBWorld Fanatic!
Joined: Feb 2003
Posts: 5,622
Likes: 1
From: Los Angeles, Ca
Sean's Sister--
those of you that have done something like this, what have you used to close the opening of the rear cover??
i have to dremel a opening for the wire that connects to the bulbs thats attached to the ballast but then i need something to cover the hole or else water and dirt can get in the light from the rear
i have to dremel a opening for the wire that connects to the bulbs thats attached to the ballast but then i need something to cover the hole or else water and dirt can get in the light from the rear
MBWorld Fanatic!
Joined: Jan 2004
Posts: 5,943
Likes: 178
From: Seattle WA
99 E320
i Dremeled off just enough clearance to allow passage of the high voltage
cable. When the hatch closes, it also acts as a strain plug....keeping the
cord in position. But I also relieved more plastic....and stuck in a rubber
grommet surrounding the high voltage cable. After closing, I squirted a
dab of silicone around it.
cable. When the hatch closes, it also acts as a strain plug....keeping the
cord in position. But I also relieved more plastic....and stuck in a rubber
grommet surrounding the high voltage cable. After closing, I squirted a
dab of silicone around it.
Thread Starter
MBWorld Fanatic!
Joined: Feb 2003
Posts: 5,622
Likes: 1
From: Los Angeles, Ca
Sean's Sister--
Originally Posted by raymond g-
i Dremeled off just enough clearance to allow passage of the high voltage
cable. When the hatch closes, it also acts as a strain plug....keeping the
cord in position. But I also relieved more plastic....and stuck in a rubber
grommet surrounding the high voltage cable. After closing, I squirted a
dab of silicone around it.
cable. When the hatch closes, it also acts as a strain plug....keeping the
cord in position. But I also relieved more plastic....and stuck in a rubber
grommet surrounding the high voltage cable. After closing, I squirted a
dab of silicone around it.
MBWorld Fanatic!
Joined: Jan 2004
Posts: 5,943
Likes: 178
From: Seattle WA
99 E320
oh.... for that puppy, i just went down to my local mega, big gulp hardware
store (lowes...home depot) and went into that section with the parts bins
eg washers, grommets, cork plugs, captured ball retaining pins, circ-clips,
etc. i picked up the one which had an inside diameter which would enclose
the high voltage cable. mine was bixenon so i had a couple of wires extra.
they cost about 10� @
Thread Starter
MBWorld Fanatic!
Joined: Feb 2003
Posts: 5,622
Likes: 1
From: Los Angeles, Ca
Sean's Sister--
Originally Posted by raymond g-
oh.... for that puppy, i just went down to my local mega, big gulp hardware
store (lowes...home depot) and went into that section with the parts bins
eg washers, grommets, cork plugs, captured ball retaining pins, circ-clips,
etc. i picked up the one which had an inside diameter which would enclose
the high voltage cable. mine was bixenon so i had a couple of wires extra.
they cost about 10� @
store (lowes...home depot) and went into that section with the parts bins
eg washers, grommets, cork plugs, captured ball retaining pins, circ-clips,
etc. i picked up the one which had an inside diameter which would enclose
the high voltage cable. mine was bixenon so i had a couple of wires extra.
they cost about 10� @
MBWorld Fanatic!
Joined: Jan 2004
Posts: 5,943
Likes: 178
From: Seattle WA
99 E320
A-
you talking about that big square cutout in the rear hatch? Is this where
you're looking for ideas to seal?
I didn't have make this cut because the rear of my proj was well within the
housing. If this cutout was made to extend the rear due to the length of
the proj....as well as the exit of the high tension wire, then you'd probably
be looking at something like a plastic lid, eg paint can lid, or some such.
But hard for me to gauge what exactly to use because once mounted inside
your vehicle, there would need to be sufficient clearance for everything....and
more. As you insert and remove the headlight housing, ballast, etc, you need
to be sure you have enough room to manipulate the parts.
Thread Starter
MBWorld Fanatic!
Joined: Feb 2003
Posts: 5,622
Likes: 1
From: Los Angeles, Ca
Sean's Sister--
i think i'm okay on everything expect how to wire the damn things.......hid planet the guys said i would need to do a wiring harness but never heard anyone on here doing it before and even huy never said anything but he would know best but for some reason he's been a flake...... doesn't seem lke many people know what i'm talking about because either they bought it from huy or that just install a hid kit...
MBWorld Fanatic!
Joined: Jan 2004
Posts: 5,943
Likes: 178
From: Seattle WA
99 E320
The wiring harness is a super safety method of hooking up and protecting the costly
factory wiring. Basically, it helps to isolate the power load into an auxiliary
harness....kinda like a sub panel in your house circuit box. Between the factory
harness and the add-on wiring harness, you isolate using relays and fuses.
Now, bear in mind that with your car and mine, it'll probably work fine as-is.
This, presumeably, holds true because factory configures ours for HID as an
option. When they do, they don't add much more wiring, but sufficient to
work headlight washer, or auto leveling for the vehicle.
In-line with your ballast incoming wires (two skinny ones) install fuses.
Just try using smaller fuses. Dont start off with factory 15 amps. Try 10.
If it doesn't blow, leave that in there. If it does blow, try 15...but *dont*
go over that. Never go over the factory fuse rating. (15a is the fuse
designated for HID on my 99 E320) fuses are cheap. blowing out a ballast
or bulb or other is much much costlier.
Test this using spare auto battery or motorcycle battery before you spend
all the energy installing it into your vehicle. you want to isolate and verify
function and avoid having to remove bits n pieces unnecessarily.
keep in touch.... i try to help though it's hard sight unseen. i will always
advise conservatively and will try to point out caution areas if I can.
Last edited by raymond g-; Apr 27, 2006 at 01:49 AM.
Thread Starter
MBWorld Fanatic!
Joined: Feb 2003
Posts: 5,622
Likes: 1
From: Los Angeles, Ca
Sean's Sister--
Originally Posted by raymond g-
The wiring harness is a super safety method of hooking up and protecting the costly
factory wiring. Basically, it helps to isolate the power load into an auxiliary
harness....kinda like a sub panel in your house circuit box. Between the factory
harness and the add-on wiring harness, you isolate using relays and fuses.
Now, bear in mind that with your car and mine, it'll probably work fine as-is.
This, presumeably, holds true because factory configures ours for HID as an
option. When they do, they don't add much more wiring, but sufficient to
work headlight washer, or auto leveling for the vehicle.
In-line with your ballast incoming wires (two skinny ones) install fuses.
Just try using smaller fuses. Dont start off with factory 15 amps. Try 10.
If it doesn't blow, leave that in there. If it does blow, try 15...but *dont*
go over that. Never go over the factory fuse rating. (15a is the fuse
designated for HID on my 99 E320) fuses are cheap. blowing out a ballast
or bulb or other is much much costlier.
Test this using spare auto battery or motorcycle battery before you spend
all the energy installing it into your vehicle. you want to isolate and verify
function and avoid having to remove bits n pieces unnecessarily.
keep in touch.... i try to help though it's hard sight unseen. i will always
advise conservatively and will try to point out caution areas if I can.
factory wiring. Basically, it helps to isolate the power load into an auxiliary
harness....kinda like a sub panel in your house circuit box. Between the factory
harness and the add-on wiring harness, you isolate using relays and fuses.
Now, bear in mind that with your car and mine, it'll probably work fine as-is.
This, presumeably, holds true because factory configures ours for HID as an
option. When they do, they don't add much more wiring, but sufficient to
work headlight washer, or auto leveling for the vehicle.
In-line with your ballast incoming wires (two skinny ones) install fuses.
Just try using smaller fuses. Dont start off with factory 15 amps. Try 10.
If it doesn't blow, leave that in there. If it does blow, try 15...but *dont*
go over that. Never go over the factory fuse rating. (15a is the fuse
designated for HID on my 99 E320) fuses are cheap. blowing out a ballast
or bulb or other is much much costlier.
Test this using spare auto battery or motorcycle battery before you spend
all the energy installing it into your vehicle. you want to isolate and verify
function and avoid having to remove bits n pieces unnecessarily.
keep in touch.... i try to help though it's hard sight unseen. i will always
advise conservatively and will try to point out caution areas if I can.
on the amp thing i believe its the other way around.......i've installed alot of hid kits in benz's and bimmers and have noticed with a stock fuse it would blow it and by upgraded to a higher fuse took care of the problem.......it happened to mine as well at the beginging and i believe i'm using a 20 amp instead of the 15 and was fine for the other few years
MBWorld Fanatic!
Joined: Jan 2004
Posts: 5,943
Likes: 178
From: Seattle WA
99 E320
yeah, you can use butt connectors. basically, you want a clean, solid connection to the existing MB headlamp connector. so I suppose you have option to use spade end and plug that into the MB connector, or in-line solderless crimp into the wire just upstream from the headlight plug.
insofar as the fuse thing.... you're designing a pressure valve into the system. you WANT it to blow at a control point safely below that which weakens the wiring. MB chose 15 amps. i dont know what margin of error is provided, that's why i suggested (and conservatively) 15 amps.
if you toss in a 20amp fuse, it means that though the wiring is rated "X" and designed to blow at 15amps safely, you've opted to compress this safety margin. in other words, you're allowing the wiring to operate higher and hotter even though MB has chosen 15a to blow. it may be all fine so each person decides how much to risk. you still have a 15a fuse in the box beneath the hood (in the MB fuse panel) right?
so...to push this line of reasoning a bit to the extreme: you can put in a 25a or 30a or 35a fuse...sure. but realize that the goal is NOT to keep it from blowing, but to keep it from blowing BEFORE the wiring, connectors, and lights are damaged. you may have solved the blowing problem by insering a higher rated fuse in other projects, but that is contrary to safe electrical system designing.
in the old days, there were screw in fuses instead of circuit breakers in the homes. people would plug in hair dryers, heaters etc and blow the fuse.
the PROPER response is to 1) rewire, or 2) unplug the high load...or operate seperately, or 3) move one of the high load devices into different circuit.
the BAD response is to 1) screw in higher rated fuse, or 2) put a penny in the socket and screw in the blown fuse. With the latter two responses, the wire gets hot.....a fire starts....and the sirens are heard in the distance.
it is also likely that you're still operating within the safety and operating envelope....but that is through luck and serendipity. and if so, you're still okay.
Last edited by raymond g-; Apr 27, 2006 at 02:27 AM.
Thread Starter
MBWorld Fanatic!
Joined: Feb 2003
Posts: 5,622
Likes: 1
From: Los Angeles, Ca
Sean's Sister--
Originally Posted by raymond g-
yeah, you can use butt connectors. basically, you want a clean, solid connection to the existing MB headlamp connector. so I suppose you have option to use spade end and plug that into the MB connector, or in-line solderless crimp into the wire just upstream from the headlight plug.
insofar as the fuse thing.... you're designing a pressure valve into the system. you WANT it to blow at a control point safely below that which weakens the wiring. MB chose 15 amps. i dont know what margin of error is provided, that's why i suggested (and conservatively) 15 amps.
if you toss in a 20amp fuse, it means that though the wiring is rated "X" and designed to blow at 15amps safely, you've opted to compress this safety margin. in other words, you're allowing the wiring to operate higher and hotter even though MB has chosen 15a to blow. it may be all fine so each person decides how much to risk. you still have a 15a fuse in the box beneath the hood (in the MB fuse panel) right?
so...to push this line of reasoning a bit to the extreme: you can put in a 25a or 30a or 35a fuse...sure. but realize that the goal is NOT to keep it from blowing, but to keep it from blowing BEFORE the wiring, connectors, and lights are damaged. you may have solved the blowing problem by insering a higher rated fuse in other projects, but that is contrary to safe electrical system designing.
in the old days, there were screw in fuses instead of circuit breakers in the homes. people would plug in hair dryers, heaters etc and blow the fuse.
the PROPER response is to 1) rewire, or 2) unplug the high load...or operate seperately, or 3) move one of the high load devices into different circuit.
the BAD response is to 1) screw in higher rated fuse, or 2) put a penny in the socket and screw in the blown fuse. With the latter two responses, the wire gets hot.....a fire starts....and the sirens are heard in the distance.
it is also likely that you're still operating within the safety and operating envelope....but that is through luck and serendipity. and if so, you're still okay.
insofar as the fuse thing.... you're designing a pressure valve into the system. you WANT it to blow at a control point safely below that which weakens the wiring. MB chose 15 amps. i dont know what margin of error is provided, that's why i suggested (and conservatively) 15 amps.
if you toss in a 20amp fuse, it means that though the wiring is rated "X" and designed to blow at 15amps safely, you've opted to compress this safety margin. in other words, you're allowing the wiring to operate higher and hotter even though MB has chosen 15a to blow. it may be all fine so each person decides how much to risk. you still have a 15a fuse in the box beneath the hood (in the MB fuse panel) right?
so...to push this line of reasoning a bit to the extreme: you can put in a 25a or 30a or 35a fuse...sure. but realize that the goal is NOT to keep it from blowing, but to keep it from blowing BEFORE the wiring, connectors, and lights are damaged. you may have solved the blowing problem by insering a higher rated fuse in other projects, but that is contrary to safe electrical system designing.
in the old days, there were screw in fuses instead of circuit breakers in the homes. people would plug in hair dryers, heaters etc and blow the fuse.
the PROPER response is to 1) rewire, or 2) unplug the high load...or operate seperately, or 3) move one of the high load devices into different circuit.
the BAD response is to 1) screw in higher rated fuse, or 2) put a penny in the socket and screw in the blown fuse. With the latter two responses, the wire gets hot.....a fire starts....and the sirens are heard in the distance.
it is also likely that you're still operating within the safety and operating envelope....but that is through luck and serendipity. and if so, you're still okay.
as far as wiring it up....theres 4 wires.....2 on the back of the headlight and 2 on the ballast.......from what i've gathered i simple connect the 4 together and i should be done?
correct........god, these are the reasons i hate DIY jobs.....
MBWorld Fanatic!
Joined: Jan 2004
Posts: 5,943
Likes: 178
From: Seattle WA
99 E320
dang, you still up? 
i would connect a VOM to the factory headlight connector to determine which
of the 4 power the low beam. i think you only need POS and NEG. then, there
should be another for the HIGH beam and city beam. hmmm, i'll bet the
4 are for LOW and CITY......and an seperate connector for HIGH.
am too tired to head out to the car right now in my fuzzy slippers. i'll look
tomorrow. if i remember, i'll also check on All-Data.
Thread Starter
MBWorld Fanatic!
Joined: Feb 2003
Posts: 5,622
Likes: 1
From: Los Angeles, Ca
Sean's Sister--
Originally Posted by raymond g-
dang, you still up?
i would connect a VOM to the factory headlight connector to determine which
of the 4 power the low beam. i think you only need POS and NEG. then, there
should be another for the HIGH beam and city beam. hmmm, i'll bet the
4 are for LOW and CITY......and an seperate connector for HIGH.
am too tired to head out to the car right now in my fuzzy slippers. i'll look
tomorrow. if i remember, i'll also check on All-Data.
well the high beam and city light wires are ok......theres a black which is ground and the yellow which is most likly the power and on the ballast it's red and black so red would connect to the yellow and the black to black.....the city/high beam wires are left alone and ready to go......only thing i'd scared of is testing it out on a battery without getting shocked......its not fun being shocked.......i got shocked in the past when i had a honda as a ricer i did everything to that car and got shocked and learned as it was my first car but when i did a few hid installs i got shocked once and i actually felt my heart skip a beat.........lol
maybe i'll get a friend to wire it up.....lol, whats the best way you think or am i gonna be ok?
MBWorld Fanatic!
Joined: Apr 2003
Posts: 1,464
Likes: 9
From: SoCal OC
S, GL, Escalade ESV, my shoes
Alex
I'm back in town, I'll call you today. My work schedule has been so hectic lately. Just bring everything up, I'll wire & hook up everything for you. We set up appoinment twice (once on Tue evening, and one on Sat morning), but you never called to confirm & follow up for the meet. I think given both you and I are quite busy w/ our work, the best is probably around lunch time (should take about an hour at most), just make sure you show up ?
I think the cut you're making to your light would cause leak & moister, I would reseal that whole thing, the cut is actually different. About the fuse, the Denso ballast that you use draw only 6A during boot, and 3A thereafter, so I would put at most 10A fuse in it. The hella Gen-3 (OEM mercedes ballast) draw close to 10A during boot, that's why Mercedes put 15A fuse in it. The Denso ballast is one of the most efficient ballast out there, and that's why you don't need wiring harhness. Wiring harhness is only needed mostly on Germany ballast, since they draw so much power when start up.
It's much cheaper to replace fuse than to replace wiring harhness. Putting a 20A is a recipe for disaster. If something go wrong w/ the ballast or wire, chance is your wire would be fried before the fuse blow.
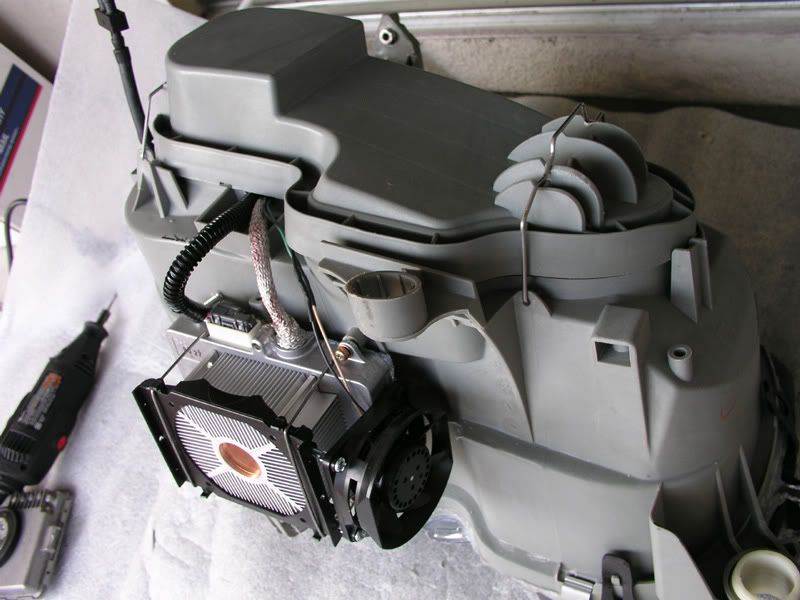
If you decide to try it on your own first, here's the pix of how I wired one of the headlight. It's the same denso ballast as you used, just that I modified it to be high wattage ballast (adjustable 35-70A), so heatsink and fan are added at the bottom, however, the wiring schema is the same. As you see, I cut a little grove at the bottom of the housing (very little, and where the lid contact the housing), and the wire should go through nicely, and only that way, you can connect the ballast to the bulb, w/ your way, the wire is not long enough for connection
I'm back in town, I'll call you today. My work schedule has been so hectic lately. Just bring everything up, I'll wire & hook up everything for you. We set up appoinment twice (once on Tue evening, and one on Sat morning), but you never called to confirm & follow up for the meet. I think given both you and I are quite busy w/ our work, the best is probably around lunch time (should take about an hour at most), just make sure you show up ?
I think the cut you're making to your light would cause leak & moister, I would reseal that whole thing, the cut is actually different. About the fuse, the Denso ballast that you use draw only 6A during boot, and 3A thereafter, so I would put at most 10A fuse in it. The hella Gen-3 (OEM mercedes ballast) draw close to 10A during boot, that's why Mercedes put 15A fuse in it. The Denso ballast is one of the most efficient ballast out there, and that's why you don't need wiring harhness. Wiring harhness is only needed mostly on Germany ballast, since they draw so much power when start up.
It's much cheaper to replace fuse than to replace wiring harhness. Putting a 20A is a recipe for disaster. If something go wrong w/ the ballast or wire, chance is your wire would be fried before the fuse blow.
If you decide to try it on your own first, here's the pix of how I wired one of the headlight. It's the same denso ballast as you used, just that I modified it to be high wattage ballast (adjustable 35-70A), so heatsink and fan are added at the bottom, however, the wiring schema is the same. As you see, I cut a little grove at the bottom of the housing (very little, and where the lid contact the housing), and the wire should go through nicely, and only that way, you can connect the ballast to the bulb, w/ your way, the wire is not long enough for connection
Thread Starter
MBWorld Fanatic!
Joined: Feb 2003
Posts: 5,622
Likes: 1
From: Los Angeles, Ca
Sean's Sister--
huy i got your message and i just called you back.....if your around i will meet up with you.....i thought i was waiting for your call, thats why i didn't call you.....
i'll be waiting
i'll be waiting


