When you click on links to various merchants on this site and make a purchase, this can result in this site earning a commission. Affiliate programs and affiliations include, but are not limited to, the eBay Partner Network.
I've got the problem of cold air blowing regardless of temp setting so suspecting heater control valve.
Now my car is a RHD(New Zealand) I've read some of posts claiming how difficult this on on the RHD anywhere from 3-6 hours to impossible and avoid at all costs. Anyone that has replaced the control on the RHD(U.K\AUS) do you have any tips or should I just save myself the time and pain and get the mechanic to replace?
Last edited by nivram13; Oct 20, 2015 at 12:00 AM.
I've got the problem of cold air blowing regardless of temp setting so suspecting heater control valve.
Now my car is a RHD(New Zealand) I've read some of posts claiming how difficult this on on the RHD anywhere from 3-6 hours to impossible and avoid at all costs. Anyone that has replaced the control on the RHD(U.K\AUS) do you have any tips or should I just save myself the time and pain and get the mechanic to replace?
mine is also RHD
yes it is near impossible as it is under the master cyl.
I went to do it, but ended taking it to a shop that works on Mercedes ( not a merc dealer )
they quoted 1 hour, but called to say how hard it was and charged me 2 hours. still a bargain as they have to undo the brake lines.
I supplied the heater tap and all NEW o rings. and now it works a charm.
Hope that helps.
Thanks been to a couple indi Merc specialist and they say anywhere from 2-4 hours to complete dependent on what has to be moved to install the valve. Given the stupid location Mercedes have installed this on the RHD I'll leave it a specialist to complete on this occasion.
Just ordered that kit today. Could probably source the parts a few dollars cheaper elsewhere but I can't be bothered to do the research. Thanks for posting up this DIY, my new-to-me car needs this part replaced as well and I'm looking forward to getting my hands dirty with her for the first time.
I ordered that kit which includes the valve, 3 o-rings and some clips for the underhood panel. The valve already had 3 new o-rings on it, so that was a waste. I did use 3-4 of the new clips but honestly could have gotten away with just ordering a new valve for $45 instead of over $60.
Good news, the problem is fixed! Each side of the rear now has hot or cold air on demand. I am also very impressed with the engineering that went into this car. I've done extensive wrenching on my old Audi S4 so I'm pretty familiar with German engineering but the MBZ is just on a higher level. The way everything seals together, the way the hood opens to the service position - they just think of everything.
Got mine in the mail today, wasn't expecting it until next week. I plan to install it Sunday, unless I get out of work early tomorrow.
I'll update this post once I test the part. Looking forward to a warm car!
**UPDATE**
Swapped the part, ran the engine for about 3 to 5 minutes, no warm air...
I'm going to top off the coolant, since a little had leaked out, then drive to the grocery store to see if there is a difference.
**FINAL UPDATE**
IT WORKS! HEAT AGAIN!
Last edited by speedracer.eric; Dec 5, 2015 at 07:14 PM.
Reason: Installed Part
I have an 06 E55. Same issues as everyone is describing. Sometimes the back blows warm air with the AC on, sometimes the front blows cold with the heat on etc.. Recently it hasn't been blowing hot air at all through the front vents so I set out to change the valve.
I ordered part # A 211 832 06 84.
I received it and it looked right.
Wasnt until I removed my old valve ( part # A 211 832 05 84 ) that I realized they are different!!
Ugh !!
The new part is on the right and it has an extra nozzle.
Bought the part off ebay $42. installed following Ryda's step by step instructions. 1.5 hrs later, I have heat again..just in time for this winter chill. I thank you! cheers
Hi everyone. My car (E200 CDI) is blowing warm/ cold air intermittently but not hot. In some cases it blows warm on side vents and cold on the mid ones. On the rear vents only cold. I have a 4 zone climate control. Today i replaced the heater valve and the result was the same. Nothing changed. I have a universal diagnostic tool (diagun x431) and i get the b10/4 error code (In-car temperature sensor) Is it possible this sensor to affect the temperature ?
The hoses from the exchange valve are hot (all 4), that means the water is going trough the cabin radiator. To remove the sensor is a real battle.
U think this sensor can be the cause to this behaviour ? Not blowing hot air trough the vents ? And if the water that goes to cabin radiator is hot, why is blowing cold air in rear ? Not even a little warm, only cold?
Thank you
Cristian
I have an 06 E55. Same issues as everyone is describing. Sometimes the back blows warm air with the AC on, sometimes the front blows cold with the heat on etc.. Recently it hasn't been blowing hot air at all through the front vents so I set out to change the valve.
I ordered part # A 211 832 06 84.
I received it and it looked right.
Wasnt until I removed my old valve ( part # A 211 832 05 84 ) that I realized they are different!!
Ugh !!
The new part is on the right and it has an extra nozzle.
Did you determine what the extra nozzle was for on the new heater valve and what it connects to?
Were they the exact same part and did it fit okay?
The extra nozzle is for cars with option 228 auxiliary heater. Do a search for w211 option 228 webasto. I don't think it was available in the US. It's a fuel based heating unit tucked a front fenderwell. You likely have the wrong part.
Okay, last weekend was frickin hot in So-Cali reaching 90+ and that�s when I first started to experience extremely hot air blowing out from the rear vents (B-pillar and from center console). My front a/c vents were working fine, but the hot air being blown to the rear passenger area was unbearable. I remember seeing several threads of people experiencing the same problem and since my car is no longer under warranty, I decided to tackle the job myself. Thanks to Konigstiger, found the culprit to be with the changeover valve. https://mbworld.org/forums/showpost....49&postcount=2
So here I go, on with another DIY.
Tools required:
Flatnose screwdriver
Needle nose pliers
An extended angle needle nose pliers
Ratchet
13MM socket
T25 Torx wrench or screwdriver
Wire coat hanger
Parts needed:
New changeover valve (part #A211 832 05 84). This is probably a revised valve w/ a new design since my faulty valve has the part #A211 832 00 84.
Here is what the changeover valve looks like. (old valve unit)
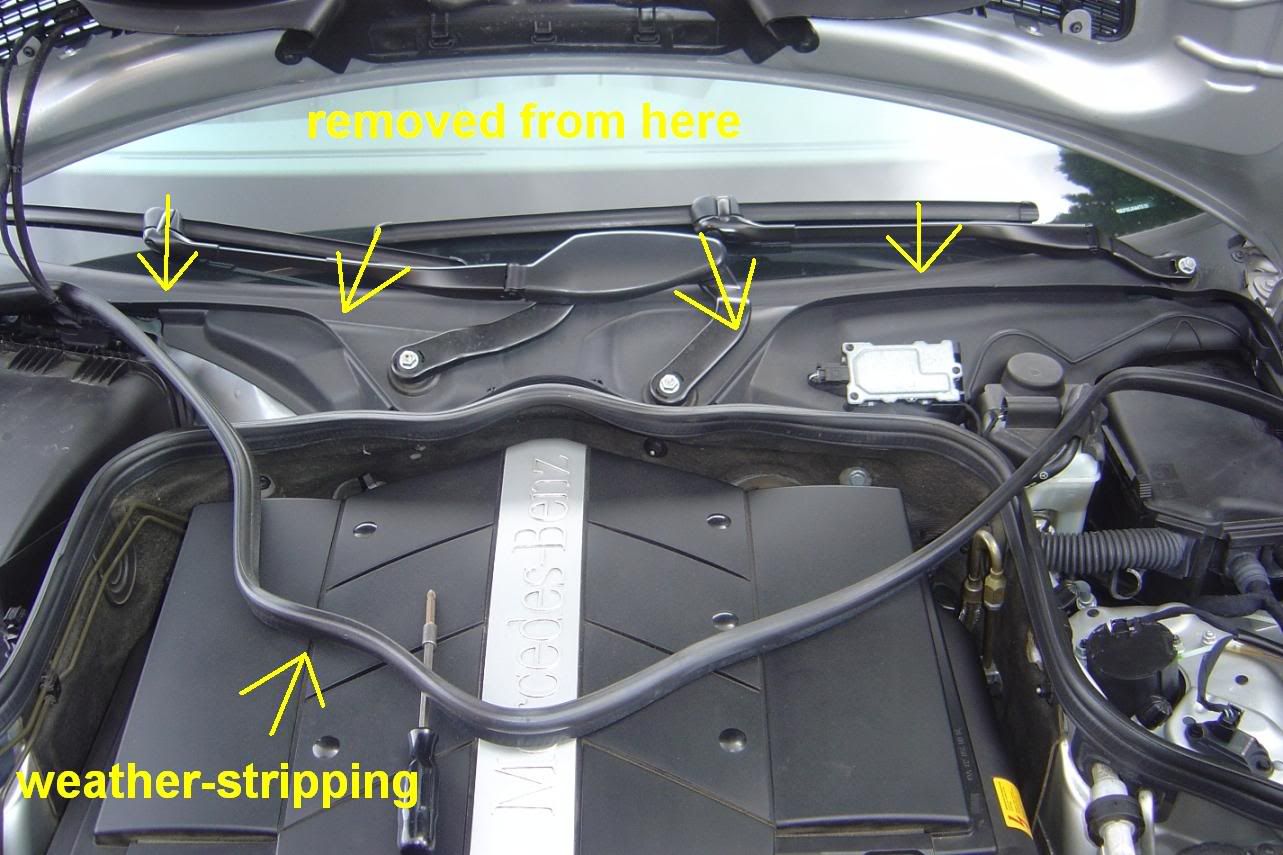
1st, remove the outer weather-stripping
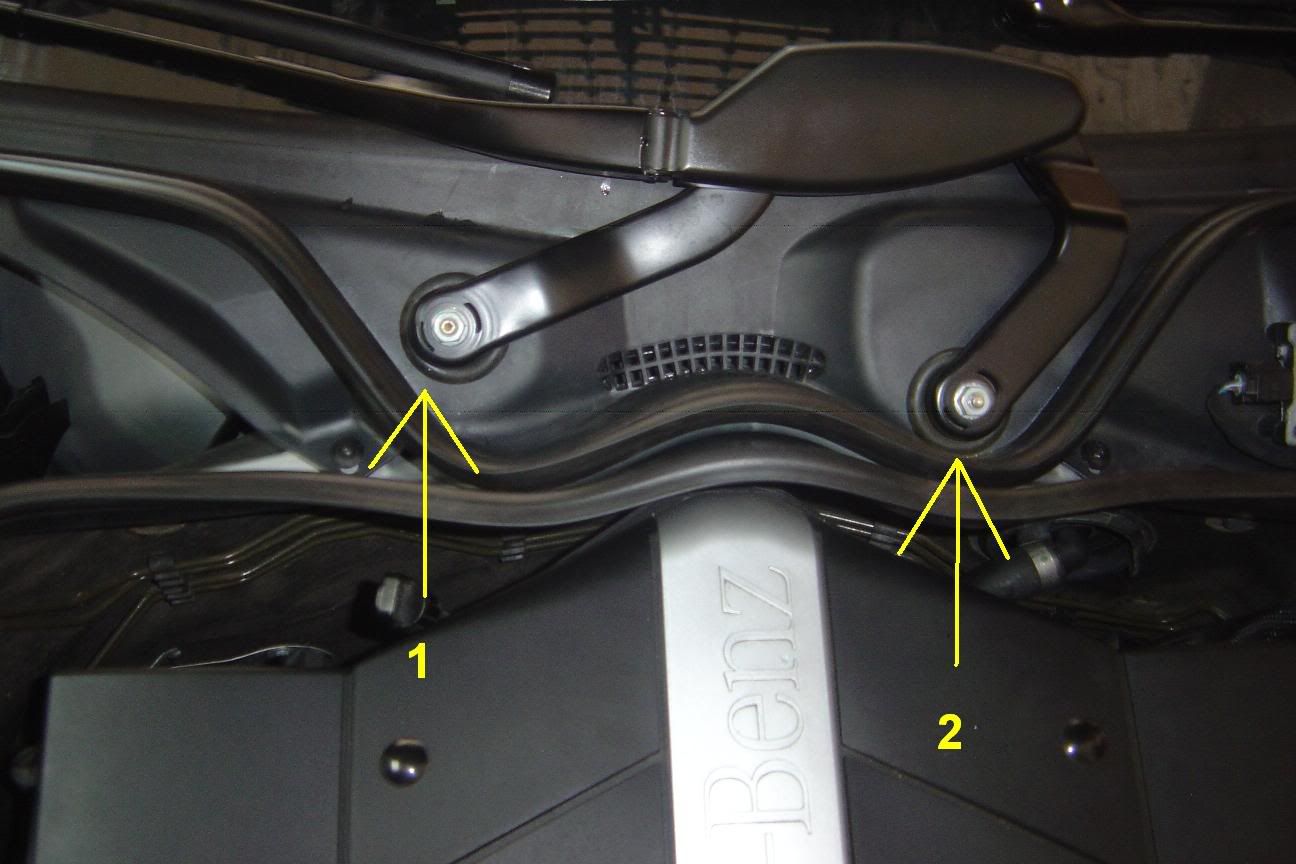
2nd, you�ll need to remove both wiper arm assembly with a ratchet and a 13mm socket. Here are the 3 nuts you�ll need to remove.
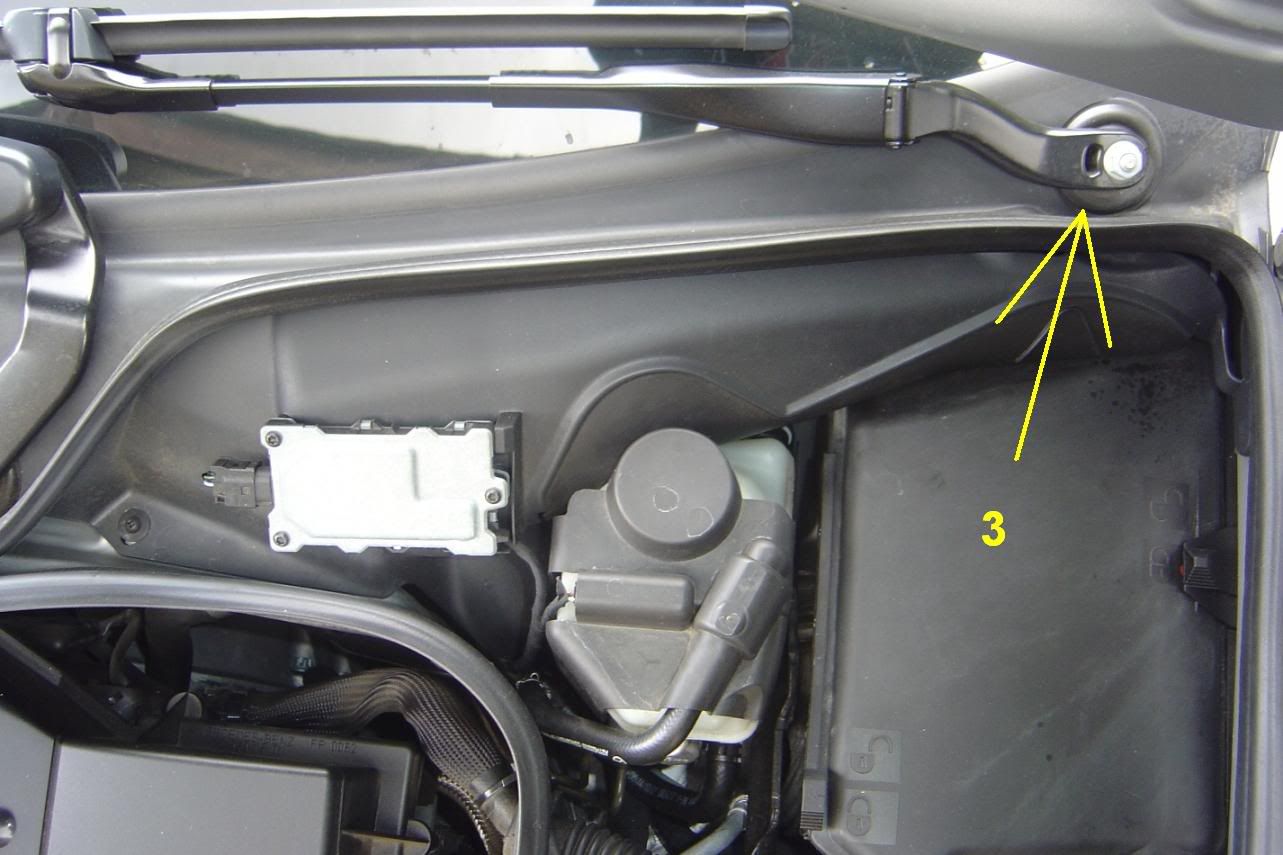
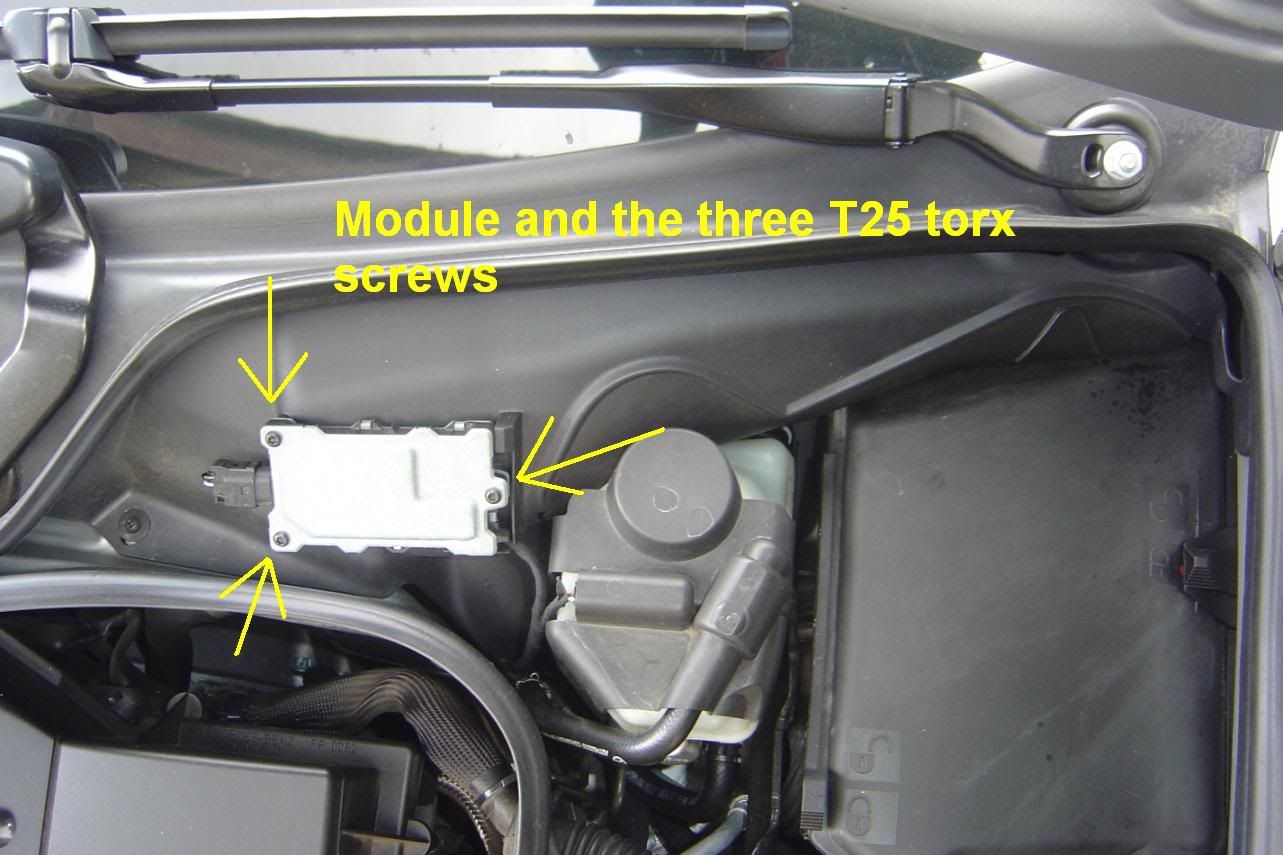
Next remove this module on the driver�s side. I�m not sure what it exactly does, but you�ll need to unscrew it from the plastic trim panel. Using the T25 Torx screwdriver or wrench, remove the 3 screws and set the module aside. You don�t even need to disconnect it.
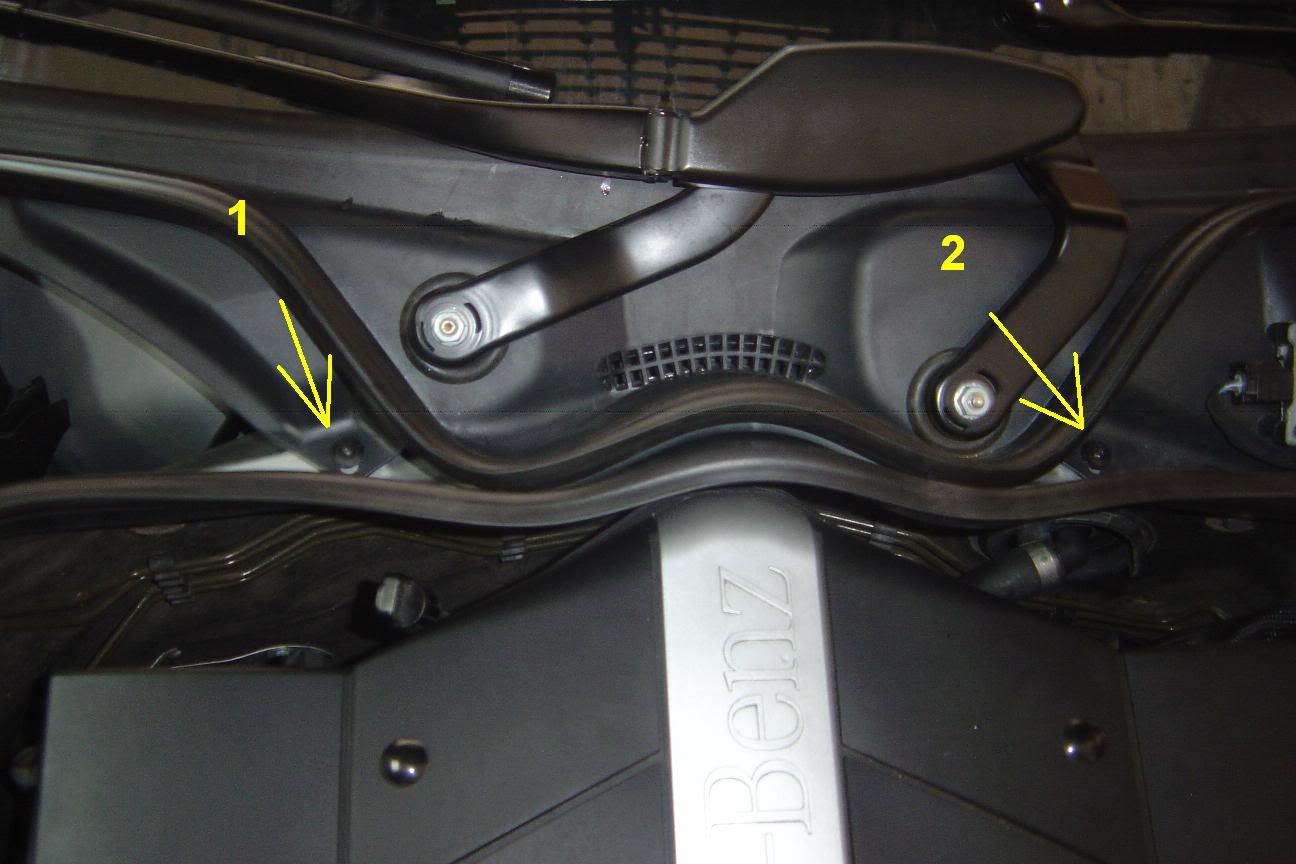
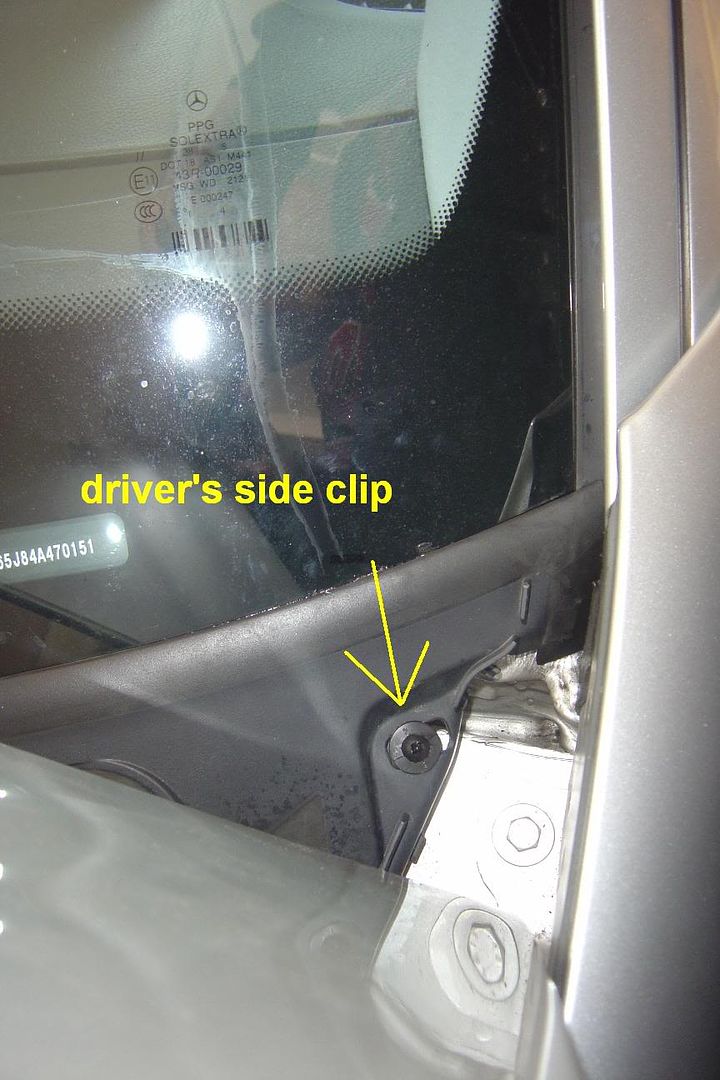
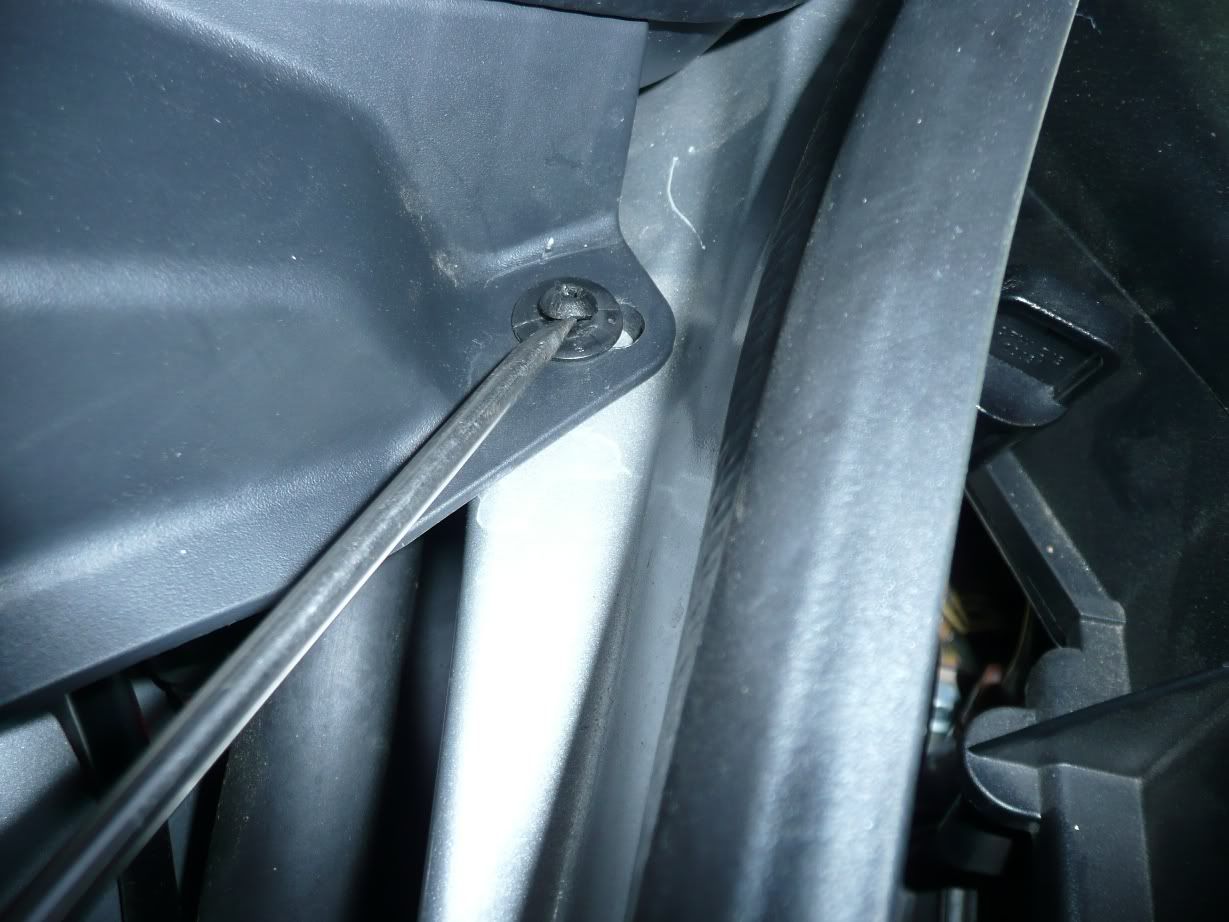
Now you�ll need to remove plastic trim panel that sits at the bottom of the windshield. It is secured down with 4 plastic clips. (they look like philip plastic screws). To remove these clips you gently slide a thin flathead screwdriver under the head of the clip and pry it up high enough so that you could use the needle nose pliers to pull on the shaft. Do not remove the shaft, just pull it out � of an inch or less then remove the clip.
Location of plastic clips
Prying the shaft
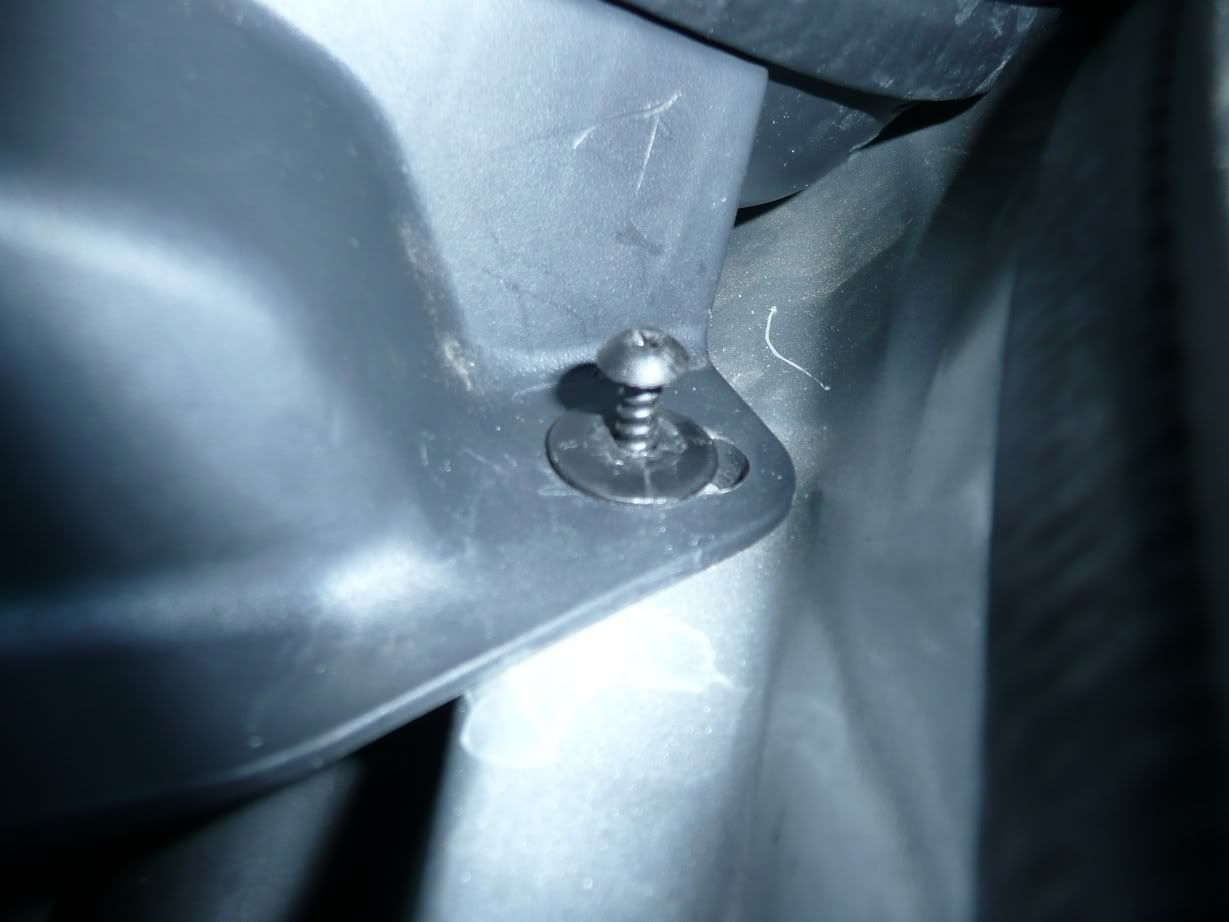
Shaft extended out
Clip finally removed
At the bottom of the plastic trim panel is a big rubber hose that you�ll need to disconnect. On the passenger side, you�ll need to unhook the 2 electrical wires from the hanger. Now you could remove the plastic trim panel.
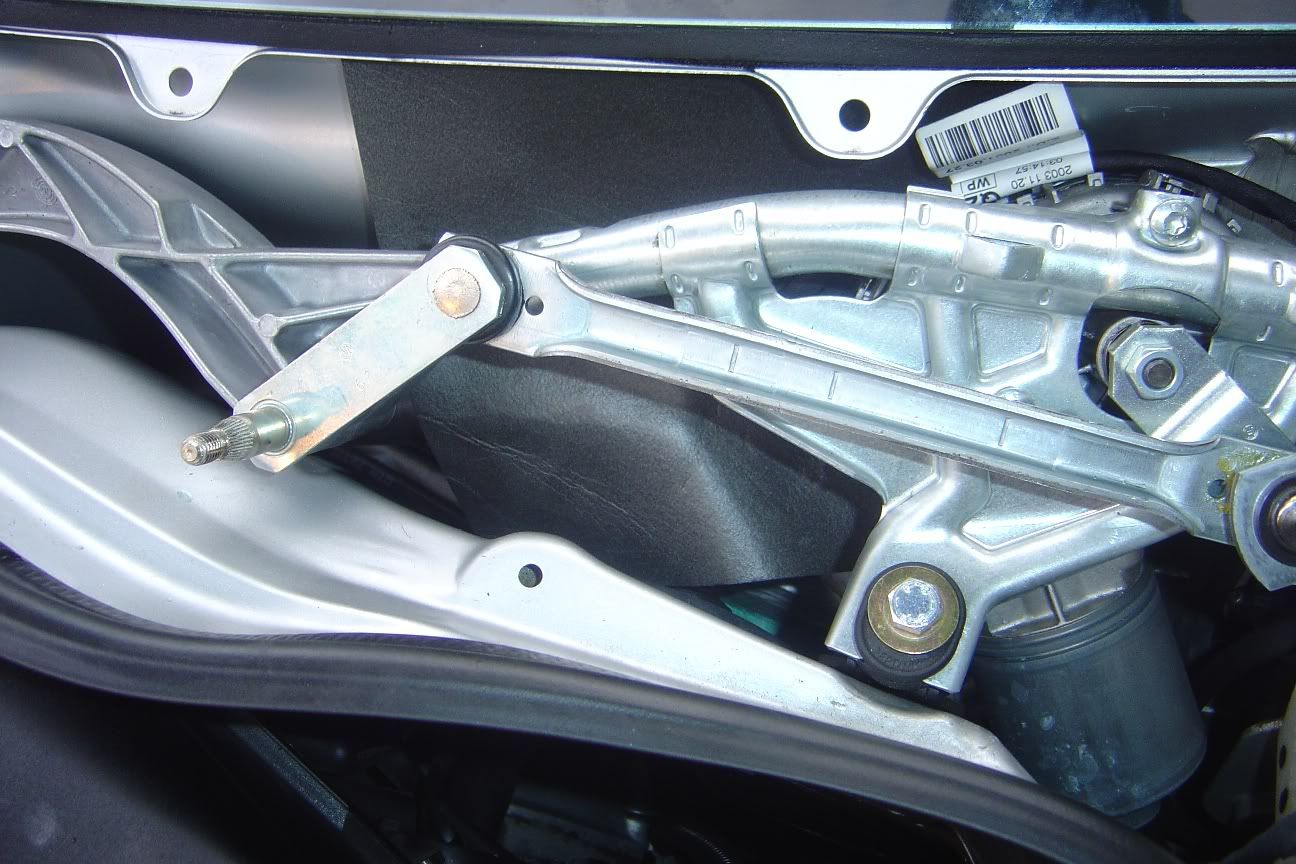
When you remove the plastic trim, you�ll see more wiper arm linkages as seen in the pic.
The changeover valve is covered with this thin foam padding. Just unfold it and tuck it under the wiper linkages. Next, you�ll need to reposition the linkages so you that you could access the valve. Gently push on the linkages until you have enough room. Now you�ll see the changover valve nested on the driver�s side firewall. If you have big hands like myself, you�ll be in a world of hate because it�s a tight squeeze!!
The valve has a total of 4 openings, 3 of which have a built in clip/lock and there is one socket for an electrical connector. In order to install or remove the tube/hose, you�ll need to unlock these locks by pulling on the clip outward.
Clips in locked position
Clips in unlocked position
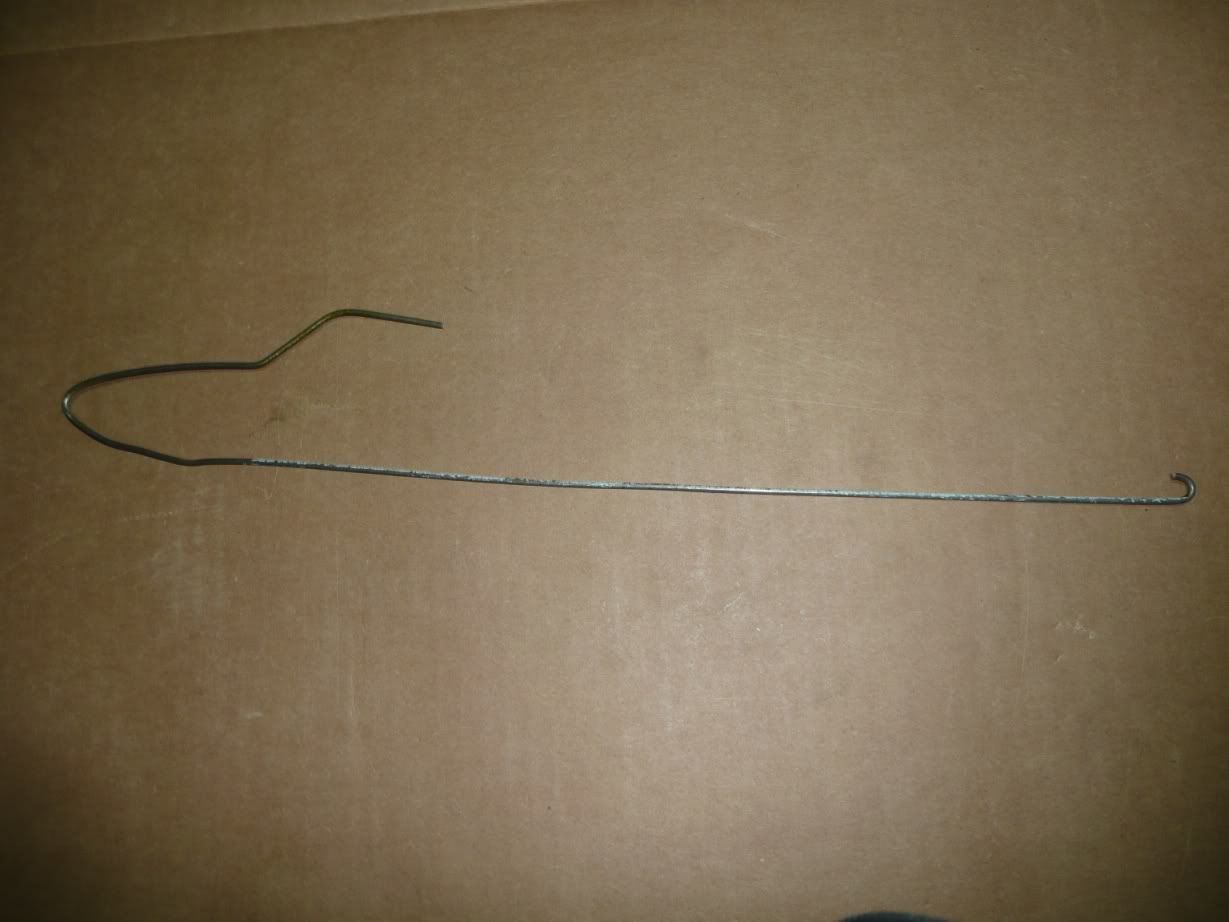
Since the valve is located in an extremely tight area, this is where a wire coat hanger will come in handy. Cut up a hanger then at the end, make a small hook. You�ll use this to unlock the clips. One of the locking clips is accessible between the engine and partition.
Coat hanger
Unlock clip with coat hanger
Hose removed: (small amount of coolant will leak out)
The 4th opening is connected to a hose that has a clamp. Use your angled needle nose pliers to remove this clamp and hose, then disconnect the electrical connector. The 2 locking clips are up against the firewall. From the driver�s side, use your coat hanger again to unlock the top clip. Now from the passenger�s side, use your coat hanger to unlock the bottom clip. Now with everything disconnected, remove the valve body unit and install the new one in reverse order. Make sure you lock them clips! Reposition the wiper linkages back to their normal state and flip the foam padding back over the valve. Reinstall plastic trim, electronic module, weather-stripping and wiper arms. Now enjoy your a/c!
Did this job recently on an 05 E55 & its 10x easier if you remove the wiper linkage & the air boxes. With those removed there is an abundance of room. My valve had 3 o-rings already in it despite the parts description explicitly saying 3 o-rings are needed.
My 2003 E500 I had the same issues. Blowing cool air from the front vents. Rear vents blowing hot air. I followed this DIY down to the coat hanger...Perfect fix. Cowl needed to be replaced (Revised part Number: 2118301213).
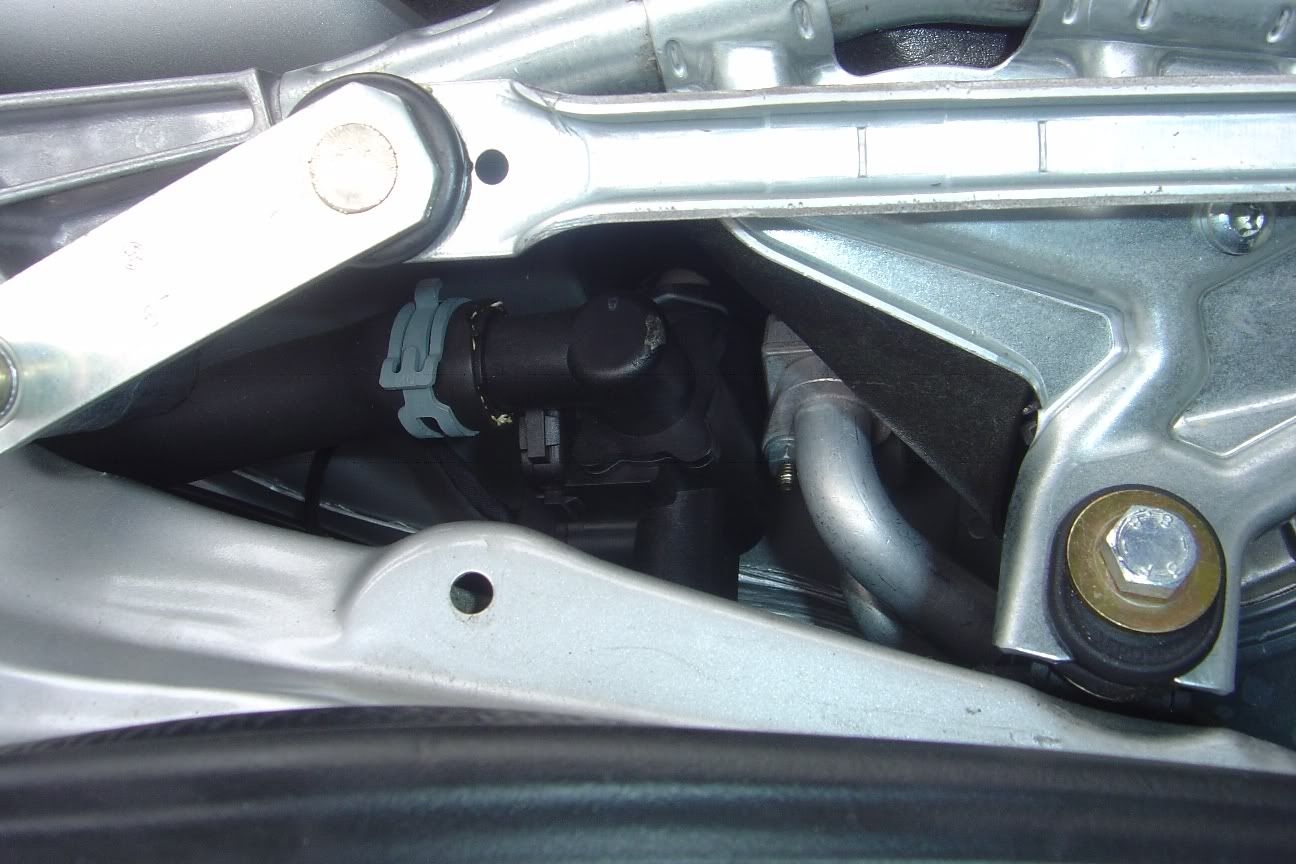
I recently changed my valve out, symptoms were the usual cold air only regardless of heat setting. Now my vehicle is a right hand drive, which is different from the left hand drive vehicles as Mercedes in their wisdom buried the valve under the master brake cylinder on the RHD W211.
Swapping the valve out is difficult due to space restrictions, not impossible but very challenging I can see why many leave it to a garage to attempt took me 4 hours, which is what the inde quoted me for the same job, the most difficult part by far placing the valve back under the master cylinder.
For all you with RHD vehicle here are some tips which I hope will help.
� Follow above instructions to remove wipers, cowling etc.
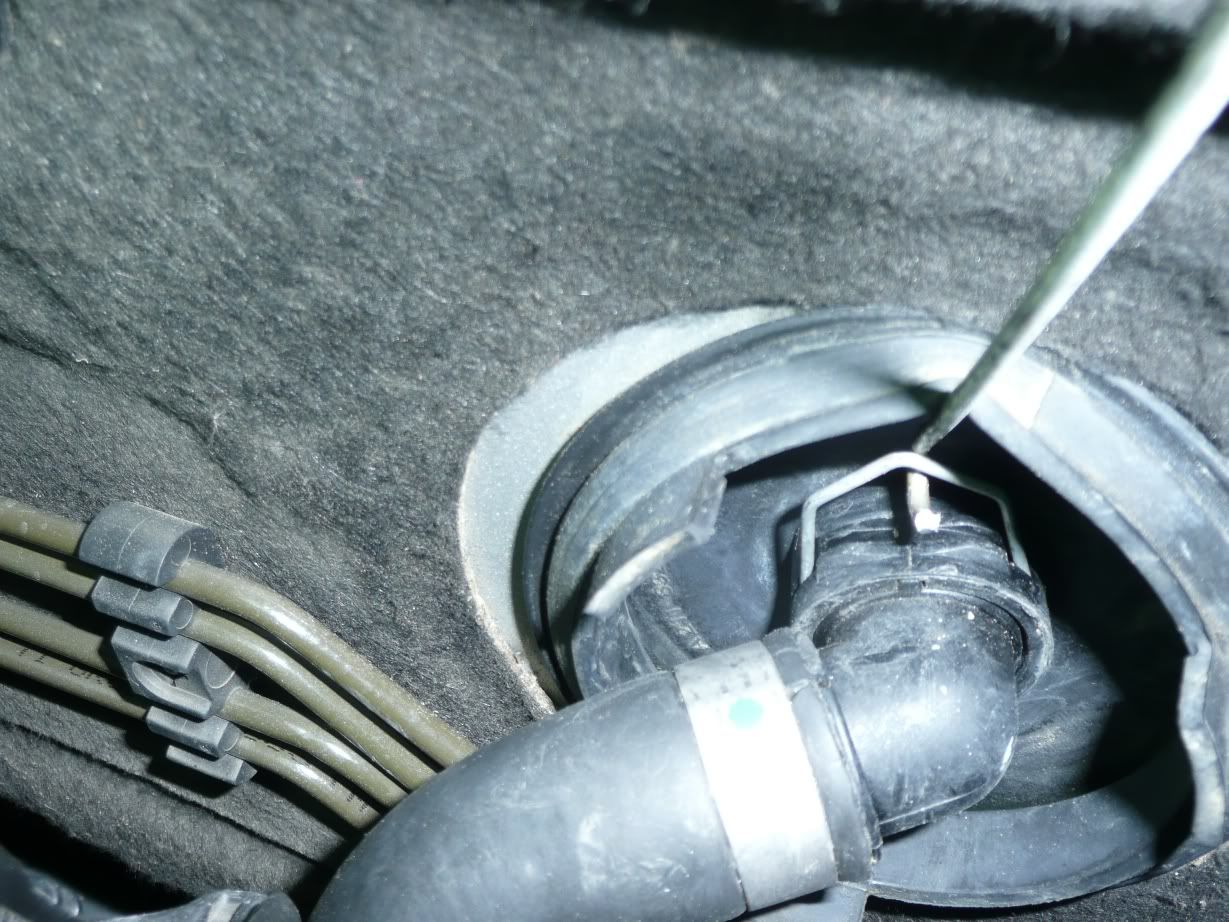
� Detach hoses from firewall which run into heater core I used a hose hook for this.
� With on hand reach down and grab valve it will be seated in on a bracket
� You need to pull the valve out of the bracket, you�ll need to wrestle with it but it will come lose
� Once the valve is loose pull the valve under and up on top, note how the valve comes out this will be critical later when you put the valve back.
� While the valve is out you need to remove the bracket under the master cylinder, it�s not needed and the valve will not go back with the bracket in place.
� Attach hoses to new valve including the electrical connector.
� The valve will only go back in one way basically the reverse of how you removed it, this is a real challenge and will take some time to get it right took me an hour!
I removed nothing additional I know others have talked about removing master brake cylinder and front SAM whilst you could do this it�s not necessary and would be a lot of additional effort. Hope this is of some help for all you with RHD vehicles.
Get rid of this bracket
Old valve
Last edited by nivram13; Oct 13, 2016 at 11:49 PM.
^^ That is a great help, mine is RHD, and I went to do it, and saw it was a harder job than planned.
Called the local Mercedes workshop ( non genuine ) and asked a price, he said $120, i said you have done it before, he said yeah.
i said okay, book me in.
later that day the phone rings...... your car is much harder than we planned !!
i said yeah i know, that why you got it, and I didn't do it !!
Anyway, they pulled the master and did it. cost me $170, which was okay still.
LHD. Did anyone of u guys use pinch off pliers to prevent the coolant from leaking when disconnecting the hose? Or is it not a big deal if they leak out when disconnected??
Mercedes SLR McLaren 722 S Is Extremely Rare Example Modified by McLaren
Slideshow: A one-of-one U.S.-spec Mercedes-Benz SLR McLaren Roadster became even rarer after a factory-backed transformation at McLaren's headquarters.