When you click on links to various merchants on this site and make a purchase, this can result in this site earning a commission. Affiliate programs and affiliations include, but are not limited to, the eBay Partner Network.
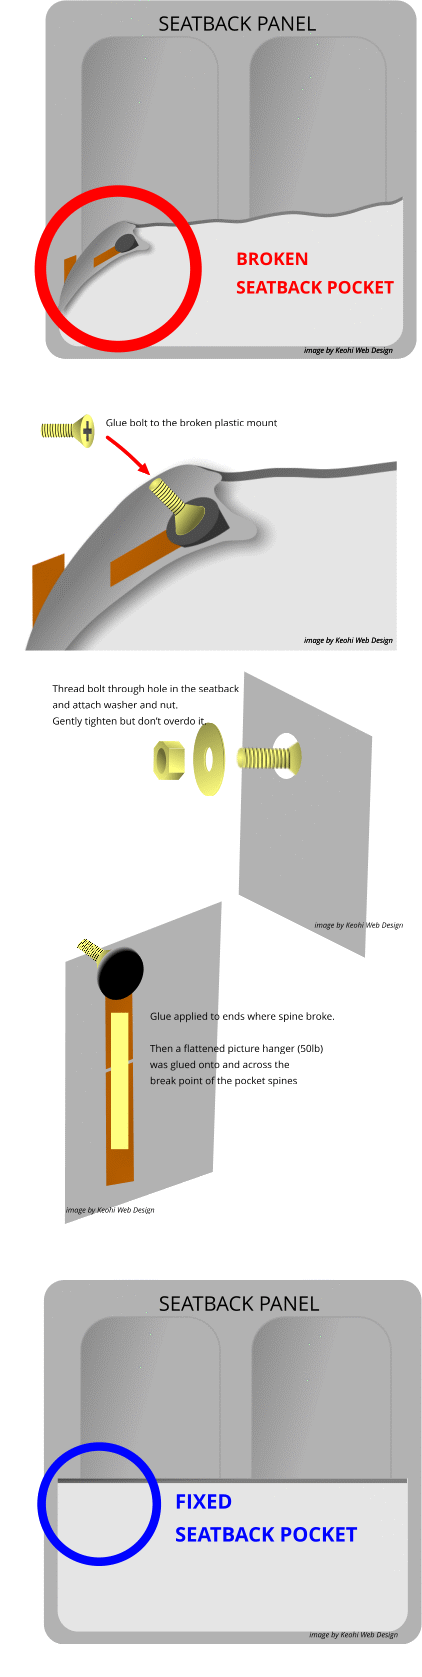
I finally got around to fixing the broken seatback pockets to my E350.
Essentially the plastic "rivet" that holds the top of of the seatback pocket has broken off due to wear and tear.
One cannot simply replace the seatback pocket. You have to replace the whole assembly. I initially thought about going the easy route and getting OEM replacements but figured I'd try repairing them first.
I was initially thinking about using little screws as another benz owner had done but after giving it more thought I figured I'd take a different approach.
It's actually simple and easy using simple tools and materials totaling under $10 purchased at Lowes hardware store.
Materials used:
- Gorilla Super Glue Gel
- Machine nuts and bolts (#8-32 x 1/2 in)... 12 pcs in a small bag .. Hillman 490415
- Flat washers (#10) ... 24 pcs in a small bag ... Hillman 490686
- Picture Hangers rated 50lbs ... 3 pcs .. Hillmand 122304
Tools used:
- A pair of pliers
- Hammer
- Screwdriver with star shaped head
STEP 1. REMOVE THE SEATBACK
- Removing the lumbar support handle by popping the little round rubber center cover.
- Unscrew the two screws at the bottom of the seatback back panel.
- Slide down the panel while slightly pulling out the wing with the lumbar stalk to release the seatback panel.
STEP 2: INSTALL A NEW "RIVET"
- Apply glue to the broken plastic "rivet" on the top of the seatback pocket.
- Set a #8-32 screw onto the broken "rivet" head and hold it for a few seconds to keep it in place.
- I added a few drops of glue around the edge of the screw after a few minutes to give it extra holding strength
- Let dry thoroughly. I waited about 30 minutes to ensure a strong bond.
STEP 3: ATTACH THE SEATBACK POCKET TO THE SEATBACK PANEL
- Line up and guide the newly installed screw on the seatback pocket through the hole on the seatback panel.
- On the other side of the panel, install a #10 washer, followed by a nut.
- Tighten with light pressure. Do not overtighten and risk separating the screw from the seatpocket.
STEP 4: REATTACH THE SPINES
- Lift the side of the seat pocket to see the spines.
- Line up the spines and apply glue to reattach them. Give ample time to let it dry.
- Get a picture hanger. Remove the bends with a pair of pliers. Flatten it with a hammer.
- Apply glue along the length of the picture hanger.
- Lift the side of seat pocket and lay the picture hanger with the glue side down onto the spines making you bridge the spines.
- Let it dry completely.
STEP 5: INSPECT YOUR WORK
- Check to make sure the screw is secure on the seatback.
- Check to make sure the picture hanger bridging the spines are glued securely.
STEP 6: REINSTALL THE SEATBACK PANELS
- Reverse the removal process.
- Note that the lumbar support handle install only one way on the stalk. You need to rotate it while slightly pushing down into the stalk. When you hit the location where it belongs, it will glide into place.
That's it. Hope this helps some.
Attached is a simple graphic of some of the steps for clarification.
Very happy with this repair. Looks and works like it was never broken.
Mahalo and Happy Holidays!
Last edited by eaglehawaii; Nov 28, 2018 at 05:23 AM.
Reason: Added a few final comments.
Tried fixing the sag on my w211 estate back seat pockets similar to your guide
Originally Posted by eaglehawaii
Aloha,
I finally got around to fixing the broken seatback pockets to my E350.
Essentially the plastic "rivet" that holds the top of of the seatback pocket has broken off due to wear and tear.
One cannot simply replace the seatback pocket. You have to replace the whole assembly. I initially thought about going the easy route and getting OEM replacements but figured I'd try repairing them first.
I was initially thinking about using little screws as another benz owner had done but after giving it more thought I figured I'd take a different approach.
It's actually simple and easy using simple tools and materials totaling under $10 purchased at Lowes hardware store.
Materials used:
- Gorilla Super Glue Gel
- Machine nuts and bolts (#8-32 x 1/2 in)... 12 pcs in a small bag .. Hillman 490415
- Flat washers (#10) ... 24 pcs in a small bag ... Hillman 490686
- Picture Hangers rated 50lbs ... 3 pcs .. Hillmand 122304
Tools used:
- A pair of pliers
- Hammer
- Screwdriver with star shaped head
STEP 1. REMOVE THE SEATBACK
- Removing the lumbar support handle by popping the little round rubber center cover.
- Unscrew the two screws at the bottom of the seatback back panel.
- Slide down the panel while slightly pulling out the wing with the lumbar stalk to release the seatback panel.
STEP 2: INSTALL A NEW "RIVET"
- Apply glue to the broken plastic "rivet" on the top of the seatback pocket.
- Set a #8-32 screw onto the broken "rivet" head and hold it for a few seconds to keep it in place.
- I added a few drops of glue around the edge of the screw after a few minutes to give it extra holding strength
- Let dry thoroughly. I waited about 30 minutes to ensure a strong bond.
STEP 3: ATTACH THE SEATBACK POCKET TO THE SEATBACK PANEL
- Line up and guide the newly installed screw on the seatback pocket through the hole on the seatback panel.
- On the other side of the panel, install a #10 washer, followed by a nut.
- Tighten with light pressure. Do not overtighten and risk separating the screw from the seatpocket.
STEP 4: REATTACH THE SPINES
- Lift the side of the seat pocket to see the spines.
- Line up the spines and apply glue to reattach them. Give ample time to let it dry.
- Get a picture hanger. Remove the bends with a pair of pliers. Flatten it with a hammer.
- Apply glue along the length of the picture hanger.
- Lift the side of seat pocket and lay the picture hanger with the glue side down onto the spines making you bridge the spines.
- Let it dry completely.
STEP 5: INSPECT YOUR WORK
- Check to make sure the screw is secure on the seatback.
- Check to make sure the picture hanger bridging the spines are glued securely.
STEP 6: REINSTALL THE SEATBACK PANELS
- Reverse the removal process.
- Note that the lumbar support handle install only one way on the stalk. You need to rotate it while slightly pushing down into the stalk. When you hit the location where it belongs, it will glide into place.
That's it. Hope this helps some.
Attached is a simple graphic of some of the steps for clarification.
Very happy with this repair. Looks and works like it was never broken.
Mahalo and Happy Holidays!
first time posting and I just wanna say I�m grateful for your post
here�s some pics from my fix
tips for anyone else doing ut
use a slower drying glue the qbond I used dried instantly which was a problem with alignment
clip down the nubs or stand offs as much as possible to get it to sit flush against the seat when fixed
maybe drilling through completely and using the screw through would also be a very sturdy solution
the qbond worked great for the plastic piece joinery because it comes with a plastic powered filler that can strengthen the repair a lot
picture hangers are great as well just install them on the INSIDE not like me as they are slightly visible as a bulge in the leather now
I bought some different screws but needed to use all of them in the end. The illustration from op make it look likes there�s only a few bolts needed but it�s 10 per seat
I�m in a metric country so 5mm bolts is kind of equivalent and half inch length was difficult to find but the shorter the better as there�s low clearance for excess at the bottom of the seat where it joins the base frame.
thank you for your guide bro.
Used Qbond instead of gorilla glue due to price 60 rand vs 350. Mistake in my opinion for the screws gel would be better
Found a replacement for sale online. If anyone doesn�t want to do the repair
I just found this on AliExpress: | Car Left Right Seat Panel Leather Backrest Trim Cover Panel For Mercedes BENZ E Class W211 2005-2008 E320 E500 https://a.aliexpress.com/_EwkeHIE
Mercedes SLR McLaren 722 S Is Extremely Rare Example Modified by McLaren
Slideshow: A one-of-one U.S.-spec Mercedes-Benz SLR McLaren Roadster became even rarer after a factory-backed transformation at McLaren's headquarters.