When you click on links to various merchants on this site and make a purchase, this can result in this site earning a commission. Affiliate programs and affiliations include, but are not limited to, the eBay Partner Network.
Need help or ideas repairing 2016 G550 rear door ambient light bulb at the elbow rest
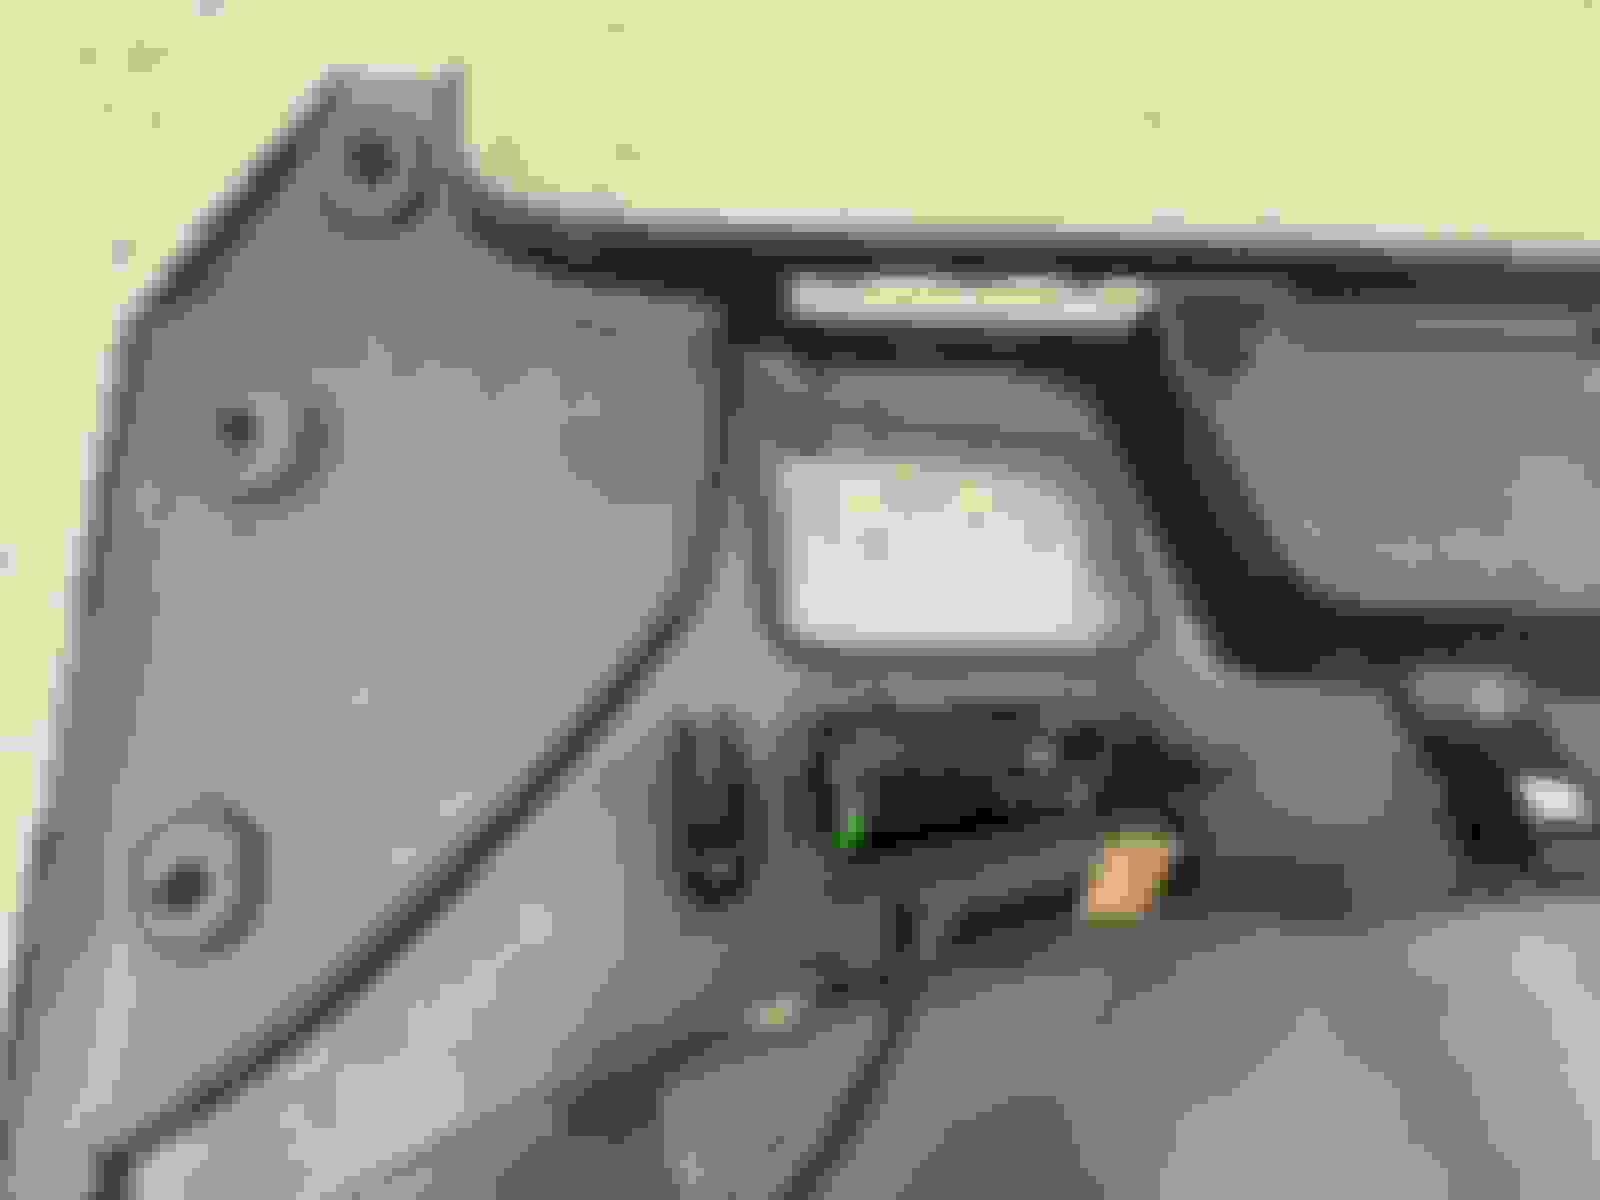
2016 G550. The ambient light strip along the elbow rest of the rear driver side door has not worked since I bought the vehicle used. First guess is the LED light itself is bad, so I am looking to replace the light and the little section of power ribbon leading up to where the door wiring plugs in. Any ebay listing for the door wiring does not include the LED light and the little section of wiring... circled in red in the attached picture.
I am wondering if I can just remove the old LED light and epoxy a standard 194 wedge LED bulb facing into the light tube, then wire directly from the brown and yellow wires at the harness to the bulb itself. Anyone with some experience and knowledge with W463 wiring, please let me know your thoughts.
Alright, so at this point I realize I'm probably just having an online conversation with no one, posting into a black hole. Nonetheless, I'm going to keep posting updates here as I research and work through the problem, in case someone later one finds this thread. So from a similar post on this forum (with no resolution), I got a photo of a defective LED light and ribbon piece, which I'm guessing is probably the same problem I'm having. It looks like the ribbon in the picture has a cut or defect halfway down that may have been causing a short. Regardless, if you look at the overall layout of the circuit, there are three wires going into the harness for the ribbon. It looks like there are two LEDs at the end of the ribbon, and each has a positive (+) lead. In the center of the ribbon is a shared Ground (-). It looks like there may have been a defective solder at the LEDs where the Ground touched the Positive, and it burned out and even the LED fell off. This makes me believe that you can just glue a generic LED at the end of the ambient light tube and connect power and ground directly from the brown and yellow wires that normally enter the harness. When I get around to it, I may try that and report back. For now, I have a few more important fixes to address.
Yeah, MB World has really become a ghost town on the W463 forum. Good to document for others int he future though.
Yes, you're thoughts seem correct. Best thing to do is to plug the contraption in and take a voltage reading on the supplied volage. I'm guessing 12V. Then buy a corresponding LED from Mouser or Digikey that fits the bill. You'll have to solder it on, or better yet get rid of the flex cable completely and just use normal wires if you're handy with a soldering iron.
Also your choice of LEDs will change the output color/temperature/intensity of the ambient lighting, so getting any random LED may not work well to match.
It seems this post hasn't been update for a long time, I found it because I recently got a 2015 G550 and all those ambient lights are out. I did replace them with generic LED with similar color, a tad dimmer than OEM but I am satisfy.
The cable that powered both door handle and armrest ambient lighting are from the speaker, the ones that hanging out from the speaker on the first picture.
One of the door handle light is also out, so I tap it onto the same cable and hot glue the new LED bulb onto the door handle housing where the light was suppose to be.
The ribbon cable was the original LED for the armrest ambient lighting, I pull that out and replaced it with the generic LED bulb and use electrical tape to hold it in place, it only shines from the front end of the light tube so the front will be brighter an dimmer towards the end of the tube. Same as the OEM.
These are the 12V generic LED bulb I use, they are pretty cheap around 20 bucks for maybe 20 of them on ebay.
Here is the finished product, both the handle and under armrest on this door are from the new LED.
Night time shot of the driver door.
Both front and rear doors.
The color looks much more matching to the OEM in real life than in photo, almost perfect match. You can choose any color you wanted also those generic LED comes in many different colors I believe. I am an amateur and took me around 3 hours to do all 4 doors, not bad to spend a weekend morning!
So glad you posted this. Thank you. I was putting off trying this because I was worried that directly wiring an LED to those brown and yellow wires might cause a problem with the door module or something, but now you proved it will work. Thank you.
So glad you posted this. Thank you. I was putting off trying this because I was worried that directly wiring an LED to those brown and yellow wires might cause a problem with the door module or something, but now you proved it will work. Thank you.
As of now after 3 weeks I don't see any problems with the lighting, I was kind of worry too at first but I just try it anyways. I believe the power from those 2 brown and yellow wires are just a very generic 12V and a ground but nothing complicated. Hopefully it will last and not ruin the module too in a long run!
Just a quick update - I had some downtime today so I swapped out the old amber LEDs for some brighter white ones. Definitely a bit of a change, but it's way brighter now and feels more modern with the white glow. Generic 12V 3014 white LED bulb.
You're right, the white does look more updated. I'll probably go with white as well.
I was wondering what size LED I need to buy. 3014 is pretty big - I believe the same size as the 194. So I guess when I do mine I'll just buy some 194 bulbs with sockets and connect the wires.
Was there a how-to page or video you referenced for taking off the door panel? I haven't done it before and I don't want break anything.
So here is a quick rundown of the process. I posted a pic of the tiny 3014 LEDs I used - they're super cheap on Amazon and come in a roll. They're actually really small, but they're perfect for this job. I used a generic 12V white color ones, and it's way brighter than the old amber one.
So, here's how I did it: I cut the LEDs to fit and bent them around the light tube. You have to cut them into strips of three LEDs each, and they're flexible, so you can wrap them around the tube. I put one LED at the tip of the tube, where the OEM light is, and the other two on the sides of the tube. You can hot glue them onto the tube or wrap them on with 3M electrical tape - I used the tape because it's easier to remove if I ever want to change them again.
To wire them up, just connect the strip to the +/- points - it's really easy and straightforward. You can solder any car electrical wire on or hot glue it on; either way works.
Now, for the door cards: it's pretty straightforward. For the front doors, there are six screws on the front and five on the rear - make sure you remember which ones go where because they're all different sizes and lengths! Once you remove the screws, unscrew the lock pin and remove it, then gently pull the door card off. Be careful of the lock pin when you pull the door card off - it can get caught in the hole. Also, wear some thin gloves so you don't cut your hand.
First, disconnect the door handle cable - it's easy, just unhook the hook it from the handle and pull the cable out from the bottom of the handle. Make sure you install the cable back properly with the cable end stopper in place, or else the door won't lock or open. For the rear doors, you don't need to disconnect anything electronic - just remove the screws and gently pull the door card off.
For the front, the window switch and door adjusting switch cables are really short, so you'll need to unplug them too right after you remove the door handle cable. Other than that, it's the same procedure as the rear doors.
Some of the black door card clips will break when you pull the door cards off, so grab a pack of replacements from Amazon (around $15 for 30) or use the OEM part number (4639880278) if you want to go that route.
Originally Posted by farmdog
You're right, the white does look more updated. I'll probably go with white as well.
I was wondering what size LED I need to buy. 3014 is pretty big - I believe the same size as the 194. So I guess when I do mine I'll just buy some 194 bulbs with sockets and connect the wires.
Was there a how-to page or video you referenced for taking off the door panel? I haven't done it before and I don't want break anything.
So here is a quick rundown of the process. I posted a pic of the tiny 3014 LEDs I used - they're super cheap on Amazon and come in a roll. They're actually really small, but they're perfect for this job. I used a generic 12V white color ones, and it's way brighter than the old amber one.
So, here's how I did it: I cut the LEDs to fit and bent them around the light tube. You have to cut them into strips of three LEDs each, and they're flexible, so you can wrap them around the tube. I put one LED at the tip of the tube, where the OEM light is, and the other two on the sides of the tube. You can hot glue them onto the tube or wrap them on with 3M electrical tape - I used the tape because it's easier to remove if I ever want to change them again.
To wire them up, just connect the strip to the +/- points - it's really easy and straightforward. You can solder any car electrical wire on or hot glue it on; either way works.
Now, for the door cards: it's pretty straightforward. For the front doors, there are six screws on the front and five on the rear - make sure you remember which ones go where because they're all different sizes and lengths! Once you remove the screws, unscrew the lock pin and remove it, then gently pull the door card off. Be careful of the lock pin when you pull the door card off - it can get caught in the hole. Also, wear some thin gloves so you don't cut your hand.
First, disconnect the door handle cable - it's easy, just unhook the hook it from the handle and pull the cable out from the bottom of the handle. Make sure you install the cable back properly with the cable end stopper in place, or else the door won't lock or open. For the rear doors, you don't need to disconnect anything electronic - just remove the screws and gently pull the door card off.
For the front, the window switch and door adjusting switch cables are really short, so you'll need to unplug them too right after you remove the door handle cable. Other than that, it's the same procedure as the rear doors.
Some of the black door card clips will break when you pull the door cards off, so grab a pack of replacements from Amazon (around $15 for 30) or use the OEM part number (4639880278) if you want to go that route.
Super helpful. I'm shocked there is no youtube video on a how-to. Would definitely be utilized.
Where are you connecting the new led strip and where are you taking the power from? You mention the the speaker wire so you just tap into that? Can you tap into this? This is from the handle.
Mercedes SLR McLaren 722 S Is Extremely Rare Example Modified by McLaren
Slideshow: A one-of-one U.S.-spec Mercedes-Benz SLR McLaren Roadster became even rarer after a factory-backed transformation at McLaren's headquarters.