When you click on links to various merchants on this site and make a purchase, this can result in this site earning a commission. Affiliate programs and affiliations include, but are not limited to, the eBay Partner Network.
I want to change my wood trim for a different colour. My car atmosphere lighting package. Is the trim interchangeable with non lighting package vehicles? I haven't popped any off yet but it looks like the light is behind he trim, not in it.
Also, anyone with dark burlwood that wants to trade for the Ashwood?
It's a shame, my trim doesn't have a single crack, and I doubt I'll find any in same condition but I don't like the colour
Just a thought... while I have not done this personally, I've read/seen pics of guys (not just MB) that have had their trim "vinyl wrapped". It comes out looking fantastic. The colors/patterns are almost endless... carbon fiber, brushed aluminum... blackout... burl wood... etc. Google a bit for "3M Di-Noc vinyl" (although I'm sure there are other brands). Chances are, there's a car speciality shop (check into places that do hi-end audio to start with) in your area that does this.
I want to change my wood trim for a different colour. My car atmosphere lighting package. Is the trim interchangeable with non lighting package vehicles? I haven't popped any off yet but it looks like the light is behind he trim, not in it.
Also, anyone with dark burlwood that wants to trade for the Ashwood?
It's a shame, my trim doesn't have a single crack, and I doubt I'll find any in same condition but I don't like the colour
I can't fault you for the look of that wood trim. I'm not a fan of it myself. I got lucky with the dark wood.
I don�t have first hand experience with removing the trim and how it integrates with the ambient lighting, but I think I read somewhere in another thread that the light strips were part of the trim. This could have been about the X166 or W166 platform, though. I hope I'm wrong for your sake. I'm guessing that you want to keep the lighting. I'm not sure if you could, were you to find f a donor vehicle without that option.
Just a thought... while I have not done this personally, I've read/seen pics of guys (not just MB) that have had their trim "vinyl wrapped". It comes out looking fantastic. The colors/patterns are almost endless... carbon fiber, brushed aluminum... blackout... burl wood... etc. Google a bit for "3M Di-Noc vinyl" (although I'm sure there are other brands). Chances are, there's a car speciality shop (check into places that do hi-end audio to start with) in your area that does this.
I have checked out vinyl before. I don't know if it was not good quality maybe, but it lacks the depth that the veneer has I think. Like our trim will look different depending on the angle you look at it, due to the grain of the wood.
Originally Posted by expl0rer
I can't fault you for the look of that wood trim. I'm not a fan of it myself. I got lucky with the dark wood.
I don�t have first hand experience with removing the trim and how it integrates with the ambient lighting, but I think I read somewhere in another thread that the light strips were part of the trim. This could have been about the X166 or W166 platform, though. I hope I'm wrong for your sake. I'm guessing that you want to keep the lighting. I'm not sure if you could, were you to find f a donor vehicle without that option.
Nice! So you got the dark burlwood type? Yes I do want to keep the lighting. It's a nice touch imho. I guess I will try to pop a piece off and see if the light is attached or not. It is really only a concern on the front trim too. The doors don't have light in them.
Nice! So you got the dark burlwood type? Yes I do want to keep the lighting. It's a nice touch imho. I guess I will try to pop a piece off and see if the light is attached or not. It is really only a concern on the front trim too. The doors don't have light in them.
Interesting about the doors not having lights I guess MB went half @$$ on that. They had the hard part with the dash, why not just go all the way around. I don't see the point of having two options for something like this.
I have the dark burl, it blends in with the black leather nicely. It has a few scratches on the veneer, but none are broken and I dont look at the scratched trim often so not something that bothers me. The other two wood inserts looked too much out of place for my taste. I had other more important requirements for options when I was looking for a GL so I would have overlooked the wood trim if it weren't the dark burl, but lucked out with the specimen I came upon, it had that option.
It seems like you may be able to buy trim with the lighting package in the doors as well, but won't be able to connect them if you don't have a harness. Or you might have a harness already and just plug and pray. Sorry, old IT joke, couldn't resist. 🙂
This is where it gets fun. Take off parts to inspect, reinstall unless you don't mind a half disassembled car to drive around (safely!), hunt for parts, order, wait, reassemble.
Odd. Im wondering if the connection behind the door skins are unplugged or the previous owner unplugged them?
There's actually only one (1) LED for each door. The LED is in a small plastic housing that connects to a lightbar. I have the part numbers for the lightbar if needed.
Odd. Im wondering if the connection behind the door skins are unplugged or the previous owner unplugged them?
There's actually only one (1) LED for each door. The LED is in a small plastic housing that connects to a lightbar. I have the part numbers for the lightbar if needed.
Hey Guys! I am so sorry, I did not get notified of the last 3 responses for some reason. I just am starting to revisit the idea of switching out the wood trim again, and was searching for wood codes and came up with my original post here lol
So I think I was unclear, and should clarify. My doors do have lighting in them just like expl0rer's pictures show! What I was trying to say is that the wood pieces in the doors do not have the LEDs, so that if I had to find "LED specific" wood trim pieces, it would only be for the dashboard. (IE the lighting in the doors is at the handle vice in the wood trim pieces).
expl0rer, I love that you did that! Was this hard? is it a full LED strip you had to replace? or is it like a fiber running the length of the trim, with LED bulb shining into it?
Are you referring to the blue led lighting? That wasn't me. It was Yup497. Mine are "standard" OE yellow hue. I like the yellow hue, personally, on setting 3. Barely noticeable when driving and handy when stopped and trying to handle something.
Judging by Yup497's post, it should not be hard. The wood trim should have the optical strip already, you just need to change the light source in the door (behind the trim) to your preferred colour. Now, you were saying that your door trim did not have the lighting, only the dash did. If you wanted to add lighting to the doors, I think you'd have to find a donor car with the correct packages (wood and lighting). Do you have any of the options I posted on your build sheet/data card? Datamb.com should give you the options your car originally came with.
Edit: when I said you'd need a donor car with the correct packages, you could have two donor cars, actually. One for the wood trim, another for the lighting package. It should make the search easier. Or aftermarket lighting might be available too.
I do have lighting in the doors just like Yup (thanks for correction, that is who I was referring to). I'm saying that the lighting in the doors is not at the wood trim, but rather at the door handle.
I have not tried datamb. Will give that a shot. I have been using the vin decoder site, though they are probably similar.
I'm wondering if all the wood trim can accommodate the optical strip, or only trim with lighting package.
It's official! I'm stupid today. And every other day I was thinking the lighting ran along the wood trim in the doors. It obviously is not. It is only running along the wood trim on the dash. Like you and Yup497, on mine the lighting on the doors is along the door handles, not the wood trim. I had to take a look to be sure I wasn't losing it. Evidently I've been spreading misinformation on this thread left, right and centre. Apologies for that!
Datamb and lastvin provide the same information.
I'm not sure about whether the wood trim would be the same for specimens with and without the lighring package.
Hahaha No worries mate! Happens to everyone
I think I may have found the donor piece from a GL550 light package and dark wood. Just waiting on seller to confirm. If not, maybe I will buy the cheapest non-light package piece just to compare to mine and see if they are interchangeable.
Yes the LED bars run under the wood trim but are actually attached to the dash.
If you want to see a better view of what it looks like and you have factory ambient lighting, take a plastic trim tool and pop off the silver piece on the driver's or passenger side doors. You'll see the clear LED bar.
In reference to the color of the wood. I have the factory dark wood now, center console and on the doors.
I did purchase a black wood that I really like for the cup holder area on the console I believe to be either from an ML or similar. I haven't installed it yet.
Are the LEDs pretty easy to find? (to change color like you did)
So you will have two different colors of wood? everything dark brown, and just the cup area is black? Interesting how that will look. That piece of trim is easy to swap out btw, if you have not tried yet.
Are the LEDs pretty easy to find? (to change color like you did)
So you will have two different colors of wood? everything dark brown, and just the cup area is black? Interesting how that will look. That piece of trim is easy to swap out btw, if you have not tried yet.
There's only 1 LED per LED bar.
In order to access the 1 LED that illuminates the bar under the silver trim on the driver and passenger door, you have to remove the door skin and you'll see a tiny black box that attaches to the LED bar..
Since I have factory ambient lighting, I just swapped the yellow LED diode to a blue LED diode. Used the small box that the original LED came in and reattached it.
On my heads up display I have the option to adjust the brightness. I'm sure there's a way to swap out the yellow LED diode to a red, green, blue, however you wouldn't be able to use the factory HUD to adjust it.
It cost me maybe $12 and some time. I did do a write up on it in a thread on here.
My cup holders also illuminate from factory and I replaced those to blue as well.
As far as the trim goes, I planned on purchasing the rest of the center stack in the black piano trim, just never got around to it.
Oh man, I am going to find that write up. I do not have cupholder lights =( going to figure that out too. I ended up buying whole dash with wood trim pieces from a 550 that has the illumination package.
If you are still interested in the black wood trim for the rest of the center stack, maybe we can do tradesies? =) If our colors match up obviously. Pretty sure none of my trim has any cracks in it. Only the cupholder piece has a crack, but you do not need that anyway
Just wanted to update, in case anyone is searching for answers on this topic.
I scored some dark brown dash trim pieces with light bar. One of the pieces required some repair, and I must say, epoxy worked well to hide a crack.
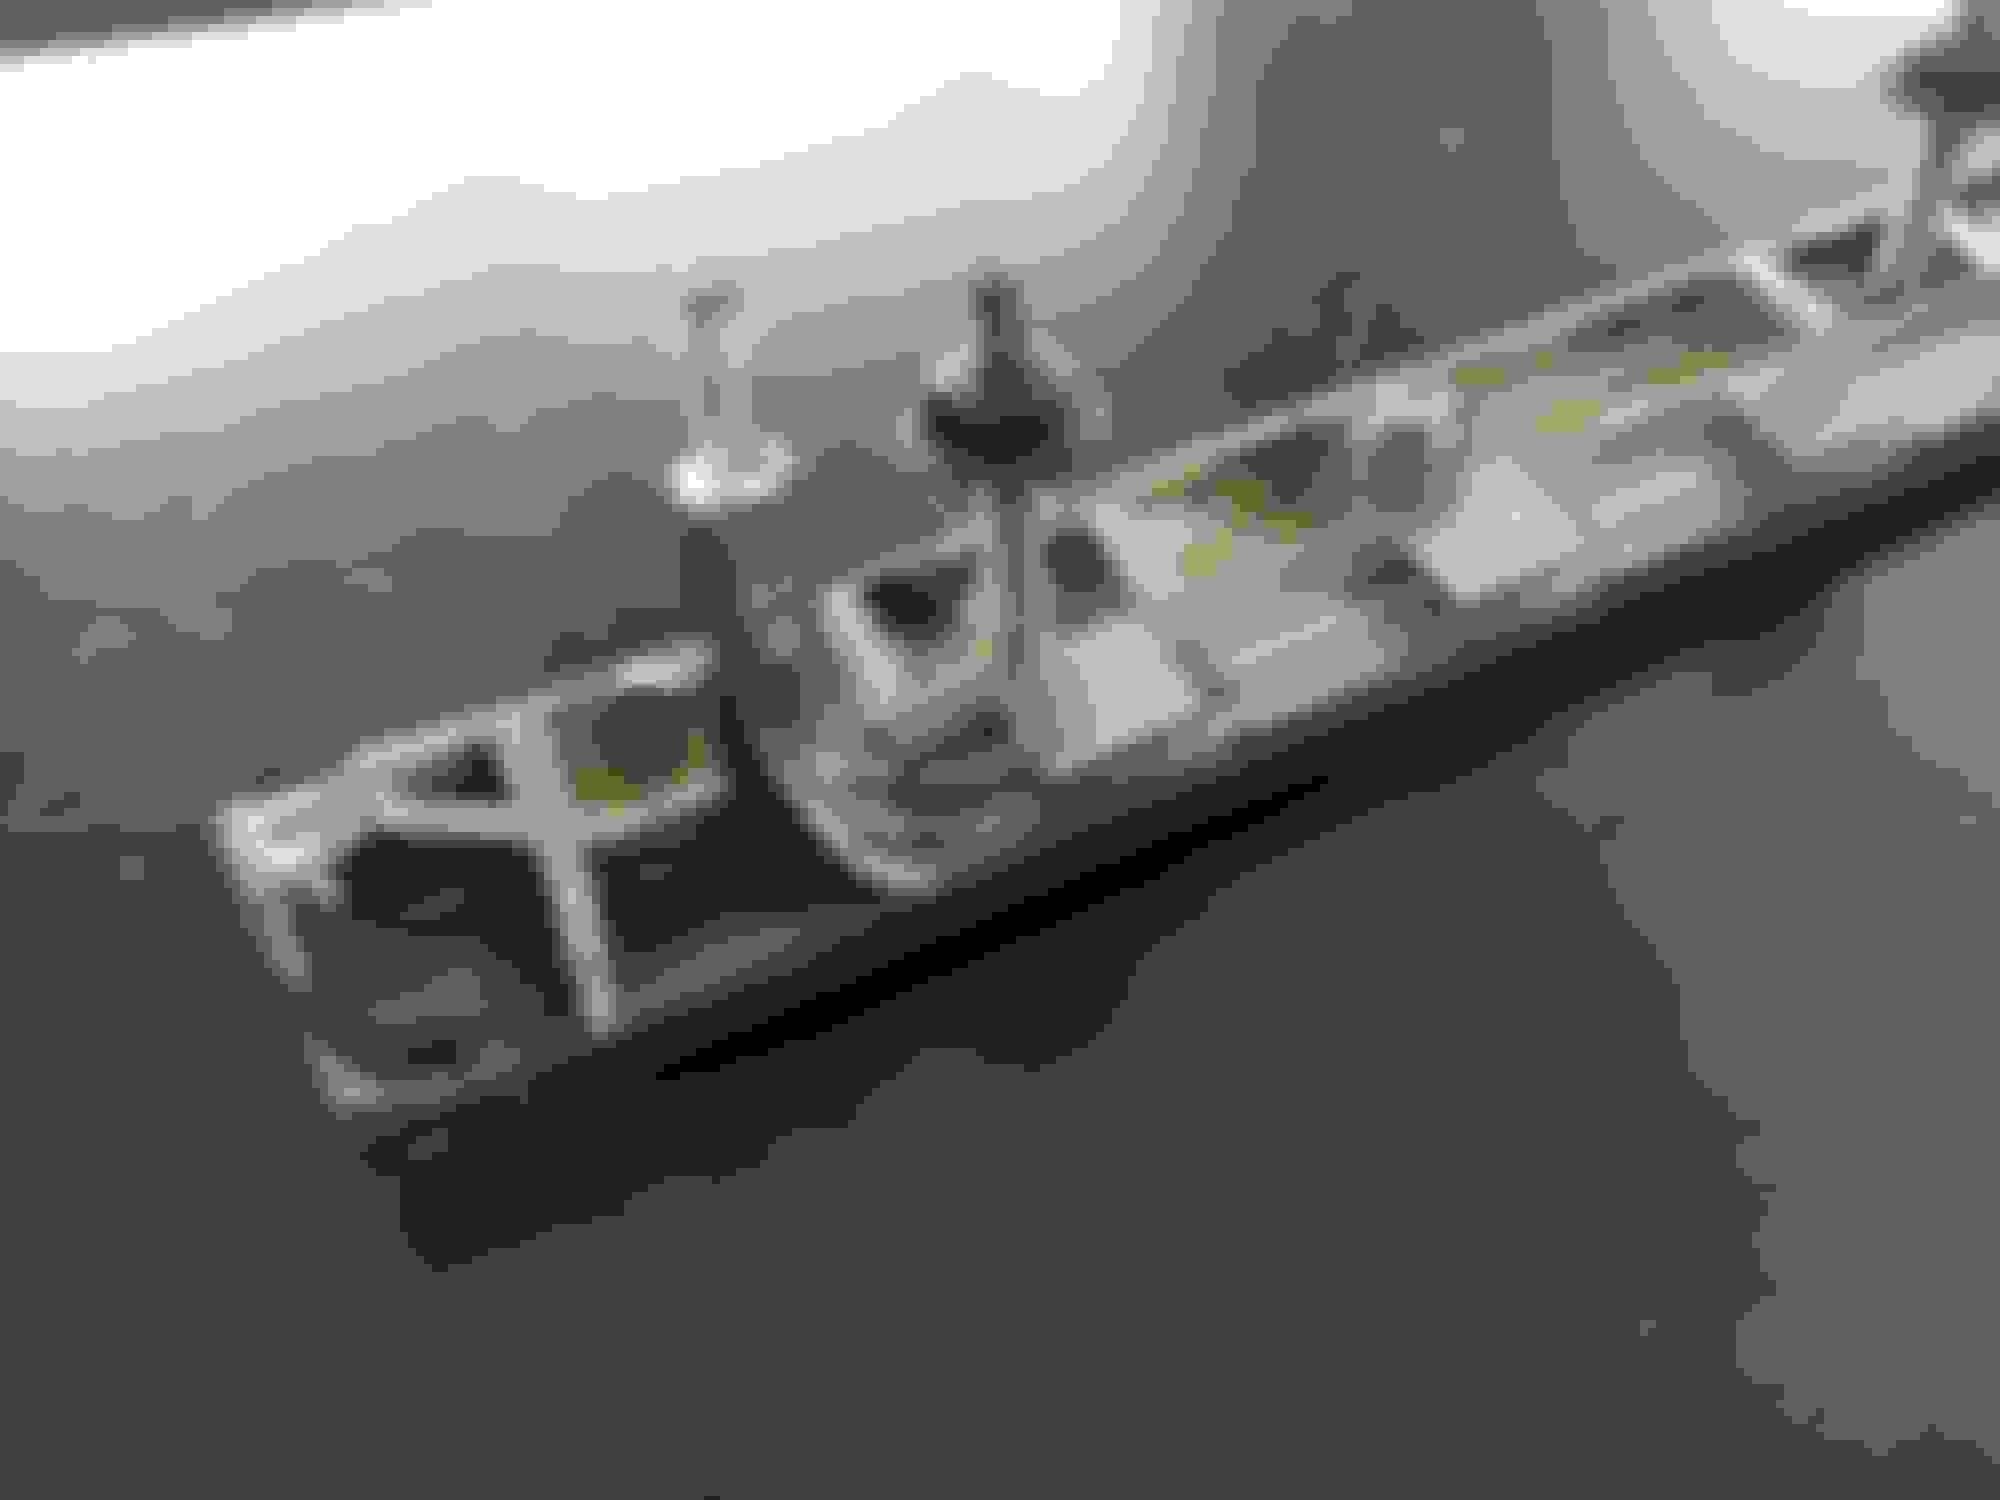
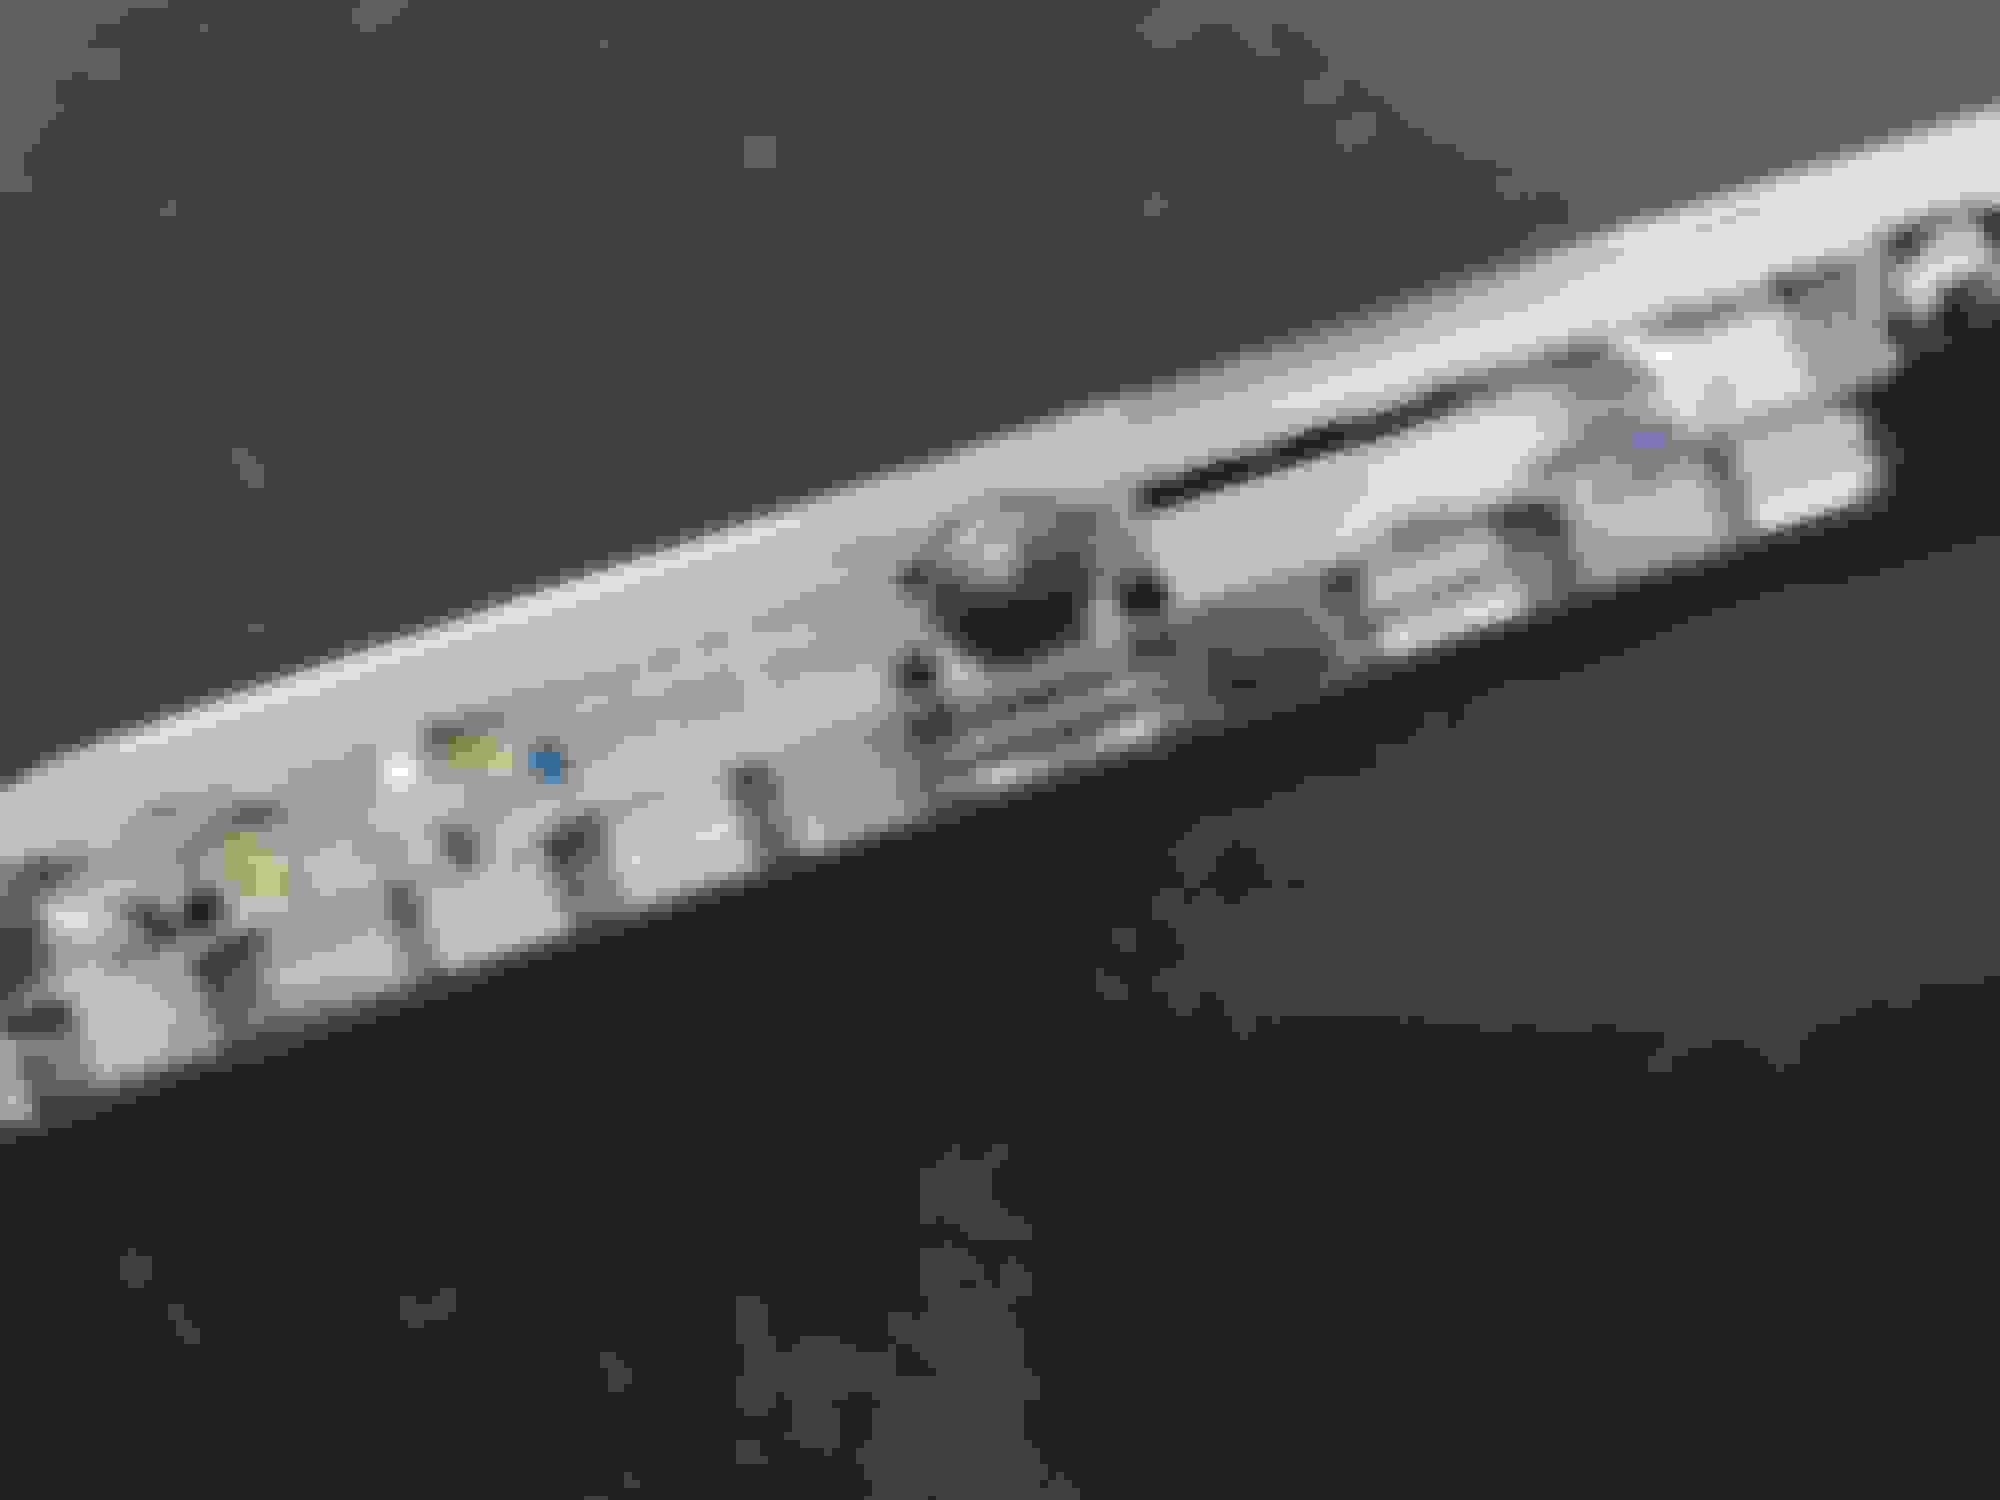
The Verdict
The dash pieces have the light bar attached to them for sure. This is unlike the trim pieces in the doors - the light bar is NOT attached to the silver trim in the door. I am attaching a couple photos showing the bar and how it is held in the dash wood trim. The trim pieces themselves are different from non illuminated because they have clips that hold the light bar. All this being said, it you have illuminated pieces already, and buy non illuminated, with enough dedication, I am sure you could move light bar over and attach it to the non illuminated piece. Just pay careful attention to where the connector of the light bar will penetrate the dash.
Advice for changing the dash trim pieces.
There is no need to pull the whole dash. The left side piece can be removed by just removing the left vent. The little center piece was reachable by removing the center console wood panel (below the command unit). The right piece may be accessible from right vent as well, if you have thin arms. Not sure, I removed the glove box first. You're I'll need to remove the vent anyway though to get at the last bolt. So maybe start with the vent and see if you can reach far enough through that opening. If you have lighted pieces, pull off the connector/LED pieces prior to removal. The connector pulls right off - no clips or anything.
Cupholder/center compartment illumination.
I want to touch on this because it was mentioned as well. While doing all this, I pulled off the whole center unit. My car did not come with lights in compartment or in cupholder. Coincidentally I purchased a center unit a while back to replace some broken vents, and add a secondary compartment to the armrest like in W164 models (I do not get why NO GL came with two compartments in armrest). Anyway this unit happened to come with wiring for the lights. I was able to remove the connectors from donor unit, and splice them into my harness. It is a fairly easy job - both connectors splice into same 2 wires. These are the two wires that feed the connector in the ashtray. If someone is interested in adding lighting to these, I can provide steps to splice in connectors. Hell you can even run your own wires and jerry rig the connectors to the lights. It is just 2 wires. Armrest light works, I am waiting on lighted cup holder to arrive from eBay, but I'm certain it will work as well.
Finally, I now have some beautiful condition Ashwood pieces with illumination that I will be selling. Of all my trim pieces only cup holder has a crack. So if anyone is interested let me know. I am still on hunt for the 4 door pieces, and the ashtray and slide out tray trim pieces to complete my conversion.
Just wanted to update, in case anyone is searching for answers on this topic.
I scored some dark brown dash trim pieces with light bar. One of the pieces required some repair, and I must say, epoxy worked well to hide a crack.
The Verdict
The dash pieces have the light bar attached to them for sure. This is unlike the trim pieces in the doors - the light bar is NOT attached to the silver trim in the door. I am attaching a couple photos showing the bar and how it is held in the dash wood trim. The trim pieces themselves are different from non illuminated because they have clips that hold the light bar. All this being said, it you have illuminated pieces already, and buy non illuminated, with enough dedication, I am sure you could move light bar over and attach it to the non illuminated piece. Just pay careful attention to where the connector of the light bar will penetrate the dash.
Advice for changing the dash trim pieces.
There is no need to pull the whole dash. The left side piece can be removed by just removing the left vent. The little center piece was reachable by removing the center console wood panel (below the command unit). The right piece may be accessible from right vent as well, if you have thin arms. Not sure, I removed the glove box first. You're I'll need to remove the vent anyway though to get at the last bolt. So maybe start with the vent and see if you can reach far enough through that opening. If you have lighted pieces, pull off the connector/LED pieces prior to removal. The connector pulls right off - no clips or anything.
Cupholder/center compartment illumination.
I want to touch on this because it was mentioned as well. While doing all this, I pulled off the whole center unit. My car did not come with lights in compartment or in cupholder. Coincidentally I purchased a center unit a while back to replace some broken vents, and add a secondary compartment to the armrest like in W164 models (I do not get why NO GL came with two compartments in armrest). Anyway this unit happened to come with wiring for the lights. I was able to remove the connectors from donor unit, and splice them into my harness. It is a fairly easy job - both connectors splice into same 2 wires. These are the two wires that feed the connector in the ashtray. If someone is interested in adding lighting to these, I can provide steps to splice in connectors. Hell you can even run your own wires and jerry rig the connectors to the lights. It is just 2 wires. Armrest light works, I am waiting on lighted cup holder to arrive from eBay, but I'm certain it will work as well.
Finally, I now have some beautiful condition Ashwood pieces with illumination that I will be selling. Of all my trim pieces only cup holder has a crack. So if anyone is interested let me know. I am still on hunt for the 4 door pieces, and the ashtray and slide out tray trim pieces to complete my conversion.
Wow, thank you brother, I did swap all my trim with a darker one as well, but was wondering how do I remove the 2 small trims left and right of the steering. Now I know, thank you for the detailed and helpful explanation 👍👍
Wow, thank you brother, I did swap all my trim with a darker one as well, but was wondering how do I remove the 2 small trims left and right of the steering. Now I know, thank you for the detailed and helpful explanation 👍👍
Mercedes SLR McLaren 722 S Is Extremely Rare Example Modified by McLaren
Slideshow: A one-of-one U.S.-spec Mercedes-Benz SLR McLaren Roadster became even rarer after a factory-backed transformation at McLaren's headquarters.