


GLK Low Beam Headlight Replacement - and the dreaded spring/clip

Junior Member
Joined: Nov 2008
Posts: 25
Likes: 0
2001 SLK320

Member
Joined: Aug 2012
Posts: 130
Likes: 1
GLK250 BT
Ok.. i'm super frustrated with the whole lowbeam headlight issue with the GLK. I did do my passengers side replacement in April this year. Sure to heck, the drivers side is now out. My vehicle has 31,000 kms and this sucks.
Anyway, i figured that since i did the passengers side myself (used the telescopic mirror trick) and was able to work the spring properly, i figure i'm smart enough to replace the bulb in the drivers side now. Well, no luck, the spot is just too cramped and i got as far as getting the bulb out (by feel), but the spring came off. Thank the Lord the spring didnt fall into the headlight assembly.
Now i have to try and put the new bulb in and then the spring back into place. I think i may have to tie some fishing line to the spring, just incase i drop it into the headlight assembly. Is it true you cant buy the spring by it self ?
Any tips from someone who's done the drivers side recently on putting the spring back into place?
I'm so tempted to just take the whole front drivers side wheel liner out.

Newbie
Joined: Jul 2010
Posts: 1
Likes: 0
GLK350, ML320, 996, 914
I gave up on trying to get the new bulb installed on our 2010 GLK. Too cold outside and better things to do. Took it to the dealer yesterday and they were good enough to do it at no charge. Because the clip was in my hand rather than attached to the car they said it was quicker and easier to remove the wheel and inner fender liner which didn't seem to take them very long at all and may be an alternative to doing it by feel.

Newbie
Joined: Mar 2013
Posts: 1
Likes: 0
glk350,450sl,c230,450slc
headlight replacement with clip off
1.5 hours later ,some blood but lightbulb replaced . It can be done without removing fender and bumper ....i did use a drop of silicone to hold bulb in place. thanks for the tips
ps ....this was the r/s ...
ps ....this was the r/s ...

Newbie
Joined: Mar 2013
Posts: 1
Likes: 0
2010 GLK350 2wd
glk350 lowbeam replacement additional help
THNX for all the lead in help. I was trying to replace the bulb and figured I should get some hints. the hints are great but I added a useful step.
BTW - I bought a pair of bulbs intending to replace both sides. I opted to let the drivers side blow before I replace it (additional evidence of intelligence!!!)
Bob
- Read all the other stuff.
- SLIDE the spring is the biggest piece of info - its not hinged, its intended to slide
- Get a piece of hose/tubing that fits snuggly around the two blade connectors on the bulb.
- Cut it to length where it will rest on the fender well as the bulb is fully inserted in place.
- I notched my tube (because you cant see squat) so I could feel on the tube where the bottom tab angular position was and rotate the tube as needed for a good fit of the bulb
- You can rest the tube on the fender well or hold it.
- With the other hand, use a tool of the right length to get on top of the spring to start sliding it down. The space above the spring is to restricted to use your finger. Too long of a tool will not allow you to get the tool on top of the spring to push down. Use the inside casing of the headlamp assembly as a guide to make sure you come in above the spring with the tool. Once you get the spring started downwards, its easy to finish by hand.
BTW - I bought a pair of bulbs intending to replace both sides. I opted to let the drivers side blow before I replace it (additional evidence of intelligence!!!)
Bob

Junior Member
Joined: Dec 2012
Posts: 35
Likes: 0
From: Southern Calif
2013 ML350
I gave up on trying to get the new bulb installed on our 2010 GLK. Too cold outside and better things to do. Took it to the dealer yesterday and they were good enough to do it at no charge. Because the clip was in my hand rather than attached to the car they said it was quicker and easier to remove the wheel and inner fender liner which didn't seem to take them very long at all and may be an alternative to doing it by feel.
I bought the replacement bulbs as I use my headlights often and bought it CPO with 2.5 years already on it, but have not tried this yet, just curious to see what others have experienced if you did pull the liner back slightly as is discussed here vs what seems to be a surgical procedure from above.

MBWorld Fanatic!
Joined: Jul 2008
Posts: 1,569
Likes: 2
From: Los Angeles / Manila
08 C63 AMG
NEWBIE HERE.... quick question. I have a 2010 GLK and my questions are will a Diamond Vision Philip Bulbs H7 will fit my low beam and Diamond Vision Philip Bulbs H11 will fit the fog lights? And what kind/size for the city light? Thanks in advance.
MBWorld Fanatic!
Joined: Jul 2008
Posts: 1,569
Likes: 2
From: Los Angeles / Manila
08 C63 AMG
I did it!!! Best advice was the fish line to tie the clip/spring and taking pix with my iphone and just starring at the pix while my hand is inside the headlight... What works for me is just taking off the clip and inserting a new bulb and install the clip again .
MB World Stories
The Best of Mercedes & AMG

New Electric Mercedes-AMG GT 4-Door Coupe Unveiled: 10 Things You Need to Know
Verdad Gallardo
6 Mercedes Models That Did NOT Age Well (But Are Somehow Still Cool)
Verdad Gallardo
Manual Mercedes? 6 Times Sindelfingen Let Drivers Have All The Fun
Verdad Gallardo
Mercedes SLR McLaren 722 S Is Extremely Rare Example Modified by McLaren
Verdad Gallardo
8 Classic Boxy Mercedes Designs That Have Aged Like Fine Wine
Verdad Gallardo
Flawlessly Restored Mercedes 190E Evo II Heads to Auction
Verdad Gallardo
Electric Mercedes C-Class Unveiled: 11 Things You Need to Know
Verdad Gallardo
Mercedes EQS Gets A Major Update: Everything You Need to Know
Verdad Gallardo
5 Underrated Mercedes-Benz Models That Don't Get the Love They Deserve
Verdad Gallardo
Junior Member
Joined: Mar 2010
Posts: 15
Likes: 0
2010 Mercedes GLK 350
So the clip came off and disappeared inside the bulb housing. Can't see it, tried a magnet, no luck.
Anyone know where I can buy a replacement clip online?
In the meantime I held the bulb socket in place with a piece of duct tape and then put a piece of memory foam on top and screwed the cover on with the foam holding the socket in place under pressure from the cap.
What kind of heat builds up inside that bulb housing?
What are my other options other than paying the dealer?
Thanks
Len


Junior Member
Joined: Jun 2013
Posts: 34
Likes: 0
11' GLK350 - AMG Package
don't understand how so many have issues with this bulb replacement...after reading the thread, reviewing the pictures and taking a cell phone pic of my own before "un-engaging" the clip I was able to get both done in a total of 15 minutes. Slide clip up, replace bulb, slide clip down. Piece of cake..if done correctly there is 0 risk and dislodging and/or losing the clip. It is actually well designed to slide up and slide back down without having to completely remove the clip/assembly

Newbie
Joined: Oct 2013
Posts: 1
Likes: 0
GLK350
Many thanks!
The GLK user manual tells you that the low beam headlight bulb is replaceable by the owner and yet many people on this forum say its a job for the dealer. Changing the driver side (USA) bulb is said to be the most difficult.
Having spent 2 hours on this 'simple' task, my wife told me to share with the world just how the darn springh/clip goes on. So here I am.
Getting to the bulb is easy. Follow the manual for this. From this point on you are working blind - assuming your hands are not too big to even make a start.
When I got the part where the wires are to be removed I could easily get hold of the clip but my first thought was, do I pull really hard or is there a retainer that needs to be manipulated. The answer is - pull hard.
I am not really sure what sequence got the spring off the bulb. I think I pushed down and it released. I can tell you that down or up, it won't take long to get the desired result - clip/spring off, old bulb out - now the fun starts.
The manual's picture of the bulb and clip/spring assembly is about as much use as a chocolate teapot. Trying to see into the headlight assembly's hole is all but impossible. So with no idea about what you need to do you will spend hours trying to feel your way. I did.
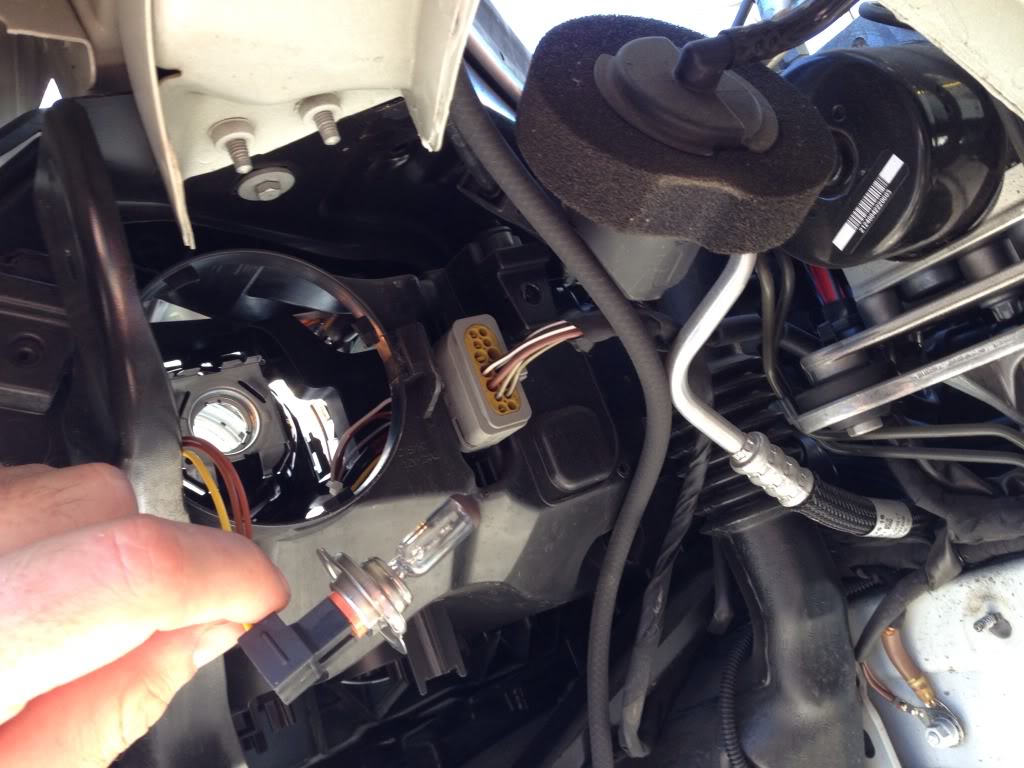
Eventually I found a picture on this forum that showed (upside down) the back of the bulb with the spring/clip hanging in the wrong place. I have used this to illustrate the correct arrangement. See attached photo.
A-B shows a slot that each open end of the spring/clip (1) should be inserted into. C shows the guide and slot that the spring/clip goes into.
The sequence that worked for me was...
1. Put bulb in place and make sure it is seated correctly. The tab goes down. (If I had been able to find some superglue I would have put a tiny, tiny dot on the bulb case because it does not want to stay seated when you take your hand of it. Maybe a tiny piece of double sided tape would be safer!). The point is; be aware that bulb may come unseated.
2. Working blind (you have no choice) insert clip/spring ends (1) into A-B slots on each side on the bulb holder. You should be able to get the spring to stay in place perpedicular to its final position. In other words, sticking out at you.
3. Remove your hand from the hole carefully and then use a mirror of manipulate your head to look and make sure the clip/spring is in the A-B slot. I was initally trying to make the clip/spring was closer to B. I think this was a mistake. I found that squashing the ends (1) towards each other made the clip/spring seat at A better.
4. If the clip spring is seated as described, carefully use your hand to lift and rotate the spring/clip (keeping some upward force) until the clip/spring hits the retaining notches (C) at about position 2.
5. Push the clip home. You may find that you will need to push the clip/spring down so the ends (1) are as-shown in my illustration. I think this ensures that the spring is doing its job. If the ends (1) are closer to B the bulb may fall out.
6. Reassembly after this is very easy.
Finally realizing what needed to be done was a big help to me. I'd say it took 3 or 4 attempts to make it the clip/spring and bulb seat properly. One of the biggest problems is keeping the bulb seated as you manipulate the clip.
A favor. Please don't lambast me about super glue. There is no need to debate it. I was so frustrated I would have done it had it beed to-hand. A clever way of keeping the bulb seated can be your own problem to solve.
Good luck. I hope you can accomplish this 'simple task' without scratched and swollen hands.
Having spent 2 hours on this 'simple' task, my wife told me to share with the world just how the darn springh/clip goes on. So here I am.
Getting to the bulb is easy. Follow the manual for this. From this point on you are working blind - assuming your hands are not too big to even make a start.
When I got the part where the wires are to be removed I could easily get hold of the clip but my first thought was, do I pull really hard or is there a retainer that needs to be manipulated. The answer is - pull hard.
I am not really sure what sequence got the spring off the bulb. I think I pushed down and it released. I can tell you that down or up, it won't take long to get the desired result - clip/spring off, old bulb out - now the fun starts.
The manual's picture of the bulb and clip/spring assembly is about as much use as a chocolate teapot. Trying to see into the headlight assembly's hole is all but impossible. So with no idea about what you need to do you will spend hours trying to feel your way. I did.
Eventually I found a picture on this forum that showed (upside down) the back of the bulb with the spring/clip hanging in the wrong place. I have used this to illustrate the correct arrangement. See attached photo.
A-B shows a slot that each open end of the spring/clip (1) should be inserted into. C shows the guide and slot that the spring/clip goes into.
The sequence that worked for me was...
1. Put bulb in place and make sure it is seated correctly. The tab goes down. (If I had been able to find some superglue I would have put a tiny, tiny dot on the bulb case because it does not want to stay seated when you take your hand of it. Maybe a tiny piece of double sided tape would be safer!). The point is; be aware that bulb may come unseated.
2. Working blind (you have no choice) insert clip/spring ends (1) into A-B slots on each side on the bulb holder. You should be able to get the spring to stay in place perpedicular to its final position. In other words, sticking out at you.
3. Remove your hand from the hole carefully and then use a mirror of manipulate your head to look and make sure the clip/spring is in the A-B slot. I was initally trying to make the clip/spring was closer to B. I think this was a mistake. I found that squashing the ends (1) towards each other made the clip/spring seat at A better.
4. If the clip spring is seated as described, carefully use your hand to lift and rotate the spring/clip (keeping some upward force) until the clip/spring hits the retaining notches (C) at about position 2.
5. Push the clip home. You may find that you will need to push the clip/spring down so the ends (1) are as-shown in my illustration. I think this ensures that the spring is doing its job. If the ends (1) are closer to B the bulb may fall out.
6. Reassembly after this is very easy.
Finally realizing what needed to be done was a big help to me. I'd say it took 3 or 4 attempts to make it the clip/spring and bulb seat properly. One of the biggest problems is keeping the bulb seated as you manipulate the clip.
A favor. Please don't lambast me about super glue. There is no need to debate it. I was so frustrated I would have done it had it beed to-hand. A clever way of keeping the bulb seated can be your own problem to solve.
Good luck. I hope you can accomplish this 'simple task' without scratched and swollen hands.
Just replaced both low beams on our 2011 GLK... Completed both in about 40 minutes...would not have been possible without your post!

Super Member
Joined: Dec 2010
Posts: 831
Likes: 13
From: N.C. USA
2015, ML250 BlueTEC
Replacement headlights--Xenons
I had fun this weekend, too. Replaced the halogens with HIDs purchased from Philips. Also bought the additional harness with relays and resistors that hook up to the battery. Wiring that was the easy part. The bit*h was placing the bulb correctly, holding it in place while pushing down on the spring tab, and then stuffing the additional wiring into the light compartment and trying to close it up with the end-cap. Gaining access was no picnic either. Scarred up hands prove that. The GLK is done. Now comes the wife's C300. Hopefully it will be easier this time. Oh yeah, do not drop a screw or piece from the lights. They go into a black hole in the engine compartment never to be found again.
Newbie
Joined: Nov 2013
Posts: 1
Likes: 0
glk350
These posts have been EXTREMELY helpful. Thank you all. I used the advice to change my glk 350 low beams. Firts i followed the manual. Pushed down on the clip and it went in the black hole. Then used the magnet to get it back. Then used the phone cam to see what i was doing and attached fishing line to ensure the clip did not go back into the black hole.. Never would have figured out the clip without your posts! Thank you. For those preparing to change their glk 350 low beams. DO NOT PUSH DOWN ON THE CLIP. Pull it up 1/4 to half inch until the bulb freely comes out. Leave thewire connected as a handle. Driver side took five minutes without removing anything....just push up on the clip. Remove the bulb and wire. Change bulb. Put back in place (flat part of bulb base goes down). Then slide clip back down only a quarter inch or so until it locks the bulb in place again. Very simple if you follow this EXACTLY and nothing else. Thanks again for the posts and i look forward to your help on other issues in the future!
Super Member
Joined: Dec 2010
Posts: 831
Likes: 13
From: N.C. USA
2015, ML250 BlueTEC

Senior Member

Joined: Apr 2013
Posts: 445
Likes: 8
From: Tucson AZ
2010 Mercedes GLK 350, 2001 BMW Z3 3.0 Roadster, 1997 Cherokee XJ
Bulbs purchased from Candlepower Inc. Research shows no problems with wattage & heat issues. Whole lot of good info out there on this topic. Took a hard look at the passenger side & wimped out. Think I will go with the fender liner removal to access. As I have aged, the trick is to figure out which battles are worth fighting & pulling the inner wheel well looks like the way to go for me. Another point on aging is you do not like mirrors!
Junior Member
Joined: Jan 2014
Posts: 16
Likes: 1
2011 Mercedes GLK & Merkur XR4Ti
Hmmm lol.
OK.
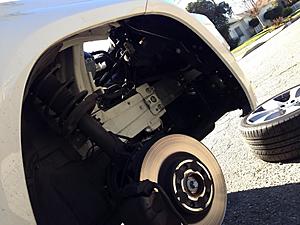
I went a slightly different tack for replacing the two low beam bulbs.
I read through and large hand size and lack of patience had me figuring out a different route.
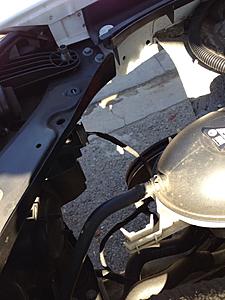
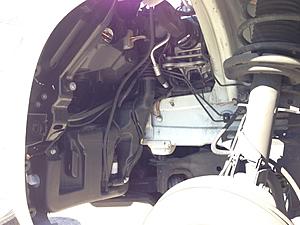
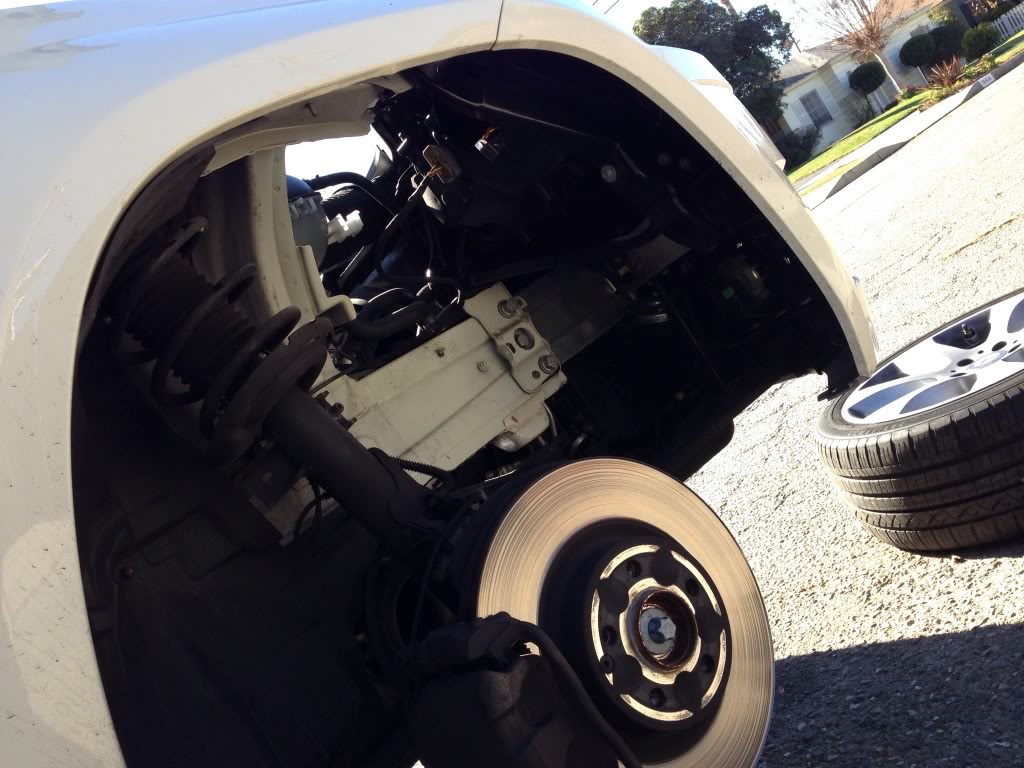
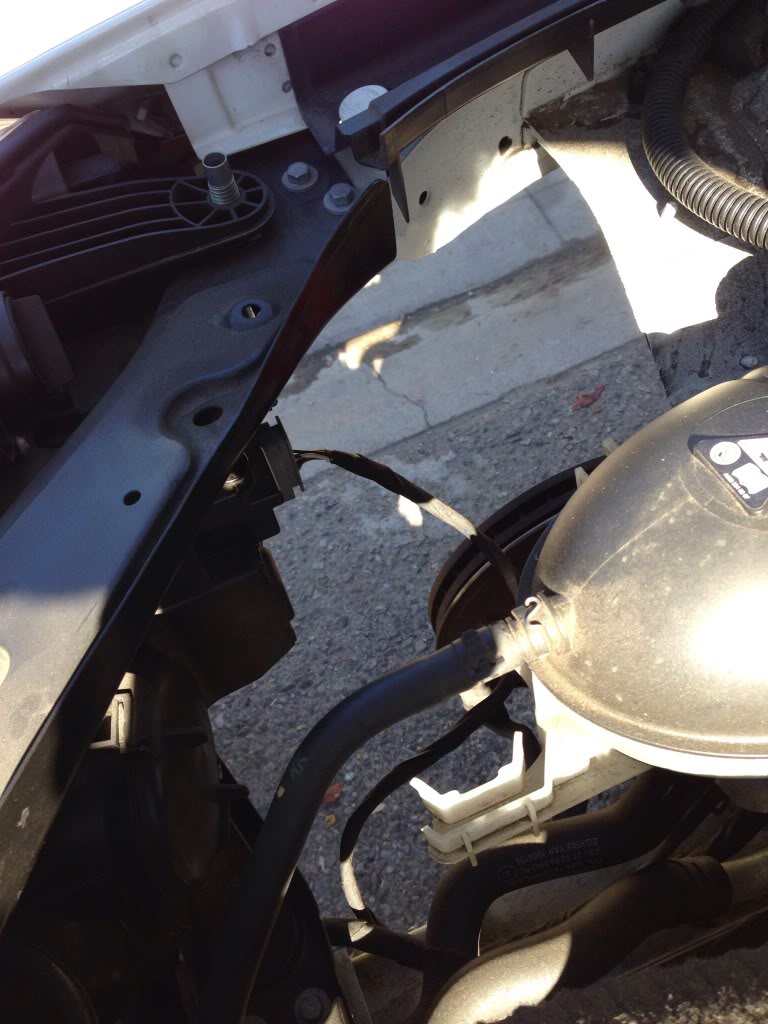
I removed the front wheels and took out the front half of the plastic arch liner. Access is awesome then.
Just takes a little time.
There are about 4 push clips that you have to pull the center out of, 3/4 plastic nuts & one metal nut under the front valance.
Passenger side.
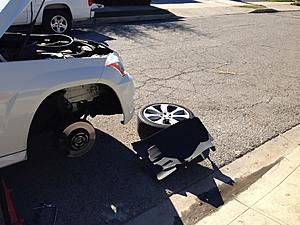
And drivers side.

OK.
I went a slightly different tack for replacing the two low beam bulbs.
I read through and large hand size and lack of patience had me figuring out a different route.
I removed the front wheels and took out the front half of the plastic arch liner. Access is awesome then.
Just takes a little time.
There are about 4 push clips that you have to pull the center out of, 3/4 plastic nuts & one metal nut under the front valance.
Passenger side.

And drivers side.

Junior Member
Joined: Jan 2014
Posts: 16
Likes: 1
2011 Mercedes GLK & Merkur XR4Ti
Super Member
Joined: Jan 2012
Posts: 590
Likes: 2
From: Washington
10 E63, Sold -07 E63
Junior Member
Joined: Jan 2014
Posts: 16
Likes: 1
2011 Mercedes GLK & Merkur XR4Ti
Ahh yeah.
I started to do it with the wheel on but I like a bit of room.
I wanted to get my head in there to see what was going on.
I'd already dropped a bulb down into the belly of the lamp. lol.
I started to do it with the wheel on but I like a bit of room.
I wanted to get my head in there to see what was going on.
I'd already dropped a bulb down into the belly of the lamp. lol.


