When you click on links to various merchants on this site and make a purchase, this can result in this site earning a commission. Affiliate programs and affiliations include, but are not limited to, the eBay Partner Network.
Yet another person looking for that spring clip (I am)..... Does anyone have a link to a good replacement part? Unfortunately, the car is relatively new for me (2010 GLK350 purchased about 6 months ago) and the previous repair was someone that appears to have gotten really frustrated with that spring clip and just twisted it around the bulb and socket like a twist tie. I just popped it back in the socket and stuck the cover on until I can find a replacement clip. I'll post pics here if anyone else wants a laugh at my predicament...
But again, does anyone here have a link to a good replacement part?
Ugh, that's the problem, mine is all twisted up like a bread tie, and without taking apart the other side I can't tell for certain. But looking at other pics and videos, it looks like there are "outward" facing bends that engage and catch the top of the bulb that the clip in your link doesn't appear to have. This is the best pic that I have found based on another video link that I'll post below...
I have been searching all the sites and what I�ve found the problem to be is that part is a part of the housing, which is ridiculous. You can get replacements for all the parts which are not mounted to the headlight assembly.
I would contact your local MB dealer to see if they have a way of getting just the clip spring because this is a common problem.
I will keep researching as well.
Jeff
Wow, on a whim I called my local MB dealer and it's a part they normally keep in stock. It's a $15 item, but that's better than trying to order various clips and such that may or may not work. Or finding a used headlamp unit that can be had for $150 + $50 shipping at ebay (or spending a few hours calling all of the local junkyards looking for one).
Try calling your local parts and asking for part #0009932607 - this one fits a wide range of models, so it's not just for my 2010 GLK350...
Sorry for the false hopes. The clip that matches part # 0009932607 isn't the same clip in the video, it looks like 90% of the others generally available out there with the large sections that bend back (and not mostly flat). I sent this vid to Tyler at MB and he's going to research and see if he can get the part. Meanwhile, here's a pic of what was in my MB. It wasn't the previous clip, but a section of 14 or 15 ga electrical ground wire... Give the guy some credit for McGyvering this when I'm assuming he ran into the same problem as the rest of us, lost the clip and couldn't find just that one part without buying the entire unit.
I am also in need of a clip. Any suggestions? Thanks
What happened to your original clip? If it fell into the light enclosure, you can reach in with a flexible magnetic tool, and fish it out, otherwise you may have to go the Stealership.
Thanks so much for all the information. After reading all of this online I was able to change out both Low Beam Lights in under an hour. Most of that time was spent on the awful Driver's Side (which was also the one that went out) but I would have never been able to do it without this thread of comments.
I gave up on the infamous blind installation process (so much for German engineering!). Instead, I went with the following workaround:
1. Removed and threw awaythe headlight housing clip
2. Epoxied three 0.25" diameter magnets around the outermost surface of the bulb fixture on its housing-facing-side (Sorry - I forgot to take a pic of this but I'm sure you can figure out where to glue the magnets)
3. Reconnected the bulb fixture power supply
4. Inserted the bulb fixture into the headlight housing. The section of the housing which touches the fixture is made of metal which is why magnets do the job.
5. Turned the headlights on and adjusted the alignment of the new bulb fixture using my garage door
BTW - the magnets (see pic below) cost me $5 at my local Michaels store.
Hello I know you wrote this 2 years ago. I was just wondering did you ever end up having any issues with the magnets. I lost both of my retainer clips for my passenger side and I bought a headlight assembly but the clip did not come with the assembly I just bought so trying to find a way to make the exact fit out of a h7 universal clip that I have.
Originally Posted by PartickThistled
I gave up on the infamous blind installation process (so much for German engineering!). Instead, I went with the following workaround:
1. Removed and threw awaythe headlight housing clip
2. Epoxied three 0.25" diameter magnets around the outermost surface of the bulb fixture on its housing-facing-side (Sorry - I forgot to take a pic of this but I'm sure you can figure out where to glue the magnets)
3. Reconnected the bulb fixture power supply
4. Inserted the bulb fixture into the headlight housing. The section of the housing which touches the fixture is made of metal which is why magnets do the job.
5. Turned the headlights on and adjusted the alignment of the new bulb fixture using my garage door
BTW - the magnets (see pic below) cost me $5 at my local Michaels store.
I just swapped out my low beam (projector) H7 light bulbs for LEDs. Maybe I've got sneakier fingers, but found it to be a pretty simple, straightforward process. It turns out that the left light is original (with the clip as shown above), but the right light is an aftermarket unit that's more traditional (folds down over the base of the light bulb, holding it in).
The left (original) was easy enough - just reach above the bulb, push the clip up about 1/2", slide the old light out, slide the new light in (tab straight down) and push the wire clip down 1/2".
The right was a little scarier since there's no way in the world that pivoting clip is going to clear the fan / housing behind the bulb. Turns out the LED "bulbs" I bought have a removeable baseplate, so it was just a matter of putting it in place (just like a regular H7 bulb) and the pushing the much larger LED bulb into the baseplate.
FWIW, this short (no narration) video I did might help:
Ugh, that's the problem, mine is all twisted up like a bread tie, and without taking apart the other side I can't tell for certain. But looking at other pics and videos, it looks like there are "outward" facing bends that engage and catch the top of the bulb that the clip in your link doesn't appear to have. This is the best pic that I have found based on another video link that I'll post below...
.
Mine GLK350 with AMG package looks different. I have search the web looking for my clip, it is nowhere to be found. Anyone shine any light on my issue?
BRO YOU ARE LOOKING AT GUIDES/PARTS/POSTS ABOUT/TO REPLACE STOCK HALOGEN BULBS.
YOU HAVE STOCK HID BULBS.
IF YOU WANT THE SAME STYLE CLIPS AS THESE POSTS BUY HALOGEN HEADLIGHT HOUSINGS.
You sound like a hack with plenty of knowledge. Can't figure it out, hack it off and replace it. hahaha. I'd rather not butcher my car based on your recommendation. FYI my GLK has AMG package, I'm sure someone else has the same clip with experience. Btw I have proper HID bulb, definitely don't need your advise.
You sound like a hack with plenty of knowledge. Can't figure it out, hack it off and replace it. hahaha. I'd rather not butcher my car based on your recommendation. FYI my GLK has AMG package, I'm sure someone else has the same clip with experience. Btw I have proper HID bulb, definitely don't need your advise.
Yes you have HID bulbs, so stop trying match up your clips with people that have halogens. What do you not understand about this?
wow how did you find it, is there a video how to remove
He may have done a search. He's probably doing another search right now to see if he can find you a video. If he can't find one then hopefully he will make a video for you.
Thanks i figured it out. My clip is removed from the top by squeezing the wire together. Juggled it and it come off. The plate fell off but the clip was able attach back on without it. It snug without the plate.. Thanks a bunch guys, this forum is great!
Thanks i figured it out. My clip is removed from the top by squeezing the wire together. Juggled it and it come off. The plate fell off but the clip was able attach back on without it. It snug without the plate.. Thanks a bunch guys, this forum is great!
Hey dudes, first post here. I bought a 2012 GLK 350 a few months ago and love it. Only problem was that when I went to replace my low beam bulbs, the previous owner had stuffed aluminum foil behind the bulb to keep it in place due to the clips being missing. I tried scouring the internet for solutions but couldn't really find anything that worked very well so I decided to make something that would work.
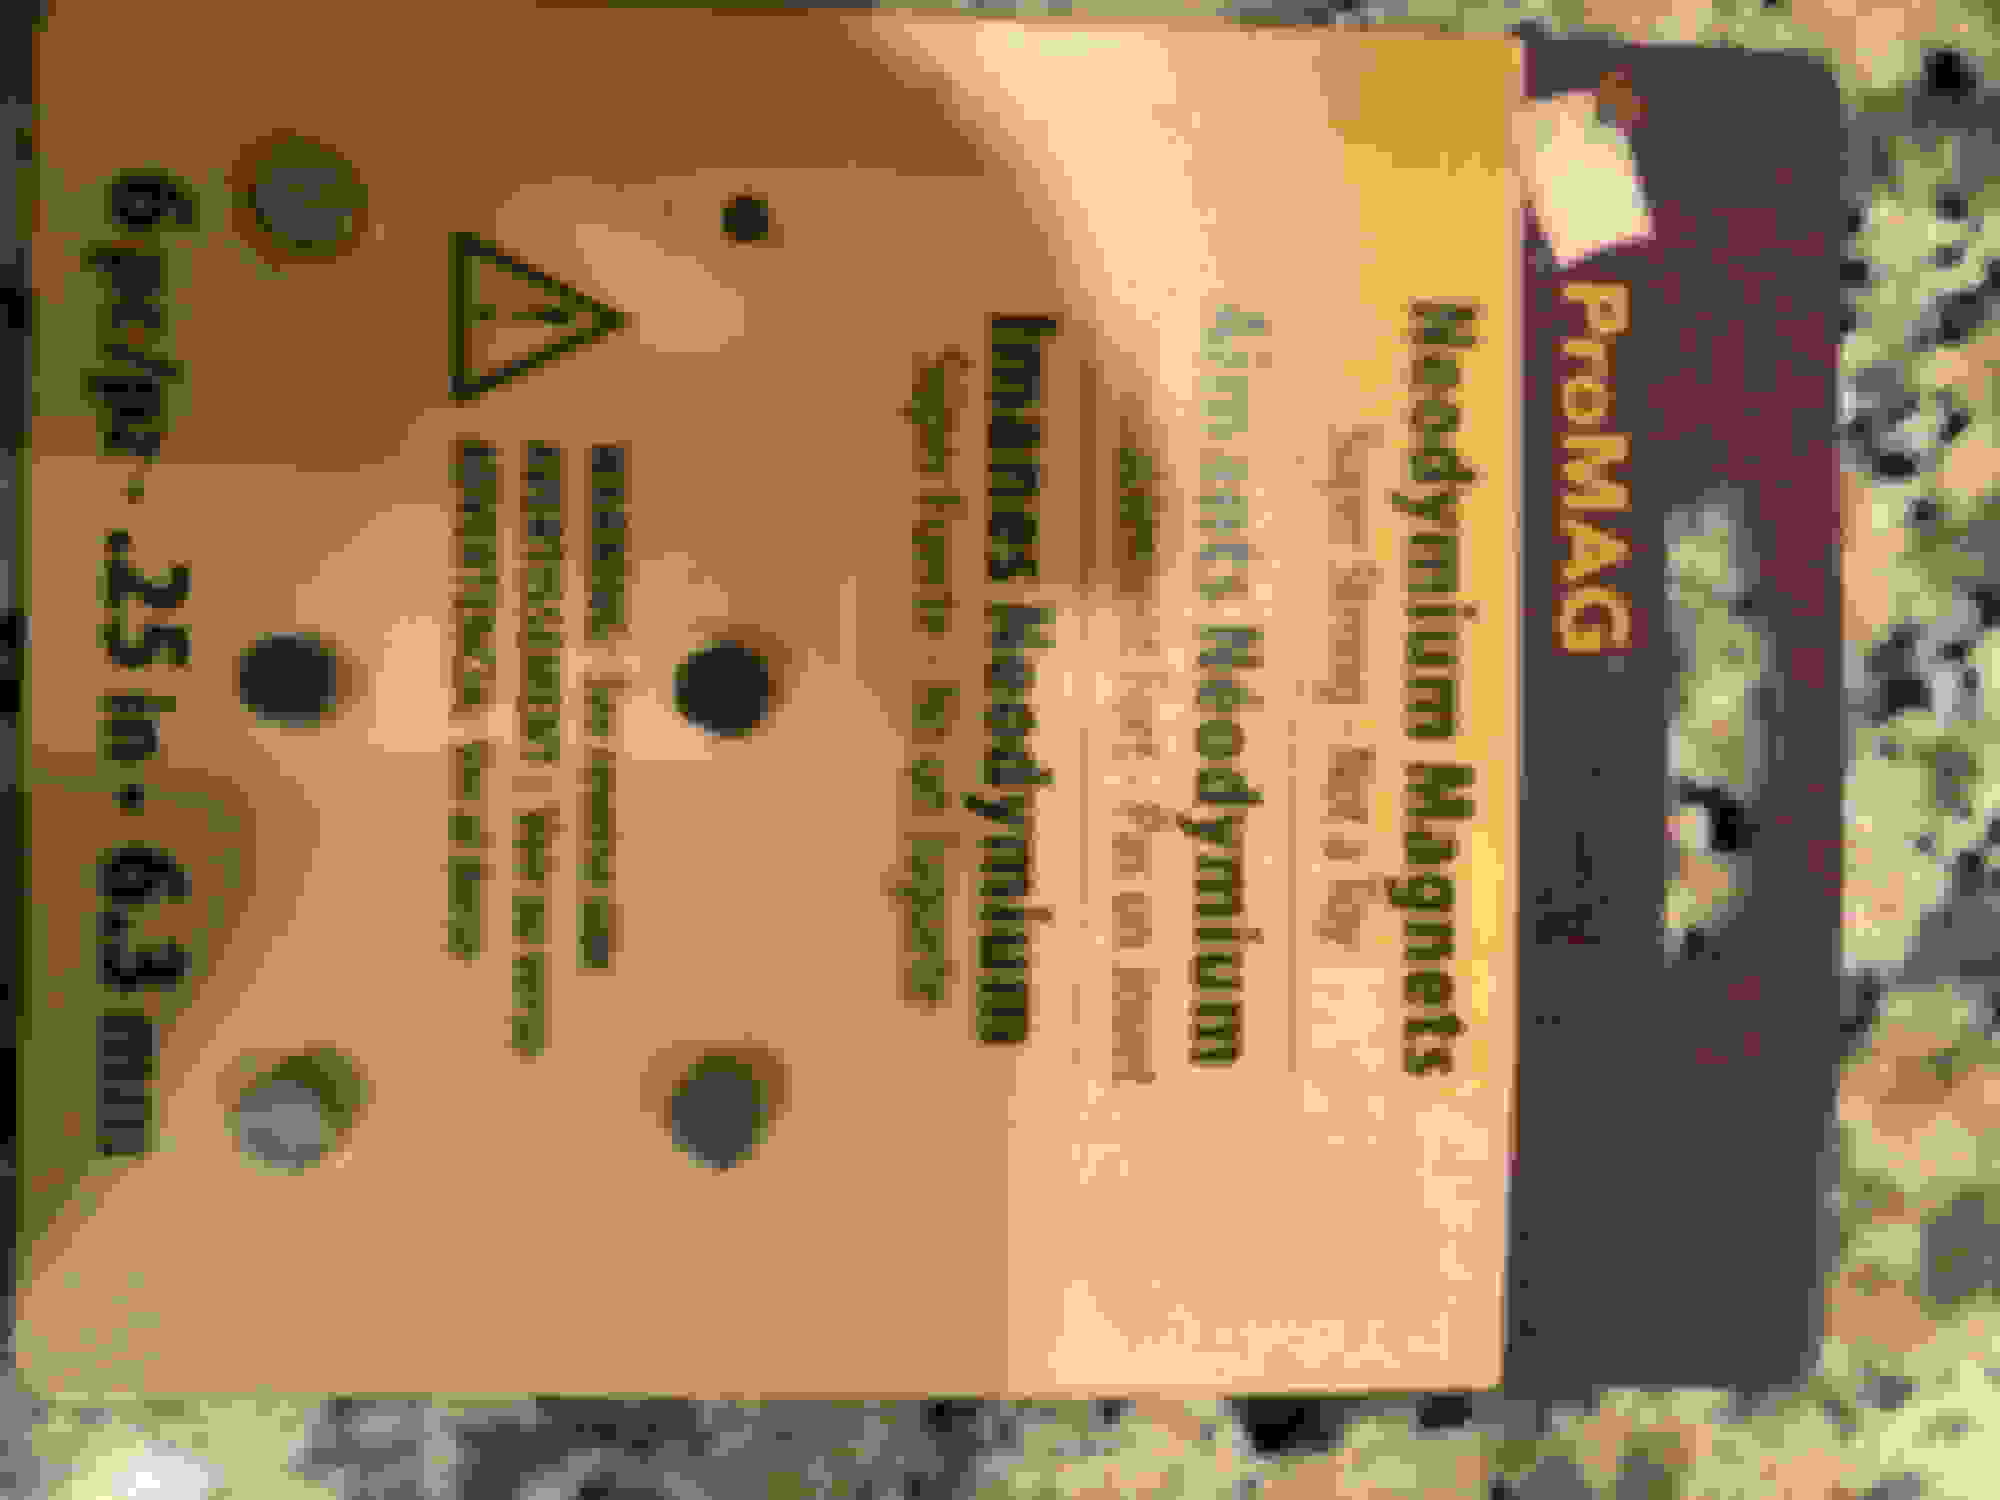
I bought some washers with an interior diameter of 0.75" and an outer diameter of 1.25" (outside diameter was actually a bit larger and I ended up trimming it down). Then bought some neodymium magnets from buymagnets.com. I purchased a range of strengths from N42 to N55, I'd recommend the N52's (0.25" diameter X 0.125" thickness).
I went out in the garage and drilled a bunch of holes in the washers just slightly smaller than the magnets diameter and hammered them all into the washers. You're gonna want to get the magnets fairly close to the outside of the washer rim. After that I just slid them onto the backs of the lightbulbs and they stayed in place really well, which was super important for installing them as we all know you have to contort your hands all kinds of ways to get the bulbs in place. When I installed them, as soon as I got the bulbs in the correct position the magnets took over and everything was good to go. It was easy to rotate them to get the light beam dialed in and you can take them out if you have to fairly easy as well.
This worked for me and I'm super happy with it. Been driving with perfect headlights for a couple months now and it's a huge relief. Anyways I thought you guys might be interested. Here's some pics, cheers.
Hey dudes, first post here. I bought a 2012 GLK 350 a few months ago and love it. Only problem was that when I went to replace my low beam bulbs, the previous owner had stuffed aluminum foil behind the bulb to keep it in place due to the clips being missing. I tried scouring the internet for solutions but couldn't really find anything that worked very well so I decided to make something that would work.
I bought some washers with an interior diameter of 0.75" and an outer diameter of 1.25" (outside diameter was actually a bit larger and I ended up trimming it down). Then bought some neodymium magnets from buymagnets.com.
.
Nice job on the magnet solution. After 12 years ownership on my 2011 and ~ 4 low beam changes later, the process got easier each time. When I look at Today�s landscape in comparison; having a rwd bias, port injected, timing chain ( others have caught on to chains), naturally aspirated v6 with a decent displacement � are all such luxuries in their own right that finding a replacement for the GLK can�t be easily done and a finicky headlight bulb replacement is a minor inconvenience I can live with.
Completely agree. I actually bought an OBD chip from Rocket Chip and after the 250 mile break in period the thing came alive even more. I really like the motor and it gets really decent mileage, especially with the Rocket Chip. I think I got a 2 mpg boost along with the HP increase when it was all said and done.
I've also really enjoyed making it my own by doing a bunch of DIY upgrades:
- The car is like an arctic white color and the rims came black with red calipers so I've been kind of following that motif, flat black with red accents
- I did the door trim, bumper trim, and the bumper skid plate matte black.
- Outer door pillars between the front and rear doors I made flat black
- Window weather stripping trim at the bottoms of the windows flat black (basically all exterior trim or accents I either painted or plasti-dipped flat black)
- Trunk emblems and hood badge are flat black with red accents
- I got smokey lensed LED turn signals for the rear view mirrors and painted them flat black
- Grill is black with black illuminated Mercedes emblem
- Aluminum racing pedals
- Windows are all super dark tinted
- Xenon headlights
- Updated the stereo system:
- JL Audio C5 6.5" front door woofers
- Hertz HT 1" tweeters
- JL Audio C2 6.5" coaxials for the back door speakers
- Audison AP8.9 Bit DSP amplifier (digital signal)
- Audison AP1D subwoofer amplifier
- JL Audio 12TW3-D4 thin mount subwoofer
- Added Apple wireless CarPlay//screen mirroring//extra USB port
- Added a backup camera
- Removed the cigarette lighter and replaced it with a 2-port USB-C fast charging and USB-A charging plugin
- Bought some new door lock and AC buttons bc they were kind of worn off
- Going to powder coat the exhaust tips matte black this week
Anyways I've really found this forum to be a huge cache of helpful info as I continue making all these upgrades, so I thought I'd contribute.
I actually just found a website where you can purchased neodymium washer magnets that are axially magnetized, so I ordered a few. They should just slide onto the back of the headlight bulbs and since the entire washer is a magnet it should work even better. I ordered these two kinds (both are N42 strength bc I figured if the whole washer is magnetized it shouldn't have to be quite as strong):
Mercedes SLR McLaren 722 S Is Extremely Rare Example Modified by McLaren
Slideshow: A one-of-one U.S.-spec Mercedes-Benz SLR McLaren Roadster became even rarer after a factory-backed transformation at McLaren's headquarters.