When you click on links to various merchants on this site and make a purchase, this can result in this site earning a commission. Affiliate programs and affiliations include, but are not limited to, the eBay Partner Network.
One of the projects I recently did on this GLK350 was a coolant change.
According to the owner's manual, the coolant change on this car isn't due for awhile, something like 100 or 150k miles. This car isn't that old, however, was purchased used and likely serviced somewhere other than the MB dealership. When I checked the coolant, it appeared to have a greenish yellow tint to it, indicating it possibly had some regular auto-parts-store green mixed it at some point in its life. For that reason, we decided to do a quick drain/fill.
This is not a full flush, as we did not drain the block or the heater core. We split the difference between 'the wrong coolant probably isn't hurting anything' and 'a gallon of new coolant is only $20'. I will leave you all to discuss the merits and disadvantages of only doing a halfway job on this one. If you have an unmolested car that has only the MB coolant in it, I still would consider doing one of these half services at 80k miles or so to refresh the corrosion inhibitors and then another half service at 150k (or whenever the book says to do it) rather than doing one full flush at 150k, but thats just me.
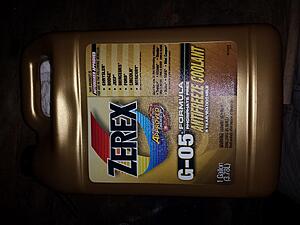
We used Zerex G05, which has a very pale yellow/clear tint to it. I'm not sure of the dye used in the official MB coolant but word on the street is that the Zerex G05 is what MB uses. I got the gallon at Pep Boys, AAP and Autozone don't stock Zerex anymore. Use distilled water.
Start by removing the skid plate. You can remove just the front half and leave the rear, but you have to be careful separating the sections not to crack the plastic. Clearance is minimal. Also, you can do this without raising the car but in retrospect putting it on ramps would have been easier.
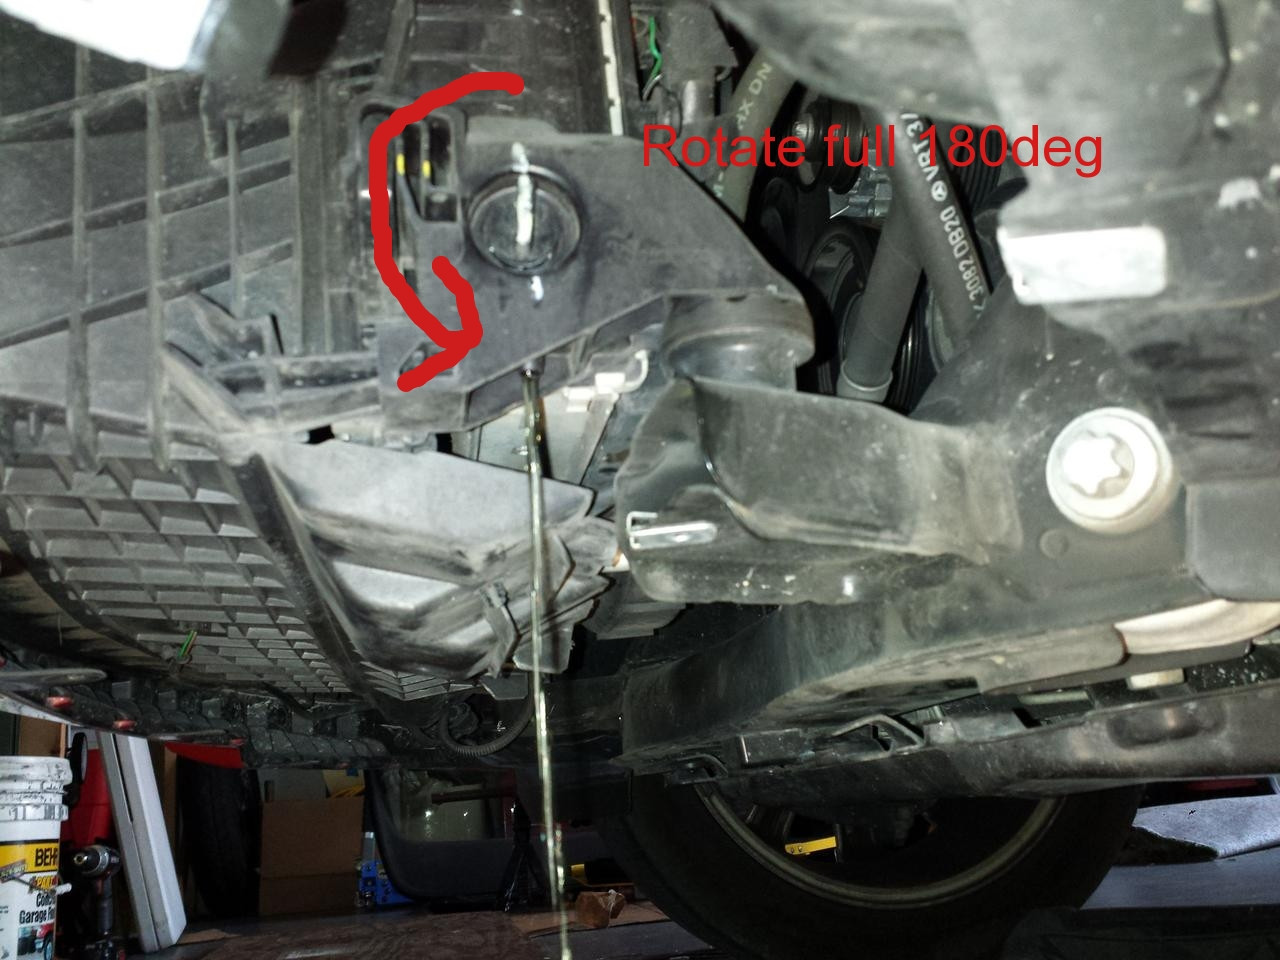
On the driver's side there is a radiator drain valve. Rotate it 180deg counterclockwise. It will rotate 90deg very easily, the second 90 will be significantly tougher and may require a pair of pliers. Have the drain pan ready. I like to drain coolant into something I can measure quantity with. Draining the radiator I got about 1 gallon even out.
Since I wasn't draining the block, I made a quick helper tool. I took a length of vinyl hose (I think 1"OD but can't remember for sure) and wrapped some duct tape around the end to the point where it had an okay seal with the coolant reservoir. Then I blew on the end to force some more coolant out. I blew into it about 4-5 times and got out an additional half gallon. Laugh at my unconventional methods but this whole job took me about 15 mins (minus the time taken to get the splash shield off) doing it this way.
With 1.5 gallons extracted, thats around 6 quarts. The system holds 8.9, so I got out around 2/3 of the coolant.
Mixing 50/50, I first poured about 3 quarts of coolant in, then around 2 quarts of water and let the system settle. Some european cars (namely BMW) can be a pain in the *** about getting the air out of the system, the GLK seemed to not have that problem. I squeezed the upper rad hose a few times to work out as much air as I could and topped off the last quart of water. Drove it around the block to get it up to temp and the next day, checked the coolant level, topping off with the Zerex to get to the correct full level.
Total time for job: 30 mins
Total cost: $20 for coolant, $2 for distilled water.
Quick question.
I think I might have put in the wrong type of coolant in my W204 and I didn't use distilled water to mix with the coolant... instead, I used drinking water. So I'm considering to do a coolant flush.
Can I use one of those "Air Power America 5060 Topsider Multi-Purpose Fluid Removing System" (http://smile.amazon.com/America-5060.../dp/B001445IZ8) to extract the coolant out, instead of "draining" it? Thoughts or comments? Thanks!
edit...
seem the GLK is much easier then others, i just drove the car up on my ramp to get the front end in the air and let the engine run for 5 minutes with the cap off.
After reviewing full service records from MB and Carfax for my new to me 2012 GLK350, coolant replacement was necessary due to the absence of maintenance records indicating this procedure had been performed. A single bottle of premixed Peak Blue coolant from Autozone, priced at approximately $20 USD, was sufficient for the task. Hat tip to the original poster for how to do this - I used this as the basis for my own coolant change!
After lifting the GLK350 on my QuickJack and following the removal of the bottom skid plate protection panels, the circular dial should be turned 180 degrees counterclockwise to facilitate coolant drainage via the bottom petcock, as illustrated in the accompanying image. The drainage process took roughly 15 minutes to complete, during which time a wide catch pan and protective covering, such as cardboard or rags, were essential in minimizing the inevitable splash mess.
Despite precautions, coolant splattered during drainage, emphasizing the importance of eye and skin protection. When refilling, an oversized funnel was utilized to prevent spillage into the engine bay.
After filling, the radiator cap was left open, and the car heater was set to maximum heat until the engine reached its normal operating temperature of approximately 195 degrees F / 90 degrees C, allowing the thermostat to fully open and purge excess air from the system. When the thermostat opens you can see the coolant level immediately drop in the reservoir. Once the air had been bled from the system, the coolant level was adjusted to the recommended threshold, and the cap was secured with care to avoid overtightening, taking note of the small notch on the bottom lip of the Mercedes coolant cap that corresponds to a notch on the radiator filler neck.
Fairly easy to do on the 2012 GLK350 once you�ve removed the bottom front skid plate from the underside. 2012 GLK350 coolant reservoir. Location of 2012 GLK350 coolant drain petcock. 2012 GLK350 coolant fill using big funnel. Coolant used from Autozone on 2012 GLK350. 2012 GLK350 coolant Cap - note the small indention at the 6 o�clock position - DO NOT OVERTIGHTEN past this point or you might break the coolant cap sealing mechanism. 2012 GLK350 coolant drainage in process. Drained coolant from 2012 GLK350.
Last edited by eg1HnS4AHskZ; Jan 29, 2026 at 10:22 PM.
Reason: Added photos
Mercedes SLR McLaren 722 S Is Extremely Rare Example Modified by McLaren
Slideshow: A one-of-one U.S.-spec Mercedes-Benz SLR McLaren Roadster became even rarer after a factory-backed transformation at McLaren's headquarters.