When you click on links to various merchants on this site and make a purchase, this can result in this site earning a commission. Affiliate programs and affiliations include, but are not limited to, the eBay Partner Network.
I got the same situation as you. I also bought the new sensor from Oreilly's ( I guess same as yours with the brand Import Direct ? ). Replaced and drove about 10 miles, the problem occurs again, car threw code of crankshaft sensor. So, today I replaced with another sensor cost 80$ from an European auto shop for another brand that got the " Made in Germany " on it. Works just fine. I guess the one from Oreilly's is not a compatible one for some cars.
ENRIKE ! Just wanted to tell you how much I appreciated your Post! I followed your directions to the Tee and although it took me a little longer as the new sensor did not want to go in, it finally did with a little twisting hit the mark and all was completed in an hour. AutohausAZ was fast and helpful, saved me a lot of money and time. Anyone that can turn a wrench and follows your info can accomplish this repair. Thanks again with much aloha and mahalo: Ralph Terry.
I want to thank all who have posted information and pictures here. Bought a CPS at Autozone and even in 35 deg drizzle only took 30 min to change. (2004 ML350)
Joining a forum is only logical if it has value. Being a former Acura owner I was part of a few forums. After a few years they had lost their luster and the conversations had become stale.
Now I am a overjoyed and pleased owner of a ML.
I had reviewed this site before I bought the truck. Looking at lots of pictures and reading lots of vehicle comments. The test drive was the best test drive I had had in many years.
Anyways.
Being a used truck, I had a problem with the vehicle not starting after 1 month of ownership. Checking this web site, finding people who were having or had had the same problem and finding this post gave me a 99% surety that I was experiencing a similar problem.
I'm a long distance truck driver who travels 45 states. My ML had the problem in my companies parking lot and I had to leave it for a few weeks.
Buying the parts was an adventure. I bought the Crank Shaft Sensor in Southern California shop and the (E8),E10 and E12 Torx along with 1/8, 1/4 extensions in a Western Idaho Baxters.
Got back after 4 weeks. Installed the part and BAM! or crank,crank.
Engine started on first try. And have had no probs since.
Thanks to this site, I saved sooooo much mula.
I Hope that in the future I will be able to contribute meaningful dialog that will help and maintain this site.
Last edited by miltcharlie; Dec 25, 2013 at 02:13 PM.
This is my Do It Yourself for the CPS Change. My car is a ML320 V-6
There is some DIY out there but they don't have good pictures and they are for the V-8.
The symptoms were:
1. Engine stalled while accelerating. Car would not re-start.
2. Good Power, no ignition. First I thought it was the fuel pump, Everything sounded strong but no ignition.
3. Was going to tow it home when I decided to try to start engine for the 5th time, it started.
4. Drove it home, checked codes with OBDII Scanner, Code PO335
Decided to replace CPS. It's $150 from dealer (about $50 at AutohausAZ)
MB p/n: a0031532728. Bosch p/n: 0261210171
The part number is different for V-8 and it may be different if you have a different year ML so find out from the dealer before you buy!
Replacing the CPs took about 30 minutes:
TOOLS needed: (see pic)
1. E8 Torx socket. Please get the female, 1/4" drive socket. I had a 3/8" drive and it was too big. I got the 1/4" drive at NAPA for $4. I would'nt recommend using anything else, pls use the torx socket.
2. 1/4" drive extensions. I only needed one, but it is way easier if you have 4 or 5 of the 4" or 6" extensions. If you don't have them, don't buy them just for this job.
3. Socket Wrench.
4. Lots of light.
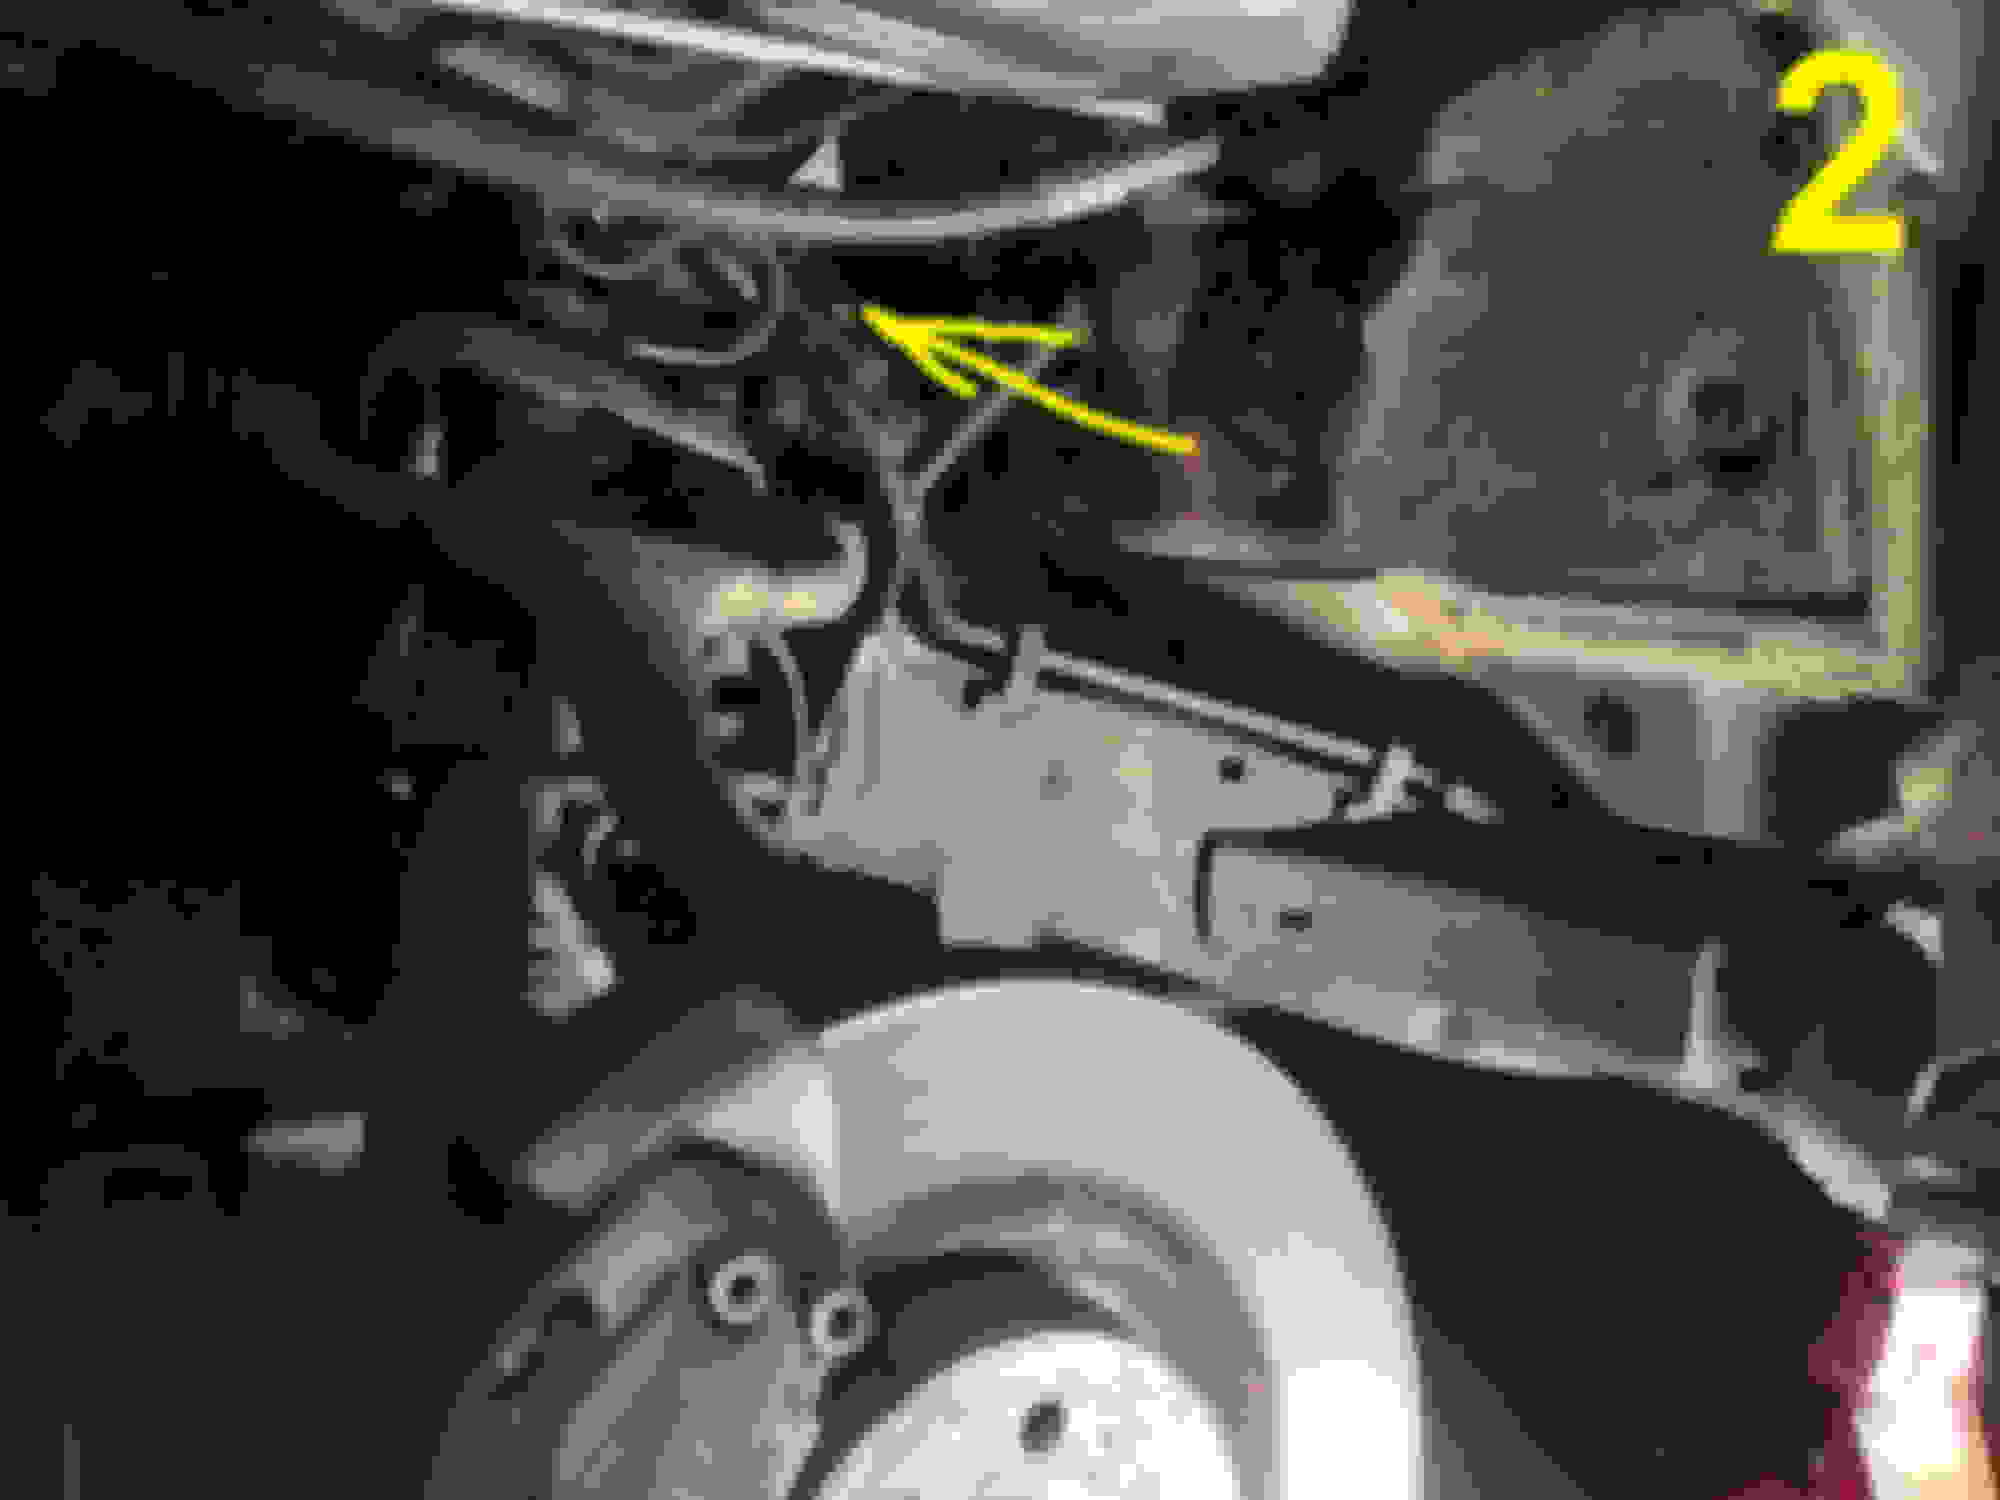
LOCATION: (see pic)
1. No need to jack vehicle up, no need to remove wheel cover or heat shield, you have a V-6!!!! you are lucky. Look at my pic, find the brake fluid reservoir, I have my ratchet wrench right behind it in an angle toward the engine. Get on top of the engine and put a flashlight right there behind this brake fluid reservoir. It will look like on the other picture I have of the CPS without the plug on it. It will help if you have the new plug in your hand. See the pic of the old and new CPS's.
Once you locate it, the easier way to change this plug is without looking at it. I got on top of the engine and got my whole arm in there. you could get a tall chair and stand on it but it's easier to lay on the engine.
2. Next step is to disconnect the plug. You can feel a little lever/latch that you need to push, that will free the connector, be gentle.
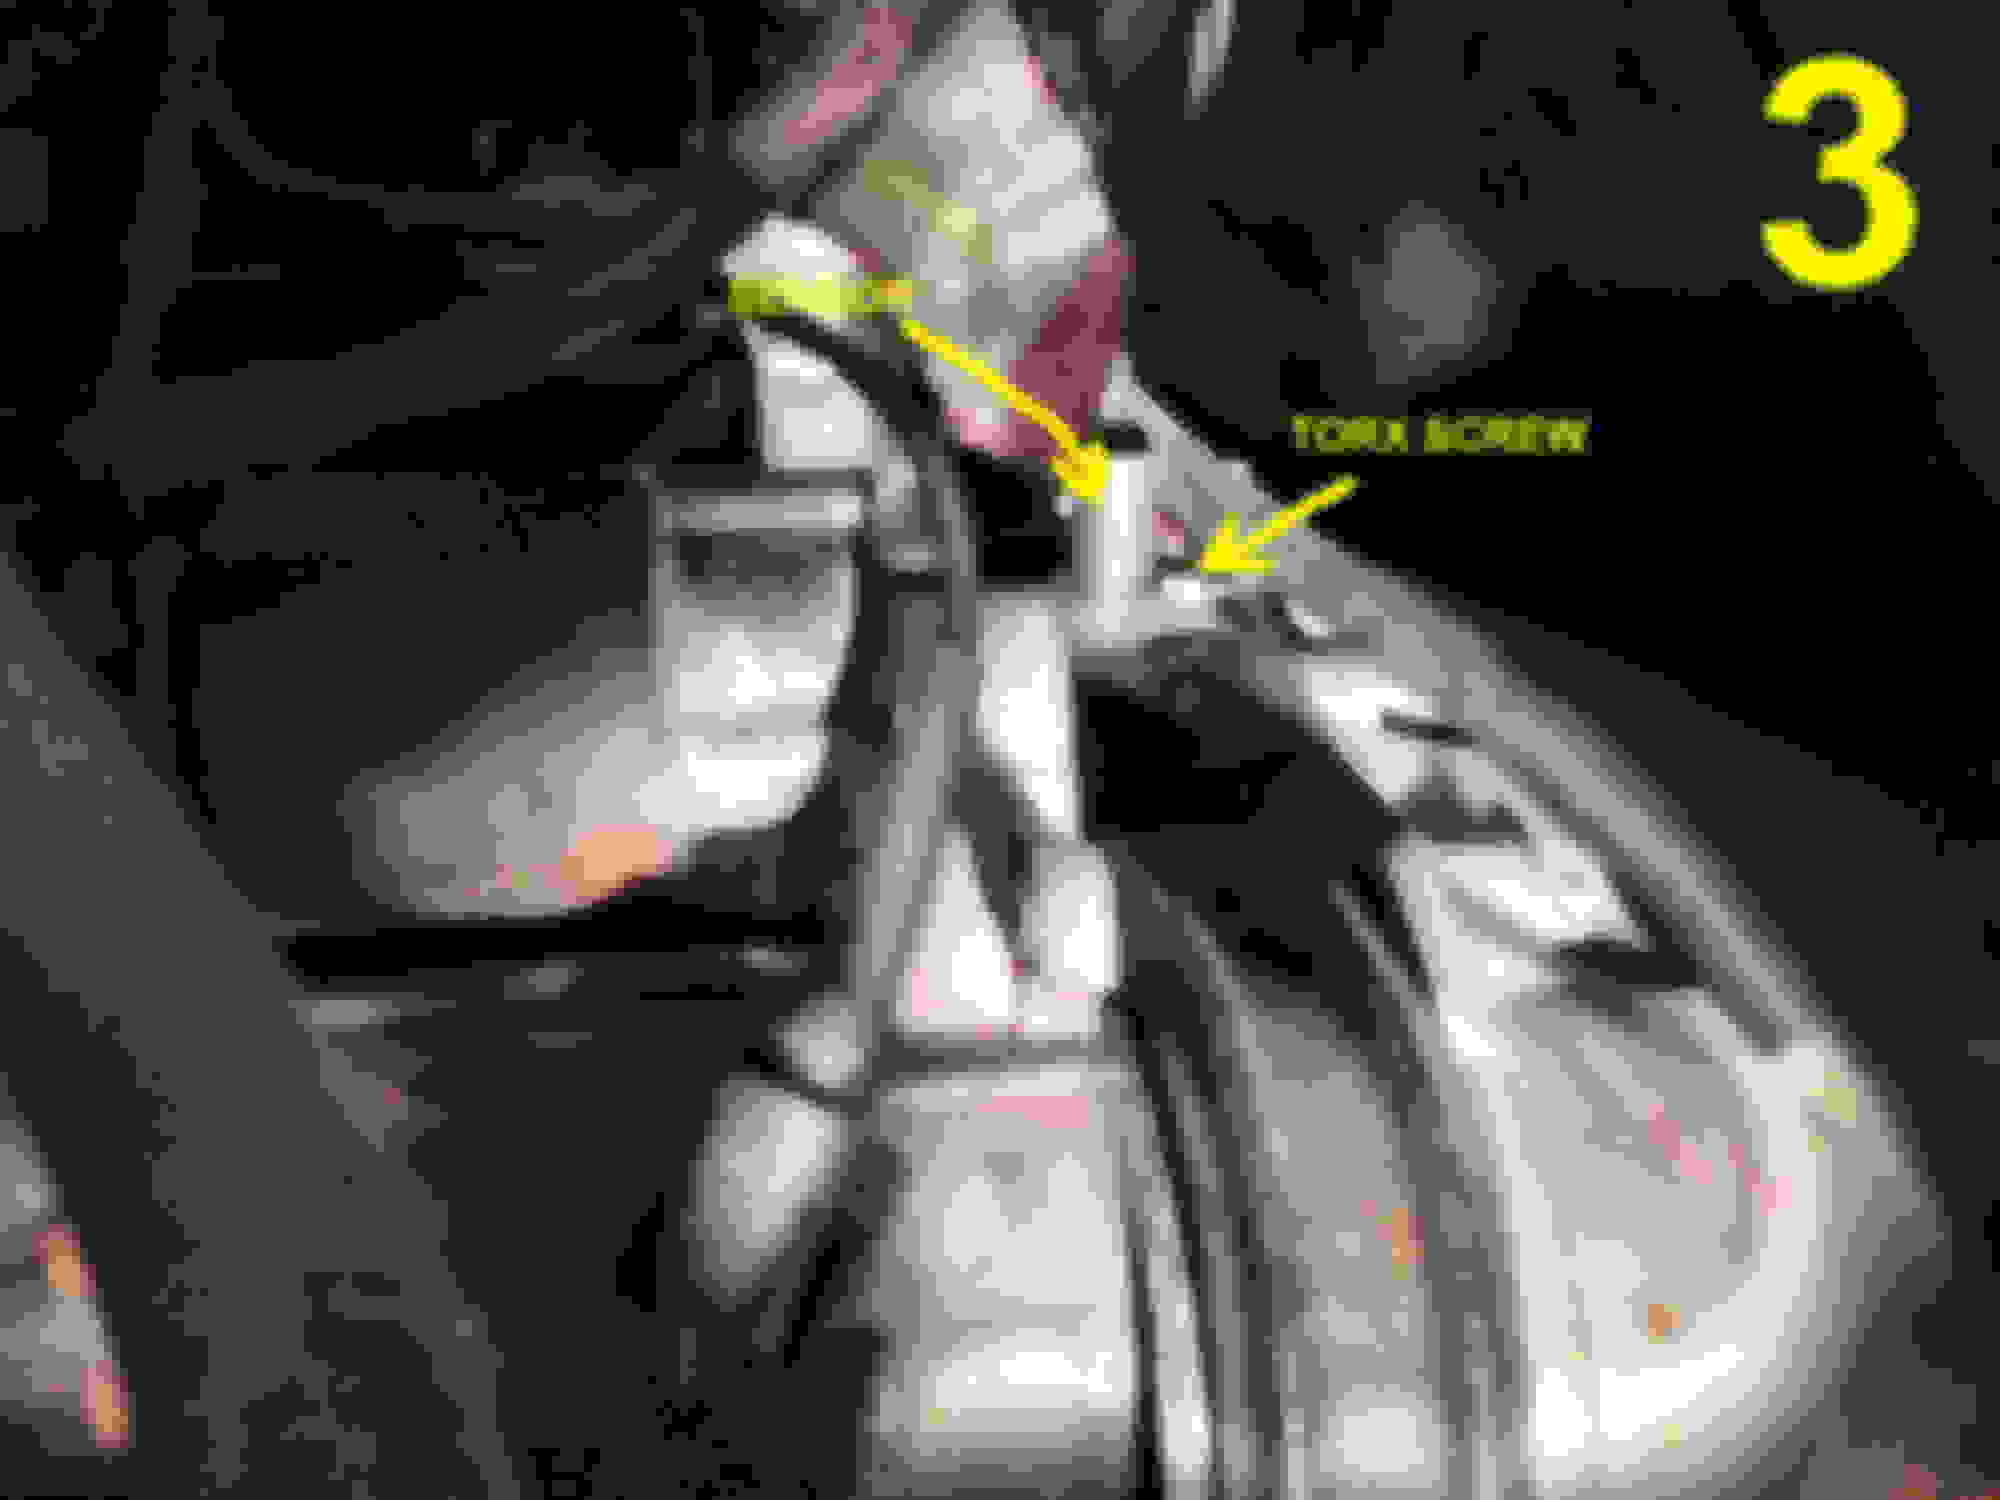
3. Put the E8 socket on the 6" extension and before you put it on the ratchet, put it on the bolt. (see picture of bolt and picture of sensor). Remember, it is way easier to do all this without trying to watch, just trust your hands.
4. Get the ratchet and put it in there. If for some reason you MUST see what you are doing, get more extensions and connect one at a time, to clear the brake fluid reservoir and all the other lines that are around. Now you can get the ratchet at the end and a light to make sure you are turning the bolt the right way : ) Before you loosen it up all the way STOP, tighten it up a little ways and remove all the tools. Then get in there and finish the removal process with your fingers, be sure not to drop it, although chances are it will drop all the way down to the ground.
5. Now you are ready to pull the sensor. All you need to do is put your hand on it and pull it out. Some people had some issues removing the sensor, i wouldn't spray it because that stuff will penetrate the hole, it should come out as long as you are pulling straight out, it will help if you spin it.
6. Once the sensor is removed, plug the hole with a tissue and clean the surrounding area, then unplug the hole and install new CPS. It will be tight but it will go in, just make sure you are pushing it straight down. Remember, it is way easier if you don't try to look at the sensor while you remove/install it.
7. The next step is tricky. the best way to install the bolt is by hand, get in a semi-comfortable position on top of the engine and grab the bolt with your fingers, by now you know exactly where the sensor is, you will be able to feel the hole with your remaining fingers, stick it in there and try to start it. if you cannot start it don't worry. Now grab the socket on and extension and put them on the bolt. AGAIN, if you can do all this without watching, just get your arm in there with the extension and the socket. If you must see it while you tighten the bolt get the socket/ratchet on bolt first and then reach for the extensions. Do not over tighten bolt!
8. Place the CPS plug back on the sensor.
9. Reset code with a OBDII scanner or disconnect battery for 20 minutes (so they say) and reconnect. The code went away by itself on my ML.
Hope this description and the bad pictures help, feel free to add to this thread.
looks easy enogh untill you try this at 32� F and 20mph winds froze my but off didnt finish taking it off.


 .
.