


ball joint replacement Tutorial DIY
Thread Starter
Super Member


Joined: Nov 2004
Posts: 689
Likes: 26
From: So Cal
07 GL450, 91 NSX, 12 Prius
ball joint replacement Tutorial DIY
DIY W220 ball joint replacement
This was performed on my 2002 S430 at 80,000 miles I notice that my front suspension was making creaking sound at low speed. from all the reading on the internet it point to possible fail ball joints or struts. I talked to a mechanic and he say it is usually the ball joint and struts are very expensive since they are Air spring struts. Since my brother has the tool from the ball joint replacement on his W211 E500. We decide to tackle the W220 ball joint replacement.
Here is my brothers DIY tutorial.
W211 ball joint - http://diyw211balljointchange.blogspot.com/
W211 alignment.- http://mercedes-diy-alignment.blogspot.com/
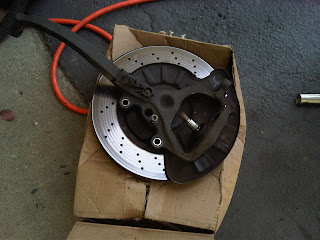
It took us 2 hrs to complete the first side. Took only 1 hr to finish the other side since we figured out the procedure. It is probably a good time to replace the brake rotor and pads too. You are removing most of the same parts anyways.
Separating ball joint is pretty spectacular. It cracks apart pretty violently. You will see some videos !!!!
Parts:
New Ball Joint $30-$50 each.
New Lower control arm $115 each on ebay.
Special Tool required:
Mercedes Ball Joint remover $99 on ebay
Mercedes/BMW ball joint separator $25 on ebay.
Larger sized allen wrench set
Larger sized socket and open end set. 17mm, 18mm, 21mm, 22mm.
Impact wrench would help speed things up.
Misc smaller socket for the mud guard removal.
Jack stands
Jack

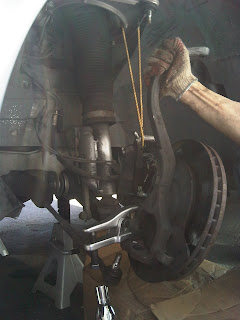
1. Jack up the front end and remove wheels. Support with Jack stands. I placed the jack stand at the sub frame that is between the main lower control arm.
2. remove the front inner mud guard. – you can remove it partially so you can get to the lower control arm bolts.
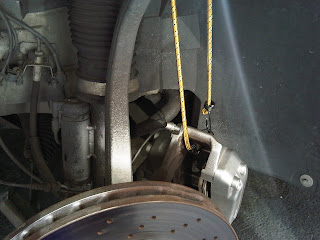
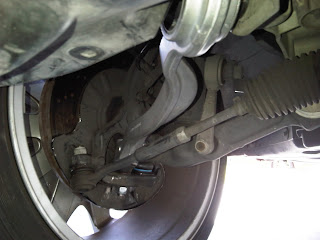
3. Remove Brakes - 2 bolt at the rear of the upright. tie up the caliper with ropes to avoid stress on brake lines.
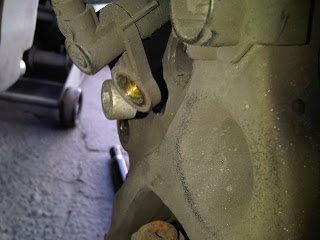
4. Remove ABS sensor - large hex bolt at the rear of the upright. also pop out the 2 sensor wire from its holder .
5. Remove lower tie rod bolt and separate the tie rod with the ball joint separator.

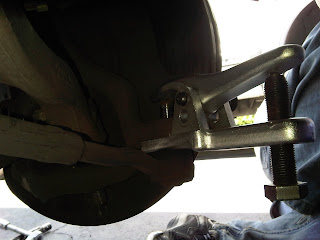
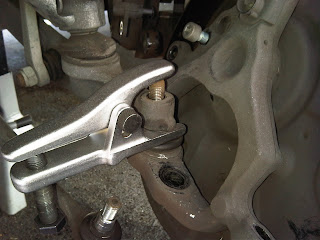
6. Remove the control thrust arm bolt and separate the lower control thrust arm with the ball joint separator. See Video!


http://www.youtube.com/watch?v=l9YM2qZaN_4
7. Remove the upper control arm bolt and separate the ball joint with the ball joint separator.

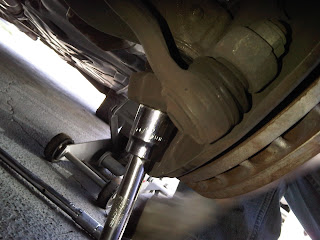
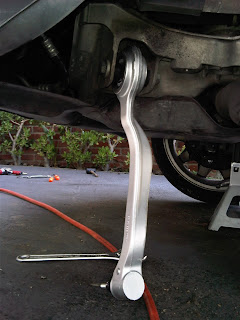
8. Remove the lower ball joint bolt. you have to tilt the front up right outward to get a good clear path to the lower ball joint bolt. Place something under the upright assemble to cushion the assemble when it drops. I used a cardboard box that is filled with wrapping materials. Separate the ball joint with the separator. See Video!
http://www.youtube.com/watch?v=Egq59Ot2ZhU
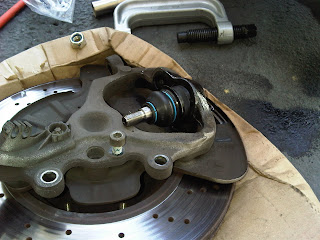
9. With the upright out of the car. Place it on the cushion Box. Use the Ball joint remover/install and press out the ball joint. Use a second extension breaker bar to hold the tool in place.

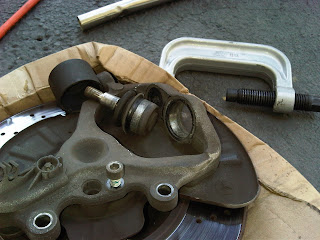
10. Press in the new ball joint with the same tool but reconfigured to install.

11. reinstall the ball joint bolt and Torque to specification.
12. reinstall the upper control arm bolt and Torque to specification.
13. reinstall the lower control arm bolt and Torque ball joint bolt to specification.
14. reinstall the tie rod bolt and Torque to specification.
15. reinstall ABS sensor.
16. reinstall Brake Caliper
17. reinstall sensor wire to place holder.
18. reinstall the mud guard
19. reinstall wheel.
20. Torque down the lower control arm bushing bolt when the car is at its normal ride height. This is important because The bushing will always be twisted if you tighten the bushing when the suspension is at the unloaded state. We used a car ramp so we can get under the car when the suspension is loaded.
You are done! and saved a lot of $$$. You can keep the tools or sell it back on ebay.
The car will feel more solid on the road now and no noise.
To see the larger pictures. click on the pictures on my blog. http://mercedes-w220-ball-joint-diy.blogspot.com/
This was performed on my 2002 S430 at 80,000 miles I notice that my front suspension was making creaking sound at low speed. from all the reading on the internet it point to possible fail ball joints or struts. I talked to a mechanic and he say it is usually the ball joint and struts are very expensive since they are Air spring struts. Since my brother has the tool from the ball joint replacement on his W211 E500. We decide to tackle the W220 ball joint replacement.
Here is my brothers DIY tutorial.
W211 ball joint - http://diyw211balljointchange.blogspot.com/
W211 alignment.- http://mercedes-diy-alignment.blogspot.com/
It took us 2 hrs to complete the first side. Took only 1 hr to finish the other side since we figured out the procedure. It is probably a good time to replace the brake rotor and pads too. You are removing most of the same parts anyways.
Separating ball joint is pretty spectacular. It cracks apart pretty violently. You will see some videos !!!!
Parts:
New Ball Joint $30-$50 each.
New Lower control arm $115 each on ebay.
Special Tool required:
Mercedes Ball Joint remover $99 on ebay
Mercedes/BMW ball joint separator $25 on ebay.
Larger sized allen wrench set
Larger sized socket and open end set. 17mm, 18mm, 21mm, 22mm.
Impact wrench would help speed things up.
Misc smaller socket for the mud guard removal.
Jack stands
Jack
1. Jack up the front end and remove wheels. Support with Jack stands. I placed the jack stand at the sub frame that is between the main lower control arm.
2. remove the front inner mud guard. – you can remove it partially so you can get to the lower control arm bolts.
3. Remove Brakes - 2 bolt at the rear of the upright. tie up the caliper with ropes to avoid stress on brake lines.
4. Remove ABS sensor - large hex bolt at the rear of the upright. also pop out the 2 sensor wire from its holder .
5. Remove lower tie rod bolt and separate the tie rod with the ball joint separator.
6. Remove the control thrust arm bolt and separate the lower control thrust arm with the ball joint separator. See Video!
http://www.youtube.com/watch?v=l9YM2qZaN_4
7. Remove the upper control arm bolt and separate the ball joint with the ball joint separator.
8. Remove the lower ball joint bolt. you have to tilt the front up right outward to get a good clear path to the lower ball joint bolt. Place something under the upright assemble to cushion the assemble when it drops. I used a cardboard box that is filled with wrapping materials. Separate the ball joint with the separator. See Video!
http://www.youtube.com/watch?v=Egq59Ot2ZhU
9. With the upright out of the car. Place it on the cushion Box. Use the Ball joint remover/install and press out the ball joint. Use a second extension breaker bar to hold the tool in place.
10. Press in the new ball joint with the same tool but reconfigured to install.
11. reinstall the ball joint bolt and Torque to specification.
12. reinstall the upper control arm bolt and Torque to specification.
13. reinstall the lower control arm bolt and Torque ball joint bolt to specification.
14. reinstall the tie rod bolt and Torque to specification.
15. reinstall ABS sensor.
16. reinstall Brake Caliper
17. reinstall sensor wire to place holder.
18. reinstall the mud guard
19. reinstall wheel.
20. Torque down the lower control arm bushing bolt when the car is at its normal ride height. This is important because The bushing will always be twisted if you tighten the bushing when the suspension is at the unloaded state. We used a car ramp so we can get under the car when the suspension is loaded.
You are done! and saved a lot of $$$. You can keep the tools or sell it back on ebay.
The car will feel more solid on the road now and no noise.
To see the larger pictures. click on the pictures on my blog. http://mercedes-w220-ball-joint-diy.blogspot.com/
Last edited by fkong777; May 10, 2010 at 06:21 PM.
Thread Starter
Super Member
Joined: Nov 2004
Posts: 689
Likes: 26
From: So Cal
07 GL450, 91 NSX, 12 Prius
The ball joint on the control arm doesnt press out. if your LCA ball joint is bad. you like will have the main lower ball joint going bad too. I'd just do them both at the same time.
Trending Topics
MB World Stories
The Best of Mercedes & AMG

6 Mercedes Models That Did NOT Age Well (But Are Somehow Still Cool)
Verdad Gallardo
Manual Mercedes? 6 Times Sindelfingen Let Drivers Have All The Fun
Verdad Gallardo
Mercedes SLR McLaren 722 S Is Extremely Rare Example Modified by McLaren
Verdad Gallardo
8 Classic Boxy Mercedes Designs That Have Aged Like Fine Wine
Verdad Gallardo
Flawlessly Restored Mercedes 190E Evo II Heads to Auction
Verdad Gallardo
Electric Mercedes C-Class Unveiled: 11 Things You Need to Know
Verdad Gallardo
Mercedes EQS Gets A Major Update: Everything You Need to Know
Verdad Gallardo
5 Underrated Mercedes-Benz Models That Don't Get the Love They Deserve
Verdad Gallardo
Mercedes 300D Has Pushed Well Past 1 Million Miles and It Ain't Stopping
Verdad Gallardo
Newbie
Joined: Aug 2010
Posts: 8
Likes: 0
From: DFW
S500/2000, E320/01/wagon
Since you took the upright completely out of the Tie-rod, you have to re-align the car, 4 wheel alignment cost $360 from dealer. Unless you need to replace the tie-rod, you can replace the ball joints, trust arm, lower control arm without taken out the upright, tie rod, brake caliper or any of the sensor, pads and save lots of time.

Newbie
Joined: Jan 2012
Posts: 1
Likes: 0
From: Brighton MI
2002 S Class 430, 2002 SLK230
Great help, I changed mine on both sides and it worked just as you described. The allen wrench for the ABS is 8mm. make sure you have one before you start.
Thanks for the detailed write up.
Thanks for the detailed write up.

Newbie
Joined: May 2013
Posts: 1
Likes: 0
2002 S430 w/ AMG
Fantastic post. I'm going to do this replace, but would like to also replace the front rearward control arm. Any idea how it is connected to the airmatic and how I need to go about disassembling/assembling it to the airmatic? Thanks.
Newbie
Joined: Dec 2018
Posts: 1
Likes: 0
00 S500
Since you took the upright completely out of the Tie-rod, you have to re-align the car, 4 wheel alignment cost $360 from dealer. Unless you need to replace the tie-rod, you can replace the ball joints, trust arm, lower control arm without taken out the upright, tie rod, brake caliper or any of the sensor, pads and save lots of time.
I thought this was right 😐


