


SL/R129: Needed: R129 Rear View Mirror Removal Instructions
Thread Starter
Super Member
Joined: Aug 2005
Posts: 591
Likes: 9
From: Covington, WA
'96 SL600, '05 S55 AMG, '06 C230
Needed: R129 Rear View Mirror Removal Instructions
Looking for instructions on how to remove the entire interior rear view mirror assembly from a '96 SL600. My mirror does not have electric motor control, nor does it have the garage door opener option. Just a plain 'ol OEM mirror with the IR Sensor. Need to make repairs as the mirror is getting the 'shakes' as I drive down the road.
Surprisingly, I could not find any instructions on the MB R129 Technical DVD and what I found with 'net searches was lacking in continuity or completeness. Once I get the mirror assembly off the windshield frame, I can make repairs.
I'm willing to assemble step-by-step instructions along and pictures, if I can get assistance in getting started.
Junior Member
Joined: Aug 2007
Posts: 26
Likes: 0
From: Atlanta
95 SL 500, 08 Infinity FX35
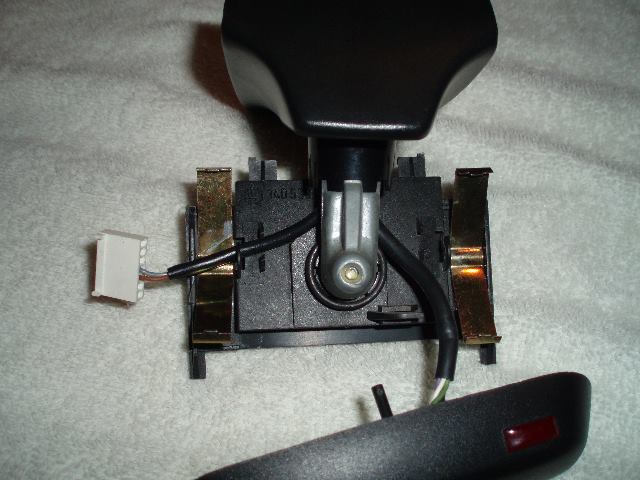
The mirror is tighly secured by 2 spring clips. You need to grab the base and pull down firmly and careful as you might rip the connection. I used a flat metal putty knife to pry it open. Applying some Wd40 makes it much easier to reinstall.
Thread Starter
Super Member
Joined: Aug 2005
Posts: 591
Likes: 9
From: Covington, WA
'96 SL600, '05 S55 AMG, '06 C230
Thanks symplered! Once I got over the 'fear factor', the mirror came off easily. You are right about the connector. My mirror assembly broke-away faster than I could stop it, so the connector disconnected, but does not appear damaged. Picture was invaluable, too.
One-step instructions... I love 'em!
One-step instructions... I love 'em!
Thread Starter
Super Member
Joined: Aug 2005
Posts: 591
Likes: 9
From: Covington, WA
'96 SL600, '05 S55 AMG, '06 C230
The interior rear view mirror of my �96 SL600 had a shake that was very annoying. Here are the step-by-step instructions on how I disassembled, repaired and reassembled the mirror.
Once I got inside the mirror assembly, it appeared that either a previous owner attempted a repair or something had disintegrated. Since this is the only mirror assembly I have performed surgery on, I�m not sure what is supposed to be in there. Nevertheless, this repair made the inside rear view mirror assembly very solid.
A couple disclaimers� The mirror assembly used in this repair is from a �96 SL600. It is not motorized, but does have ambient light sensing technology for dimming the mirror at night, as well as the IR receiver for central locking capability. But the basic steps should be the same for any R129, perhaps with slight variation.
Also, this procedure is not for the faint of heart or type A+ personalities as it does require extreme patience towards the end. As mentioned above, my mirror assembly may have parts missing that could/would make the reassembly easier. But if I do have all the components, then patience is necessary.
Finally, this procedure does not repair something that is broken. If there are broken plastic pieces inside, the mirror assembly may have to be replaced. But if things are just loose, this procedure should work well.
Tools and Materials Needed:
1. Plastic electronic tuning tool or small plastic wedge (a small flat-blade screwdriver might be used if extreme care is exercised)
2. Two pieces of 1/8-inch thick flat rubber material, each cut to 3-1/2� x 1-5/8� (nothing special except that they must be flat; no ribs � find it any well-stocked hardware store). You can substitute 1/4-inch thick, if you want � I just happened to have some 1/8-inch in the garage.
3. Double-side tape (Do *not* use double-sided foam tape; get the stuff you use at Christmas)
Instructions:
1. Remove the entire mirror assembly from the vehicle by pulling the base and neck firmly in a downward direction. Do *not* pull on the mirror body/housing itself! Be careful as the force of the �breakaway� may disengage the connector. If need be, disconnect the electrical connector.
2. Press the edge of the mirror assembly body along the clamshell ring to begin disengaging the clamshell piece. It�s easier to start at either top corner and work along the top. The small plastic wedge works well here.
3. Unsnap the IR receiver from the bottom of the mirror assembly.
4. Remove the clamshell ring from the body. CAUTION: Be careful here as mirror components may be loose on the inside and may fall out when the clamshell is removed. In particular, watch out for a pair of brass flat springs. They are large, but may spring out � not violently, but with enough force to scoot under a table or cabinet.

5. Disconnect the 7-pin connector from the back of the mirror. This is the circuitry that controls the mirror nighttime dimming function.

6. Once apart, investigate as to the cause of mirror looseness. In my case, two springs became disengaged and allowed the mirror to flop. There may also be a situation where something broke. If something is broken, you will have to evaluate whether repairs can be made.

7. Assuming the mirror is simply loose and everything appears intact, proceed to add some thickness behind the mirror. Using double-sided tape, adhere the two 1/8-inch thick rubber pads together to form a 1/4-inch thick piece of rubber.

8. Using a small piece of double-sided tape, adhere the rubber pad to the flat section of the gimbal assembly. If the rubber is cut to the dimensions shown, it will be obvious exactly where it is to be mounted.

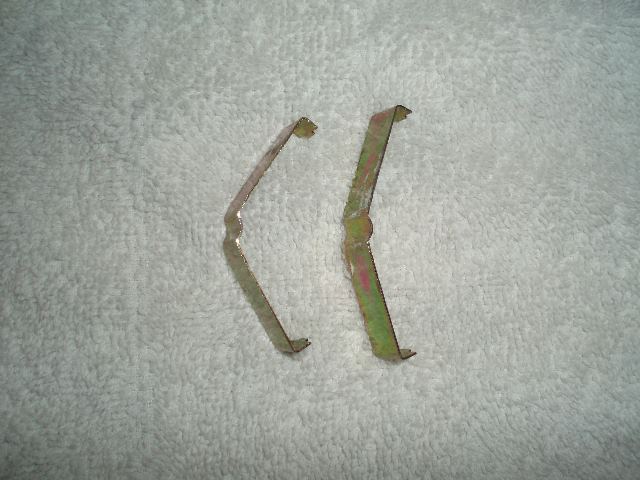
9. Gently bend the ends of each pressure spring together a little to increase the overall height of the spring. Do *not* over bend! You only want to increase the spring strength a little. The spring on the right is what came out of my mirror assembly, while the one on the left is one that I just bent. This should give you an idea of how much to bend each spring.
10. Adhere a small piece of double-sided tape to the indention of each spring.

11. Place both springs on the side opposite the mounted rubber pad. The indentions in the spring mate with a corresponding rib. This sets the alignment of the springs.

This picture shows both springs in place. Also note the 7-pin connector is now properly routed through its holder loop.
12. Reconnect the 7-pin connector and lay the mirror on top of the rubber pad. Do *not* adhere with double-sided tape � the mirror must be allowed to shift and settle, as the final assembly proceeds.
CAUTION: From here on, a lot of patience is required.
13. Gently sit the prepared gimbal assembly with mirror into the mirror assembly body. The springs must sit on the two �spines� within the body. Patience is required because even though there is double-sided tape to hold the springs in place, they shift quite easily. You will probably have to attempt a number of times to get it properly set in place. In my case, I believe there is a piece missing that maintains a set distance between each spring. Without it, the springs can shift a little. Nevertheless, it can be accomplished, with a little patience. Please note that the mirror has been removed from this picture so that the springs can be more easily seen.

This picture shows the gimbal properly in place with the mirror resting properly on the rubber pad.

14. Carefully reassemble the clamshell, starting at the top. Use care here so that the spring alignment does not get disturbed. As you add pressure onto the clamshell, the springs will provide force which will hold the mirror firmly against the clamshell. It�s the rubber pad and added spring height that accomplishes this.

15. While holding the clamshell and body, check to make sure the entire assembly is tight and nothing is loose. If properly assembled, the mirror will be quite firmly held against the clamshell. If not, disassemble and investigate. More than likely, one on the springs is loose.
16. Snap the IR receiver into the bottom of the mirror assembly. The mirror assembly is now completely reassembled and can be handled as a single unit.
17. Using a dab of grease or a quick shot of WD40, lubricate each end of the spring at the very top of the mirror assembly. This will aid in snapping it back into place.
18. Reinstall the mirror assembly into the vehicle by connecting the electrical connector. As the mirror assembly is maneuvered into place, be sure the electrical connector is placed in its space � there is a small well for it so that it does not get pinched.
19. Using a firm upward motion on the upper mount, snap the mirror assembly in place. Do *not* exert force on the mirror body.
20. Test IR receiver function.
21. Enjoy a jiggle-free rear view mirror!
Thanks to symplered for the suggestion of lubricating the large spring when reinstalling the entire mirror assembly back into the vehicle.
Cheers,
Jeff
Once I got inside the mirror assembly, it appeared that either a previous owner attempted a repair or something had disintegrated. Since this is the only mirror assembly I have performed surgery on, I�m not sure what is supposed to be in there. Nevertheless, this repair made the inside rear view mirror assembly very solid.
A couple disclaimers� The mirror assembly used in this repair is from a �96 SL600. It is not motorized, but does have ambient light sensing technology for dimming the mirror at night, as well as the IR receiver for central locking capability. But the basic steps should be the same for any R129, perhaps with slight variation.
Also, this procedure is not for the faint of heart or type A+ personalities as it does require extreme patience towards the end. As mentioned above, my mirror assembly may have parts missing that could/would make the reassembly easier. But if I do have all the components, then patience is necessary.
Finally, this procedure does not repair something that is broken. If there are broken plastic pieces inside, the mirror assembly may have to be replaced. But if things are just loose, this procedure should work well.
Tools and Materials Needed:
1. Plastic electronic tuning tool or small plastic wedge (a small flat-blade screwdriver might be used if extreme care is exercised)
2. Two pieces of 1/8-inch thick flat rubber material, each cut to 3-1/2� x 1-5/8� (nothing special except that they must be flat; no ribs � find it any well-stocked hardware store). You can substitute 1/4-inch thick, if you want � I just happened to have some 1/8-inch in the garage.
3. Double-side tape (Do *not* use double-sided foam tape; get the stuff you use at Christmas)
Instructions:
1. Remove the entire mirror assembly from the vehicle by pulling the base and neck firmly in a downward direction. Do *not* pull on the mirror body/housing itself! Be careful as the force of the �breakaway� may disengage the connector. If need be, disconnect the electrical connector.
2. Press the edge of the mirror assembly body along the clamshell ring to begin disengaging the clamshell piece. It�s easier to start at either top corner and work along the top. The small plastic wedge works well here.
3. Unsnap the IR receiver from the bottom of the mirror assembly.
4. Remove the clamshell ring from the body. CAUTION: Be careful here as mirror components may be loose on the inside and may fall out when the clamshell is removed. In particular, watch out for a pair of brass flat springs. They are large, but may spring out � not violently, but with enough force to scoot under a table or cabinet.
5. Disconnect the 7-pin connector from the back of the mirror. This is the circuitry that controls the mirror nighttime dimming function.
6. Once apart, investigate as to the cause of mirror looseness. In my case, two springs became disengaged and allowed the mirror to flop. There may also be a situation where something broke. If something is broken, you will have to evaluate whether repairs can be made.
7. Assuming the mirror is simply loose and everything appears intact, proceed to add some thickness behind the mirror. Using double-sided tape, adhere the two 1/8-inch thick rubber pads together to form a 1/4-inch thick piece of rubber.
8. Using a small piece of double-sided tape, adhere the rubber pad to the flat section of the gimbal assembly. If the rubber is cut to the dimensions shown, it will be obvious exactly where it is to be mounted.
9. Gently bend the ends of each pressure spring together a little to increase the overall height of the spring. Do *not* over bend! You only want to increase the spring strength a little. The spring on the right is what came out of my mirror assembly, while the one on the left is one that I just bent. This should give you an idea of how much to bend each spring.
10. Adhere a small piece of double-sided tape to the indention of each spring.
11. Place both springs on the side opposite the mounted rubber pad. The indentions in the spring mate with a corresponding rib. This sets the alignment of the springs.
This picture shows both springs in place. Also note the 7-pin connector is now properly routed through its holder loop.
12. Reconnect the 7-pin connector and lay the mirror on top of the rubber pad. Do *not* adhere with double-sided tape � the mirror must be allowed to shift and settle, as the final assembly proceeds.
CAUTION: From here on, a lot of patience is required.
13. Gently sit the prepared gimbal assembly with mirror into the mirror assembly body. The springs must sit on the two �spines� within the body. Patience is required because even though there is double-sided tape to hold the springs in place, they shift quite easily. You will probably have to attempt a number of times to get it properly set in place. In my case, I believe there is a piece missing that maintains a set distance between each spring. Without it, the springs can shift a little. Nevertheless, it can be accomplished, with a little patience. Please note that the mirror has been removed from this picture so that the springs can be more easily seen.
This picture shows the gimbal properly in place with the mirror resting properly on the rubber pad.
14. Carefully reassemble the clamshell, starting at the top. Use care here so that the spring alignment does not get disturbed. As you add pressure onto the clamshell, the springs will provide force which will hold the mirror firmly against the clamshell. It�s the rubber pad and added spring height that accomplishes this.
15. While holding the clamshell and body, check to make sure the entire assembly is tight and nothing is loose. If properly assembled, the mirror will be quite firmly held against the clamshell. If not, disassemble and investigate. More than likely, one on the springs is loose.
16. Snap the IR receiver into the bottom of the mirror assembly. The mirror assembly is now completely reassembled and can be handled as a single unit.
17. Using a dab of grease or a quick shot of WD40, lubricate each end of the spring at the very top of the mirror assembly. This will aid in snapping it back into place.
18. Reinstall the mirror assembly into the vehicle by connecting the electrical connector. As the mirror assembly is maneuvered into place, be sure the electrical connector is placed in its space � there is a small well for it so that it does not get pinched.
19. Using a firm upward motion on the upper mount, snap the mirror assembly in place. Do *not* exert force on the mirror body.
20. Test IR receiver function.
21. Enjoy a jiggle-free rear view mirror!
Thanks to symplered for the suggestion of lubricating the large spring when reinstalling the entire mirror assembly back into the vehicle.
Cheers,
Jeff
Last edited by MB-Dude; Aug 31, 2007 at 11:29 PM.

Senior Member
Joined: Nov 2004
Posts: 282
Likes: 3
From: Bradenton, FL
'87 560SL Sold, '99 SL500 For Keeps
Hey Jeff, when I asked you to 'post your fix', I didn't expect the Chiltons Repair Manual Version...WOW!
Thanks so much for taking the time to make this about as 'idiot proof' as you did. I think even I can do this now. Great Job!!
Bob
Thanks so much for taking the time to make this about as 'idiot proof' as you did. I think even I can do this now. Great Job!!
Bob
Thread Starter
Super Member
Joined: Aug 2005
Posts: 591
Likes: 9
From: Covington, WA
'96 SL600, '05 S55 AMG, '06 C230
Cheers,
Jeff
Trending Topics
MB World Stories
The Best of Mercedes & AMG

Manual Mercedes? 6 Times Sindelfingen Let Drivers Have All The Fun
Verdad Gallardo
Mercedes SLR McLaren 722 S Is Extremely Rare Example Modified by McLaren
Verdad Gallardo
8 Classic Boxy Mercedes Designs That Have Aged Like Fine Wine
Verdad Gallardo
Flawlessly Restored Mercedes 190E Evo II Heads to Auction
Verdad Gallardo
Electric Mercedes C-Class Unveiled: 11 Things You Need to Know
Verdad Gallardo
Mercedes EQS Gets A Major Update: Everything You Need to Know
Verdad Gallardo
5 Underrated Mercedes-Benz Models That Don't Get the Love They Deserve
Verdad Gallardo
Mercedes 300D Has Pushed Well Past 1 Million Miles and It Ain't Stopping
Verdad Gallardo
10 Most Reliable Mercedes-Benz Models You Can Buy Used
Verdad Gallardo
Newbie
Joined: Jul 2009
Posts: 1
Likes: 0
mb c230
I know it's a bit late, but ...
I was googling for a diagram on putting this damned thing back together (interior rear view for a c230) and this was the EXACT thing I was looking for.
I had the shower of parts when I got it apart and was having a hell of a time. Thank you for your diligence in creating a guide with pics!
I had the shower of parts when I got it apart and was having a hell of a time. Thank you for your diligence in creating a guide with pics!


Newbie
Joined: Jul 2009
Posts: 3
Likes: 1
1995 sl 320
rear mirror r 129
If you're a purist and everything has to be mechanically correct...forget this idea. I was told this week that the mirrro was an$800.00 item (at the dealer). It really had the "shakes" after 15 years. I tried a few things to fix it but what worked and really well after the test drive was this. I took a piece of 1/4 rubber tubing and cut a 1 inch piece. I tilted the mirror down towartd the dash while facing straight back. This gained me the maximum downward tilt. I then worked the tubing into the gap between the post and the mirror. It took some doing but I worked it down so that none of the tubing was exposed. I was still able to tilt and adjust the mirror to a variety of angles. I then took the sl 320 on the same roads as I did before the tubing install. It doesn't shake or jiggle at all. My best fix so far.


Newbie
Joined: Jan 2015
Posts: 1
Likes: 0
500sl
I had a similar problem with my '96. All the closure tabs had been broken off
previously by other owner. I used 6 two-way clear tape from cupboard hooks to
hold it together after reassembly. Do you have any idea on how to remove my
phone panel so that I can use the space for sun glasses, etc?
previously by other owner. I used 6 two-way clear tape from cupboard hooks to
hold it together after reassembly. Do you have any idea on how to remove my
phone panel so that I can use the space for sun glasses, etc?

Newbie
Joined: Apr 2015
Posts: 2
Likes: 0
1995 SL600
Jeff
Can't thank you enough for your removal instructions. My question now is do you know if you can purchase parts for the mirror. I bought the car and mirror was half way removed. Of course the gray housing is broken and the spring clips are missing.
Thanks in advance
Can't thank you enough for your removal instructions. My question now is do you know if you can purchase parts for the mirror. I bought the car and mirror was half way removed. Of course the gray housing is broken and the spring clips are missing.
Thanks in advance

Newbie
Joined: Jul 2016
Posts: 1
Likes: 0
1997 SL600 & 1987 BMW 325es
Hello all. I just joined. I had exact same problem. Fixed it 8 years ago, in exact same way. Now it is doing it again. So I decided to fix it different way, and I notices any C230 Rear View Mirror, is identical to SL Mirrors. As you all know the used price of SL Mirrors for 1991 to 2000 is between 300 to 600 dollars. I don't know what is the new price, and I didn't call when I saw the price of used one. So I purchased C230 rear View mirror from Ebay for $25 dollars. After opening it I noticed that the inside and the bracket and wiring is different. So I had to modify my mirror bracket, and use the C230 front and back cover. It was not easy, but I had to sand honey comb housing inside the C230 Mirror so I can fit my original SL Mirror bracket into the C230 back cover. No tape is require, and it will be solid and no more mirror dancing while you drive.
The only issue I have reinstalling the mirror into it's housing. It is the most difficult task I have ever encounter. Tried grease and spray and didn't work. I have not installed it back, because I have no more elbow power to do it.
The only issue I have reinstalling the mirror into it's housing. It is the most difficult task I have ever encounter. Tried grease and spray and didn't work. I have not installed it back, because I have no more elbow power to do it.


