When you click on links to various merchants on this site and make a purchase, this can result in this site earning a commission. Affiliate programs and affiliations include, but are not limited to, the eBay Partner Network.
1999 SL600;1971 Citroen DS; 1973 Citroen SM 3.0; 1973 Citroen SM 2.7 EFI
1999 SL600 Suspension Accumulator Replacement
Any tips/tricks for replacing the front and rear suspension accumulators? I am replacing all four since the ride has become somewhat harsh lately (no codes yet, but I don't want to risk damage to the struts). One specific question I have is how to depressurize the system. Do I use the red lock-out button when I lift the car so the wheels are in full droop or does the lock-out keep the pressure in? What exactly does that lock-out button do anyway. MB warns that it should always be used when lifting the car off its wheels, but doesn't explain why.....
I have not replaced the accumulators on your year.
I used my ramp lift to get to a working height for my old back!, used bottle jacks to raise the body so the tires hung and I could remove the tires.
Since I had no lock out switch on the 94 ( but do have on other toys ) I had to start and run the motor to get the final wheel position when the replacement was complete and the ride height adjustment had been complete ( two purposes in one repair )
because the membranes were leaking I had lots of fluid to collect, but when opening the hose lines the fluid did not jet out!
I recall the loosen the mounting connectors but don't remove the bolts because the tool access was constricted ( I hate losing skin to any DIY project )
Hope this provides some insight
1999 SL600;1971 Citroen DS; 1973 Citroen SM 3.0; 1973 Citroen SM 2.7 EFI
For what it's worth, I documented how I went about it:
The ADS system uses hydraulic accumulators (gas springs) in conjunction with a hydraulic strut to augment the coil springs that support the weight of the vehicle. The accumulators are charged with nitrogen gas, which leaks out over time, rendering the gas springs inoperative. I noticed recently that my wife�s 1999 SL 600 had a harsh, bouncy ride. Having driven Citroens for most of my life, I realized immediately that the car had at least one bad suspension accumulator, so I ordered a set of four online.
To change the front accumulators, I put the car on a frame lift so all four wheels were off the ground. Before lifting the car off the ground, I engaged the lock out switch for the ADS system and shut off the engine. I did not get a bath of high pressure hydraulic fluid when I opened up the hydraulic lines, so I surmise engaging the lock out switch is the correct approach (or at least is one correct approach). I removed the left front tire and splash panel behind the wheel to expose the accumulator.
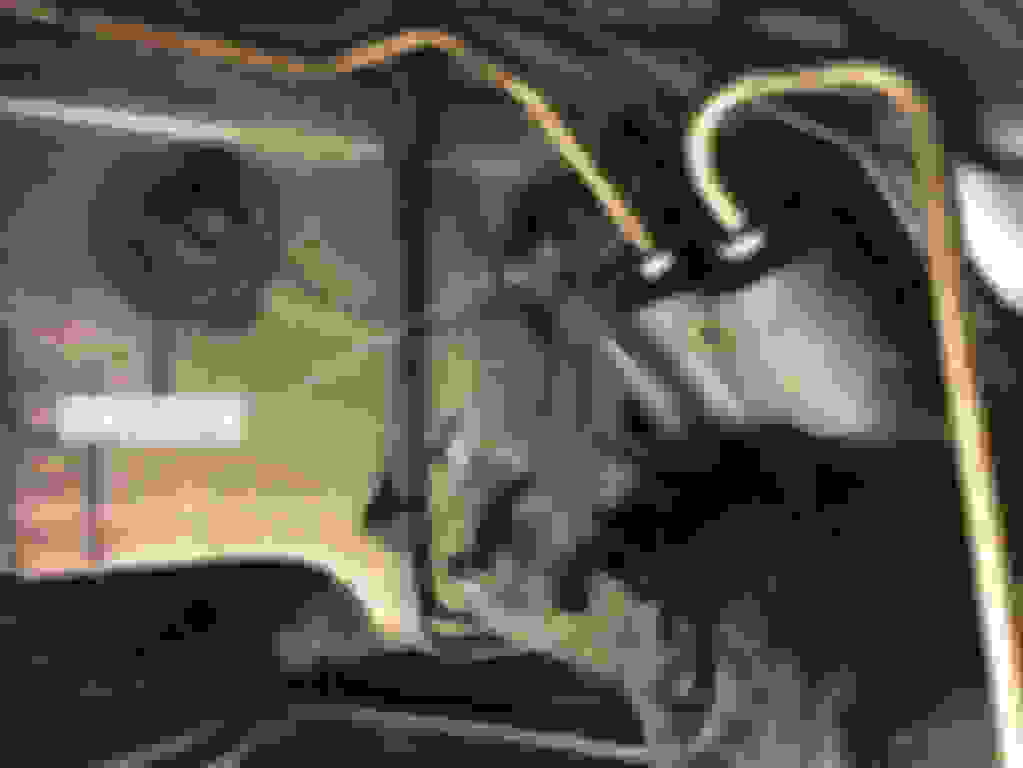
Inner Fender Removed
The accumulator itself is held onto a bracket, attached to the frame, which also supports the electronic damper valve. I had to remove the bracket from the car to get access to the three bolts holding the accumulator to the bracket. This is because the accumulator is held to the bracket by three special bolts that take a 13mm wrench on the front, but a 2.5mm Allen key in the back. The mounting bolts will simply spin in the bracket if you try to loosen the accumulator without first removing the bracket from the frame. Before removing the bracket, I cracked the small line going into the accumulator using an 11mm (7/16�) flare nut wrench. I placed an oil catch basin underneath to catch the hydraulic fluid that dripped out of the accumulator. Once most of the fluid had drained I removed the small line, then using a 19mm and a 20mm open end wrench, I undid the large line going into the accumulator.
Hydraulic Connections that must be disconnected
To remove the accumulator without having to remove the electronic damper valve, I undid the single 13mm A/F bolt that goes straight through the valve body. I then removed the three 10mm A/F bolts holding the bracket to the frame [photo]. Once these were removed, with a bit of jiggling, I was able to free the bracket and accumulator from the frame, then free the accumulator from the bracket using a 13mm wrench and 2.5mm Allen hex key.
Disconnecting Damper Valve Mount
Disconnecting Accumulator Bracket from Frame
While holding the accumulator in a bench vise, I removed the inverted flare adapter from the accumulator using an air impact gun and a 20mm socket. I torqued the adapter onto the new accumulator using 90 N-m (70 ft-lbs.) of torque with a new M14 copper crush washer. Installation was reverse order of disassembly. Rear accumulators were pretty straightforward. You can see both of them from below, except access to the left rear sphere is obscured by the exhaust system, so you will need to have a 17mm (11/16�) and an 11mm (7/16�) crows foot line wrench in order to undo the line fittings. Remove the three 10mm A/F nuts holding the accumulators to the floor of the spare tire well, then remove the accumulators from inside the spare tire well. Assembly is in reverse order of disassembly.
Mercedes SLR McLaren 722 S Is Extremely Rare Example Modified by McLaren
Slideshow: A one-of-one U.S.-spec Mercedes-Benz SLR McLaren Roadster became even rarer after a factory-backed transformation at McLaren's headquarters.