
SL/R230: 03 SL500 replace ABC accumulator, rear

Thread Starter
Newbie
Joined: Aug 2013
Posts: 4
Likes: 0
'03 SL500
03 SL500 replace ABC accumulator, rear
I'm looking for a step by step to replace the rear accumulator. Would like to understand how to remove the panel that holds the accumulator and valve block. I have attached a picture. I have already changed the front and noticed some improvement.

Member
Joined: Jul 2013
Posts: 241
Likes: 16
2005 SL55 AMG
Hello Bclancy888, I'm working on this exact same project on my 2005 SL55 AMG (exact same setup). I'm ordering the parts tomorrow and I'm going to begin disassembly this week.
Sorry I don't have anything for you right now but, I'll take pictures and post them here as I proceed in the event no one else replies.
Sorry I don't have anything for you right now but, I'll take pictures and post them here as I proceed in the event no one else replies.
Member
Joined: Jul 2013
Posts: 241
Likes: 16
2005 SL55 AMG
OK Brian I just finished removing the rear valve block assembly. It was much easier than it looks. As you've performed removal and replacement of your front Accumulator some of this will be redundant to you. I decided I'd do an entire write up for those who are not as familiar with the system.
Time: With car on stands and wheel off ready to begin removal exactly 1 episode of Sons of Anarchy :-)
(my wife was starting a DVD episode of Sons of Anarchy when I went out to the garage tonight to remove the valve block and the credits were rolling when I came in) so, about 1 hour
Two notes:
1) It is absolutely crucial to keep the work area, hoses and valve block clean and free of any dirt at all times! Even the smallest particle of dirt intruding into the ABC system can cause system failure. IF you do not plan to remove and clean the Valve Block Assembly I strongly recommend purchasing an assortment of hydraulic plugs (IE Capplugs.com) so you can immediately plug the port in the Valve Block as soon as a ABC Hose is removed. Cap plugs should be available at any facility that deals with hydraulic hoses or fittings.
2) It is in no way necessary to place any undue stress on any of the ABC hoses to remove the Valve Block Assembly. No prying, pulling or twisting is necessary! Please handle all ABC Hoses with care so you do not end up with a leaky hose!
On to removal:
I had a tool that made removal a breeze. I consider this tool necessary to remove the valve block assembly. I see no way to remove the assembly safely without it:
Snap-On 17mm Crows Foot: FRHM17
A similar crows foot may work but, this is the exact tool I used and removal was a snap. If you don't have one, you can call or stop by any service shop and ask any tech for the number of the local snap-on distributor. Alternatively, a parts store or Craftsman crows foot may work.
Here are the primary tools I used for removal:
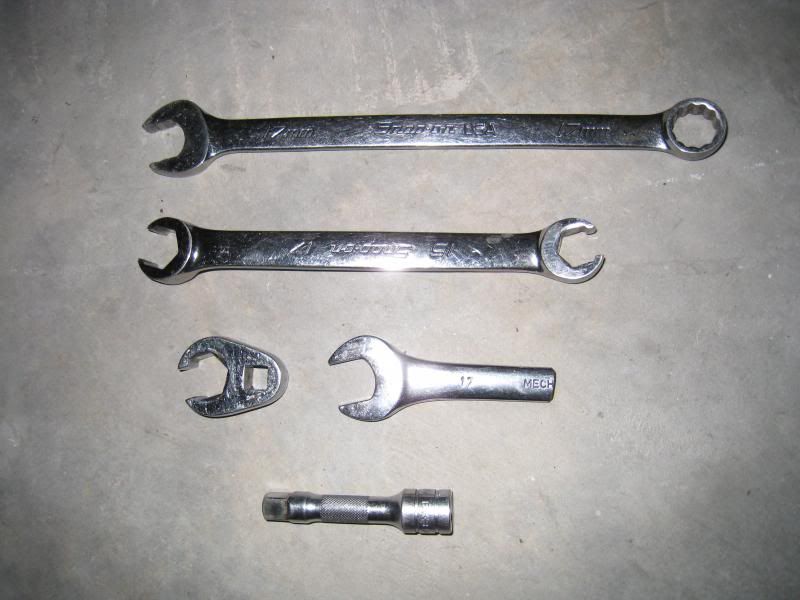
All ABC Hose Fittings requiring removal to remove the Valve Block are 17mm.
The short 17mm wrench is a wrench I cut down long ago. This helped in removing one of the ABC Hoses but, I don't consider it crucial to the job. As with any hydraulic hose you MUST use a wrench designed specifically for removing hydraulic lines. Failure to do so will likely result in a rounded off ABC Hose Fitting and possibly necessitate replacement of the entire ABC Hose! The standard wrenches above were used for ease in loosening and removing the ABC hoses only after they were initially broke free using one of the Line Wrenches.
First, all 4 corners of the car were up on jack stands. While the Valve Block Removal procedure could be carried out with just the rear of the car up on stands I will be working on the front Accumulator as well so, the car was in the air. I mention this as having all 4 wheels at full droop completely depressurizes the ABC system (after about 15 minutes in the air).
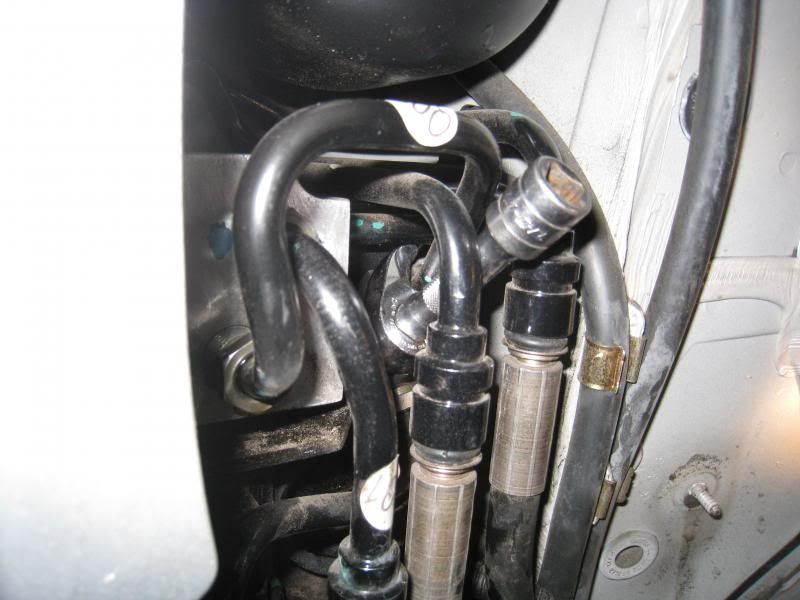
To be safe, I also loosened the rear left ABC valve:
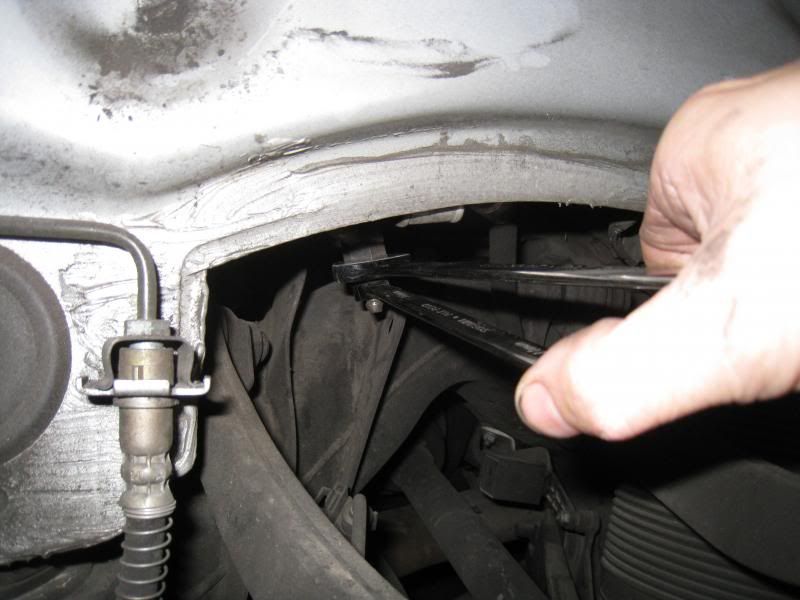
I loosened this fitting slowly and there was some pressure released along with minor fluid loss. Place a drain pan under the fitting and Loosen slowly!
Move the drain pan below the Valve Block Assembly. Clean the entire area (any dirty hoses, Valve Block and Accumulators) with Brake Clean then blow off with compressed air. Air in a can is fine if you don't have a compressor handy. Wipe down any excess with a clean rag.
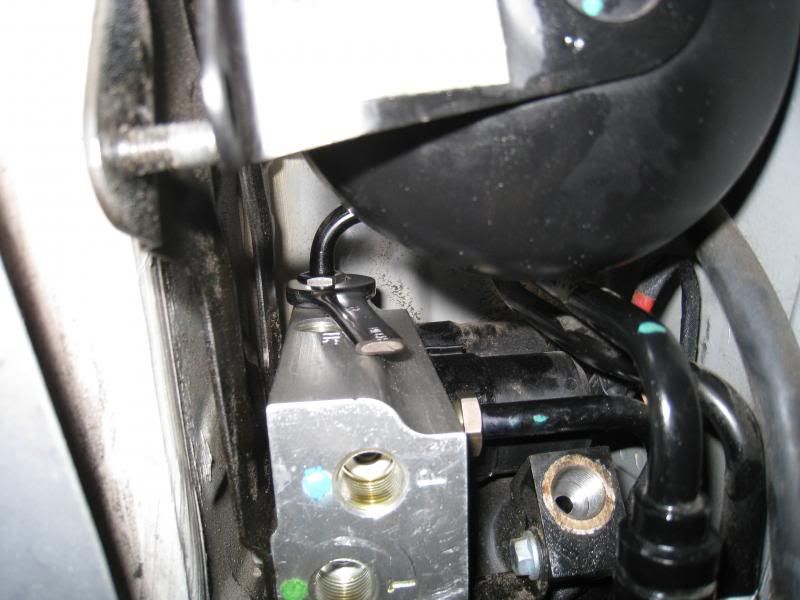
First, remove the 10mm nut securing the hose retainer. This will allow for extra movement in the hoses while disassembling.
Remove the first hose:
As you can see the Crows Foot is a perfect fit for hose removal. Break the hose free then use the crows foot or your fingers to remove.
As soon as the hose was removed from the Valve Block I cleaned the fluid off with brake clean on a rag, then wrapped the hose end with saran wrap and tape to insure no dirt enters the hose. If you are not planning to disassemble and clean your Valve Block install a plug in the port immediately to keep dirt out.
2nd hose, the other end of this hard line:
Again, the crows foot sneaks right in with a short extension. This end attaches to the small Accumulator junction block.
Remove the short hard line entirely and block both ends.
On to the next hose:
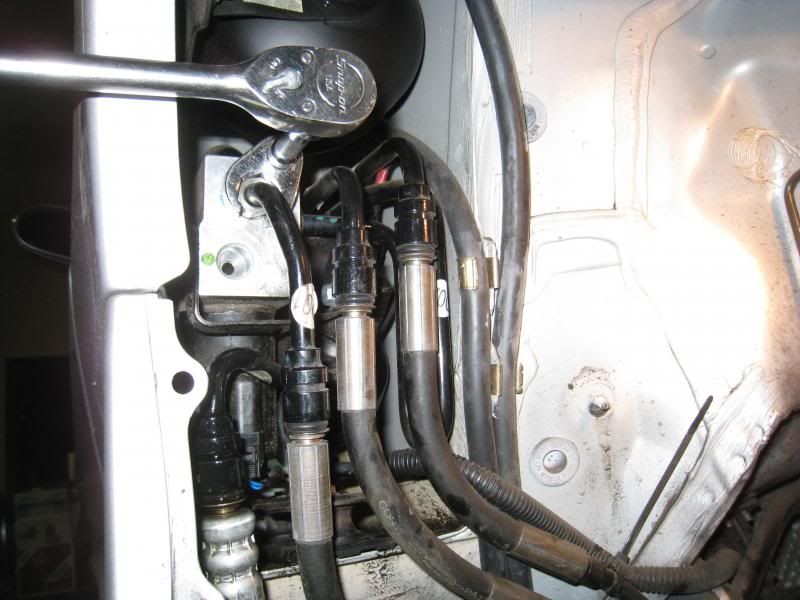
Again, wrap with Saran Wrap and tape/block the hose end and also the port in the junction block if not planning to clean it.
And the next one:
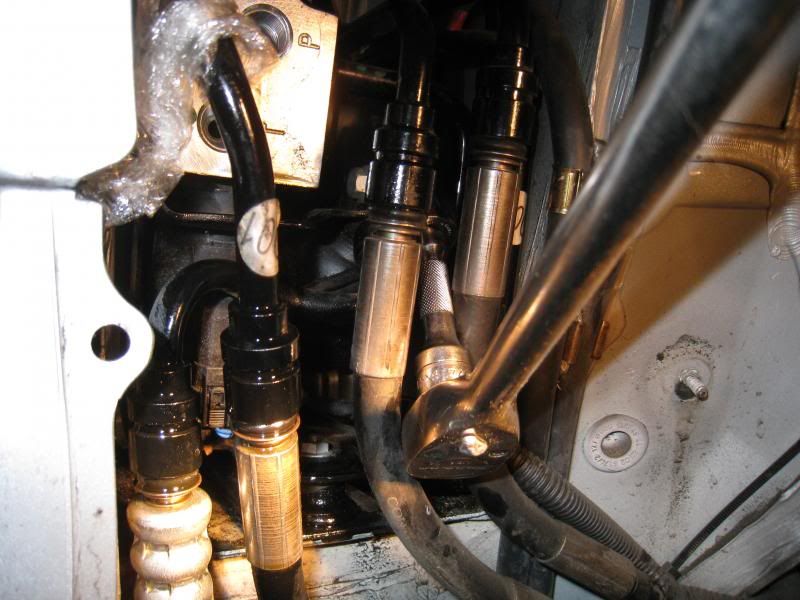
This fitting was difficult to photo but, the crows foot slid right in. No issues here at all.
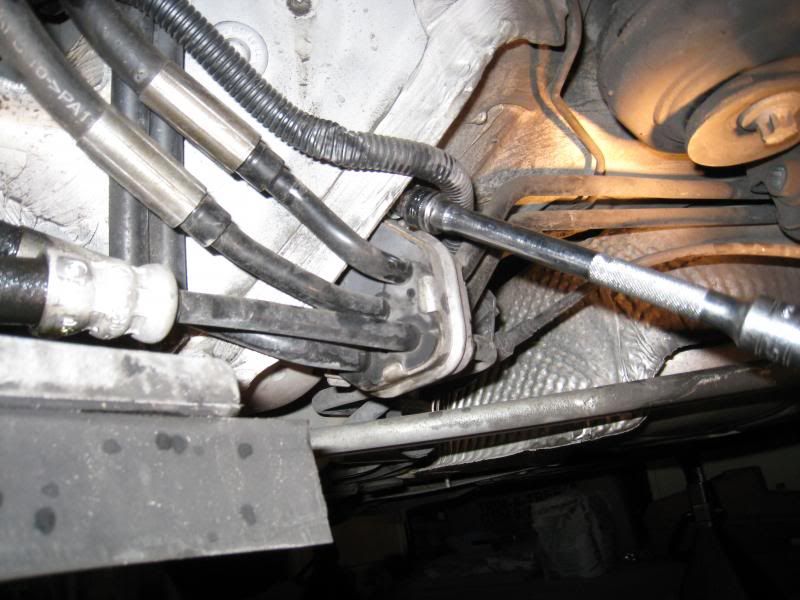
And now moving to the 1st hose on top of the Valve Block:

It's a little tight removing this hose once the fitting is removed from the Valve Block. Clearance is at a minimum between the Valve Block and the Accumulator. I found the hose much easier to safely maneuver when grasped from below with one hand then the top of the hose maneuvered out and away with your other hand:
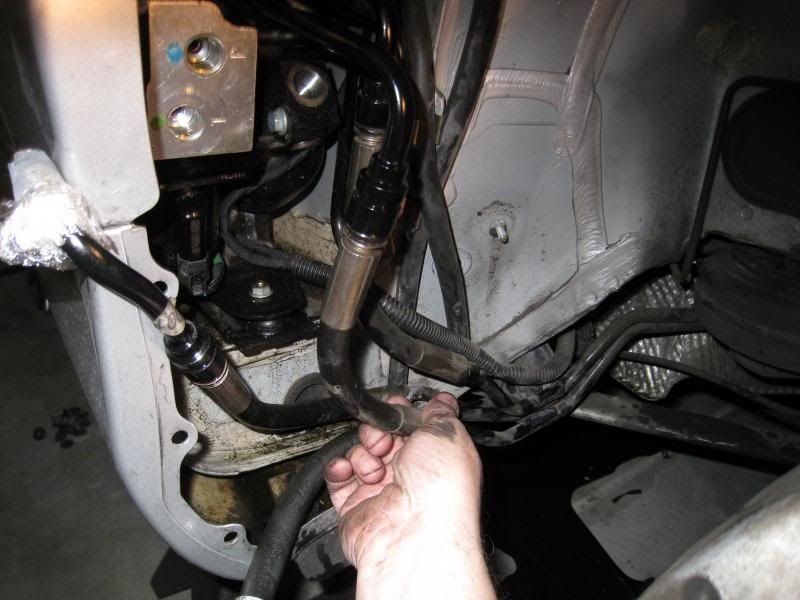
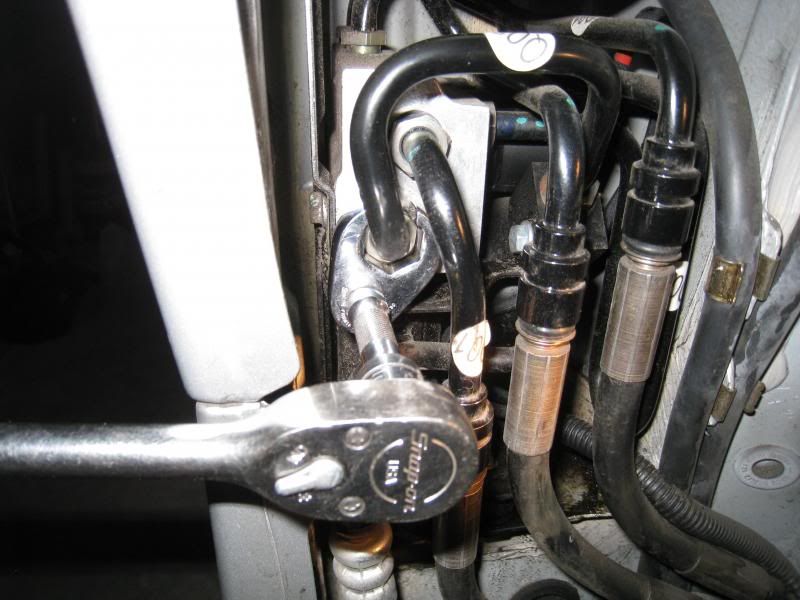
Once that hose is safely removed proceed to remove the rear hose:
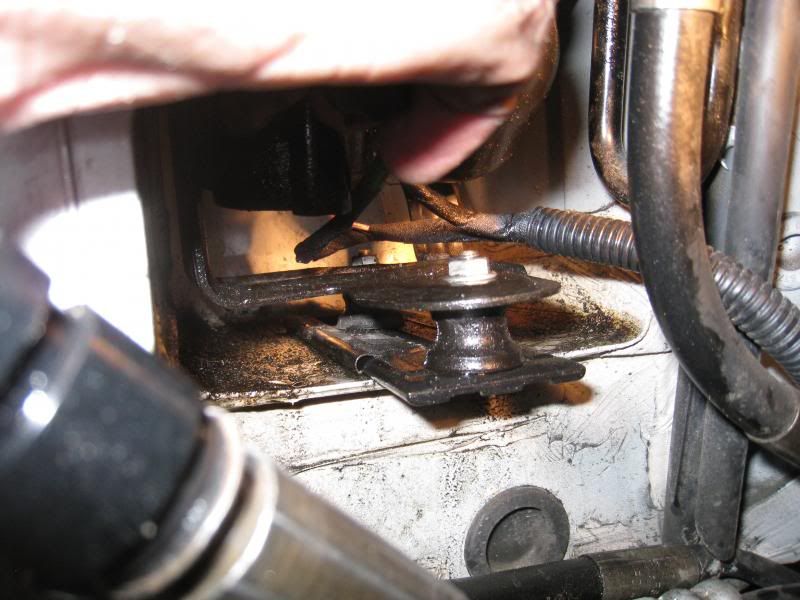
Here I had already broke the fitting loose with the line wrench and was proceeding to loosed the fitting with the stubby 17mm. If I did it again I would remove the top nut securing the entire assembly to the car (via the rubber insulator, just above the large accumulator) and carefully try to slide the entire assembly out a little bit and get a hand in there to loosen the fitting by hand. It was a real pain loosening the fitting even with the short wrench. There's just not a lot of room in there. With all the other ABC hoses removed at this point it's likely you can slide the entire assembly part way out.
I mention above the entire assembly slides out on the bottom. Here is a good pic showing the slide mount:
Once you have removed the top rear hose in the step above you are ready to very carefully slide the entire assembly out of it's cubby. Be sure to clear the way of the ABC hoses you have removed and you don't pull on any wired connected to the Valve Block. Slide the Assembly just enough to reach each electrical connector to disconnect.
I took a couple of pic's of the electrical connectors as they attach to the Valve Block:


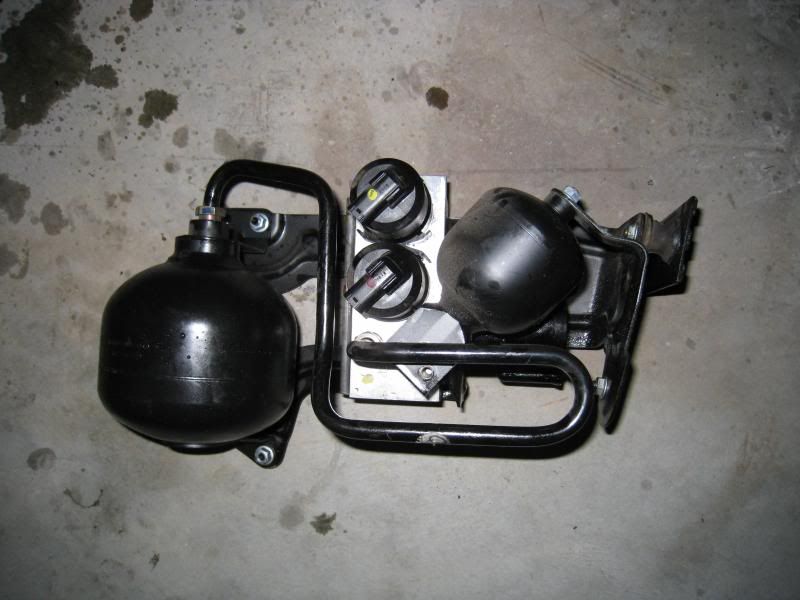
Here is the assembly removed:
Finally, the entire assembly removed from the car:
That's it!
Hope this helps,
Brian
Time: With car on stands and wheel off ready to begin removal exactly 1 episode of Sons of Anarchy :-)
(my wife was starting a DVD episode of Sons of Anarchy when I went out to the garage tonight to remove the valve block and the credits were rolling when I came in) so, about 1 hour
Two notes:
1) It is absolutely crucial to keep the work area, hoses and valve block clean and free of any dirt at all times! Even the smallest particle of dirt intruding into the ABC system can cause system failure. IF you do not plan to remove and clean the Valve Block Assembly I strongly recommend purchasing an assortment of hydraulic plugs (IE Capplugs.com) so you can immediately plug the port in the Valve Block as soon as a ABC Hose is removed. Cap plugs should be available at any facility that deals with hydraulic hoses or fittings.
2) It is in no way necessary to place any undue stress on any of the ABC hoses to remove the Valve Block Assembly. No prying, pulling or twisting is necessary! Please handle all ABC Hoses with care so you do not end up with a leaky hose!
On to removal:
I had a tool that made removal a breeze. I consider this tool necessary to remove the valve block assembly. I see no way to remove the assembly safely without it:
Snap-On 17mm Crows Foot: FRHM17
A similar crows foot may work but, this is the exact tool I used and removal was a snap. If you don't have one, you can call or stop by any service shop and ask any tech for the number of the local snap-on distributor. Alternatively, a parts store or Craftsman crows foot may work.
Here are the primary tools I used for removal:

All ABC Hose Fittings requiring removal to remove the Valve Block are 17mm.
The short 17mm wrench is a wrench I cut down long ago. This helped in removing one of the ABC Hoses but, I don't consider it crucial to the job. As with any hydraulic hose you MUST use a wrench designed specifically for removing hydraulic lines. Failure to do so will likely result in a rounded off ABC Hose Fitting and possibly necessitate replacement of the entire ABC Hose! The standard wrenches above were used for ease in loosening and removing the ABC hoses only after they were initially broke free using one of the Line Wrenches.
First, all 4 corners of the car were up on jack stands. While the Valve Block Removal procedure could be carried out with just the rear of the car up on stands I will be working on the front Accumulator as well so, the car was in the air. I mention this as having all 4 wheels at full droop completely depressurizes the ABC system (after about 15 minutes in the air).
To be safe, I also loosened the rear left ABC valve:

I loosened this fitting slowly and there was some pressure released along with minor fluid loss. Place a drain pan under the fitting and Loosen slowly!
Move the drain pan below the Valve Block Assembly. Clean the entire area (any dirty hoses, Valve Block and Accumulators) with Brake Clean then blow off with compressed air. Air in a can is fine if you don't have a compressor handy. Wipe down any excess with a clean rag.
First, remove the 10mm nut securing the hose retainer. This will allow for extra movement in the hoses while disassembling.

Remove the first hose:

As you can see the Crows Foot is a perfect fit for hose removal. Break the hose free then use the crows foot or your fingers to remove.
As soon as the hose was removed from the Valve Block I cleaned the fluid off with brake clean on a rag, then wrapped the hose end with saran wrap and tape to insure no dirt enters the hose. If you are not planning to disassemble and clean your Valve Block install a plug in the port immediately to keep dirt out.
2nd hose, the other end of this hard line:

Again, the crows foot sneaks right in with a short extension. This end attaches to the small Accumulator junction block.
Remove the short hard line entirely and block both ends.
On to the next hose:

Again, wrap with Saran Wrap and tape/block the hose end and also the port in the junction block if not planning to clean it.
And the next one:

This fitting was difficult to photo but, the crows foot slid right in. No issues here at all.
And now moving to the 1st hose on top of the Valve Block:

It's a little tight removing this hose once the fitting is removed from the Valve Block. Clearance is at a minimum between the Valve Block and the Accumulator. I found the hose much easier to safely maneuver when grasped from below with one hand then the top of the hose maneuvered out and away with your other hand:

Once that hose is safely removed proceed to remove the rear hose:

Here I had already broke the fitting loose with the line wrench and was proceeding to loosed the fitting with the stubby 17mm. If I did it again I would remove the top nut securing the entire assembly to the car (via the rubber insulator, just above the large accumulator) and carefully try to slide the entire assembly out a little bit and get a hand in there to loosen the fitting by hand. It was a real pain loosening the fitting even with the short wrench. There's just not a lot of room in there. With all the other ABC hoses removed at this point it's likely you can slide the entire assembly part way out.
I mention above the entire assembly slides out on the bottom. Here is a good pic showing the slide mount:

Once you have removed the top rear hose in the step above you are ready to very carefully slide the entire assembly out of it's cubby. Be sure to clear the way of the ABC hoses you have removed and you don't pull on any wired connected to the Valve Block. Slide the Assembly just enough to reach each electrical connector to disconnect.
I took a couple of pic's of the electrical connectors as they attach to the Valve Block:


Here is the assembly removed:
Finally, the entire assembly removed from the car:

That's it!
Hope this helps,
Brian
Last edited by vtvette; Sep 10, 2013 at 01:28 AM.
Thread Starter
Newbie
Joined: Aug 2013
Posts: 4
Likes: 0
'03 SL500
Hey Brian, this is awesome. It's like unlocking the keys to the gate. I think it will be worth the investment for some of these tools to get the job done. This is a great step by step and the pictures help a lot. I have the accumulator and plan on working on it in a few weeks. Let me know about the final outcome. If you rebuild the valve, where did you get the seals? I bought some from MB but I'm convinced they aren't the right ones. I'm curious if this fixes the ABC light issue. Let me know and thanks again for the detail!!
Member
Joined: Jul 2013
Posts: 241
Likes: 16
2005 SL55 AMG
Hey Brian, this is awesome. It's like unlocking the keys to the gate. I think it will be worth the investment for some of these tools to get the job done. This is a great step by step and the pictures help a lot. I have the accumulator and plan on working on it in a few weeks. Let me know about the final outcome. If you rebuild the valve, where did you get the seals? I bought some from MB but I'm convinced they aren't the right ones. I'm curious if this fixes the ABC light issue. Let me know and thanks again for the detail!!
I ordered the Orings from McMaster-Carr. There are apparently two different size O-rings used for the Valve Block. I found references to these sizes in another post:
Aflas (or buna-n) O-Ring
AS568A Dash Number 015
ID: 9/16"
OD" 11/16"
Width: 1/16" (.070")
McMaster Part Number: 5240T21
Aflas (or buna-n) O-ring
AS568A Dash Number 016
ID: 9/16"
OD: 11/16"
Width: 1/16" (.070")
McMaster Part Number: 5240T22
Note: For those not familiar, AS568A is an O-ring sizing standard. 015 and 016 refer to the sizing designation for these two O-rings used in our Valve Blocks.
Aflas is a trade name of a type of fluoroelastomer O-ring material. It offers excellent heat resistance as well as resistance to strong caustic acids and bases, as well as resistance to oil's.
buna-n is nitrile rubber O-ring material, and the most common elastomer used in the manufacture of O-rings. Buna-n offers excellent general purpose sealing and is resistant to petroleum oils and fluids, silicone greases and oils and ethylene glycol (anti-freeze) based fluids. Buna-n is used in most automotive applications with exception of A/C hoses and any application involving brake fluid.
Either Aflas (fluoroelastomer) or buna-n o-rings should be more than adequate for use in our Valve Blocks


