When you click on links to various merchants on this site and make a purchase, this can result in this site earning a commission. Affiliate programs and affiliations include, but are not limited to, the eBay Partner Network.
Hi,
Sorry to hear about that unsuccessful half day:
some suggestions: (1) my fuses were ok as well but I found that they were not making good connections at the securing nuts. The best thing to do is to slacken these nuts off and re-torque them. This tends to scrape the metal under the nuts and ensure good fresh contact with low contact resistance. The multimeter will tend to show the fuse as ok but this can be just a reading across the fuse tabs. The current has to flow through the fuse tab connections so re-torque of the nuts is critical. Ideally, you could take each fuse out, scrape away surface corrosion and re-seat/re-torque. This process got my rear battery charging and showing the alternator voltage across the battery.
(2) When the battery is sparked at the back, there is a risk of blowing one of the fuses in the little fuse panel beside the rear battery. It's a smaller job so worth checking next: You need to take this out to see the fuses at the reverse side. One of the fuses is in series with the fuse in the footwell and if this has blown, it will need fixed, as there will be no charging path to your rear battery.
(3) If it turns out that all fuses are ok and tightly torqued, there is a risk that the battery management module has got damp into it and become damaged but try the fuse torque approach first and make sure you have an increase in battery terminal voltage at both batteries, when the engine is running. If you don't, fuse pathways must, I believe, be faulty, preventing the alternator voltage reaching the battery that is not charging.
Hope you get success with this
When working on fuses, it is best to disconnect both batteries. One lead can be disconnected at each battery and placed inside a plastic bag/pouch.
Check the right order for reconnecting batteries. From memory, you reconnect the starter battery last.
Sparking batteries is a very common slip and everybody manages to do this some time! In my experience, this usually tends to blow a fuse and that is all.
For the rear battery, the first fuse to blow will be the one in the little fuse box beside the battery. I think it is 100A from memory, so it is going to blow before the 200A fuse in the footwell
Happy hunting!
John
Hi rodeo I have done the same thing changing the aux battery and sparked it everything works but the console radio cluster will not turn on. How did you fix it?
Here, https://mbworld.org/forums/sl-class-...ml#post8097396 If you don't want to pay the dealership and buy the device, drive your car for 30 or 40 miles. That might get rid of the error. 30 or 40 miles is purely my guess cause I remember driving the car but perhaps not long enough.
Read your comment on my phone then switched to my laptop to reply and forgot what your issue was in the interim. Yours seems to be fuse issue. Start w fuses related to radio. Not an expert on this but I think fuse, amp, speakers, and everything helping sound coming out of your radio are connected in a series fashion to give it a good check on all fuses for any of these components. If everything works except for the radio I'd say it's probably something small and specific to radio speaker etc.
Try reading all faulty codes if you can. Sometimes you have more issues but not obvious to you at this point or no symptoms so far.
Hi,
The first thing to check is the voltage at the auxiliary battery while the car is running. If it rises above 12 to around 13.6-14.6 V, you know the alternator is charging the battery. This means that the battery management module will also be happier and will not turn off things to save the auxiliary battery. It has a priority list of things to shut down to save power.
If you run the car and find the auxiliary battery is not charging, this has to be fixed first, before other things can work normally again.
If your alternator is good and the engine compartment battery is showing a charging voltage with the engine running, there are only two things that can be at fault to stop the alternator output also reaching the auxiliary output: they are both fuses. Either the 200A fuse in the passenger footwell has failed (or is making poor contact at its terminals) or the 100 A fuse in the auxiliary battery area has failed or is making poor contact at its terminals.
once you get a charging voltage through to the auxiliary battery, the other problems should fix themselves as the battery management module will be happy and stop shutting things down to save power.
With the engine running, what voltage are you reading at (1) engine compartment battery terminals and (2) auxiliary battery terminals?
John
WebbJAC I don't think Mysl550 has red battery error. He's quoting me which I had the error couple years ago and is fixed now. Mysl550 is having issues w the radio.
One other thing came to mind, sometimes I start the car then turn on the radio and no sound. Radio is on but no sound. No big deal. Shut the engine off. Start the car again and fixed. It's happened maybe a handful of times in the past few years so not something I'd spend hours on.
Hopefully these will help. As I mentioned, you need to check your terminal voltages at both batteries, with the car running. If either is at 12V or less, the alternator output is not getting through to that battery. A charging battery will show something like 13.4 -14.6 V with engine running. The battery management module might be switching things off if the auxiliary battery is not charging. If so, one of the two 200A fuses in the footwell is not making good contact or the fuse for the auxiliary battery at the back of the little fuse holder near the auxiliary battery is blown
OK so I am doing this repair right now. I inherited a car and it turns out that somewhere in the distant past it had been improperly jumped, blowing fuse F52/1.
HELPFUL ADDITIONAL TIPS I THINK THESE WERE NOT MENTIONED ELSEWHERE IN THIS THREAD:
1.) Besides rolling back the carpet, also remove the passenger side underdash plastic panel. There are three T25 Torx. They are along the forward area of the panel and are fairly obvious, then unplug the sensor and the speaker mounted on the backside of this panel. Again obivous. The panel has to be worked out from behind the center console forward edge. It will come out. It is not very easy, but it will come out.
2.) Besides rollling back the carpet, also remove the passenger kick panel carpet. Held by one Phillips screw under the push in decorative insert. Remove it, then work the carpet out of the way. Not necessary to remove the decorative rocker rail cover. Just work the carpet out from behind it.
3.) After removing the kick panel, the floor carpet will roll back further on the side nearest the door. This additional step will give you space to rotate and remove the demonic Bose subwoofer for easy removal. Ditto for the steel floor kick panel.
NOW THE RANT: Friends, I have a fabulous and spacious garage. I have machine tools, drill presses, a lathe, a mill, I have a welder, an oxyacetylene rig, I have glass-beading facilities, hell, I even have air conditioning, and I have a wealth of hand tools. In fact, I have virtually very hand tool you could ever want, and a lot that are so esoteric and specialized that you would be hard pressed to figure out what they are. I also have electronics gear out the wazoo. Scopes, curve tracers, a Dytavachron, VTVM, blah blah blah...I even have a pair of beautiful Tannoy System 12 loudspeakers mounted on the wall to play my Wagner through when I am working on these damned German cars! and most of all I have 45 years of heavy duty wrenching on US, German, Italian and Japanese cars. I LIKE working on cars. Get the picture? I'm not a novice.
But this F52/1 fuse thing? This has to be the STUPIDEST, MOST DIABOLICAL and MOST POORLY CONSIDERED design decision I've yet encountered on my '06 R230.
What is it with German designers? Are you still angry about WW2? Do you secretly HATE the people who buy these cars and also like to work on them? Do you have some bizzarre sado-masochistic design school where you send your worst students? Do you then assign them to electrical system design?
I thought my BMW N54 starter motor under the intake manifold was bad...
I thought the Bimmer's electronic water pump fuse hidden inside the firewall was beyond idiotic...
but this F52/1 fuse location surely takes the cake! Mercedes Benz? Why oh why would you EVER EVER EVER put a fuse (ANY FUSE) in such a deliberately inaccessible location? And why in particular would it be a fuse that will blow if someone attempts to jump start the car and does it in the incorrect fashion. Of all the things that might go wrong, jumping a car wrong is the most common and possible thing. Have you ever had a dead battery? Did you plan for it? NO! It is always dark, it is always raining, it is always at a bad time. No one WANTS jumping in the first place, but if it must be done, then for GOD SAKE design a system that won't blow a fuse hidden beneath five layers of infrastructure just because someone "did it wrong"! THAT - OR PUT THE DAMNED FUSE WHERE IT CAN EASILY BE REPLACED BECAUSE YOU ANTICIPATE THAT NOVICES ARE GOING TO BLOW IT EVERY NOW AND THEN.
p.s. Now I gotta say, burying the second fuse under the first - AND MAKING THE SECOND ONE THE MOST LIKELY TO BLOW - is a particular stroke of sadistic excellence.
OK I'm done. Thanks for reading my rant. I took my meds and I am better now, and I hope the forum moderators realize I am kind of joking, sort of a little :-) I also hope the tips helped, and thanks to the OP for the great info on this repair. It has made it almost bearable.
Last edited by CoolBlueGlow; 10-11-2022 at 06:32 PM.
2014 E350 Wagon, 2007 S600, 2009 SL550 with ABC removed, 2011 S400 with Hybrid removed
To build up on the previous thread - the whole double battery design is unnecessary, regardless of how it is attempted to be justified. Luckily Mercedes changed back to a single battery in newer cars. My SL still has the dreaded red battery icon after checking all the fuses, replacing both batteries, replacing Battery Mgmt Unit and debugging sessions with Xentry and other tools. And it has had it for a few years, no other side effects or problems are visible, just the red light.
Has anyone converted to a single battery design? Looking at diagrams, it should not be too difficult to remove all that dual battery system, remove one battery and just run a thick cable from the single battery to a positive terminal of removed battery. And configure out the dual battery in s/w if necessary. Anyone? Thanks!
Well George, I feel your pain, bu as far as I can discern from a careful study of the problem, there is no practical way to un-engineer the double battery from the R230 system. The hardware infrastructure is pretty thoroughly baked into the FIRMWARE as well as software of the car. Wish it weren't so, but AFAIK it is.
Practical TIPS: After going through all this fuse checking flashing lights rigamarole, I finally took a step back, put on my electronics engineer hat and said to myself "At the end of the day this is still a battery/alternator electrical system. At some level, either it is working or it is not working. To heck with the convenience warnings and software system management tricks and presumptions...I will take direct and unambiguous measurements with my own equipment "
HOW TO DO THIS? Simple - basic electronic theory applies just as much here as anywhere else, Mercedes or no Mercedes software/firmware/hardware.
A.) Batteries have well defined standalone voltages when fullly charged, partially charged, discharged and defective. Google them. For automotive batteries, you will see that they are pretty bulletproof figures for each state.
B.) A disconnected and fully charged 12V automotive battery will have 12.6 (or perhaps very slightly less) volts.
C.) A connected and charging battery will have more than 12.6 volts.
D.) Vehicles when running and with a functional charging system will have a slightly HIGHER system voltage than the same vehicle's disconnected battery(ies) will show. You can compare those two figures to make a pretty good guestimate of the real state of your entire electrical system.
E.) A working alternator will show signs of it's efforts right at that big wire terminal right there on the back of the alternator. It will be at a minimum the same as static voltage of your battery, and in almost all practical situations slightly more, up to as much as 14.2 volts...
F.) That alternator current output will show up right there on the big wire terminal on the back side of the alternator. If you don't believe me, rig a jumper and do a shunt measurement of the alternator output right there. Turn on your lights, stereo, air conditioner, and seat heaters, and you can bet it will start making current if the overall system is working.
G.) The presence of any voltage reading ABOVE the figure you got from your disconnected batteries indicates that generated current is present. There is only one possible source of that generated current - It MUST come from the ALTERNATOR, as regulated by the ECM, and then through the battery balance module, up the wire and into the terminals of the batteries.
All of the above can be figured with a reasonable degree of certainty with this simple test; You don't need SAS software, You don't need even need a schematic. You need a good accurate DVM and a 10MM wrench to remove the battery ground terminals.
1. Disconnect both batteries. (Disconnect the GROUND lead is sufficient) Read and record each battery's disconnected (i.e. static) voltage using a quality volt-meter (like my trusty Hewlett Packard 3466A, a real bench quality professional instrument, not a Harbor Freight toy). 12.6 Volts DC or better = happiness. Remember you will have to reset the necessary stuff after disconnecting batteries (windows, steering angle sensor, blah blah blah, see owner's manual)
2. Reconnect batteries. Start car. Read and record voltage at both batteries again. If you see ANYTHING higher than what you read at static, it is coming from somewhere. If you see something about 13.2V or better, this means that this battery that is receiving outside current from some other source. Where? Mercedes or not, dual battery system or not, there is only one possibility, namely "the Alternator". If the back battery has more volts running than not and the front battery also has more volts running than not, then this means BOTH the batteries ARE receiving current (evidenced as a voltage rise above static battery voltage) which means the whole system is at some level operational...
3. EXTRA CREDIT: With car running, turn on headlights high beam, seat heaters, air conditioning on full cold, and stereo system blaring Wagner's Ride of the Valkyries, (optional) measure voltage at both batteries again. The voltage in state 3 should be the same or higher than the readings you got in step 2. If it is the same or higher, then probably good enough, no matter what the warning lights say or don't say about "visit your dealer" etc.
If it is lower in step 3 than steps 2 and 1, you are not good. Proceed with further prognostications.
OTHER TIPS:
1. A RED battery warning symbol refers to the STARTER battery (up front, aka "G1/4" in the documentation)
2. RED battery symbol CANNOT be reset except by dealer or aftermarket SDS/DAS software.
3. RED battery symbol does NOT self-heal (see page 6 of attached PDF)
4. A WHITE battery symbol refers to the CONSUMER battery (in trunk, aka G1 in the documentaiton)
5. WHITE battery symbol appears to "self-heal" upon replacement of the defective battery. A fault code will register in vehicle memory
6. Emergency jumping is accomplished at the FRONT battery only. NEVER jump to the rear battery
7. IMPORTANT: According to Mercedes documentation, 10.8VDC on either battery is the magic witching number at which the system kicks into action and starts trying to fix and/or alert you that things are going South.
8. If that happens, the attached document clearly shows what all of the possible failure modes are, and how the system handles them in each scenario. Please note that the document says NOTHING about how to fix the problem. It just explains how the car reacts to different types of electrical charging system failures.
Source for these assertions: Mercedes Benz "R230 Dual Battery On-boad Electrical System" document, 318 HO Dual Battery (ACB) 11-28-02, attached
A final post of some additional and hopefully handy info about accessing the F52/1 fuse in the Prefuse block under the passenger seat under the subwoofer under the kick panel, styrofoam noise abatement insert and carpet. (Yeah, there are fuses under there
This is the last I'm going to post on this, and this is strictly practical tricks and tips associated with the mechanics of getting at the parts in question and doing the job well.
Here goes
A.) About working around this PreFuse block. You need to understand that these open terminals you see in pictures of the Prefuse block are DIRECT HEAVY CABLES CONNECTED TO HIGH CURRENT AUTOMOTIVE BATTERIES. Before you do ANYTHING, disconnect the ground clamps on BOTH batteries.
B.) Don't just disconnect the batteries *****-nilly. You will suffer. Follow the owner's manual description exactly for the things to do before disconnecting both batteries, including opening the passenger door, and the trunk and so forth. Then follow the correct order in which you remove the ground clamps AND the order in which you reinstall them. It MATTERS both times!
C.) Since you have the ground straps off, the car is powered down. You will have to reset your window memory, seat memory, steering assist limits, and so forth. the owner's manual tells how - and the pages for those steps are given in the "disconnecting batteries" section of the manual.
Other tips and tricks to make it easier
1. When you park your car and set up to do this work, make sure your passenger door can swing absolutely all the way open 100%. You will need every bit of that clearance to reach the prefuse block you're trying to access
2. Retract the passenger seat as far back as it can possibly retract. You'll want that space too
3. Be very careful when loosening the rocker panel plastic trim to free up the carpet - it is extremely thin and fragile plastic...and embarassingly poor quality, especially for a part known to get stressed and stepped on.
4. Order of trim removal - After loosening up the fragile rocker panel trim mentioned in item 3, now remove the passenger kick panel carpet. There is one large Phillips screw with a decorative plastic cover stuck in the cross of the screw. Pop the decorative cover off an take out that screw. Next remove the under-dash dress panel. 3xT25 screws along the front edge. THEN pull the carpet back. With all three of these out, you can manuver the rest of the (MANY) pieces out with little difficulty. If you DON'T remove the kick panel carpet, you will struggle to get anything out. Just do it.
5. PreFuse COVER removal: Once you get the trim pieces in items 3 and 4 above, plus the styrofoam sound deadener, the metal kick panel and the subwoofer out, you can see the Prefuse cover. Guess what? It is partially hidden behind a black wiring module and harness. To make Prefuse access possible, remove the two 10MM nuts securing that obscuring module to the firewall. It will then pull down out of the way enough to make the cover removal possible. Now, about actually getting that cover off...I used a simple 90� hook tool, like the kind used to probe inside radiator hoses to loosen them. I simply hooked it behind the half-round cable clearance passageway on the left side of the black plastic Prefuse cover and tugged straight back. It popped right off, and without damage.
6. Tool cleanliness: If you are using tools you also used last week to dismantle that lawnmower (or whatever) be careful to really clean up your tools before you bring them in the car. Dirty greasy tools leave dirty greasy marks on nice leather upholstery and plush carpet. Wife/Girlfriend/Significant Other will not be pleased if there is a nice big wrench shaped permanent oil stain on her console carpet. Just sayin...
7. Tool sizes: I used 1/4" drive tools for all this work. They're just smaller and easier to maneuver in this very tight space. Nothing is very tight. Many of the nuts are plastic nuts.
8. Special Tools: Speaking of tools, besides a deepwell 10MM socket, you'll want to have a 1/4 drive universal joint handy. You will also want a magnetic attachment for your 10MM socket, to get the deepwell nut back in the subwoofer. I stick a little NEO magnet inside my deepwell socket. Works great.
9. Tool Prep: I use a conventional ratchet, plus a drill driver. I set up my drill driver with a u-joint, and an 8" extension. I set up my ratchet with another 8" extension and another 10MM socket. If you have them, it just makes the whole process easier and faster when it comes to spinning off those nuts and not having to swap tool setups. I also have handy a 1/4" drive ratchet, a 13MM socket (for the big fuse nuts) and an 8MM socket for the smaller F52/1 fuse.
10. Fussy Little Fuse Nuts: They are 8MM and you'll want that 8MM in regular and deep, because threading those tiny nuts back on with your fingers is impossible unless your arms are longer than mine - I'm 6'2" with an armspan of 6'5" and I was still 3 or 4 inches short to reach these nuts. Trust me. Start with a shallow 8MM and a short extension, (no ratchet - spin the extension with your fingers) You can position yourself to thread them on that way, and the fussy little nut won't disappear down into your deepwell 8MM socket or fall out and disappear down into one of those floorpan brace holes. Once you get them started for sure right, THEN use the drill driver to finish off the thread-down. Then use a ratchet to do the final tighten.
11. Be Gentle: Remember, a lot of these parts are plastic, and will crack if you go crazy with the torque. I dial my drill driver back to minimum torque and finish by hand just to be safe.
12. Nasty Mercedes Assembly Surprise # 153. Speaking of the nuts and the fuses, the big fuse is held on by just two 13MM nuts. But the little fuse (underneath) is different. Besides the two 8MM nuts holding it, you also have to remove the medium red cable secured by the 10MM nut at the top of the prefuse block. It also holds down the dual 90� conducting strap that carries current to the small fuse location. Unless you remove that conducting strap, you cannot remove the small fuse. Note too that there is a small square thrust washer on the BOTTOM 8MM nut, so starting at the block the assembly order is Fuse, then Thrust Washer (or conducting strap), then Nut.
13. About those nuts. Just in case you lose one, they are Metric M5x .80 self locking nuts
14. When I put the fuses back in, I deliberately put the visible windows UP so I could see them if they were burned out without having to remove them. Factory installed, one of mine was up, and one was down. Hmmm...
Hope these fussy little details make someone's life a little easier. As it turns out, my fuses weren't blown after all, but now I KNOW for sure.
1. A RED battery warning symbol refers to the STARTER battery (up front, aka "G1/4" in the documentation)
This warning can be for a variety of reasons, but usually it's a failing convenience battery that will throw this warning. An aging starter battery won't throw a red code, in my experience at least.
2. RED battery symbol CANNOT be reset except by dealer or aftermarket SDS/DAS software.
You can reset it with your hand-held scanner, assuming no faults with the BCM.
You will have to reset your window memory, seat memory, steering assist limits, and so forth.
Not necessarily. Mine retains everything except the window settings, with the battery disconnected. It even magically reinstates the correct clock time on the dash after a brief period!
My red battery warning symbol reset by itself after the F52/1 fuse was replaced. No dealer and no scanners. Has not been seen again in six years.
JUST AN ADD TO MY COMMENTS:
During the time that my F52/1 fuse was blown, I could turn off the RED battery warning by changing pages via the steering wheel buttons. However, it would return the next time I started the engine. Back then, I didn't own a scanner and no mechanic touched my SL, so I am absolutely sure that it stopped by itself upon my replacement of the fuse.
Last edited by CPDay; 10-15-2022 at 01:37 PM.
Reason: clarification
re: Reset of other functions. Ah, yes I see your point. A more careful read of the previously attached MB document yields up the all important word "POTENTIAL". :-) as in these normalizing resets are POTENTIALLY required "...If batteries are disconnected or dead..." That makes more sense now as to why some of mine seemed to need reset and some did not. "potential". :-)
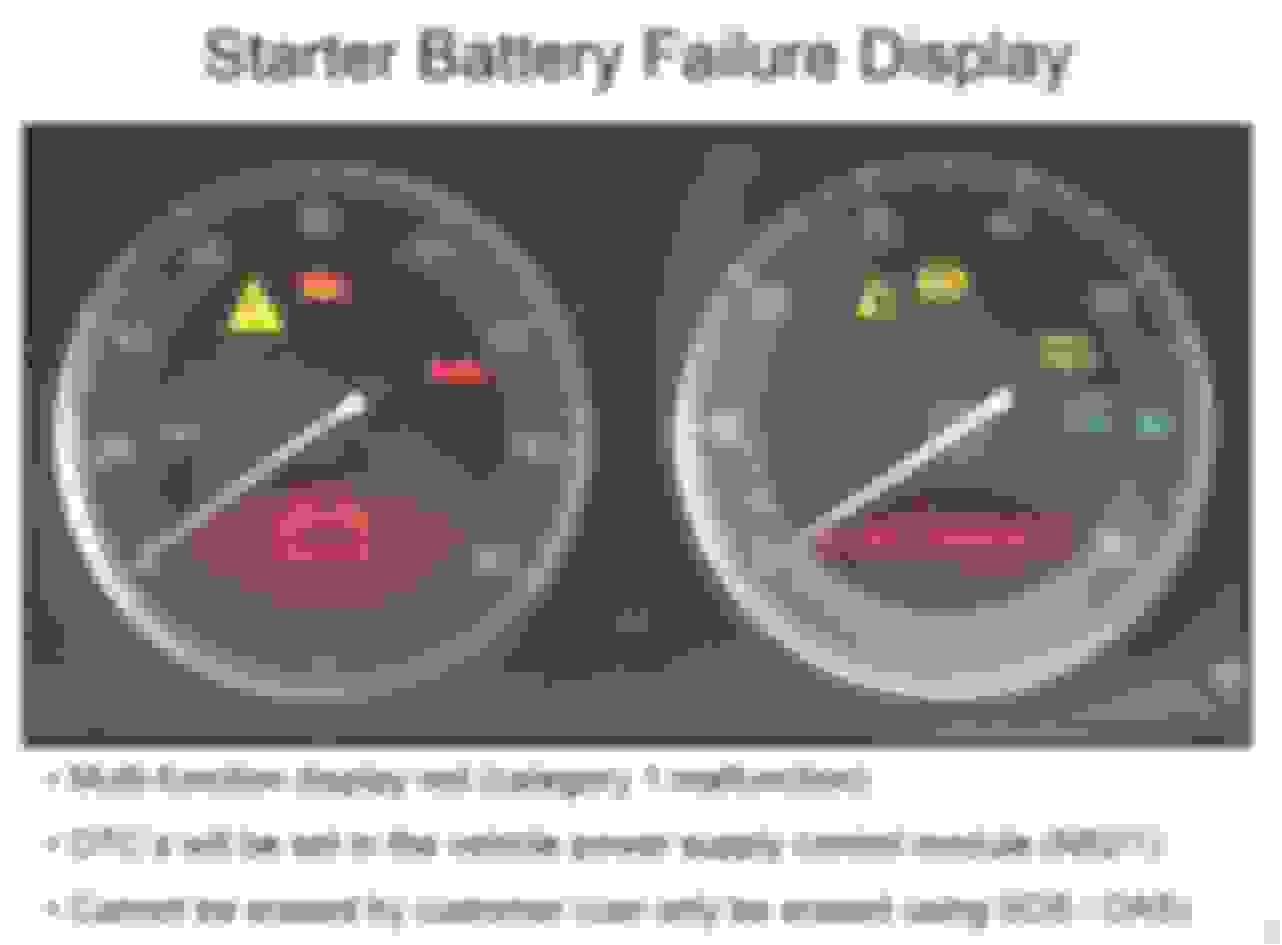
re: RED vs WHITE battery warning symbol. I'm going to stand pat on that one. The RED symbol (according to MB) refers exclusively to issues with the STARTER battery. The White battery symbol refers to issues with the CONSUMER battery, at least to my read of it. On that I am simply sumarizing statements which seem to appear quite clearly in the Mercedes literature - albeit the 2002 published version of the same. Below is the screenshot from that literature. Again, it seemed pretty definitive to me - but maybe they changed the onboard firmware/software after 2003 or something?
My Observations: My '06 car definitely does not self-heal a Red Warning simply by driving. It definitely DID self-heal from a defective Consumer Battery (white colored battery warning logo) Both those behaviors correspond to the sytem behavior as described in the 2002 literature. (NOT saying this is definitive, just saying what I observed in my car agrees with what the literature seemed to me to say)
Anyway, here's the screenshot; "STARTER BATTERY FAILURE DISPLAY" from page 6 of the MB literature
copied from MB factory document "318 HO Dual Battery (ACB) 11-28-02"
That last line seems to me to indicate that NOTHING THE CUSTOMER CAN DO (absent electronic intervention with SDS/DAS or other scanner, etc.) can erase this warning. From MB's 2002 perspective, before SDS/DAS was leaked to the general public, "Nothing" would seem to include driving the car and expecting it to self-correct. Perhaps they've changed the software after 2006? Perhaps I don't understand what they actually mean? But am I misreading this?
Not looking for a fight here, just truly trying to understand where I am mistaken. :-) FWIW, the key "ahah" moment for me from this MB document was the specification that there are two DIFFERENT battery warning symbols. One is RED and the other is WHITE. RED refers to Starter Battery only...and is a "Category 1 malfunction" (MB's term). Meanwhile, WHITE refers to CONSUMER Battery only. My read of this is that if you see a RED warning, it is about your STARTER battery, NOT your consumer battery, at least according to this MB document as written in 2002 and observed in my 2006 car.
Of course, this does not explain why CPDay's RED warning did "go away" - but I note that his car is a 2008 model. Maybe they changed the firmware on that routine because they got tired of false flags from dead starter batteries? But just as CPDay attests that his '08 SL550 DID self-heal from the red light, my '06 SL500 definitely did NOT heal from the same - with two years to attempt it, and a fresh set of both batteries and F52/1 and 2 fuses confirmed good by visual examination and the charging system definitely known to be correctly working by direct instrumented observation of its performance.
I certainly believe CPDay is telling the truth, but I am also telling the truth. There must be some difference between 06 and 08 firmware, or SL550 vs SL500 firmware, or something else.
Cheers!
Last edited by CoolBlueGlow; 10-14-2022 at 11:07 AM.
Reason: additional clarification
Well George, I feel your pain, bu as far as I can discern from a careful study of the problem, there is no practical way to un-engineer the double battery from the R230 system. The hardware infrastructure is pretty thoroughly baked into the FIRMWARE as well as software of the car. Wish it weren't so, but AFAIK it is.
Practical TIPS: After going through all this fuse checking flashing lights rigamarole, I finally took a step back, put on my electronics engineer hat and said to myself "At the end of the day this is still a battery/alternator electrical system. At some level, either it is working or it is not working. To heck with the convenience warnings and software system management tricks and presumptions...I will take direct and unambiguous measurements with my own equipment "
HOW TO DO THIS? Simple - basic electronic theory applies just as much here as anywhere else, Mercedes or no Mercedes software/firmware/hardware.
A.) Batteries have well defined standalone voltages when fullly charged, partially charged, discharged and defective. Google them. For automotive batteries, you will see that they are pretty bulletproof figures for each state.
B.) A disconnected and fully charged 12V automotive battery will have 12.6 (or perhaps very slightly less) volts.
C.) A connected and charging battery will have more than 12.6 volts.
D.) Vehicles when running and with a functional charging system will have a slightly HIGHER system voltage than the same vehicle's disconnected battery(ies) will show. You can compare those two figures to make a pretty good guestimate of the real state of your entire electrical system.
E.) A working alternator will show signs of it's efforts right at that big wire terminal right there on the back of the alternator. It will be at a minimum the same as static voltage of your battery, and in almost all practical situations slightly more, up to as much as 14.2 volts...
F.) That alternator current output will show up right there on the big wire terminal on the back side of the alternator. If you don't believe me, rig a jumper and do a shunt measurement of the alternator output right there. Turn on your lights, stereo, air conditioner, and seat heaters, and you can bet it will start making current if the overall system is working.
G.) The presence of any voltage reading ABOVE the figure you got from your disconnected batteries indicates that generated current is present. There is only one possible source of that generated current - It MUST come from the ALTERNATOR, as regulated by the ECM, and then through the battery balance module, up the wire and into the terminals of the batteries.
All of the above can be figured with a reasonable degree of certainty with this simple test; You don't need SAS software, You don't need even need a schematic. You need a good accurate DVM and a 10MM wrench to remove the battery ground terminals.
1. Disconnect both batteries. (Disconnect the GROUND lead is sufficient) Read and record each battery's disconnected (i.e. static) voltage using a quality volt-meter (like my trusty Hewlett Packard 3466A, a real bench quality professional instrument, not a Harbor Freight toy). 12.6 Volts DC or better = happiness. Remember you will have to reset the necessary stuff after disconnecting batteries (windows, steering angle sensor, blah blah blah, see owner's manual)
2. Reconnect batteries. Start car. Read and record voltage at both batteries again. If you see ANYTHING higher than what you read at static, it is coming from somewhere. If you see something about 13.2V or better, this means that this battery that is receiving outside current from some other source. Where? Mercedes or not, dual battery system or not, there is only one possibility, namely "the Alternator". If the back battery has more volts running than not and the front battery also has more volts running than not, then this means BOTH the batteries ARE receiving current (evidenced as a voltage rise above static battery voltage) which means the whole system is at some level operational...
3. EXTRA CREDIT: With car running, turn on headlights high beam, seat heaters, air conditioning on full cold, and stereo system blaring Wagner's Ride of the Valkyries, (optional) measure voltage at both batteries again. The voltage in state 3 should be the same or higher than the readings you got in step 2. If it is the same or higher, then probably good enough, no matter what the warning lights say or don't say about "visit your dealer" etc.
If it is lower in step 3 than steps 2 and 1, you are not good. Proceed with further prognostications.
OTHER TIPS:
1. A RED battery warning symbol refers to the STARTER battery (up front, aka "G1/4" in the documentation)
2. RED battery symbol CANNOT be reset except by dealer or aftermarket SDS/DAS software.
3. RED battery symbol does NOT self-heal (see page 6 of attached PDF)
4. A WHITE battery symbol refers to the CONSUMER battery (in trunk, aka G1 in the documentaiton)
5. WHITE battery symbol appears to "self-heal" upon replacement of the defective battery. A fault code will register in vehicle memory
6. Emergency jumping is accomplished at the FRONT battery only. NEVER jump to the rear battery
7. IMPORTANT: According to Mercedes documentation, 10.8VDC on either battery is the magic witching number at which the system kicks into action and starts trying to fix and/or alert you that things are going South.
8. If that happens, the attached document clearly shows what all of the possible failure modes are, and how the system handles them in each scenario. Please note that the document says NOTHING about how to fix the problem. It just explains how the car reacts to different types of electrical charging system failures.
Source for these assertions: Mercedes Benz "R230 Dual Battery On-boad Electrical System" document, 318 HO Dual Battery (ACB) 11-28-02, attached
I have a 2006 Sl500. It was sitting for about a month. I pressed the key to unlock the doors and it would not unlock. (figured car batteries were dead) Used emergency key to open door. Tried to start car and it started. Convenience features are unavailable. I let car run for about an hour in the driveway and convenience features became available. Drove car for about about an other hour and the red "battery/alternator stop vehicle" light came on and the radio lcd screen warned it would power down and did. Both Batteries were low right after when I tested on the volt meter after red light came on. I charged the batteries and changed voltage regulator on alternator. Tested both batteries with car running and off. Voltage is the same with car running and turned off. So seems they are not getting charged. Can it be the fuse(s) under the passenger floor or more likely alternator? Can I test alternator with voltmeter with car running by placing one volt meter teminal on the thick wire bolted to to the aternator and the other wire I put where? ground? I hate to go through the trouble to check the fuses under the passenger floor. It is weird that the red light came on after the consumer batter seemed to charge after running for about an hour in the driveway. I Ran diagnostic codes and there is no codes related to the battery control unit. Any steps to take to diagnose from easy to hard would be great. Thanks
Both batteries are less than a year old. I just put my multimeter on the back stud of the alternator and grounded to alternator housing. I have around 11 volts give or take reading. When I shut the car off pretty much the same reading. Brand brand-new regulator was installed yesterday. Readings at both batteries are the same with car running or off. Could the alternator be ok and the computers are telling it not to send out a charge? Or is the alternator shot? I don't. I dont want to spend money buying parts unnecessarily.

 08-29-2021, 05:00 AM


 and most of all I have 45 years of heavy duty wrenching on US, German, Italian and Japanese cars. I LIKE working on cars. Get the picture? I'm not a novice.
 Do you then assign them to electrical system design?