When you click on links to various merchants on this site and make a purchase, this can result in this site earning a commission. Affiliate programs and affiliations include, but are not limited to, the eBay Partner Network.
If the cup seal was easy to put in, nobody would use the o-rings. You need to drill out the dimples to remove the collar, and then come up with something else to replace it. Some people use a small shaft collar, but you might need to grind it down a bit to clear the clevis.
Mike, I am 100% with you. No way you can put that seal without removing the rod end. I plan to drill the dimples and place a steel pin across the collar and rod end hole when ready to assemble..!
That is why some use the o'ring which is easy to stretch around the piston!
Thanks for validating my thoughts on this!
Not a chance WS, unless the cup will be made of a very elastic material such as neoprene..! Not Polyurethane..! But thanks for the thought..! I will be removing the rod end collar!
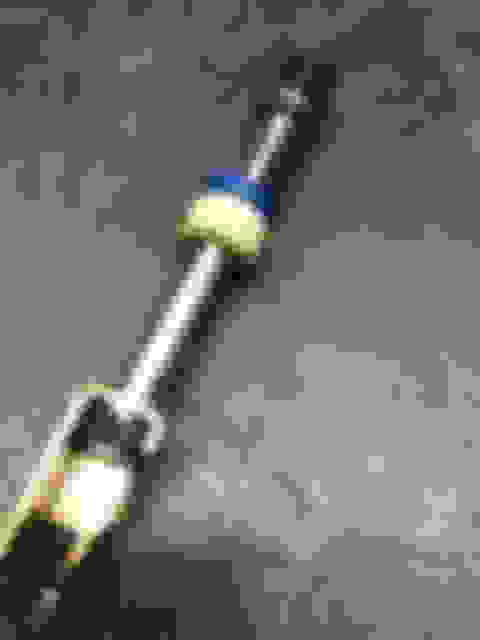
Mike, I was wondering where the crimped spot hooks into the end of the rod..! As you stated, a circumferential groove may be the logical structure to lock the collar..! Does it look something like the picture? Depending on the diameter of the neck...it may be pinned if it is larger than 6mm with a 3 mm drill bit! Another question, the piston seal, looks like an square O ring...! How can you tell it is good or bad..? Does it need to have any frictional resistance within the bore? Is that part available? A regular O ring may work here since the gap between piston and cylinder is so small, that the shear force in the O ring rubber will be very small!
The necked down diameter is pretty small, I would be a little nervous at drilling through it. This guy used a 1/4" shaft collar with a cap screw instead of a set screw. I think I would get a 6mm collar and use a longer than standard set screw with a flat or dog tip. The set screw that comes with the collar might go in too far and lose thread engagement. The 6mm collar will have a slightly smaller OD, so you shouldn't have to grind as much. The clevis does not need to be free to rotate around the rod since the rod can rotate in the cylinder.
I haven't measured everything, but the shaft is 9mm, I think it necks down to 6mm and the groove is probably 4mm. The existing collar is around 10mm OD and a standard 6mm collar is 12mm OD.
SL500, G500, Tesla Roadster, Tesla Model 3 Performance, Willys CJ2A, Toyota Tacoma
3 Years and still sealed
Originally Posted by elMacko
White Spider, regular O rings are not designed to hold high hydraulic pressures, that is why the Cup ring is the right part for the job..! The issue here is that replacing that Cup ring is a pain in the neck..! Easier to put an O ring which can stretch around the piston....but I wonder how long will last till starts leaking again..!
I am in the middle of the job and looking for related posts...but no one is telling how to put in a cup seal...!
I bought an O-Ring from this eBay seller (https://www.ebay.com/itm/272033857582), and installed it 3-4 years ago. The seal is still holding to this day, and I put my top down several times a week, all year round, as I daily drive my R230. I made sure to follow the instructions perfectly.
Mike, interestingly enough, looks like you are in my same line of thoughts. I just finished the job and I fabricated a collar and used a set screw with locktite to keep it locked..! As far as the piston ring I think it is OK..It is .005" on diameter larger than the metal body.
Kudos to you Mike!
Last edited by elMacko; 01-17-2022 at 07:45 PM.
Reason: adding info
Friends, this vehicle I have purchased is just a garden of experiences..! I am a Mechanic and a Mechanical Engineer and pretty much can resolve complex mechanical problems and this SL-500 is an encyclopedia on those...! I purchased it pretty cheap because the previous owner couldn't resolve the cumulating problems and wasn't in capacity of pay the high fees at the dealer shop. So, I purchased the car along with the issues..! So, in trying to resolve a roof leaking cylinder, I got a great feedback from the forum members and completed the job of installing a new seal successfully. Well....I did the right thing for the cylinder, and installed back properly....! Then while testing the functionality by hand moving the actuator, observed that the driver side hook was fully opening, but the passenger side was not...! I started scratching my head and tried something that is not really annotated in the forum threads..! I loosened the 3 screws holding the cylinder assembly and manually opened the hooks by using the manual access at the top of the roof...! This time both hooks opened correctly..! Then, while holding that position re-tighten the tree screws holding the assembly..! And problem resolved..! One more experience in my pocket! When I finish fully restoring this vehicle I will have obtained my doctorate in SL-500's, and would be able to answer any question coming around this way!
Remember..."Don't make decisions when you are angry.....and don't make promises when you are happy..."
I bought an O-Ring from this eBay seller (https://www.ebay.com/itm/272033857582), and installed it 3-4 years ago. The seal is still holding to this day, and I put my top down several times a week, all year round, as I daily drive my R230. I made sure to follow the instructions perfectly.
Mercedes has a terrible record in the top cylinder seal business. I would imagine the material of this shaft seal is more important than the design. I can�t imagine it being under immense pressure
Lynn, I had the same issue when I removed the liner, all the clips came unglued..! I actually recovered all of them and glued them back using a glue for jewelry called A3000 that works pretty good. But if I would have to replace any of them, I would have used a bent strip of aluminum of around .060" thick, and bend them in an L shape with the upper portion folded to mimic the shape of the clip. Then you place it into engaged position at the roof receiver. Put glue in the bottom part and when snapping the liner back, the rubber trim on the door should be able to hold it in position while the glue cures..! You may be able to find material at Lowes or home depot used for flashing!
Looks like it is my turn. Thanks for all the info in this thread.
[edit] All done. I did not encounter any issues not already covered here. Thanks again.
Last edited by tydriver; 02-24-2022 at 11:32 AM.
Reason: finished the repair
SL55, Opel GT, 70 LT-1, BMW 745 turbo, MRoadster, 49 Stude truck, 69 Z/28, Ferrari project
Mike offered to send me a couple of the clips. But, I had to buy a new cover for the c pillar, and was able to remove old clips from that cover and epoxy them to the headliner. I used PC-7 epoxy. It is the strongest epoxy I have found; even better than JB Weld.
Sent my cylinder off to CabHyd. Just got it back today along with two splices.
When I searched for new rubber for the passenger side of the roof, the first few vendors showed NLA. Of course the driver's side is available. I found one vendor who had one left. It is a bit of a wrestling match getting the new rubber onto the old frame.
May have time to put this back together this evening.
Lynn, I repaired mine cutting triangular sections where the rubber was bulging, then placed an strip of neoprene rubber 1/16" thick between the rubber and headliner, finally put rubber cement between the cut rubber and the neoprene strip...done deal!
I cant recall where I got the photo - but this was the centre latch o-ring prior to someones rebuild - here or over at slkworld.
Looks like 9mm ID 4mm cross section......
Anyone concur?
Local hydraulic guy said he has them $1 each - how many would I like?
Billie Bob, that is an "O" ring......not a good high pressure Hydraulic seal. Spend few more dollars and get you the right part. a "V" seal. I got mine from Mike, and if he cannot ship that to Australia, he can tell you the specs..!
That seal looks fine. The end is staked onto the rod, no alternative but to drill it to remove. You will need some alternative like a shaft collar to replace it during reassembly.
HR, if you look some posts back you will see what it takes....to do this job you will need some machinist tools such as a threading tap and handle, perhaps you can get by with a nut drilled to the size of the cylinder shaft end instead of a small collar..! Not an easy job without the right tools! Welding the end is another option, but....a weld precision job will be necessary with portion of the assembly submerged in water for not overheating the rod!
Thank you for your answers.
If I don't use the roof while waiting for the repair, should I expect a slow leak ?
Is the circuit pressurized every time you start or only if the roof controls are activated ?
Regarding the reassembly and the use of "Shaft Colar", it remains unclear, is there a link to a video that shows this step after the removal of the piston?
In the SLK230/32 versions - the pump=pressure only runs when you activate the roof ope/close button = hydraulic pump.
ASIDE - the seal you have shown is a cup seal - I and many other SLK drivers have successfully used o-rings for years. Q...Which way do you install the cup seal?...I mean which is the leading and which is the trailing edge? In the past - the cup seals I've removed to replace with o rings have been unrecognisable - so I couldn't tell.

 01-16-2022, 05:02 PM