
SL55/63/65/R230 AMG: Rattle - Gas tank
 06-14-2011 | 07:46 PM
#51

Junior Member
Joined: Apr 2011
Posts: 34
Likes: 5
sl55
Baffle Plate / PSE PUMP/ Air Pump
$tealer estimate:
New Gas Tank - $3000
PSE Pump and Trunk Latch plus diagnosis - $2500
Check Engine Light on ($tealer said needs a new air pump - $1600
Total $tealer Estimate - $7100
Actual Repair Cost - $5 (for the baffle plate spring).
Heres the link to my post on how to fix an SL55 PSE Pump:
http://www.google.ca/url?sa=t&source...0J6syAVBVTSxsQ
Turns out the PSE Pump supplies vaccum to the engine for certain functions. Fixed the PSE Pump, check engine light went out.
Not sure if the request for contact info was directed at me, but feel free to email me at martinairsystem@sympatico.ca with any questions.
09-05-2011 | 06:52 AM
#52

Newbie
Joined: Sep 2011
Posts: 3
Likes: 0
2003sl
I have the same problem, the noise started yesterday, but dont want to spring for the 4K, already spent lots of $ for repairs. I can follow instructions well and want to try to fix this myself, any instructions will be helpful. Thanks
09-05-2011 | 07:35 AM
#53
Junior Member
Joined: Apr 2011
Posts: 34
Likes: 5
sl55
I have posted diagrams and instructions on page 3 above. It's really not that hard once you just get started and do it.
In the picture some guy posted of the gas tank removed you can see the round sender unit hole near the middle/top of the tank.
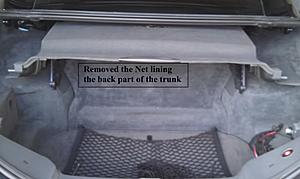
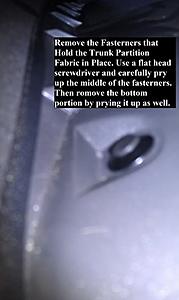
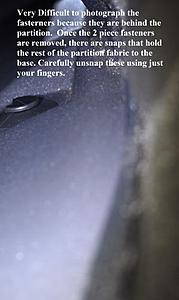
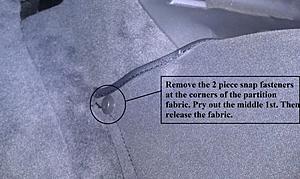
Take your felt trunk pieces out till you get the sender unit exposed (10 minutes)
Make a tool to remove the sender unit (2 screws drilled halfway into an 18" 2" x 2" piece of wood about 3" apart and near the one end of the 2 x 2). This acts like a wrench....the two screws will fit into recessed holes in the sender. Rotate 1/4 turn counterclockwise and the sender will come out.
Get a light in there and you'll see what needs to be done by looking at my diagrams.
Good Luck!!
In the picture some guy posted of the gas tank removed you can see the round sender unit hole near the middle/top of the tank.
Take your felt trunk pieces out till you get the sender unit exposed (10 minutes)
Make a tool to remove the sender unit (2 screws drilled halfway into an 18" 2" x 2" piece of wood about 3" apart and near the one end of the 2 x 2). This acts like a wrench....the two screws will fit into recessed holes in the sender. Rotate 1/4 turn counterclockwise and the sender will come out.
Get a light in there and you'll see what needs to be done by looking at my diagrams.
Good Luck!!
09-05-2011 | 01:03 PM
#54
Newbie
Joined: Sep 2011
Posts: 3
Likes: 0
2003sl
So I took the advice of Super_monkey and went after the noise in the fuel tank..and what a pain in the *** that was!!! Getting to it and diagnosing that the issue was the fuel baffle (piece of ****), was very easy as described. However, fixing it was slightly more difficult. Lots of thinking out of the box. Anyways, used coat hanger and spring to attach to baffle and fuel sending unit. Ran into snags by misplacing the spring part on the sending unit, but finally figured that you must place hole in the dark gray area near the top so not to interfere with the float mechanism. Otherwise, it disables the float and screws with the fuel level gauge. After a few hours of messing around and making sure not to drop anything in the tank, all is good. Works fine and hopefully I'll never have an issue again. If so, maybe the next step is a new tank all together. Shame benz never recalled this issue, but seeing the posts on how to fix the problem, I know why they chose not to!! Anyways, if anyone has questions, just post a reply and I'll call or email you instructions. Cost me $3.49 for the fix and some time. Better than $4000!!! Peace.
09-05-2011 | 03:20 PM
#55
Junior Member
Joined: Apr 2011
Posts: 34
Likes: 5
sl55
Getting to the sender unit is easy once you start pulling out trunk carpet etc.
Making the sender unit removal tool is pretty straight forward once you see the two holes where you need to grab hold to rotate 1/4 turn counterclockwise.
There is a bend in the plastic sender shaft. I put the hole just below the bend. If the hole is too high the sender itself will obstruct your view while you are trying to connect the spring.
The spring I used had a total unstretched length of about 7" and stretched pretty easily to 9"-10". Buy a selection.
I found it easiest to put the spring on the sender end first then used a tool to push/extend the far end of the spring over the baffle plate.
It's VERY helpful to have somebody there to help hold a light and hold the baffle plate still and close with a second hook while you try to hook the spring over the baffle.
Coat hangers aren't quite ideal....too weak. I McGivered some metal tomato stakes into the shape I wanted (a hook to hold the baffle and a "Y" to push the spring.
Good Luck!!
11-13-2011 | 08:27 AM
#56
Senior Member
Joined: Oct 2009
Posts: 321
Likes: 58
From: Miami, Fl
08 ML350, 2011 E550 Cab
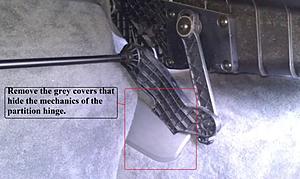
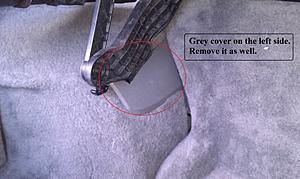
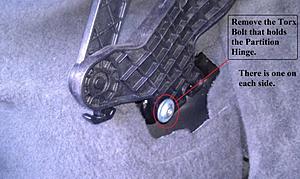
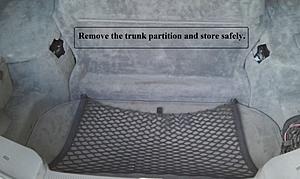
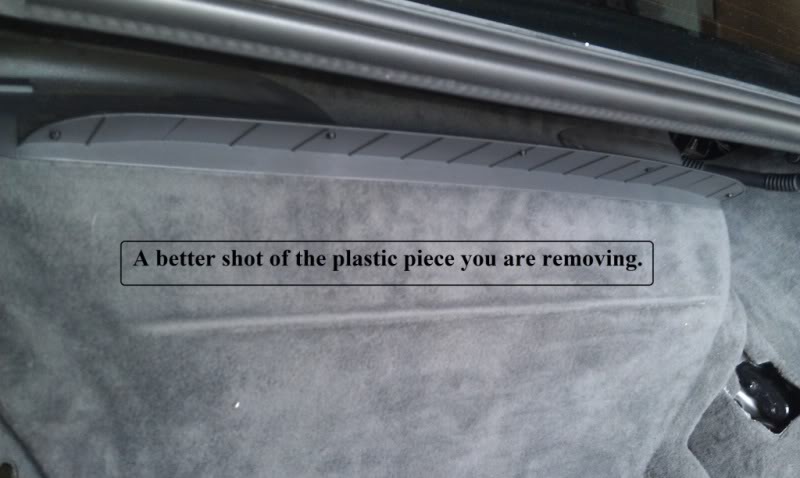
Thank you very much for all the information. I finally decided to knock this out yesterday. Took a little less than an hour. NO MORE KNOCKING SOUND. I took some pics from start to finish to help others in the future.


Last edited by NikleinR6; 11-13-2011 at 08:29 AM.


The following users liked this post:
David Contini (08-31-2018)


The following users liked this post:
marko69 (02-27-2021)
 11-15-2011 | 05:56 PM
#61
Super Member
Joined: Jan 2007
Posts: 852
Likes: 3
From: Sleepy Hollow, IL
65 Chevelle Wagon w/ C5 frame, 08 ML63, 04 S600, 04 E55,(sold) 00 ML55,(sold) 98 C43-55K Swap
I just had a car like this at work, I took some pix of the broken spot welds with my iphone. will load the pix later if it helps, the pix are not the best quality
10-20-2014 | 12:11 PM
#62

Newbie
Joined: Oct 2014
Posts: 1
Likes: 0
SL500 2003
I have followed the advise and pictures posted by NikleinR6 on my 2003 SL500 and it worked very well  . Thanks for that, NikleinR6.
The only difference in the procedure I applied is where the spring is attached to the baffle plate: I have hooked it into one of the slots in the baffle plate instead of hooking it over the top of the baffle plate.
. Thanks for that, NikleinR6.The only difference in the procedure I applied is where the spring is attached to the baffle plate: I have hooked it into one of the slots in the baffle plate instead of hooking it over the top of the baffle plate.
01-18-2015 | 07:47 PM
#64
MBWorld Fanatic!
Joined: Feb 2009
Posts: 6,897
Likes: 85
From: Central WI (BFE)
SL55, ML500 & Acura TL
 I notice you live in Greenwood. I moved from the Southern Dunes area about three years ago. I miss Greenwood. Nice area, nice folks and I used to have tons of fun cruising 31 on Summer nights. Always tons of American cars wanting to have a quick stop light to stop light run with my SL.
01-23-2015 | 12:52 PM
I notice you live in Greenwood. I moved from the Southern Dunes area about three years ago. I miss Greenwood. Nice area, nice folks and I used to have tons of fun cruising 31 on Summer nights. Always tons of American cars wanting to have a quick stop light to stop light run with my SL.
01-23-2015 | 12:52 PM
#66
MBWorld Fanatic!
Joined: Feb 2009
Posts: 6,897
Likes: 85
From: Central WI (BFE)
SL55, ML500 & Acura TL
How did the loose baffle project go?
 09-03-2015 | 05:57 PM
#69
Newbie
Joined: Sep 2015
Posts: 4
Likes: 0
From: LA, Vancouver, Tokyo
SL 600, 2004, GL320 2012
My SL 600 has the same sound as of yesterday. My garage told me to exchange the whole tank. I looked the solution up here on the forum. Has anybody done the fix around LA?
09-03-2015 | 06:53 PM
#70
MBWorld Fanatic!
Joined: Feb 2009
Posts: 6,897
Likes: 85
From: Central WI (BFE)
SL55, ML500 & Acura TL
I had the dealer replace my tank, but it was all covered under an extended warranty I had in place.
Good luck.
09-03-2015 | 07:59 PM
#71
Newbie
Joined: Sep 2015
Posts: 4
Likes: 0
From: LA, Vancouver, Tokyo
SL 600, 2004, GL320 2012
@Cal1, Many thanks your help is very much appreciated. I dont mind paying for the small fix, but my shop doesn't want to do it because they are concerned about liability issues and I dont feel comfortable doing it myself. Lets see if someone comes forward via this post, if not I will try other places as well.
09-04-2015 | 08:18 AM
#72

Newbie
Joined: Jan 2015
Posts: 5
Likes: 0
From: Greenwood, IN
2003 SL500
Gave up on the cheap fix
I tried the spring twice; the problem was better, but not perfect. Hard maneuvers (and isn't that the point in having this car???) still brought out the knock. I ordered the tank online for about $1,000 and had a mechanic replace the tank for $500. A lot of money, but it was fixed right.
09-04-2015 | 09:19 AM
#73
MBWorld Fanatic!
Joined: Feb 2009
Posts: 6,897
Likes: 85
From: Central WI (BFE)
SL55, ML500 & Acura TL
I tried the spring twice; the problem was better, but not perfect. Hard maneuvers (and isn't that the point in having this car???) still brought out the knock. I ordered the tank online for about $1,000 and had a mechanic replace the tank for $500. A lot of money, but it was fixed right.
CFI, if you end up having it done, make sure they replace the fuel filter for you at the time.
09-04-2015 | 12:14 PM
#74
Newbie
Joined: Sep 2015
Posts: 4
Likes: 0
From: LA, Vancouver, Tokyo
SL 600, 2004, GL320 2012
@7blakes, can you give me the link for the online purchase of the tank. Maybe I can convince my shop to exchange it as well. They are not so expensive and i think I can pa them the labor cost. Many thanks. I dont drive the car hard but knowing it is done proper gives me peace of mind.
@cal1, will tell them as well. Many thanks for the follow up.
@cal1, will tell them as well. Many thanks for the follow up.
09-07-2015 | 05:38 PM
#75

Junior Member
Joined: Oct 2014
Posts: 15
Likes: 1
From: Tampa, FL
2002 SLK 320, 2004 SL 500, 2004 SL600
First, thanks everyone who took the time to take pics and post instructions!
I bought my spring from Ace Hardware, Hillman 540198 Part No. 66 for $3.59
Drilled hole in sender and hooked around top of baffle.
Took about two hours to complete job. Could do it again in only an hour now that I know what I am doing.
I bought my spring from Ace Hardware, Hillman 540198 Part No. 66 for $3.59
Drilled hole in sender and hooked around top of baffle.
Took about two hours to complete job. Could do it again in only an hour now that I know what I am doing.


