


SL55/63/65/R230 AMG: DIY : SL55 Fuel Filter replacement
Thread Starter
Junior Member
Joined: Jul 2012
Posts: 54
Likes: 14
From: New Jersey
03 SL55, 07 Acura MDX
DIY : SL55 Fuel Filter replacement
Here's another Important maintenance Item that needs to be done every 60k miles or every 5 years, which ever comes first. I'd like to give thanks to Groves73 for giving me a quick tip on removing the filter once you've got it loose ("you have to figure out like a puzzle"). It's tight and Space is limited so take your time and work your way through getting the filter out.
Time to complete the job:
1-2 hrs..
First go at this it might take you anywhere from 1-2 hrs to complete the job. The only reason it'll take you so long the first time around is because of the original MB clamps, with the lack of space under the vehicle it does make it a challenge to be able to reach the clamps and pry them off. Once the MB clamps have been removed and replaced with new clamps the next time around the job will probably take you 15-20mins.
Parts Needed:
1) Fuel filter - MB Part #0024772701, or you can pick up an aftermarket fuel filter at your local auto parts store.
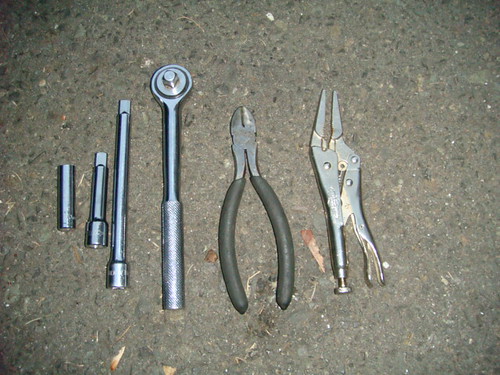
Tools you'll need:
1) Socket wrench
2) Various extensions
3) 10mm socket
4) Cutting pliers
5) Long nose locking pliers (helps with grasping the old clamps, and also closing shut the fuel hose from the gas tank to the fuel filter)
6) 2 Hose Clamps (I got them from home depot for .75 a piece) http://www.homedepot.com/p/Everbilt-...2#.UmBx8hbR05Q
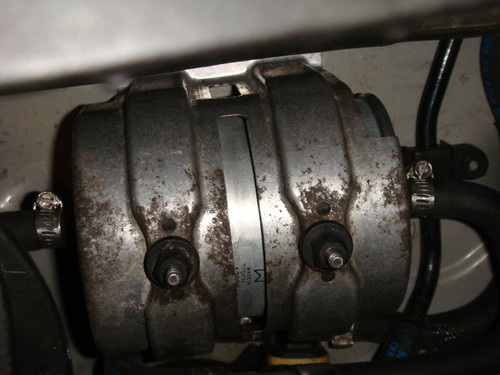
Before we get started it's best to use goggles or protective eye gear as fuel will spill out (about 4 oz). Now on to the good stuff, Jack up the car and support it with Two jacks. The fuel filter is located right directly about your rear differential, on the driver's side of the vehicle, you can't miss it.
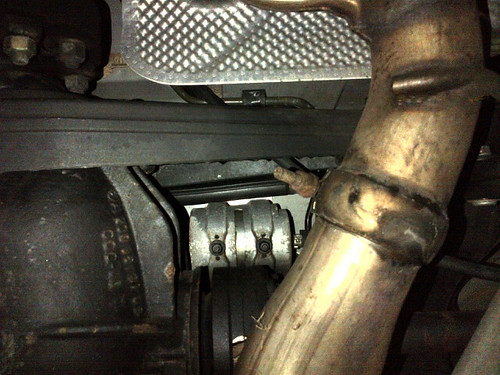
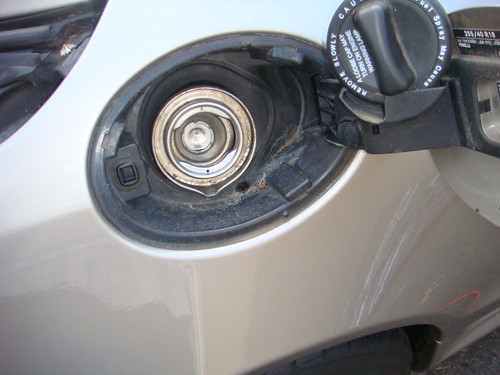
Step 1:
Release Fuel pressure. Very easy, just open the fuel filler cap.
Step 2:
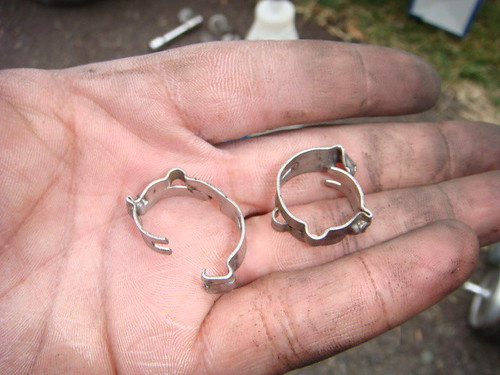
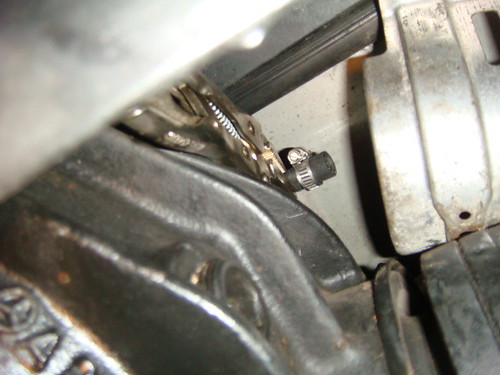
Cut the clamps off with the cutting pliers, all you want to do is break the clamps, not damage the rubber fuel hoses.
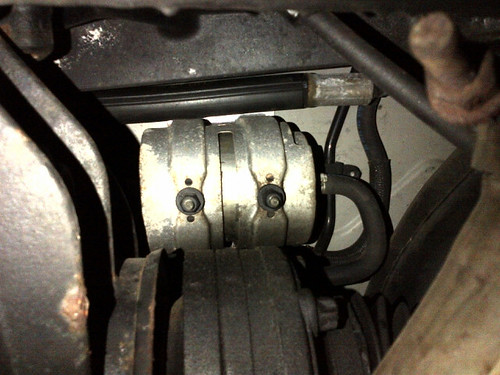
Step 3:
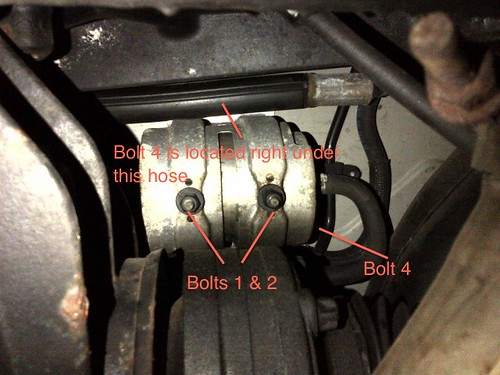
Now losen the 4 10mm plastic bolts holding the fuel filter and fuel filter housing in place. On the 4th and last bolt that's located under the hose it'll be a bit of a squeeze, I used the same ratchet to pry the hose up far enough for me to squeeze in the socket and then reattached the ratchet and loosened the bolt off. Same practice will come in handy when reinstalling the bolt towards the end of installation.
Step 4:
Now that everything is loose, it's time to loosen the hoses connected to the fuel filter, don't remove them just yet! Before removing any hoses place a catch pan underneath, then clamp the hose going from the fuel tank to the filter (That'll stop any fuel from being released from that end, any fuel that'll spill will come from the filter to the connecting hose that goes towards the engine. Now remove hoses and let the filter drain.

Step 5:
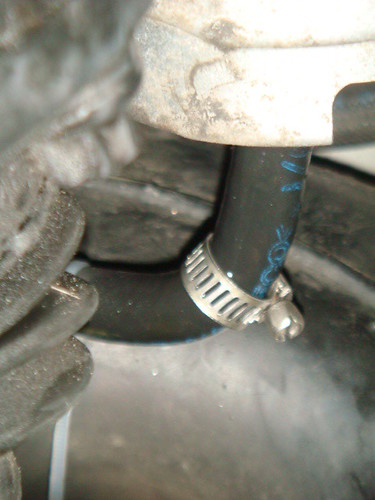
Take the new clamps and install them into the two hoses.
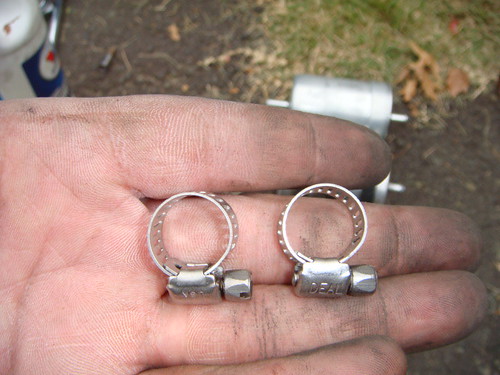
This is the fuel line from the gas tank to the fuel filter.
This is the fuel line from the fuel filter to the engine.
Step 6:
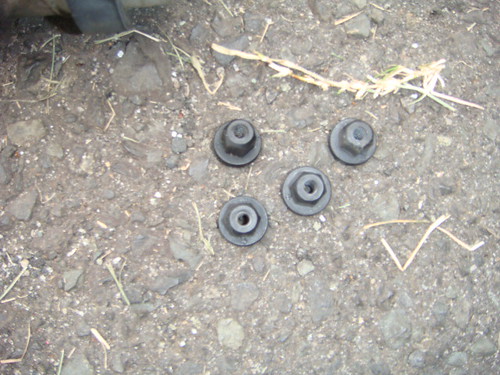
Remove fuel filter and install the rubber mounting brackets to the new filter.
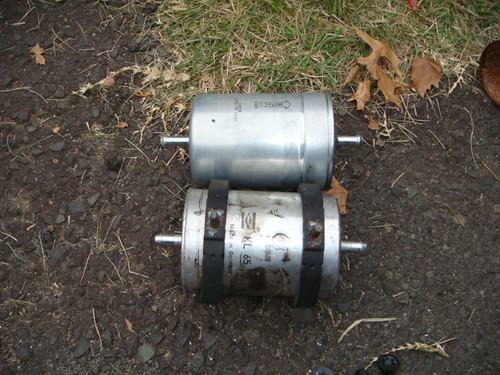
New filter with brackets installed.

Step 7:
Install new filter, Take note of the "Direction Of Gas Flow" indicator, it should have an arrow pointing the direction of gas flow, which should be installed pointing in the direction of the engine. Meaning gas flows from the gas tank, to the fuel filter, to the engine. So have the arrow pointing in the right direction, and now do everything in reverse order and your done.
Attach fuel lines to new filter, screw tight clamps, and finally bolt back the fuel filter bracket to the vehicle.
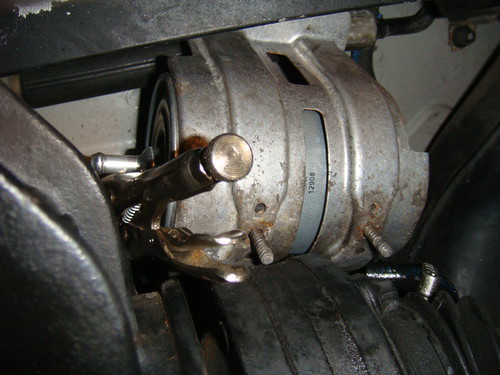
Finished product.
Time to complete the job:
1-2 hrs..
First go at this it might take you anywhere from 1-2 hrs to complete the job. The only reason it'll take you so long the first time around is because of the original MB clamps, with the lack of space under the vehicle it does make it a challenge to be able to reach the clamps and pry them off. Once the MB clamps have been removed and replaced with new clamps the next time around the job will probably take you 15-20mins.
Parts Needed:
1) Fuel filter - MB Part #0024772701, or you can pick up an aftermarket fuel filter at your local auto parts store.
Tools you'll need:
1) Socket wrench
2) Various extensions
3) 10mm socket
4) Cutting pliers
5) Long nose locking pliers (helps with grasping the old clamps, and also closing shut the fuel hose from the gas tank to the fuel filter)
6) 2 Hose Clamps (I got them from home depot for .75 a piece) http://www.homedepot.com/p/Everbilt-...2#.UmBx8hbR05Q
Before we get started it's best to use goggles or protective eye gear as fuel will spill out (about 4 oz). Now on to the good stuff, Jack up the car and support it with Two jacks. The fuel filter is located right directly about your rear differential, on the driver's side of the vehicle, you can't miss it.
Step 1:
Release Fuel pressure. Very easy, just open the fuel filler cap.
Step 2:
Cut the clamps off with the cutting pliers, all you want to do is break the clamps, not damage the rubber fuel hoses.
Step 3:
Now losen the 4 10mm plastic bolts holding the fuel filter and fuel filter housing in place. On the 4th and last bolt that's located under the hose it'll be a bit of a squeeze, I used the same ratchet to pry the hose up far enough for me to squeeze in the socket and then reattached the ratchet and loosened the bolt off. Same practice will come in handy when reinstalling the bolt towards the end of installation.
Step 4:
Now that everything is loose, it's time to loosen the hoses connected to the fuel filter, don't remove them just yet! Before removing any hoses place a catch pan underneath, then clamp the hose going from the fuel tank to the filter (That'll stop any fuel from being released from that end, any fuel that'll spill will come from the filter to the connecting hose that goes towards the engine. Now remove hoses and let the filter drain.
Step 5:
Take the new clamps and install them into the two hoses.
This is the fuel line from the gas tank to the fuel filter.
This is the fuel line from the fuel filter to the engine.
Step 6:
Remove fuel filter and install the rubber mounting brackets to the new filter.
New filter with brackets installed.
Step 7:
Install new filter, Take note of the "Direction Of Gas Flow" indicator, it should have an arrow pointing the direction of gas flow, which should be installed pointing in the direction of the engine. Meaning gas flows from the gas tank, to the fuel filter, to the engine. So have the arrow pointing in the right direction, and now do everything in reverse order and your done.
Attach fuel lines to new filter, screw tight clamps, and finally bolt back the fuel filter bracket to the vehicle.
Finished product.
Last edited by HFELIU; Oct 19, 2013 at 11:40 AM.

Member
Joined: May 2013
Posts: 89
Likes: 1
From: Alberta, Canada
2004 SL55 AMG Kompressor
BAH!!!
Where was this sunday night when i fought the heck outta mine?!?!?!
I just did mine and fought that nut under the hose! Used a long pry bar to shove the hose out of the way.
Also, I couldn't get pliers in to get the clamps off, so i used a small 90 degree pick to flick the 'latch' off and open them...they could even be re-used, but i used regular hose clamps....
I also found it easier to mount the filter into the bracket, then wrangle the whole thing back in, and only need worry about the 2 nuts and 2 lines...My filter was awful, muddy fuel came out....it was original i assume!!!
Awesome write up, wish you'd done it a week earlier!!!!
Thread Starter
Junior Member
Joined: Jul 2012
Posts: 54
Likes: 14
From: New Jersey
03 SL55, 07 Acura MDX
Lol, a week ago I was stressing just like you. I managed to get the nuts off and have everything loose before it got to late so I left it for today. You just reminded me about the prying technique, I used the same ratchet so I could slide the socket and extension in lol. Now I have to update the post lol.
Senior Member


Joined: Jul 2013
Posts: 306
Likes: 19
From: West Chester, PA - USA
2003 SL55 AMG
Another very nice clearly documented write-up you have provided for all of us. Again - in my files, and will be helpful 'down the road'.
Cheers, and thank you very much,
Gary Knox
Cheers, and thank you very much,
Gary Knox
Super Member
Joined: Jul 2013
Posts: 930
Likes: 24
06 SL65AMG, 13 Tesla Model S 60kwh, 02 Jaguar S-Type 3.0, 12 S550 4 Matic, 07 E320 Bluetec, 06 LX470
So I have about 55k on my car so far, and recently I feel there's not enough power as it use to be. I don't think its anything with my transmission since the shifts are still smooth and there's no shakes when I idle so I threw that out of the window.
At this point I'm thinking maybe a glitch with the ECU but I highly doubt it, Maybe dirty fuel injectors but I have no misfires, I don't think I have any turbo/manifold issues cause I don't hear any weird noises. So If I put it on the dyno and I don't hit my 563 rwhp power, would fuel filter be a good place to look at first? I'm prob over due for one anyways
At this point I'm thinking maybe a glitch with the ECU but I highly doubt it, Maybe dirty fuel injectors but I have no misfires, I don't think I have any turbo/manifold issues cause I don't hear any weird noises. So If I put it on the dyno and I don't hit my 563 rwhp power, would fuel filter be a good place to look at first? I'm prob over due for one anyways
Thread Starter
Junior Member
Joined: Jul 2012
Posts: 54
Likes: 14
From: New Jersey
03 SL55, 07 Acura MDX
So I have about 55k on my car so far, and recently I feel there's not enough power as it use to be. I don't think its anything with my transmission since the shifts are still smooth and there's no shakes when I idle so I threw that out of the window.
At this point I'm thinking maybe a glitch with the ECU but I highly doubt it, Maybe dirty fuel injectors but I have no misfires, I don't think I have any turbo/manifold issues cause I don't hear any weird noises. So If I put it on the dyno and I don't hit my 563 rwhp power, would fuel filter be a good place to look at first? I'm prob over due for one anyways
At this point I'm thinking maybe a glitch with the ECU but I highly doubt it, Maybe dirty fuel injectors but I have no misfires, I don't think I have any turbo/manifold issues cause I don't hear any weird noises. So If I put it on the dyno and I don't hit my 563 rwhp power, would fuel filter be a good place to look at first? I'm prob over due for one anyways

Member
Joined: Jan 2011
Posts: 237
Likes: 5
CLK320, ML550, SL55, GL450
Dealer cost to do the work is $185 here:
$126 labor
$53 filter 1 x 002-477-27-01
$4 Loom tie 1 x 005-997-27-90
$3 Hose Clamp 1 x 001-997-69-90
Mymercedesparts.com shows
$28
$2 and
$1.50
Cheers.
$126 labor
$53 filter 1 x 002-477-27-01
$4 Loom tie 1 x 005-997-27-90
$3 Hose Clamp 1 x 001-997-69-90
Mymercedesparts.com shows
$28
$2 and
$1.50
Cheers.
Trending Topics
Thread Starter
Junior Member
Joined: Jul 2012
Posts: 54
Likes: 14
From: New Jersey
03 SL55, 07 Acura MDX
eeek, so much money for so littler work. Thanks for the info on the dealer's prices, it obviously pays to DIY.
My costs came out to:
$22 Beck/Arnley Fuel filter
$.75 x2 clamps
My costs came out to:
$22 Beck/Arnley Fuel filter
$.75 x2 clamps
MB World Stories
The Best of Mercedes & AMG

Manual Mercedes? 6 Times Sindelfingen Let Drivers Have All The Fun
Verdad Gallardo
Mercedes SLR McLaren 722 S Is Extremely Rare Example Modified by McLaren
Verdad Gallardo
8 Classic Boxy Mercedes Designs That Have Aged Like Fine Wine
Verdad Gallardo
Flawlessly Restored Mercedes 190E Evo II Heads to Auction
Verdad Gallardo
Electric Mercedes C-Class Unveiled: 11 Things You Need to Know
Verdad Gallardo
Mercedes EQS Gets A Major Update: Everything You Need to Know
Verdad Gallardo
5 Underrated Mercedes-Benz Models That Don't Get the Love They Deserve
Verdad Gallardo
Mercedes 300D Has Pushed Well Past 1 Million Miles and It Ain't Stopping
Verdad Gallardo
10 Most Reliable Mercedes-Benz Models You Can Buy Used
Verdad GallardoSuper Member
Joined: Jul 2013
Posts: 930
Likes: 24
06 SL65AMG, 13 Tesla Model S 60kwh, 02 Jaguar S-Type 3.0, 12 S550 4 Matic, 07 E320 Bluetec, 06 LX470
Just an update was at eurocharged today and turns out its not the turbo but the cats are starting to clog up thus why the turbos don't feel as powerful. The 65 amg cats are through the roof when it comes to replacing (4.5-5k) but lucky I have a full plat. warranty thru Fidelity and there usually good on this type of stuff. Also I have a custom exhaust being fabricated so glad I got cats issues now, otherwise if I had my custom exhaust installed I would have missed it on my stocks
SPONSOR
Joined: May 2012
Posts: 5,081
Likes: 62
From: Harbor City, CA
Mercedes-Benz, Porsche, BMW, MINI and more!
Nicely done/documented!
We carry Bosch, Mahle and Genuine Mercedes-Benz fuel filters here if others are considering doing this project themselves.
Mark/Pelican Parts
We carry Bosch, Mahle and Genuine Mercedes-Benz fuel filters here if others are considering doing this project themselves.
Mark/Pelican Parts
Thread Starter
Junior Member
Joined: Jul 2012
Posts: 54
Likes: 14
From: New Jersey
03 SL55, 07 Acura MDX
Just an update was at eurocharged today and turns out its not the turbo but the cats are starting to clog up thus why the turbos don't feel as powerful. The 65 amg cats are through the roof when it comes to replacing (4.5-5k) but lucky I have a full plat. warranty thru Fidelity and there usually good on this type of stuff. Also I have a custom exhaust being fabricated so glad I got cats issues now, otherwise if I had my custom exhaust installed I would have missed it on my stocks
 .
.
MBWorld Fanatic!


Joined: Sep 2006
Posts: 1,921
Likes: 173
From: Long Island New York
2003 SL55,2020 GTC ,2017 GTS sold ,2002 G500 Sold,2003 SL500 Sold,
I just did my fuel filter and pump 03 SL55 the only thing I would not do is pinch those lines with a vise grip 
Senior Member
Joined: May 2019
Posts: 280
Likes: 37
From: Lincolnshire, IL
2005 SL55 AMG
I did this maintenance item today on my �05, 55k miles. It was pretty tricky breaking the factory clamps. You really need a long tool with a good grip to get up in there. Also, I wasn�t able to remove both the filter and bracket from above, so I separated them and just pulled the filter down. Clamp sizes were tricky, too. I checked with FCP Euro, then ordered the clamps from Amazon since they were cheap with cheap delivery. I bought the ones that were 15-26 mm, but were way too big. They fit, but actual diameter was probably 16mm, so lots of extra slack on the clamps. Tightening them on the much smaller diameter fuel lines was a big frustration. Having small plastic hose clamps for the fuel lines was helpful to prevent excess fuel spillage. Still, satisfying to have it done.
Last edited by poppyboy; Oct 10, 2020 at 07:24 PM.

MBWorld Fanatic!


Joined: Nov 2009
Posts: 2,616
Likes: 160
From: Southeastern USA
2010 E350 Luxury Sedan, Engine 272 (V6)
Thanks to all who posted here. Good information.
My 2010 E 350 is due for fuel filter replacement and coolant flush. After reading all of above, have decided probably need to take it to an M-B dealership. Way too complicated for DIY and too many places where something might break or need replacement. Not to mention spilling gas inside car.
Thought about using one of two independents that have done "A" services on car, but not real confident their technicians have the knowledge to handle this process at every step. Especially if some small part breaks or something. They would have to order it from somewhere most likely or else try to jerry rig something that would be out of my sight.
One indy is highly rated foreign car and other is highest rated auto service in county.
Taking it to M-B dealership involves one hour drive each way. Wife would have to drive her vehicle and pick me up as it would take them hours, if not days, to get it done. Then take me back to pick it up. Would get coolant flush and "B" service at same time.
Or, I could trade it in and let the next guy worry about it. And I would if SUV prices were not so high right now and I really, really like my E 350. Nothing M-B sells now appeals to me at all.
My 2010 E 350 is due for fuel filter replacement and coolant flush. After reading all of above, have decided probably need to take it to an M-B dealership. Way too complicated for DIY and too many places where something might break or need replacement. Not to mention spilling gas inside car.
Thought about using one of two independents that have done "A" services on car, but not real confident their technicians have the knowledge to handle this process at every step. Especially if some small part breaks or something. They would have to order it from somewhere most likely or else try to jerry rig something that would be out of my sight.
One indy is highly rated foreign car and other is highest rated auto service in county.
Taking it to M-B dealership involves one hour drive each way. Wife would have to drive her vehicle and pick me up as it would take them hours, if not days, to get it done. Then take me back to pick it up. Would get coolant flush and "B" service at same time.
Or, I could trade it in and let the next guy worry about it.
And I would if SUV prices were not so high right now and I really, really like my E 350. Nothing M-B sells now appeals to me at all.Last edited by El Cid; Sep 1, 2024 at 09:15 AM.


