


SLK/R171: HID H7 Retrofit, metal factory harness???

Thread Starter
Newbie
Joined: Apr 2006
Posts: 11
Likes: 0
From: Houston
2006 SLK280
HID H7 Retrofit, metal factory harness???
After reading many many threads about installing the h7 kit I tried to do it myself today. One thing that no one mentioned was how they actually got the HID h7 bulb to fit into the factory housing. Since there is a metal harness thingy that is attached to the factory socket that actually attaches to the bulb that screws into the headlight. And there is no way of putting it onto the aftermarket bulb. So is there a adapter or something, how do other people get them to install onto the housing.
Thanks to all in advance
Thanks to all in advance

Member
Joined: May 2005
Posts: 247
Likes: 0
From: Pasadena, CA
'12 C204 C250, '05 SLK350 (sold)
did you JUST buy the H7 HID bulb? Because you need the entire kit. The HID bulb fits onto the HID Ballast (think of it as an amplifier to convert the 12V DC to the correct power output for the bulb) and the ballast plugs into your battery for power source and your factory harness for on/off switching.
Senior Member
Joined: Dec 2005
Posts: 435
Likes: 0
From: Virginia USA
SLK55///AMG The MONSTER on the block
 Have you contacted the HID kit supplier for information on "how to" install the HID kit on a SLK? I would assume they've sold kits for just about every car and based on their experience, it should be a easy for them to walk you through the install. Based on my limited knowledge on aftermarket kits, I understand you have to "notch" or drill an opening on the dust cover that attaches on the back side of the light assembly. This allows the harness to run to the separate ballast mounted outside the light assembly. Are you able to provide pictures of your kit? This would help us to understand what you're referring to. Are you aware that most HID kits require taking you car to Mercedes service for setting the vehicle to "Xenon ON" using the StarDiagnostic tool?
Thread Starter
Newbie
Joined: Apr 2006
Posts: 11
Likes: 0
From: Houston
2006 SLK280
Originally Posted by -1-
Have you contacted the HID kit supplier for information on "how to" install the HID kit on a SLK? I would assume they've sold kits for just about every car and based on their experience, it should be a easy for them to walk you through the install. Based on my limited knowledge on aftermarket kits, I understand you have to "notch" or drill an opening on the dust cover that attaches on the back side of the light assembly. This allows the harness to run to the separate ballast mounted outside the light assembly. Are you able to provide pictures of your kit? This would help us to understand what you're referring to. Are you aware that most HID kits require taking you car to Mercedes service for setting the vehicle to "Xenon ON" using the StarDiagnostic tool?I can always try to glue the light to the headlight assembly as a last resort, but I was wondering if anyone else had any other advice on installing the lights. Before I purchased the car from my dealer I had them set the xenon = present so that�s already done. I just need to find a way to attach the bulb to the housing in the most feasible way. I have read that people on this forum had done the upgrade with H7 HID Kits before so any suggestions would be greatly appreciated.
Thanks
Trending Topics
Senior Member
Joined: Dec 2005
Posts: 435
Likes: 0
From: Virginia USA
SLK55///AMG The MONSTER on the block
Originally Posted by oj411
I purchased the unit from XenonDepot and apparently when they sell there kits it�s by bulb fitment and not car type and model so they had no resources on the R171 Slk's. I should of taken pictures when I disassembled the lighting unit, but let me try to describe it for you on the original h7 bulb it plugs into a socket like most cars but on the sockets there is a metal harness that attaches to the socket which is used to attach to the light housing. Since the aftermarket h7 HID kit is not a bulb that can just attach to the original socket but a bulb with wires sticking out of the bottom that plugs into ballast and the battery there�s no way of retrofitting the harness that�s on the original socket to the new bulb.
I can always try to glue the light to the headlight assembly as a last resort, but I was wondering if anyone else had any other advice on installing the lights. Before I purchased the car from my dealer I had them set the xenon = present so that�s already done. I just need to find a way to attach the bulb to the housing in the most feasible way. I have read that people on this forum had done the upgrade with H7 HID Kits before so any suggestions would be greatly appreciated.
Thanks
I think I understand your situation. As I understand it, the original H7 bulb has a metal base and it clips into the headlight assembly. The aftermarket Xenon bulb doesn't have the metal base and you're unable to clip it to the light assembly? If this is the case, I'd contact XenonDepot for advice. This would be a similar problem with most applications, regardless of vehicle. Can you provide a photo of the Xenon bulb you have?
MB World Stories
The Best of Mercedes & AMG

6 Mercedes Models That Did NOT Age Well (But Are Somehow Still Cool)
Verdad Gallardo
Manual Mercedes? 6 Times Sindelfingen Let Drivers Have All The Fun
Verdad Gallardo
Mercedes SLR McLaren 722 S Is Extremely Rare Example Modified by McLaren
Verdad Gallardo
8 Classic Boxy Mercedes Designs That Have Aged Like Fine Wine
Verdad Gallardo
Flawlessly Restored Mercedes 190E Evo II Heads to Auction
Verdad Gallardo
Electric Mercedes C-Class Unveiled: 11 Things You Need to Know
Verdad Gallardo
Mercedes EQS Gets A Major Update: Everything You Need to Know
Verdad Gallardo
5 Underrated Mercedes-Benz Models That Don't Get the Love They Deserve
Verdad Gallardo
Mercedes 300D Has Pushed Well Past 1 Million Miles and It Ain't Stopping
Verdad Gallardo
Newbie
Joined: May 2006
Posts: 10
Likes: 0
oj411, which h7 kit did you buy?
I am interested in doing the same modification. Right now the Xetronic kit is the top of my list. Does anyone have any experience with this kit? The kit did list mounting 'hardwares' as part of the package but there's no picture of it.
Dealer said $1600 just for the OEM HID without labor. Yikes.
Dealer said $1600 just for the OEM HID without labor. Yikes.
Originally Posted by oj411
After reading many many threads about installing the h7 kit I tried to do it myself today. One thing that no one mentioned was how they actually got the HID h7 bulb to fit into the factory housing. Since there is a metal harness thingy that is attached to the factory socket that actually attaches to the bulb that screws into the headlight. And there is no way of putting it onto the aftermarket bulb. So is there a adapter or something, how do other people get them to install onto the housing.
Thanks to all in advance
Thanks to all in advance
MBWorld Fanatic!
Joined: Sep 2004
Posts: 1,174
Likes: 0
From: Colorado, USA
MBZ SLK
Originally Posted by toef1st
I am interested in doing the same modification. Right now the Xetronic kit is the top of my list. Does anyone have any experience with this kit? The kit did list mounting 'hardwares' as part of the package but there's no picture of it.
Dealer said $1600 just for the OEM HID without labor. Yikes.
Dealer said $1600 just for the OEM HID without labor. Yikes.
http://www.benzworld.org/forums/r171...n-present.html
And this:
http://www.benzworld.org/forums/r171...ed-slk350.html

Junior Member
Joined: Sep 2005
Posts: 68
Likes: 0
From: Falls Church, VA
2005 SLK350
oj411, i had a McCullock 8000K H7 kit for months. i finally attempted the installation on my 2005 SLK350 with the help of my cousin and his friend. it took a while (think after lunch and before a late dinner on memorial day) to install the driver side cause we spent a lot of time figuring it out as we went and improvising along the way. the passenger side was a breeze since we knew what to do. i planned on taking a lot of pictures and posting some kind of tutorial but it was more pain in the *** than i expected so i'll explain the best i can since we're all family.
1. first thing and foremost-get your car to the dealership so that you can have Bi-Xenon = PRESENT settings. although i installed the hid kit first, i should've done the code setting in the beginning. when i called the dealership this morning, they didn't want to mess with the car but they changed their mind and wanted to keep my business. obviously they will not guarantee anything since they are dealing with aftermarket parts. my appointment is scheduled for thursday. i just found Jarekjp's post this morning and i'm confident that my xenons will work properly if the dealership activates the Xenon code through both ways: main diagnostic in controller and gateway ("Setting XENON=PRESENT in the central gateway stops the flicker. It can even be set before the lights are fitted. MBENZNL has the factory diagnostic"-miroj). basically you don't want to be in my predicament right now-not being able to drive at night time until i bring the car to the dealership. my hids work fine when they are turned on without the car being on. but once i turn the car on, it does the flicker/strobe light effect that i read about but wasn't sure if it was true for the slk350s. IT IS TRUE! Jarekjp said he got charged $29+tax but i got a quote of $100-150. dealership prices will vary but expect to pay that much unless you want installed hids to not work or don't install hids at all.
2. if possible, test your bulb/ignitor/ballast with a separate power source to see if they will even work. we had a spare is300 headlamp to stick the bulb into temporarily to look for light-don't look at the bulb directly for safety reasons. do not turn hids on and off repeatedly or that will damage the bulb. leave hids on for about 30 seconds before turning them off.
3. installation: at this point if you're getting the HID h7 bulb to fit into the factory housing, you've probably figured out that you have to access the headlamps through the front fender lining. the wheels do not have to be moved unless you want more room to work with but it is doable. we unbolted the driver side wheel but it did not want to come off so we left it on and managed anyway. i think there are 2 silver screws, 3 black screws, and 3 black plastic screw thingies per side.
4. getting the bulb to fit and stay in place-this took us some time to figure out. for my h7 kit, i took the silver "metal harness thing" off from the black factory socket (it pulls off easily) and i put it behind the h7 bulb. here is where CUSTOM work comes in. i basically jb welded the metal harness thing to the back of the h7 bulb. there is a tiny metal tab that prevents the metal harness from being flush with with the bottom of the bulb cause it is pointing up. i had to bend it so it lay flat. next we used some flame-retardant electrical tape to wrap the 2 wires from the h7 bulb together to make installation easier/cleaner later on.
5. next problem: the plastic rim of the h7 bulb is a little thicker than a factory bulb. there are two metal tabs on the sides of the metal harness thingy that help lock the bulb into place. it was close but it wouldn't fit easily. all you have to do is press both tabs in slightly until it fits. we were stumped until i came up with this idea and it saved us a lot of headaches. after you lock the bulb in, it will be secure. the 2 exposed copper wire thingies from the hid kit plug into the black factory socket (where the factory bulb used to plub into) and we put that inside the headlamp housing. at this point, you do not want to put the h7 bulb into the car yet. leave it somewhere safe so the jb weld can dry and make sure you don't get the bulb dirty. you can, however, test fit the bulb and ignitor/ballast location for the next step.
6. the ignitor and ballast-we jb welded both the ignitor and ballast to the plastic underside of the headlamp. we also got self-drilling screws for support. my ignitor had one hole and the ballast had 2 holes and we got a pack of 6 screws from Lowe's. we did the same thing for the passenger side for a clean install-once the fender lining is back on, you will not notice anything aftermarket.
7. dust cap issue-at first we planned to drill a hole into the dust cap for the 2wires from the h7 bulb (one to the ignitor and one to the ballat). we bought some grommets for this from Lowes but we changed our minds and used a dremel tool (remember, custom work here) to drill 2 small indentations under the dust cap. i guess you're basically drilling into the black plastic housing of the factory headlamp. we covered up the headlamp hole (the best we could) to avoid bits of plastic flying in there from the drilling. after this, you can put the h7 bulb in (clockwise to unlock, counter clockwise to unlock). plug the ignitor wires and ballast wires together.
8. optional-since your kit is working from step#2, you can now try if the kit works with your car by just turning the headlamps on but not turning the car on-no keys needed. if you turn the car on with the headlights on, you will get the flicker/strobe lights that everyone has mentioned already.
9. put the fender lining back in with all the bolts.
10. take your cousin and friend out to five guys and pay for dinner.
we took only a few pictures before we decided to give up on the picture tutorial-i will try to get some up if i find them. i will also post my results with the hid kit when i get the code fixed on thursday. i hope this helps.
Last edited by algrensan; May 30, 2006 at 06:15 PM.
Senior Member
Joined: Dec 2005
Posts: 435
Likes: 0
From: Virginia USA
SLK55///AMG The MONSTER on the block
I'm a BIG HID Xenon fan. I admire your determination in getting the kit to work. I must admit, if this is what's involved in an aftermarket kit, I'll keep the factory halogen assemblies with the aftermarket Sylvania SilverStar bulbs. I checked into an aftermarket kit months ago and changed my mind. I'm glad I did. The kit you have shouldn't require JB Weld to hold the lights in the sockets. Who makes the kit? What was the cost? I'd like to see some photos if you have any. Again, I hate to sound negative, I feel that the kit should be easier to install and fit without JB Weld, etc.
Junior Member
Joined: Sep 2005
Posts: 68
Likes: 0
From: Falls Church, VA
2005 SLK350
Originally Posted by -1-
I'm a BIG HID Xenon fan. I admire your determination in getting the kit to work. I must admit, if this is what's involved in an aftermarket kit, I'll keep the factory halogen assemblies with the aftermarket Sylvania SilverStar bulbs. I checked into an aftermarket kit months ago and changed my mind. I'm glad I did. The kit you have shouldn't require JB Weld to hold the lights in the sockets. Who makes the kit? What was the cost? I'd like to see some photos if you have any. Again, I hate to sound negative, I feel that the kit should be easier to install and fit without JB Weld, etc.the kit pretty much looks like this:

this is the way i installed my kit. no one has to install it the same way as i did. but the original poster seemed to hit a wall as i did when it came time to install the h7 bulb into the headlamp housing and this was my solution.
Last edited by algrensan; May 31, 2006 at 03:42 PM.
Senior Member
Joined: Dec 2005
Posts: 435
Likes: 0
From: Virginia USA
SLK55///AMG The MONSTER on the block
Regardless, a H7 HID light kit that is so universal that the installation is a challenge. We're talking Mercedes SLK. No disrespect to your efforts. Based on the information you provided, unless I could go with factory Bi-Xenon assemblies, I 'd keep the halogens and upgrade to a better bulb which is what I did. Your information regarding the "aftermarket" Xenon HID will help others in their decision to upgrade. Thanks!
Last edited by -1-; Jun 1, 2006 at 05:30 AM.
Junior Member
Joined: Sep 2005
Posts: 68
Likes: 0
From: Falls Church, VA
2005 SLK350
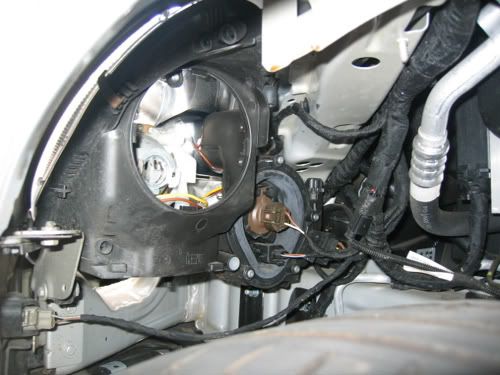
here's a pic of what you'll see when the front fender lining and dust cap are off. the yellow and brownish wire are connected to the black socket, where the factory halogen bulb used to connect to. we just tucked this inside the housing for now. we basically installed the ignitor and ballast right under the headlamp housing. it looks like there is no room but there is. again, if you want more space to work with, you can take off the wheel but you don't have to unless you got chubby arms. ;p
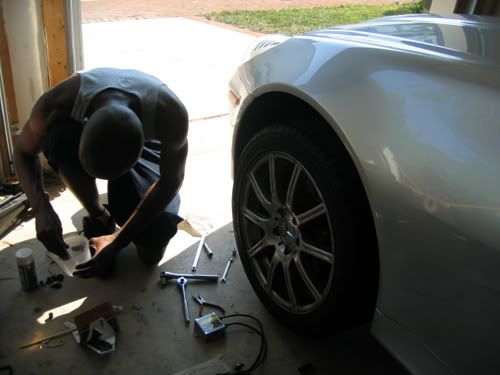
here's my cousin's friend george (our slave mechanic) mixing some jb weld into a container. i raised the car slightly using the factory jack. you can see the ballast chilling out on the floor over there.
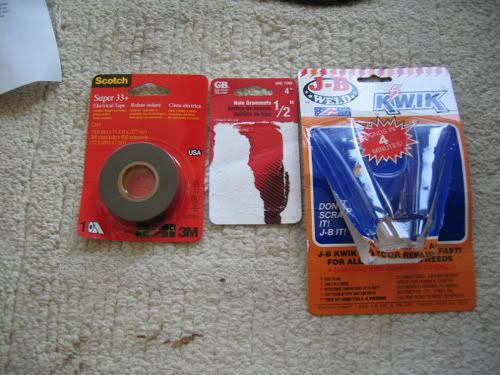
we used some flame retardant electrical tape (to clean up the wires) and jb weld-you can use whatever you think is best. jb welded stuff ain't moving anywhere. you can still convert everything back to stock if you just use 3m double sided tape and self-drilling screws for the ignitor and ballast but you'll have to figure out a way to stick the metal thing to the h7 bulb. we bought some grommets thinking we'd drill a hole into the dust cap. we just drilled a small indentation into the factory housing for the wires to come out and used silicone to seal up the space.
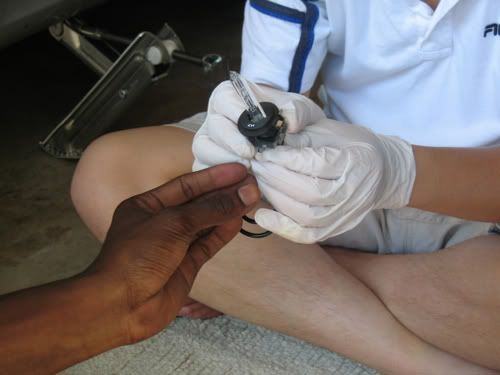
sorry for the bad pic-where's me pushing the metal clip thingy up to the back of the h7 bulb.
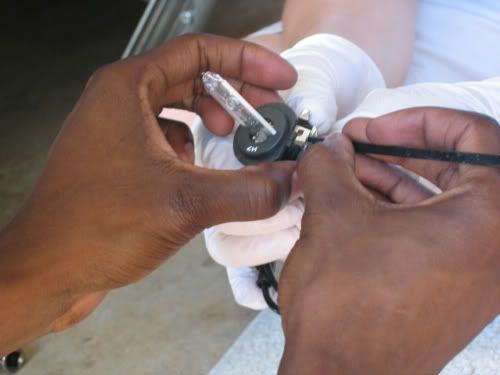
here's george applying jb weld onto the metal clip thingy with a zip tie-we're ghetto i know.
car update: i just dropped my car off at the dealership (late night drop box). i wish i took some pictures of the hids on (with car off)-"hid look" bulbs are cool but once you get a hid kit on, it's "****ing cool."

Last edited by algrensan; Jun 1, 2006 at 01:39 AM.


