
DIY Clear Side Marker Install (E55)
 09-09-2009, 08:40 PM
#1
Junior Member
Thread Starter

DIY Clear Side Marker Install (E55)
Hi all, newbie to the forum, just got a 2006 E55 couple weeks ago. This is a great place, thought for my first post I would provide a small contribution by posting the clear side marker install I just did. I searched for it on the forum and didn't find any procedures existing, so hopefully this will help someone.
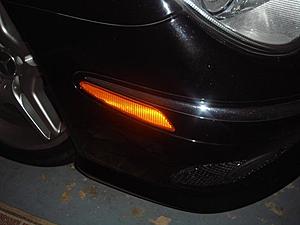
OEM yellow side marker, really an eye sore to otherwise a great looking front.
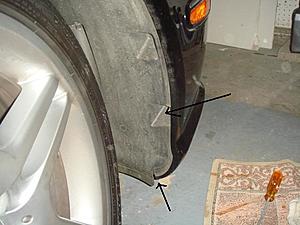
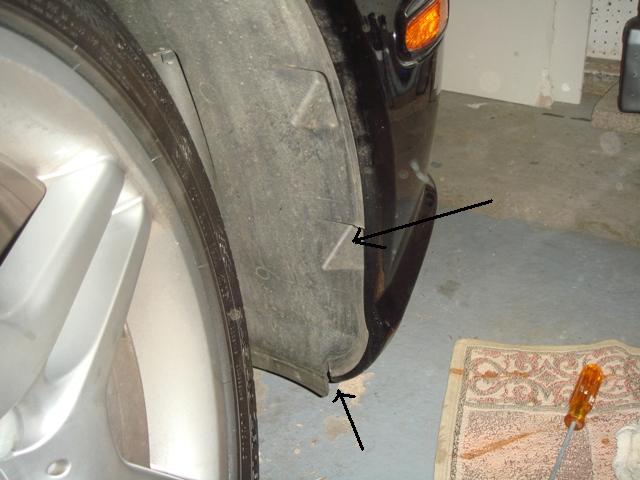
First pry out the two plastic screw thingys, one from the front inner fender, the other from underneath the fender. This was actually the hardest part of the whole job for me, those little suckers can be pretty snug in there. You could also try to pull on the panels to separate them, but I thought it is a little too risky.
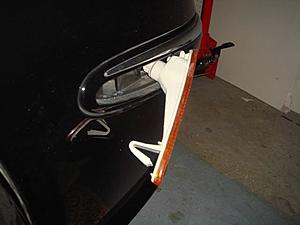
Once out, you can lift open the rubber inner fender and peek inside - Bugger! The side marker assembly is covered by this platic shroud. But fear not, we will use the opening on the housing to remove the side marker.

Use a screw driver, stick it into the opening with a slight downward angle, you should be able to feel it pushing against the holding tab on the side marker. Push it forward towards the front of the car until the side marker releases and pop out.

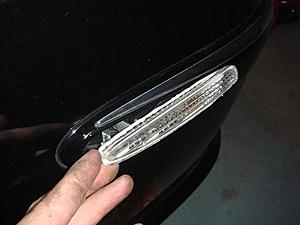
The OEM side marker with the big hook type holding tab. Remove the OEM marker by twisting the light bulb assmbly 90 degrees. Change the bulbs if you desire.
Install the new clear side marker. simply install light bulb assembly, attach the front side then push the back side with the hook into the mounting hole. Replace the plastic screws and you are done.
Whole thing probably takes 30 minutes. Enjoy!
OEM yellow side marker, really an eye sore to otherwise a great looking front.

First pry out the two plastic screw thingys, one from the front inner fender, the other from underneath the fender. This was actually the hardest part of the whole job for me, those little suckers can be pretty snug in there. You could also try to pull on the panels to separate them, but I thought it is a little too risky.
Once out, you can lift open the rubber inner fender and peek inside - Bugger! The side marker assembly is covered by this platic shroud. But fear not, we will use the opening on the housing to remove the side marker.

Use a screw driver, stick it into the opening with a slight downward angle, you should be able to feel it pushing against the holding tab on the side marker. Push it forward towards the front of the car until the side marker releases and pop out.

The OEM side marker with the big hook type holding tab. Remove the OEM marker by twisting the light bulb assmbly 90 degrees. Change the bulbs if you desire.

Install the new clear side marker. simply install light bulb assembly, attach the front side then push the back side with the hook into the mounting hole. Replace the plastic screws and you are done.

Whole thing probably takes 30 minutes. Enjoy!
Last edited by swenzi; 09-10-2009 at 08:30 AM.

 09-09-2009, 10:37 PM
#4
Super Member
Join Date: Apr 2009
Location: Washington
Posts: 598
Likes: 0
Received 1 Like
on
1 Post
2006 Mercedes E55
That is the best way but you can also cheat and do it without removing the fender liner by using a jewelrs screw driver or upholstery pick and sliding it in about 1/4" to the right of the top left corner and popping the clip that way.
did mine twice that way first to swap to clear then to change bulbs.
But nice pics!
Cheers and congrats on the car.
did mine twice that way first to swap to clear then to change bulbs.
But nice pics!
Cheers and congrats on the car.
 09-10-2009, 01:08 AM
#6

hahaha you did the long way LOl...
like above post.. flat tip screw driver and a towel..
why clear side marker? those are so euro..
usually people just get them painted to match the trim piece..
like above post.. flat tip screw driver and a towel..
why clear side marker? those are so euro..
usually people just get them painted to match the trim piece..

Trending Topics
09-10-2009, 01:23 AM
#8
 09-10-2009, 08:03 AM
#9
Administrator

 09-10-2009, 08:24 AM
#10
Junior Member
Thread Starter
Now you tell me..... 
That is the best way but you can also cheat and do it without removing the fender liner by using a jewelrs screw driver or upholstery pick and sliding it in about 1/4" to the right of the top left corner and popping the clip that way.
did mine twice that way first to swap to clear then to change bulbs.
But nice pics!
Cheers and congrats on the car.
did mine twice that way first to swap to clear then to change bulbs.
But nice pics!
Cheers and congrats on the car.
Last edited by swenzi; 09-10-2009 at 08:26 AM.
09-10-2009, 08:29 AM
#12
Junior Member
Thread Starter
Just like the look I guess.  This is typically the first mod I do on all my previous cars.
This is typically the first mod I do on all my previous cars.


