


E55 722.643 Transmission Rebuild PICS
Thread Starter
MBWorld Fanatic!
Joined: Oct 2009
Posts: 2,825
Likes: 17
From: Southern California
E55 w/ goods, Z32 Project underway
ome updates. Perhaps one day this will assist a few people looking to tackle this themselves.
Removing all of the drums from the case is one thing. Big deal. The hardest part is taking apart each and every drum to inspect and order the correct parts. A mic is required as various friction plates have different thicknesses and even EPCnet will note certain plates which do not even apply to this particular trans-saves money in the end not ordering parts blindly.
After removing the B1 drum and oil pump I found what had been expected. A badly scored housing from the spun bushing. Housing is aluminum, pump gears that ride against it is steel-housing loses. I understand this is common on these trans. This requires an entire new housing (bell housing to some). MB wants close to $500, various sources $400 with shipping. I was fortunate and was able to source one locally for $100! That made my day right there. Drove down , compared, and bought it.
Also, my goal here is a re-manufactured transmission, not a rebuilt unit. Apart from the drum housings, all parts are going to be brand new. Two bushings are from Sonnax as they are heavy duty bushings and not available anyhow from MB. Everything else are original factory parts going back in. Whereas a rebuilt unit on Ebay might have new clutch linings and a couple of seals, I'm ordering ALL new bearings, seals, clutch linings, shaft teflon seals, and multiple o-rings which there are many inside each drum unit. It all adds up. Some of these I am told rarely or never go bad, but still.......
Every component has been removed, broken down, and inspected, and parts matched up to EPCnet for ordering. I hate mistakes. I just hope they don't make any.
I should have everything from the dealer sometime next week. Until then I will be working on my E63 bumper conversion. :0
Some pics.
Old housing, scored up pretty badly.
'New' used housing. $100. Cha Ching!
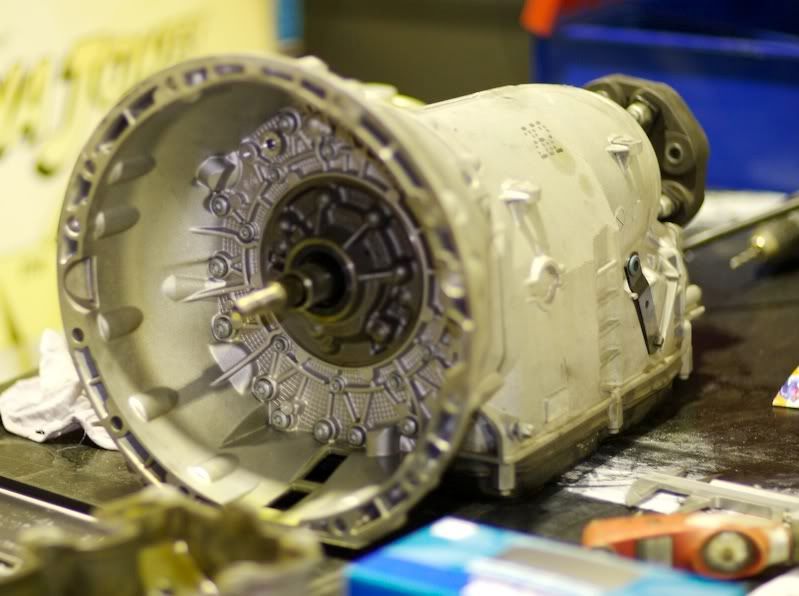
Back of the old bellhousing
Old pump and old bushing. Notice the gap?
New pump bushing vs old. I banged out the bushing in the replacement pump and pressed the Sonnax into the pump.
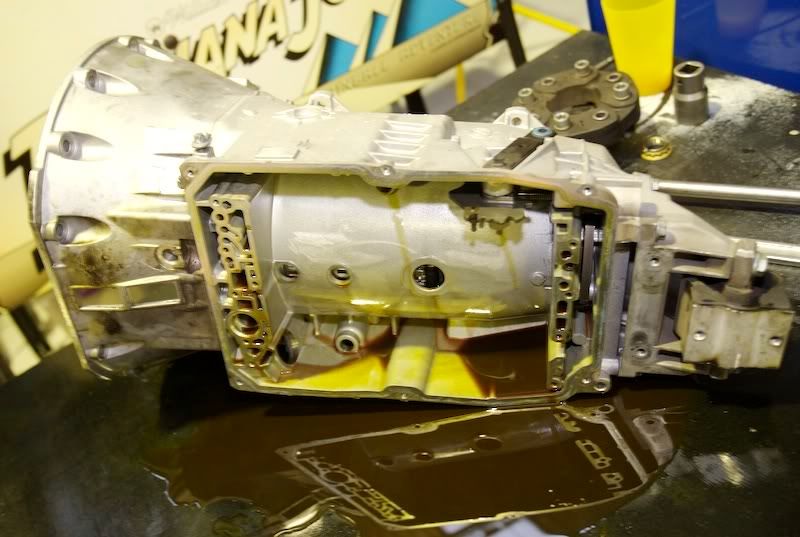
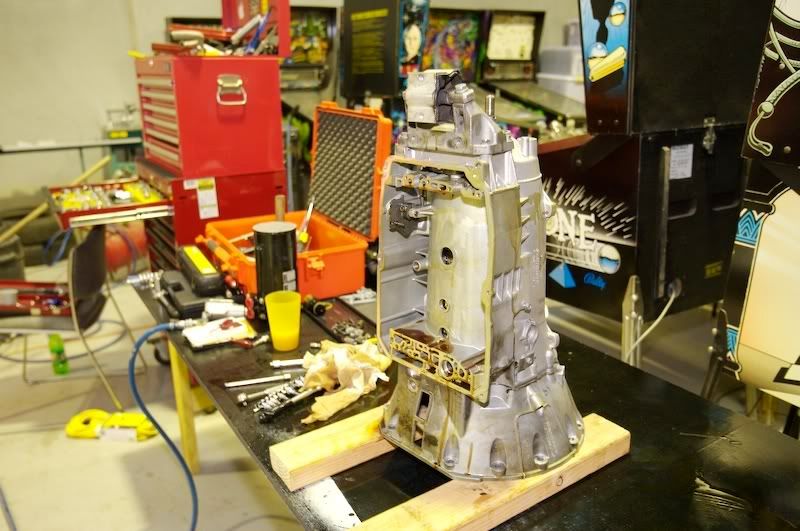
Empty case, nothing left but the parking brake sprocket.
There are multiple (over 12 bearings in the case). Though all of mine looked great, might as well do them all. Two are really problematic, I believe they are on the K2 clutch.
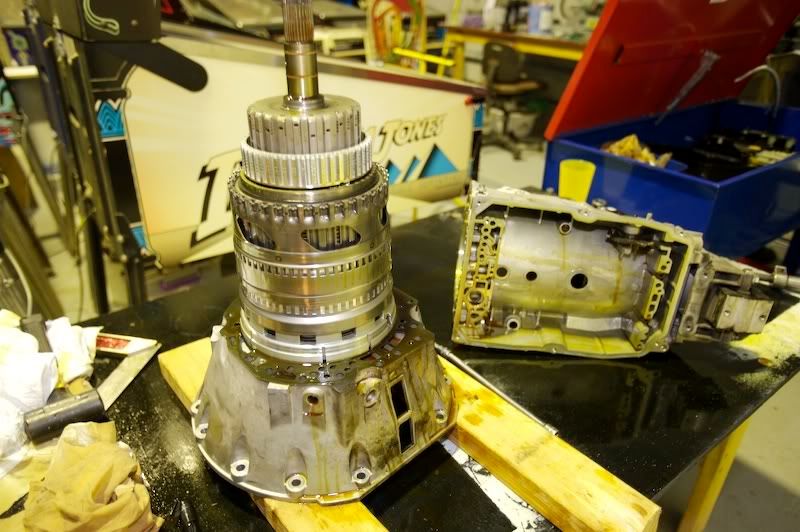
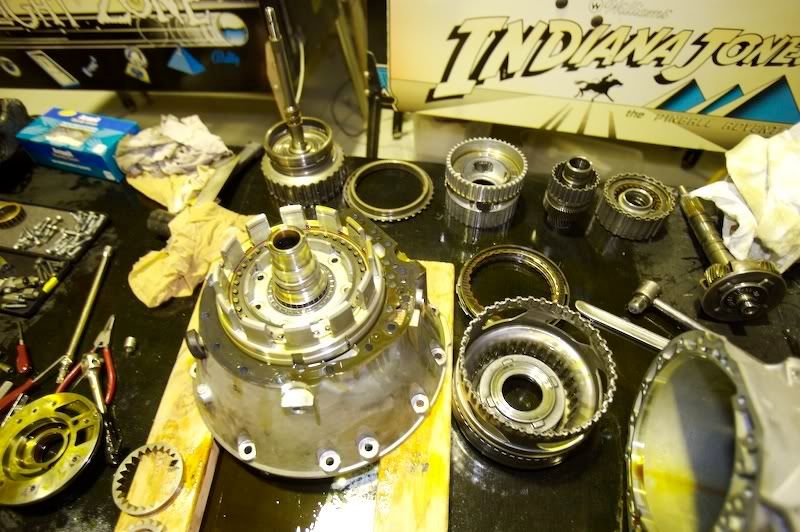
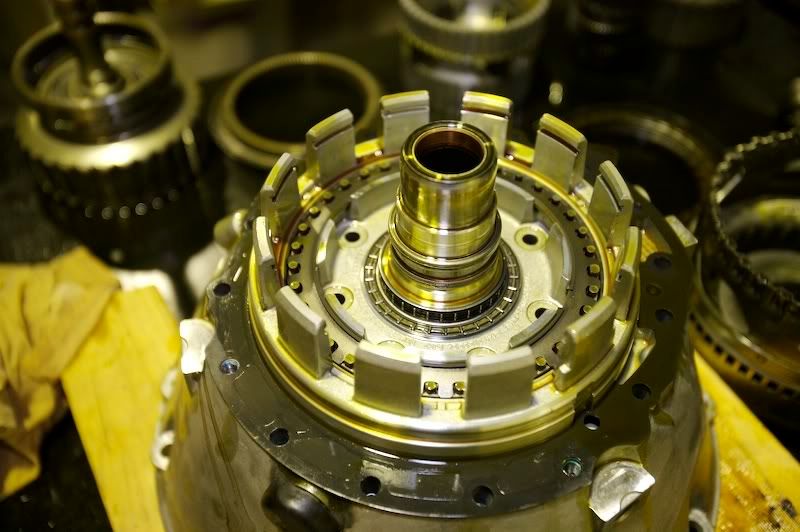
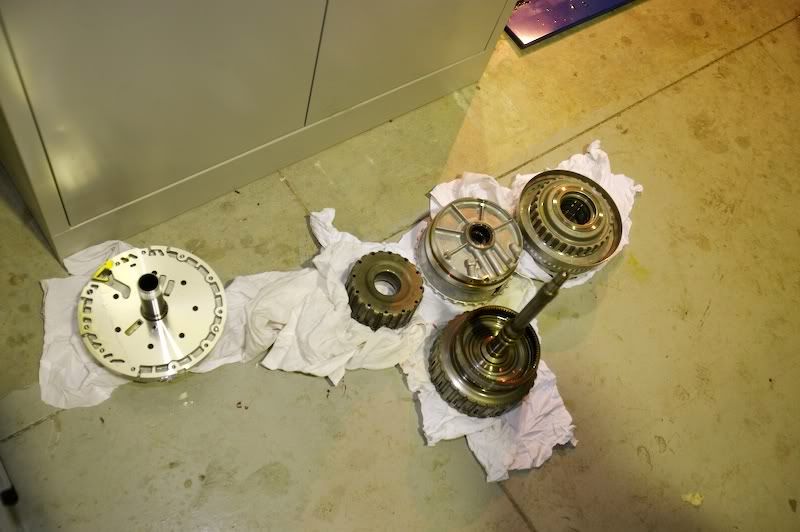
Planetary assembly-a little wear. There is A LOT of stuff inside that unit. Trust me.
Old oil pump gears.
Removing all of the drums from the case is one thing. Big deal. The hardest part is taking apart each and every drum to inspect and order the correct parts. A mic is required as various friction plates have different thicknesses and even EPCnet will note certain plates which do not even apply to this particular trans-saves money in the end not ordering parts blindly.
After removing the B1 drum and oil pump I found what had been expected. A badly scored housing from the spun bushing. Housing is aluminum, pump gears that ride against it is steel-housing loses. I understand this is common on these trans. This requires an entire new housing (bell housing to some). MB wants close to $500, various sources $400 with shipping. I was fortunate and was able to source one locally for $100!
That made my day right there. Drove down , compared, and bought it.Also, my goal here is a re-manufactured transmission, not a rebuilt unit. Apart from the drum housings, all parts are going to be brand new. Two bushings are from Sonnax as they are heavy duty bushings and not available anyhow from MB. Everything else are original factory parts going back in. Whereas a rebuilt unit on Ebay might have new clutch linings and a couple of seals, I'm ordering ALL new bearings, seals, clutch linings, shaft teflon seals, and multiple o-rings which there are many inside each drum unit. It all adds up. Some of these I am told rarely or never go bad, but still.......
Every component has been removed, broken down, and inspected, and parts matched up to EPCnet for ordering. I hate mistakes. I just hope they don't make any.
I should have everything from the dealer sometime next week. Until then I will be working on my E63 bumper conversion. :0
Some pics.
Old housing, scored up pretty badly.
'New' used housing. $100.
Cha Ching!Back of the old bellhousing
Old pump and old bushing. Notice the gap?
New pump bushing vs old. I banged out the bushing in the replacement pump and pressed the Sonnax into the pump.
Empty case, nothing left but the parking brake sprocket.
There are multiple (over 12 bearings in the case). Though all of mine looked great, might as well do them all. Two are really problematic, I believe they are on the K2 clutch.
Planetary assembly-a little wear. There is A LOT of stuff inside that unit. Trust me.
Old oil pump gears.
Last edited by pearlpower; Apr 27, 2020 at 01:00 PM.

MBWorld Fanatic!
Joined: Jun 2010
Posts: 4,173
Likes: 7
From: Puerto Rico
2005 E55 AMG
Wow...this transmission uses a gear pump. They usually use Vane pumps. I'm still convinced that the whine these cars make comes from the transmission and having a gear pump would make all the sense in the world if I'm right. Cool.
All that scoring kinda worries me since my whine is pretty loud, louder than it probably should be and pretty constant.
All that scoring kinda worries me since my whine is pretty loud, louder than it probably should be and pretty constant.
MBWorld Fanatic!
Joined: Mar 2007
Posts: 1,948
Likes: 3
From: Houston, TX
C32/C55 AMG
I read that that the transmission comes in different strengths. This transmission come in everything, from a c320 all the way to the SLR, each with a different torque rating. I think brabus still uses this transmission for their v12 monsters. There has to be something that can be done to make these transmissions stronger.

MBWorld Fanatic!
Joined: Jan 2004
Posts: 7,092
Likes: 13
From: Salt Lake City (but not Morm)
2003 E55 & 2014 GL550
I never thought we could ever find another Finny but by golly, we got one. (Finny was a legend from Austrailia who was always ripping these cars down piece by piece for us) It was magic.
Loving these pics bro!!

Loving these pics bro!!
Thread Starter
MBWorld Fanatic!
Joined: Oct 2009
Posts: 2,825
Likes: 17
From: Southern California
E55 w/ goods, Z32 Project underway

Member
Joined: Aug 2010
Posts: 107
Likes: 5
From: New Orleans, La.
2009 gmc sierra 1500, 2005 C55 AMG, 2007 SL55 AMG.
The aforementioned spun bushing, remnants went directly into the pump which ground them up between the hard pump gear and soft case. Fortunately this transmission design is such that it is very good at flushing junk in the pan. No noticeable scoring anywhere else in the transmission.
Love this thank you again for sharing this!
Would you know where i can get the break down for the c55 and the slr tranny like you found on the 722.6, I figure if the cases are the same it might be a difference in clutch plates, planets and drums and maybe they are interchangable to beef up trannies a little.
Last edited by Ducatic230; Aug 11, 2011 at 02:42 PM. Reason: half sleep
Thread Starter
MBWorld Fanatic!
Joined: Oct 2009
Posts: 2,825
Likes: 17
From: Southern California
E55 w/ goods, Z32 Project underway
ust an update as I hate it when someone starts a thread and then disappears. LOL. First of two boxes arrived today (via camel apparently), so the reassembly process has begun. All new friction plates are soaking in ATF until they are needed. My old friction actually looks and measures in very well comparatively. Piece of mind goes a ways which explains all of the new o-rings, seals, etc, but I'm not tossing the old plates as they are still good. Good for spares I suppose. Tools such as a press come in handy when reassembling the various clutch units. Next update should have me driving down the road.
Last edited by pearlpower; Apr 27, 2020 at 01:01 PM.
MB World Stories
The Best of Mercedes & AMG

New Electric Mercedes-AMG GT 4-Door Coupe Unveiled: 10 Things You Need to Know
Verdad Gallardo
6 Mercedes Models That Did NOT Age Well (But Are Somehow Still Cool)
Verdad Gallardo
Manual Mercedes? 6 Times Sindelfingen Let Drivers Have All The Fun
Verdad Gallardo
Mercedes SLR McLaren 722 S Is Extremely Rare Example Modified by McLaren
Verdad Gallardo
8 Classic Boxy Mercedes Designs That Have Aged Like Fine Wine
Verdad Gallardo
Flawlessly Restored Mercedes 190E Evo II Heads to Auction
Verdad Gallardo
Electric Mercedes C-Class Unveiled: 11 Things You Need to Know
Verdad Gallardo
Mercedes EQS Gets A Major Update: Everything You Need to Know
Verdad Gallardo
5 Underrated Mercedes-Benz Models That Don't Get the Love They Deserve
Verdad Gallardo
Thread Starter
MBWorld Fanatic!
Joined: Oct 2009
Posts: 2,825
Likes: 17
From: Southern California
E55 w/ goods, Z32 Project underway
It is time consuming, however what I did was to use MB epc-net.com to look up all of the parts by transmission # and compared them to my actual components and even then epc-net is still not 100% correct. Further, to ensure nice tight tolerances, you may have to order new snap rings once you take measurements of each clutch pack as the snap rings are sized.
The transmission is not bad to rebuild, just takes patience, a nice work area, and a decent parts source. Local dealers not included as I find most dealers jack up retail prices substantially. I ordered most everything from oediscountparts.com.
Also, there are various versions of the transmission with different sprags ,input shaft, etc. so parts that works for me, may not apply to your transmission. However, I am willing to help in any way should you decide to proceed.
Do you know exactly what is wrong with yours?
Also, for those with transmission errors codes, they do not go away once a fresh trans is installed and cannot be cleared with an OBDII scanner. It is stored in the transmission module and any code will lock out the solenoids rendering the transmission in limp mode until cleared.
Last edited by pearlpower; Sep 17, 2011 at 08:35 PM.
Thread Starter
MBWorld Fanatic!
Joined: Oct 2009
Posts: 2,825
Likes: 17
From: Southern California
E55 w/ goods, Z32 Project underway
ight as well post up a few more pics.
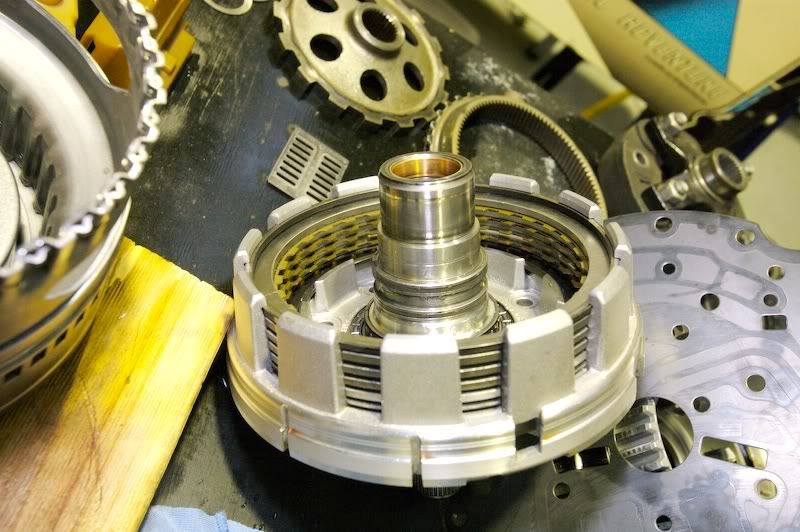
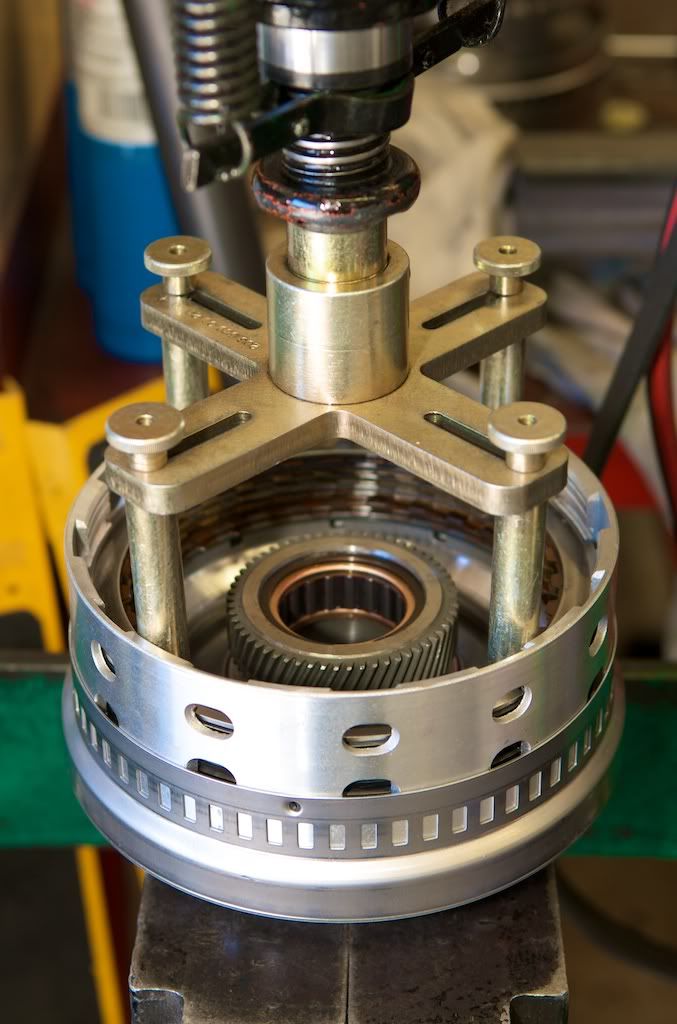
Using the press. Each clutch set has snap rings and require various sizes of gear to press down the drum to remove. I used strong PVC with custom cutouts and my press. Worked perfect. The pressure is not very strong, just awkward is all. This is required to get to the o-rings in each pack.
There are three versions of this sprag bearing.
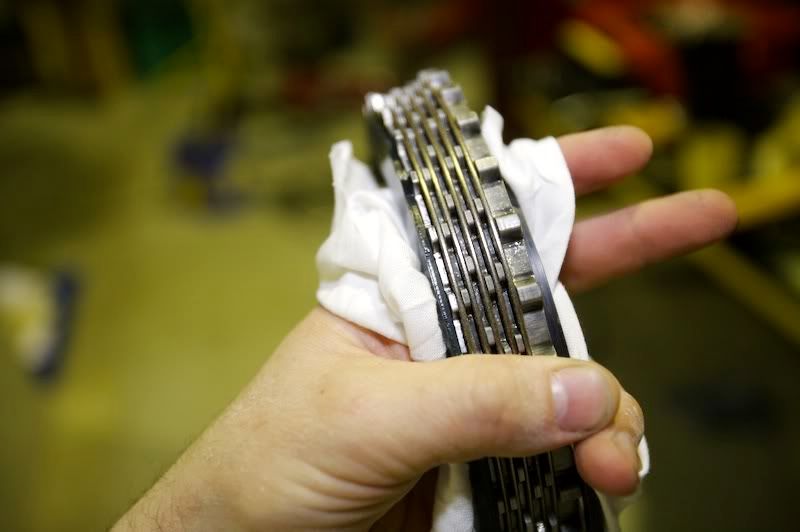
The vulnerable 3rd gear. Though the rest of the transmission appeared to be in great condition, not the 3rd gear friction and steel plates. All of them had heat spots. Replaced.
Soaking the friction for a minimum of 30 minutes to avoid any premature burning once started up.
Snap ring pliers and o-ring tools make for a happier evening. Trust me.
New bearings thoroughly greased up.
New vs old bushing. Honestly, no wear on the old bearing, another feel good moment to change it out. Not available at the dealer.
Stronger rebuilt converter. Cost $60+ more for enhancements.
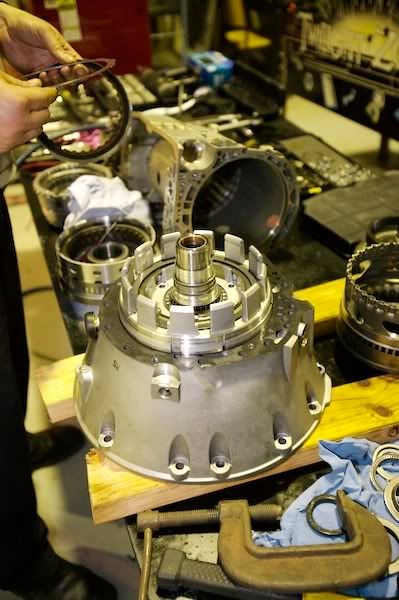
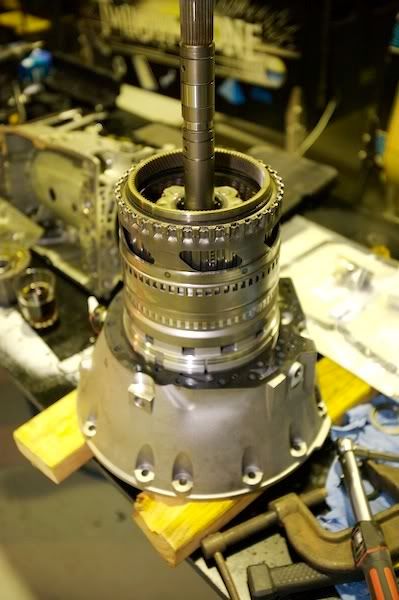
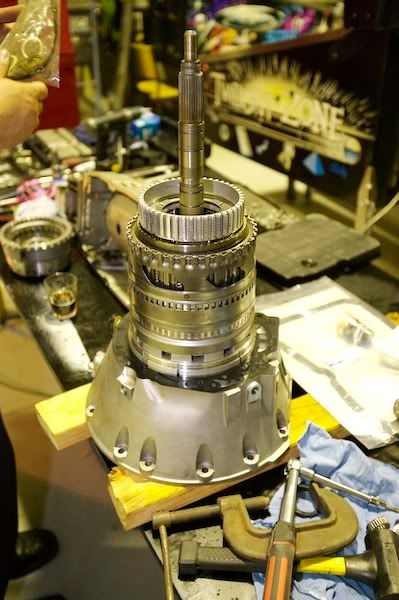
Don't care if your my neighbor or my 2 and 4 year, if your in my garage, your working. Prefilling trans with 3 qts and 1 qt into TC. Top off once in the car and started.
Completed and ready for rear mount and install. Yes, I know, rotors are on the shopping list .
Using the press. Each clutch set has snap rings and require various sizes of gear to press down the drum to remove. I used strong PVC with custom cutouts and my press. Worked perfect. The pressure is not very strong, just awkward is all. This is required to get to the o-rings in each pack.
There are three versions of this sprag bearing.
The vulnerable 3rd gear. Though the rest of the transmission appeared to be in great condition, not the 3rd gear friction and steel plates. All of them had heat spots. Replaced.
Soaking the friction for a minimum of 30 minutes to avoid any premature burning once started up.
Snap ring pliers and o-ring tools make for a happier evening. Trust me.
New bearings thoroughly greased up.
New vs old bushing. Honestly, no wear on the old bearing, another feel good moment to change it out. Not available at the dealer.
Stronger rebuilt converter. Cost $60+ more for enhancements.
Don't care if your my neighbor or my 2 and 4 year, if your in my garage, your working. Prefilling trans with 3 qts and 1 qt into TC. Top off once in the car and started.
Completed and ready for rear mount and install. Yes, I know, rotors are on the shopping list .
Last edited by pearlpower; Apr 27, 2020 at 01:01 PM.
Super Moderator
Joined: Jul 2006
Posts: 3,365
Likes: 12
From: Orange County, CA
GMC - Miata - Trek - P-Car

Thread Starter
MBWorld Fanatic!
Joined: Oct 2009
Posts: 2,825
Likes: 17
From: Southern California
E55 w/ goods, Z32 Project underway

Super Moderator
Joined: Jul 2006
Posts: 3,365
Likes: 12
From: Orange County, CA
GMC - Miata - Trek - P-Car
“Johnny and I will be catching up in the garage today - we’re not to be interrupted.” ;)
Last edited by splinter; Sep 18, 2011 at 12:35 AM.


Super Member


Joined: Jul 2003
Posts: 639
Likes: 33
From: London UK
E63s s213 2019 ,SOLD E63 Weistec, E55, C36
amazing work, well done, i wish i knew someone who paid as much attention when working on cars in the uk. Also wish i had the ***** to pull the car apart like that!

MBWorld Fanatic!
Joined: Mar 2007
Posts: 1,948
Likes: 3
From: Houston, TX
C32/C55 AMG
Have you taken a look at finny's thread, when he did his rebuild on his transmission, a screw in the transmission backed itself out ans caused him some trouble.
Here are a few videos that show the disassembly of the transmission, was it as easy as it looks in the videos?
http://www.youtube.com/watch?v=6YySi...eature=related
http://www.youtube.com/watch?v=AGbmS5tXSq8&NR=1
Here are a few videos that show the disassembly of the transmission, was it as easy as it looks in the videos?
http://www.youtube.com/watch?v=6YySi...eature=related
http://www.youtube.com/watch?v=AGbmS5tXSq8&NR=1


Thread Starter
MBWorld Fanatic!
Joined: Oct 2009
Posts: 2,825
Likes: 17
From: Southern California
E55 w/ goods, Z32 Project underway
Have you taken a look at finny's thread, when he did his rebuild on his transmission, a screw in the transmission backed itself out ans caused him some trouble.
Here are a few videos that show the disassemble of the transmission, was it as easy as it looks in the videos?
http://www.youtube.com/watch?v=6YySi...eature=related
http://www.youtube.com/watch?v=AGbmS5tXSq8&NR=1
Here are a few videos that show the disassemble of the transmission, was it as easy as it looks in the videos?
http://www.youtube.com/watch?v=6YySi...eature=related
http://www.youtube.com/watch?v=AGbmS5tXSq8&NR=1
 Actually tearing it apart is pretty easy. Though the method I was taught is not the same as the above. Either way would work. Only one way to really put it back together but I question the one video of assembly of the 722.9 as I did not see any gel on the teflon seals before putting it together and it does not appear the clutches were soaked as I saw zero fluid anywhere in the assembly.
 The guy in the video has done this a few times, do not rush the install, even scratch one of those teflon seals and you will ruin a clutch assembly.
A member read this thread and contacted me on a rebuilt unit he bought 2 months ago and has not worked since. 1/2, reverse work, no 3,4,5 and a significant burning smell and 'gray' new fluid which means a clutch pack completely burned up. K1 most likely which consist of 12 friction plates. I might be looking at it shortly and will report as to what happened if the seller does not resolve anything which so far has not. First thing that goes through my mind is either a teflon seal was scratched/torn ,snap ring, or the one way sprag bearing was installed upside down.
 He is down 3K now already. Once you get into the clutches there is no margin or error.
 I'm going to check out Finny's thread, did not know he had one, I enjoyed his other posts. Trying to think of what screw that could be. there are two that hold the B2 in place. That would just drop on top of the valve body and not in the rotating section so I'm curious. Snap rings, seals, tolerances are all important.
I have a few more pics, but the car is running great, trans shifts and grabs gears nicely. No issues.
Last edited by pearlpower; Sep 28, 2011 at 11:51 AM.
Thread Starter
MBWorld Fanatic!
Joined: Oct 2009
Posts: 2,825
Likes: 17
From: Southern California
E55 w/ goods, Z32 Project underway
Amazon has a great deal on a filter/gasket kit $12.85 shipped with Prime
http://www.amazon.com/gp/product/B001DUDEZY
http://www.amazon.com/gp/product/B001DUDEZY
MBWorld Fanatic!
Joined: Mar 2007
Posts: 1,948
Likes: 3
From: Houston, TX
C32/C55 AMG
Sorry I didn't get to post a link to the thread, but here it is:
Yes... Mmmmm what's in here... Being curious I couldn't resist. I actually rebuilt the Tranz a couple of months ago and since some parts for the engine haven't turned up yet and also to keep the thread fresh for thoes who like to watch, I'll post up some shots of the Tranz rebuild.
With the help of my mate looking over my shoulder who just happens to work at a stealership rebuilding these MB boxes for years guided me through the disassembly and identification of all common trouble spots.
Deano, one of my mates, said this box has the same internals as the ones from the SL65 including identical part numbers to all the clutch assemblies as he has rebuilt many of both types. The main problem with these boxes is when the finally assembly is done at the MB assemble line "almost all the clutch pack tolerances are out of wack to factory specifications" where he cannot recall when one was perfect... So what's the big deal about these tolerances? Basically if it's to loose it will slip... simple as that. The tolerances are critical if your throwing a lot of **** as these like we do, probably not as critical for stock applications.
When all the clutch packs are reassembled, their final compressed hight varies due to manufacturing tolerances of the actual clutch media. So... when compressed with a special tool in a press at the correct poundage, a measurement is then taken off all the clutch plates and clutches. The final spacer ring part number depends on the measurement taken which corresponds to the correct part listed as there are a few, -1, 0-1, +1 etc.... The part is then added to the pack and is ready to go.
The E55, SL65, SLR and Maybach all use the same box. Of course some of the internal part numbers are different but not many. Final ratios and programing seem to be very different.
I will be investigating the valve bodie shortly with another one of my mates who owns a large Auto Tranz shop which is equipped with a real time valve bodie tester that shows all the in's and out pressures whilst changing gears There is also a Tranz dyno among other goodies to play with.
My mate Johnny rebuilt and modified the 55 converter by removing the "two paper lock up clutches" and refitting 3 carbon fiber ones. He discovered that they were excessively worn and braking up. It was most likely due to Vmax runs but it's also a common problem which makes the car shake at certain revs.
I have all the spec documentation from MB if any one is interested in a copy. The files are in .jpg & .pdf formats. Where can I post them?
So here are the shots...
The Victim.
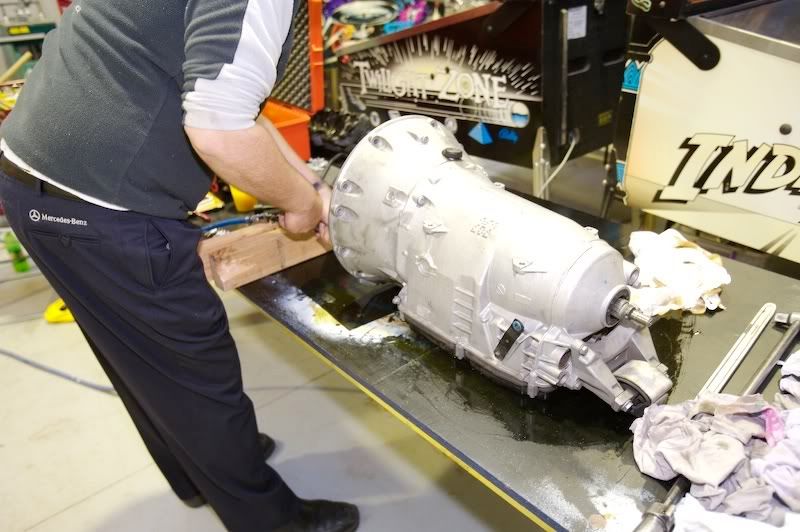
Deano removing the oil pump.
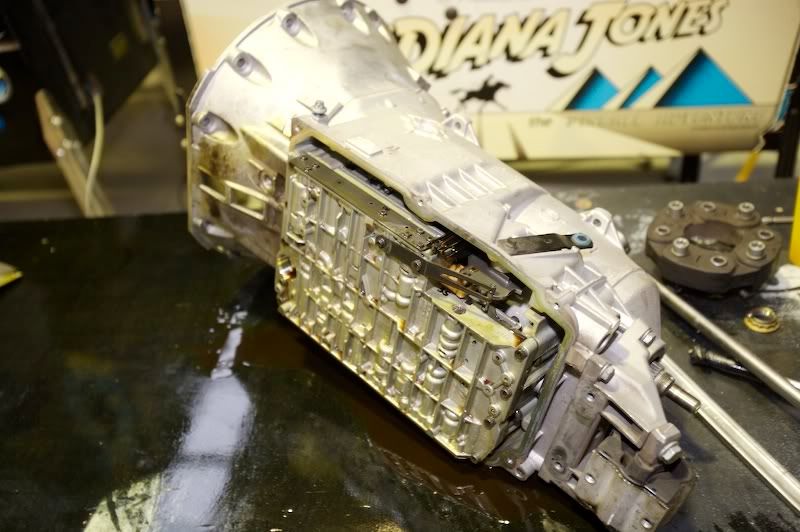
Pan and filter off.
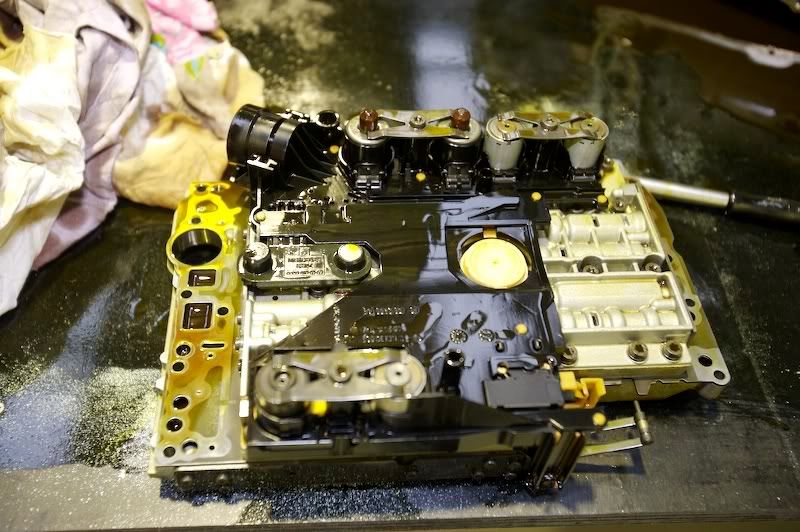
Part of the Tranz brain... Valve Bodie with modulator valves sticking up.
Brainless.
Position for disassembly.
Pop the top off.
Clutch packs and drive shafts removed.
Notice thrust bearings.
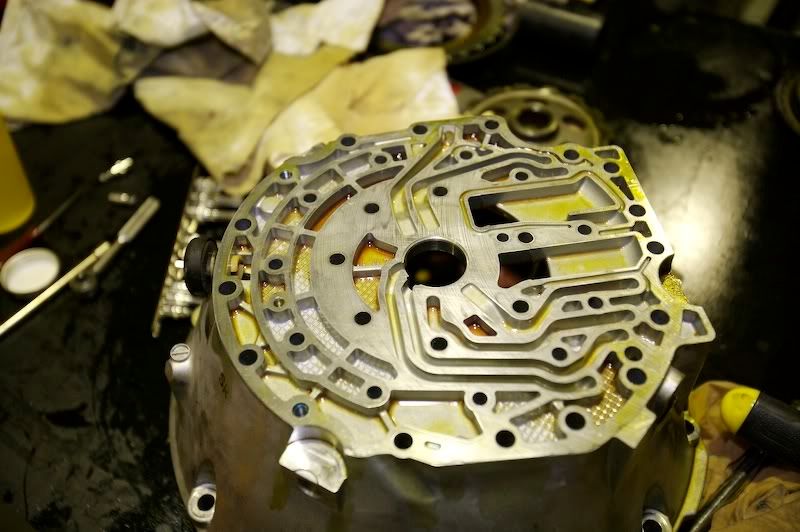
Ant farm network of hydraulics plumbed through here on the back of the bell housing.
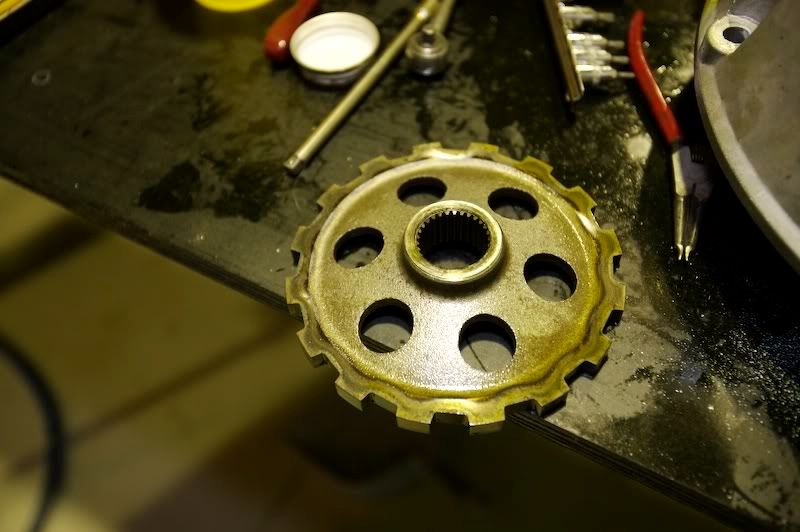
When you put it in park... guess what?... a pin grabs this wheel.
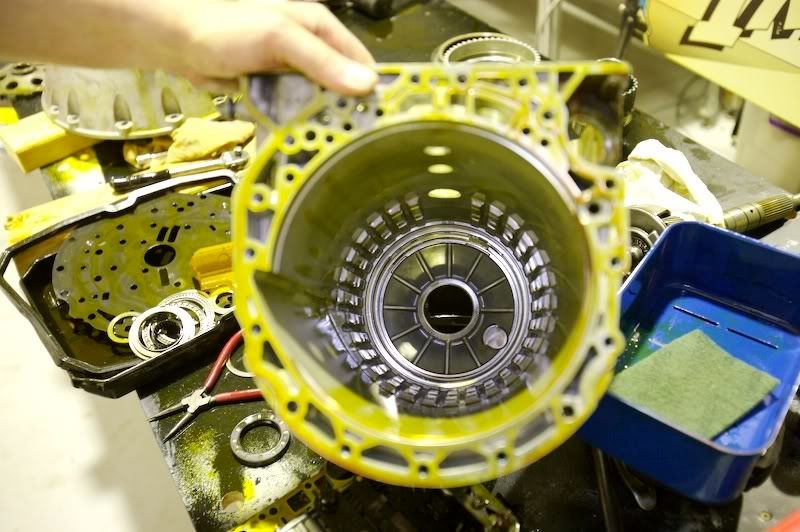
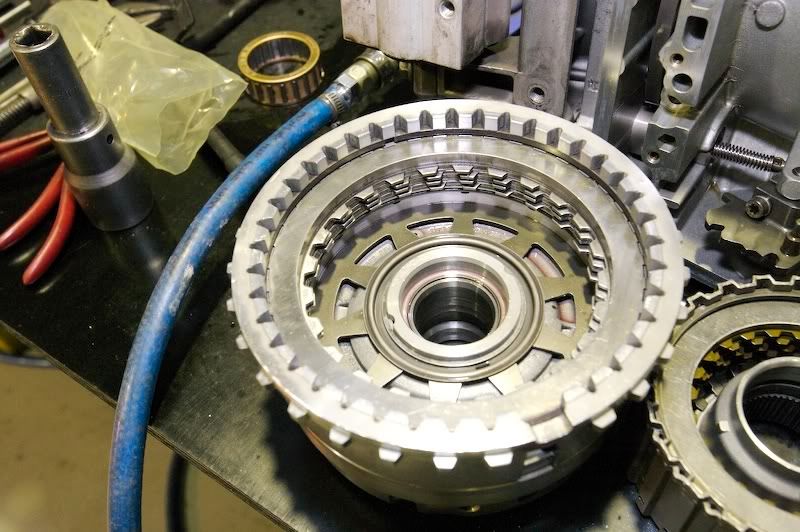
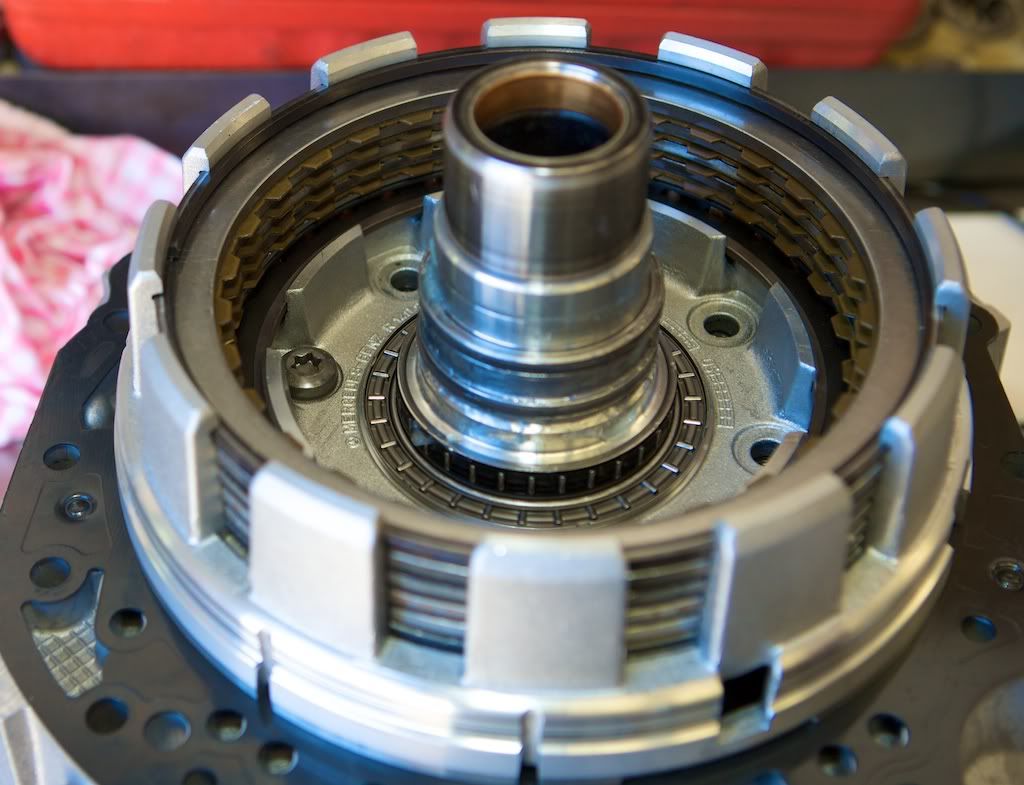
Notice the slots which the first clutch packs slide into.
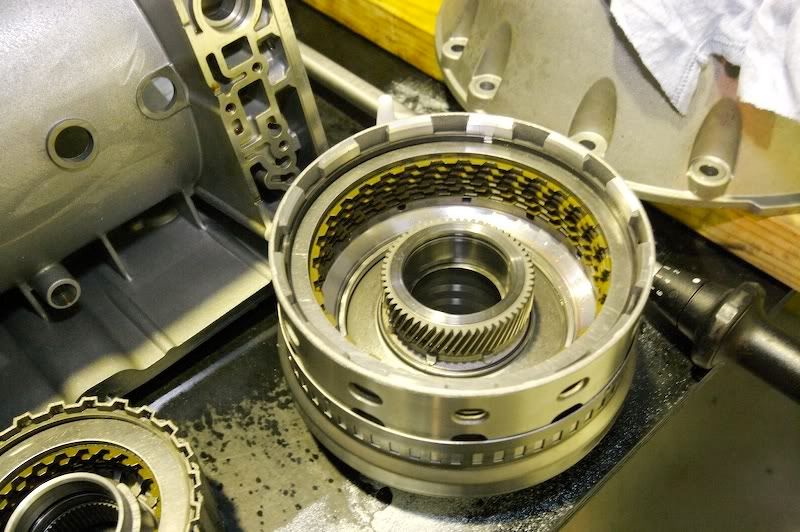
The metal rings here, not the actual clutch media are slightly bowed inwards due to excessive heat build up caused by clutch slippage. You cant notice this without a straight edge. Visually they were a blueish heat stained color. The problem is further perpetuated by causing less contact area as the clutch media stays flat. These were all replaced.
All packs rebuilt properly ready for assembly.
Clutch pack and piston assembly.
Another set.
Stacked and ready. All clutch media is soaked in fluid over night before assembly.
Bolted on with oil pump underneath.
Clutch and final drive shaft added.
Another bit put on???
With the help of my mate looking over my shoulder who just happens to work at a stealership rebuilding these MB boxes for years guided me through the disassembly and identification of all common trouble spots.
Deano, one of my mates, said this box has the same internals as the ones from the SL65 including identical part numbers to all the clutch assemblies as he has rebuilt many of both types. The main problem with these boxes is when the finally assembly is done at the MB assemble line "almost all the clutch pack tolerances are out of wack to factory specifications" where he cannot recall when one was perfect... So what's the big deal about these tolerances? Basically if it's to loose it will slip... simple as that. The tolerances are critical if your throwing a lot of **** as these like we do, probably not as critical for stock applications.
When all the clutch packs are reassembled, their final compressed hight varies due to manufacturing tolerances of the actual clutch media. So... when compressed with a special tool in a press at the correct poundage, a measurement is then taken off all the clutch plates and clutches. The final spacer ring part number depends on the measurement taken which corresponds to the correct part listed as there are a few, -1, 0-1, +1 etc.... The part is then added to the pack and is ready to go.
The E55, SL65, SLR and Maybach all use the same box. Of course some of the internal part numbers are different but not many. Final ratios and programing seem to be very different.
I will be investigating the valve bodie shortly with another one of my mates who owns a large Auto Tranz shop which is equipped with a real time valve bodie tester that shows all the in's and out pressures whilst changing gears There is also a Tranz dyno among other goodies to play with.
My mate Johnny rebuilt and modified the 55 converter by removing the "two paper lock up clutches" and refitting 3 carbon fiber ones. He discovered that they were excessively worn and braking up. It was most likely due to Vmax runs but it's also a common problem which makes the car shake at certain revs.
I have all the spec documentation from MB if any one is interested in a copy. The files are in .jpg & .pdf formats. Where can I post them?
So here are the shots...
The Victim.
Deano removing the oil pump.
Pan and filter off.
Part of the Tranz brain... Valve Bodie with modulator valves sticking up.
Brainless.
Position for disassembly.
Pop the top off.
Clutch packs and drive shafts removed.
Notice thrust bearings.
Ant farm network of hydraulics plumbed through here on the back of the bell housing.
When you put it in park... guess what?... a pin grabs this wheel.
Notice the slots which the first clutch packs slide into.
The metal rings here, not the actual clutch media are slightly bowed inwards due to excessive heat build up caused by clutch slippage. You cant notice this without a straight edge. Visually they were a blueish heat stained color. The problem is further perpetuated by causing less contact area as the clutch media stays flat. These were all replaced.
All packs rebuilt properly ready for assembly.
Clutch pack and piston assembly.
Another set.
Stacked and ready. All clutch media is soaked in fluid over night before assembly.
Bolted on with oil pump underneath.
Clutch and final drive shaft added.
Another bit put on???
MBWorld Fanatic!
Joined: Mar 2007
Posts: 1,948
Likes: 3
From: Houston, TX
C32/C55 AMG
Managed to finally fix the trany problem up... The photos tell the story...
This is the offender, notice the torx bolt at the base of the clutch which is bolted into the bell housing via the cast oil pump... This ***** decided to come lose.
It worked it's way up into the K1 clutch assembly chewing the base off like a lathe and spewing alloy particles throughout the tranz. Notice where it finally cracked a ring at the base. The tranz then threw an error basically saying the output sensor doesn't match the input sensor... Dah!!! The outer ring section is actually the sensors trigger.

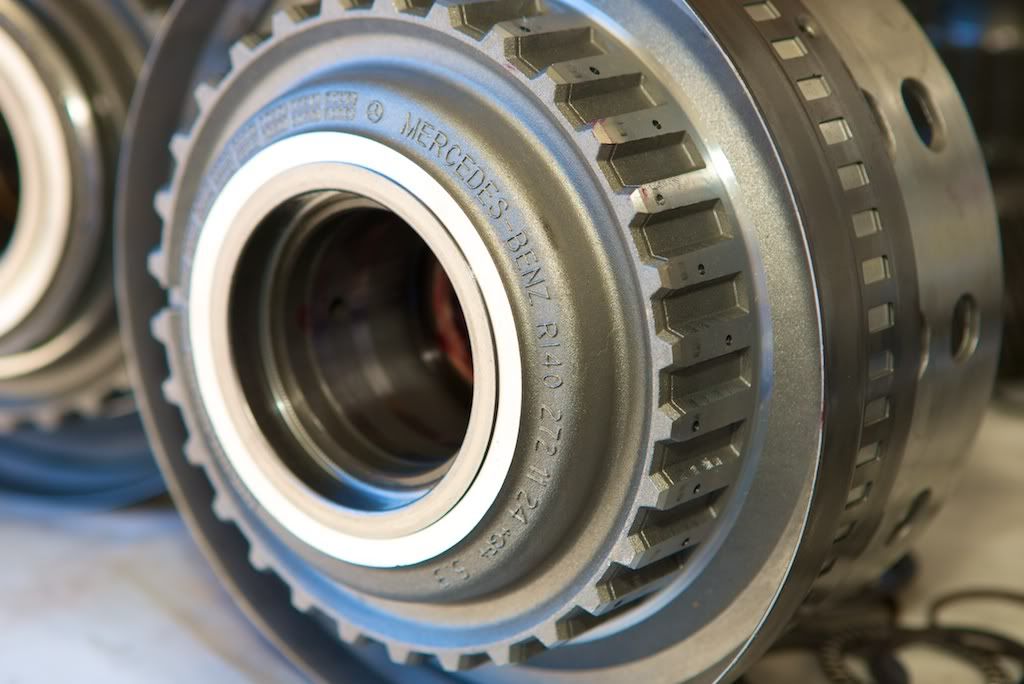
This is where the K1 is positioned in respect to final assembly.
The new K1 housing from Silver Star Transmissions in the US. Good service!
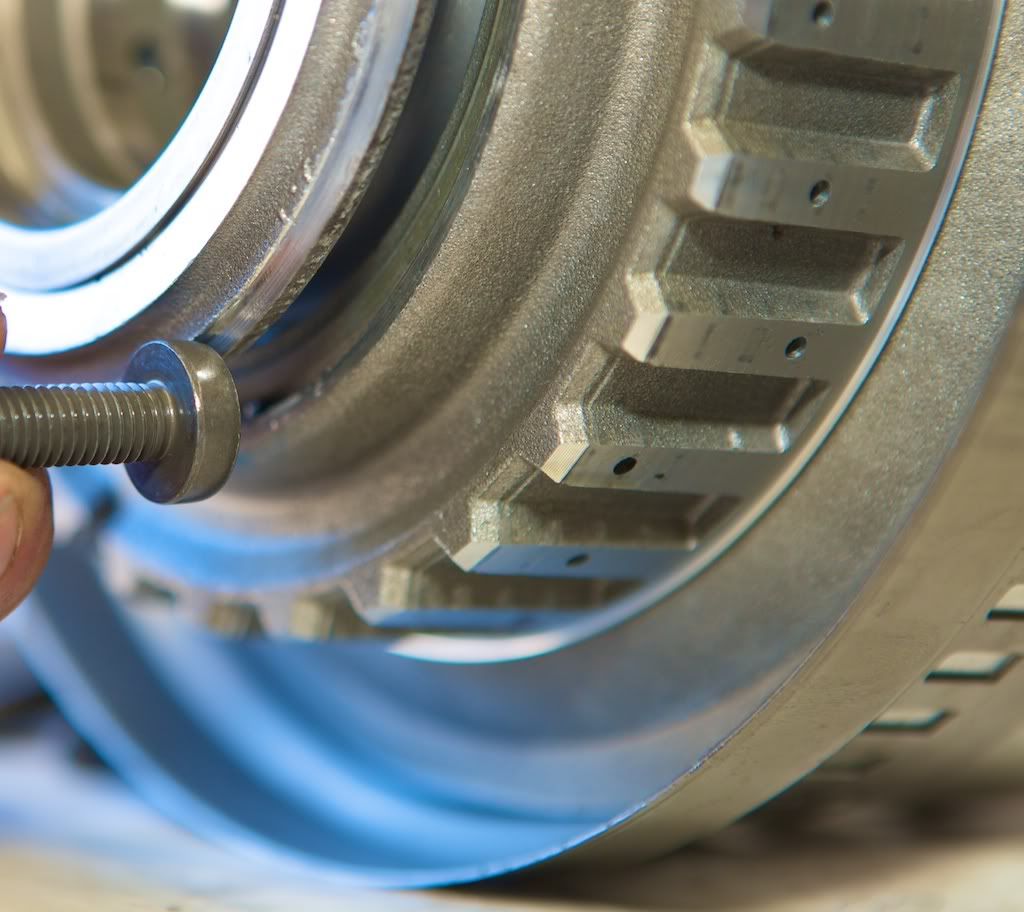
The clutches are compressed with this tool and a measurement is taken to calculate the final factory clearances where a certain thickness circlip is installed to hold the clutches in position.

All ready to go home...
Next... off to the Dyno.
This is the offender, notice the torx bolt at the base of the clutch which is bolted into the bell housing via the cast oil pump... This ***** decided to come lose.
It worked it's way up into the K1 clutch assembly chewing the base off like a lathe and spewing alloy particles throughout the tranz. Notice where it finally cracked a ring at the base. The tranz then threw an error basically saying the output sensor doesn't match the input sensor... Dah!!! The outer ring section is actually the sensors trigger.
This is where the K1 is positioned in respect to final assembly.
The new K1 housing from Silver Star Transmissions in the US. Good service!
The clutches are compressed with this tool and a measurement is taken to calculate the final factory clearances where a certain thickness circlip is installed to hold the clutches in position.
All ready to go home...
Next... off to the Dyno.


