When you click on links to various merchants on this site and make a purchase, this can result in this site earning a commission. Affiliate programs and affiliations include, but are not limited to, the eBay Partner Network.
Just had it installed, looks like in person don�t know how that translates on camera. And my other parts should arrive next week. I�m so happy that my interior is finally coming together.
Now I have to call DCT Motorsports today. for an update on my carbon shift knob
Just had it installed, looks like in person don�t know how that translates on camera. And my other parts should arrive next week. I�m so happy that my interior is finally coming together.
Now I have to call DCT Motorsports today. for an update on my carbon shift knob
Amazing, I will also ask Matt for do the same.
Are the other parts with the tiny chrome line? I saw the pictures and had no chrome line, but probably will be attach after the epoxi gets solid and would look exactly oem.
Amazing, I will also ask Matt for do the same.
Are the other parts with the tiny chrome line? I saw the pictures and had no chrome line, but probably will be attach after the epoxi gets solid and would look exactly oem.
I purchased the instrument cluster from Nic Wright, not Matt from OCarbon, but I�m sure Matt can do this well. But regardless you will have to send your parts to him, and wait 6-8 weeks to be completed. I�ve seen these offered on eBay.
Matt handlaid the carbon fiber with a recess for the chrome trim, as your original trim has this feature. All Matt is doing is removing the old wood trim, and replacing it with genuine carbon fiber that has be laid, epoxied, trimmed, heated, clear coated and buffed then cut.
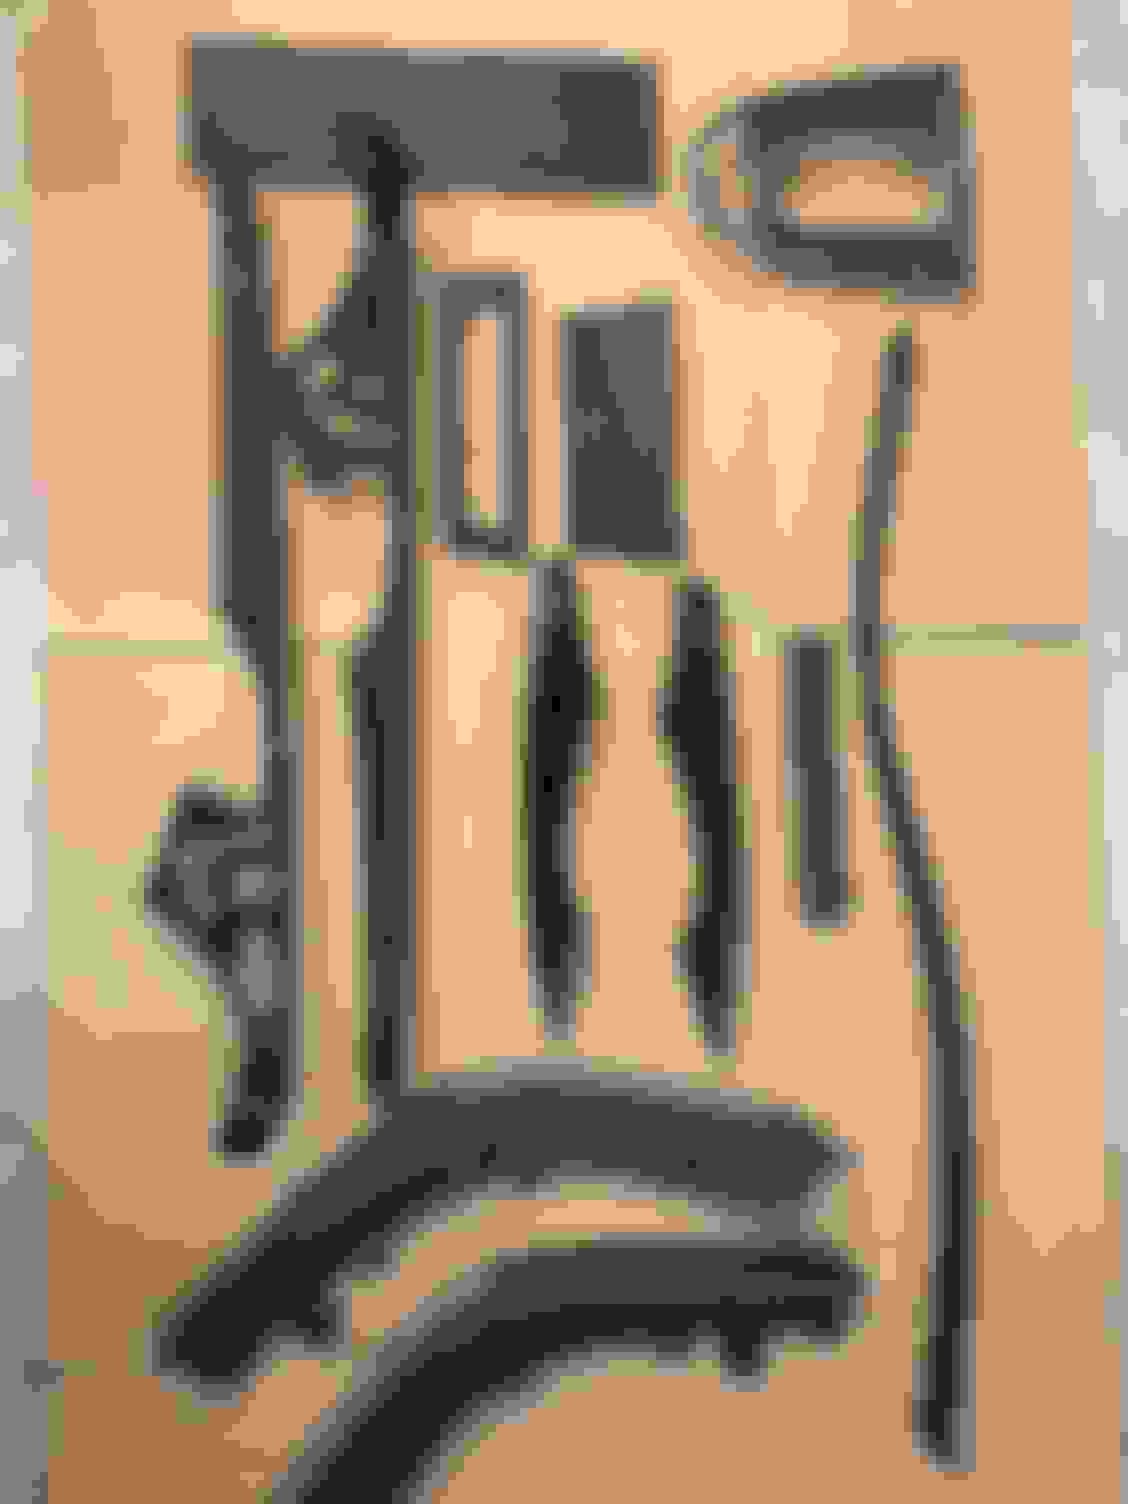
Hi Guys... Made my own real carbon skinning job for the wood covered interior in my 2008 E63 :-)
Was start getting tired of looking at the original wood trim and with 150K on the clock I thought it was about time to do another upgrade to her :-)
Materials:
Carbon Fiber Fabric 2x2 Twill 3k 5.8oz/197g from Composite Envisions
AMG logo's to embed into carbon for Ashtray a the 4 door trims
Epoxy Resin 105/207 from West System for durability. Black base layer for the carbon to stick to the trim. 3 layers on top. Wet sanding in steps up to grid 800. 1 extra top layer, Wet sanding up to grid 1000
Clear Topcoat EASTWOOD 2:1 URETHANE CLEAR for UV protection and glossy finish. Wet sanding in step up to grid 3000 finish of with polish
Ceramic coating, CQ.UK 3.0 from CARPRO for additional UV protection, glossiness and durability,
Most challenging part was for sure the sliding center console door... all these small pieces...dam..I walked around that for a couple of day before I had a solid and workable plan that would work out perfect :-)
Ended up very sweet and I know enjoy even more taking a drive in my aging E63 :-)
Center View, Note the embedded AMG logos under resin and coat :-)
Parts during one of the wet sanding phases. There are front spoilers I made on the picture which I will cover in another thread
Your DIY is very nice, I like the embedded AMG logos in the for trim. So, tell me how did you conquer the roll up center console door? Your next upgrade should be a new steering wheel 👍🏽 Just saying!
Also, from start to finish. How long did it actually take you?
Last edited by Yuille36; Sep 30, 2020 at 11:14 AM.
Too much work and hours involved even it probably would be significant faster a second time :-)
I Used 6-8 weeks on & off but did also work on other projects between as there is a lost of waiting time as well waiting on layers to harden up
The Center console challenge!
I figured it had to be one piece carbon fabric used and applied to all segments at the same time. That would eliminate removing the segments from the rubber fabric they are glued to and more important secure perfect alignment of the carbon fabric between each segment
The whole console door were mounted on a curved surface opened up a 1mm gap between each segment. This allowed me to separate them by cutting into the gaps between the segment with a sharp Stanly knife perfectly. This was done after the carbon & first top layer of resin were applied while the carbon + resin is still relative thin.
The 1 mm do not cause any visible misalignment with the door open or closed. In theory It will offset the carbon pattern each following segment slightly compared to previous. Visual the angle of the carbon pattern would appear to be off with a few degree from what you expected. I compensated for that for that by applying the carbon with a few degree in opposite direct. The result ended up perfect and completely aligned with the following gear selector console.
Following sanding down each segment and the 1/2mm carbon overhang on each side of each segment. Allowing me to to put the console on a flat surface which then close all gap between each segment for following resin layers
Applied 2nd top resin layer. As the resin start hardened up I mounted the console on a curved surface again exposing the gaps securing all segment didn't get glued together
When hardened was done sanding of each segment top and each side for resin that might have run slightly down between segments. This was repeated for following next 2 resin layers and as well for the clear top coat.
Finished up with all sanding steps up to grid 3000, polishing and finally ceramic coating
As you can imagine a lot of hours was used to accomplish this....but it worked out perfectly.
Hope above gives an idea of how I tacked the challenge otherwise feel free to ask
Matt@OCarbon had issue with the carbon fiber delaminating from the substrate. So he ended just painting my console door high gloss black. I really don't know if he ever solved that issue. But, I'm extremely pleased with my CF. and everyone that sees it, loves it.
Well, if you ever change your mind there are quite a few owners, out there that would love to have a CF interior trim.
I know that this is very time consuming, as Matt took 8 weeks to complete my interior. I absolutely love it.
Damn nice work! Looks great and the roll console looks kickass.
Do you mind sharing how much $ you had in materials?
I spend around 800$ but with purpose to have enough for several other projects. Front & Side skirts just finished as well and will be covered in another thread
Matt@OCarbon had issue with the carbon fiber delaminating from the substrate. So he ended just painting my console door high gloss black. I really don't know if he ever solved that issue. But, I'm extremely pleased with my CF. and everyone that sees it, loves it.
Well, if you ever change your mind there are quite a few owners, out there that would love to have a CF interior trim.
I know that this is very time consuming, as Matt took 8 weeks to complete my interior. I absolutely love it.
That you for your feedback, much appreciated.
This project was my first go for CF skinning so I have no idea why there would be delaminating issues but can imagine a few reasons.
Personally I did a lot of investigations to secure the right materials were chosen and procedures followed. I did numerous mistakes during the processes (not happy with the results) so I had to rethink some of all the readings and watching you tube guides i had done prior to the project.
Quite a few of those will not give you a flawless end result. I learned that on the hard way ;-)
Regarding request I will have that in mind if I should have a change of mind :-)
So how long did it take you, to manufacture your Carbon Fiber trim parts, from start to finish product? My CF from OCarbon took 8 long weeks. I was giddy as a school girl when it arrived, couldn't wait to get it installed.
So how long did it take you, to manufacture your Carbon Fiber trim parts, from start to finish product? My CF from OCarbon took 8 long weeks. I was giddy as a school girl when it arrived, couldn't wait to get it installed.
Sorry I should have quoted instead of replying. In a post above. I used 6-8 weeks but I had a couple of others carbon projects for the car at the same time doing the Interior, front spoiler & side skirts :-)
I applaud you for tackling this project, this is no small task. Matt from OCarbon explained his entire process to me, and is a quite involved process. He said that he takes his time, to ensure that the outcome is perfect. As he stated, you can�t rush perfection. But this is what he does, they started making trim for Audi�s then expanded to other manufacturers. When my parts were being made last year, he had jobs from Dubai, Australia, Europe and the US.
I strongly considered a carbon fiber steering wheel and shift knob, but after my interior was installed I really had to rethink that. My E63 has enough carbon fiber, and having a steering wheel and shifter in carbon would have been way to much. There is such a thing as carbon overload, and I didn�t want to go that route.
I have the following items in carbon fiber; engine cover and air boxes, instrument cluster, front splitter, roof spoiler, trunk spoiler and rear diffuser along with the interior trim.
I believe that my car was nicely done, and not over the top. So I kept the OEM shifter, but replaced the steering wheel with a Leather/Alcantara Flat Top/Bottom unit from Ledermanz.