Mercedes-Benz C-Class: How to Install Illuminated Door Sills
A great way to add some excitement to your C-Class is to modify the vehicle' with illuminated door sills. This is a subtle touch that will impress passengers and passersby alike.
This article applies to the Mercedes-Benz C-Class (2007-2014).
While the design of the Mercedes-Benz C-Class certainly makes it stand out, another way to add that "wow" factor to it is to illuminate the vehicle's door sills. Each time you or your passenger opens the car door, the sills light up to let the passengers know they are riding in a luxury vehicle. To learn how to add this component to your C-Class, read on. It’s a good DIY project to do at home if you have a few hours and are fairly well-skilled in modifying electrical systems.

Materials Needed
- Illuminated sills kit – Includes sills, plates, wiring looms, converters and CAN module
- Torx screwdriver
- Socket wrench set
- Plastic trim removal tool or flat head screwdriver
- Double-sided waterproof tape
- Cable ties
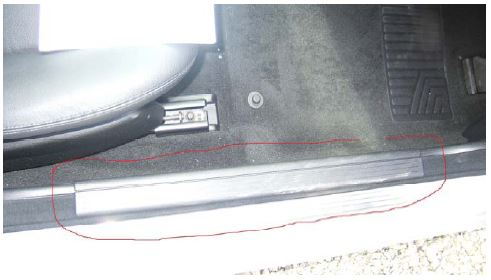
Step 1 – Remove existing sills
Pull them upwards towards the roof (they are fixed in place by clips that grip the sill very well, so pull hard). In order to best get the leverage required to do this, use either a plastic trim removal tool or a screwdriver, and lift upwards. You will be able to feel the areas where the clips are secured. With those areas, you'll need to be firm enough to loosen it, but gentle enough to not break the clips.
If you do break a clip, fear not; you can grab a small bag of them at your local dealership for only a few dollars.
Step 2 – Remove the lower A-pillar trims
These are clipped in place, so pull them towards the center of car and then unclip at the bottom. Again, this can be accomplished with your handy plastic trim removal tool or a flat head screwdriver.
The driver’s side trim has a section that attaches to a pin which, when pulled back, exposes the clips.
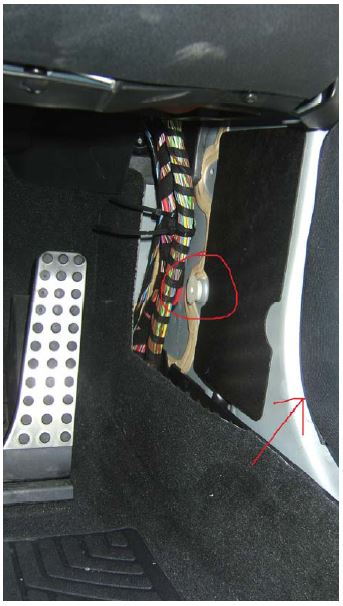
Step 3 – Undo the Torx screws on driver's side
There are three Torx screws that hold the section above the driver's side foot well. With the screws undone, you are going to need to loosen this panel by pulling down on it. Be careful not to yank it out, as there is wiring secured to the other side.
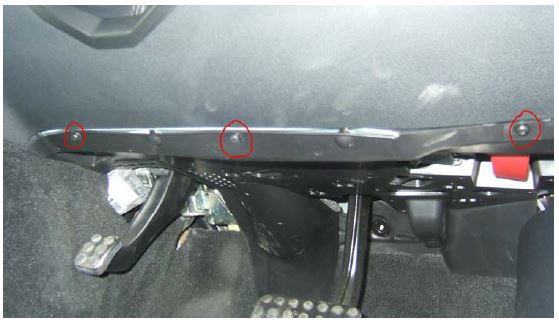
Step 4 – On passenger side, remove same trim pieces
The part above the footwell and the carpet can be undone by untucking it from the trims and pulling it out. This will expose a foam pad which unclips from the bottom; behind that is the metal footplate.
Step 5 – Remove foam pad and footplate
Unscrew the three plastic nuts using a 10mm socket and pull the footplate down to expose wiring on reverse side.
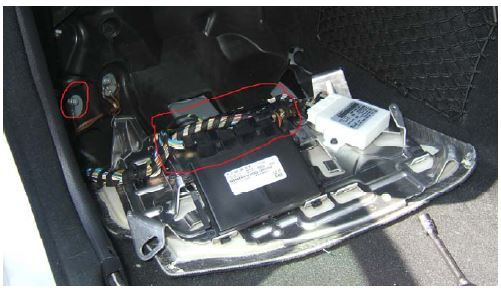
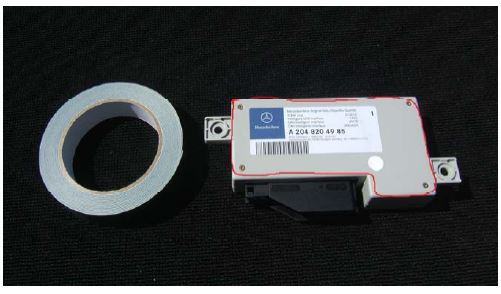
Step 6 – Install CAN module
Completely cover the reverse side of module in double-sided tape then stick it in place, taking care to ensure that the black connection point is pointing towards the front of the car.
Step 7 – Connect wires
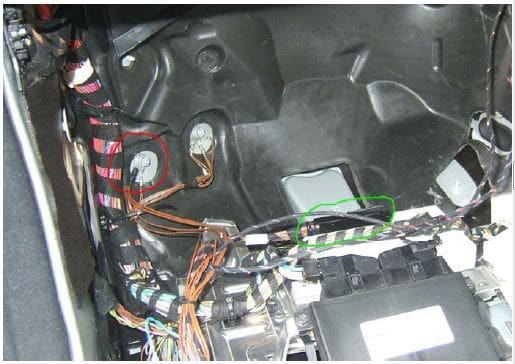
You'll note that on the second wiring harness there is a white 6-pin connector. There are three wires going into it: brown, brown/white, and brown/yellow. Connect this to the white connector on the main wiring harness. Next, connect the main black connector to the CAN module. It hooks in at one end and is then pushed home. Then, connect to the grounding point using a no.10 socket to undo the nut. Slot it on and do the nut back up (red is the grounding point and green is the main black connector connected to the CAN module).
- Next, plug the small connector with the two brown wires into the CAN distributor rail which is located in the cable duct at the door opening. Connect to any of the free slots.
- Then, feed the fuse wire and the longer end of the second cable harness over the transmission tunnel to the driver’s side. You may need to use a cable rod or coat hanger to feed it through.
- Now, on each end of the second wiring harness there are two black connectors. One fits the connection on the door sills, and the other fits the connection on the converters. Using the double-sided tape, glue the converters in place. Fit converters to the side of the cable duct.
- Plug connector into the converter and repeat for the driver’s side. When doing the driver’s side, you might find it easier to tie the cables to the existing cables up near the steering column. Make sure nothing is going to be impeded by this. Using cable ties, you can tie all the cables down on both sides of the car, neatly making sure they will not get pinched when any trim is put back.
- Lastly, clip the cable duct covers back into place. On the passenger side, the footplate, foam pad, carpet and A-pillar trim can be refitted.
Now, at the driver’s side, you will have one cable left to fit which will have the fuse on it and which needs to be connected to the fuse board.
- Pull out the cover on the side of the dashboard to reveal the fuse board. The fuse board simply unclips and can be pulled out.
- Next, remove the fuse from the connector and feed the cable up into the dashboard and through the hole where the fuse board was. Clip the connector into slot 129 and put the fuse back in.
- Once fuse is fitted, replace the trim and start putting back all the trim pieces in the driver’s side.
Step 8 – Put plate on
It's time to place the new plates over the existing ones. To do this, gently pull the door seals up to reveal the entire plate. Clean it thoroughly and stick the new plates over the existing ones. Carefully push the seals back into place.
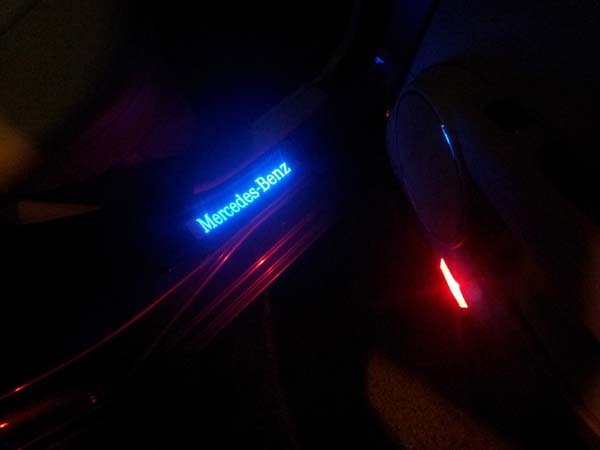
Connect the illuminated sills to the connectors and push them into place. Be careful not to pinch the cables. The new sills push down into the clips that held the old plastic ones. Use the newly fitted plates to guide where the sills need to go to be central. Simply wait until it gets dark to check that the modification works.
Related Discussions
- W204 Illuminated Sills: DIY - MBWorld.org
- Illuminated Door Sills Inverter - MBWorld.org
- Illuminated Door Sills: W204 - MBWorld.org