Mercedes-Benz E-Class and E-Class AMG: How to Check Transmission Fluid
Ever wondered how to check the transmission's fluid level of your Mercedes-Benz E-Class or E-Class AMG? It's not difficult, but there is limited information on the procedure. Here's how to correctly do it.
This article applies to the Mercedes-Benz E-Class and E-Class AMG (2002-2009).
For a couple of reasons, Mercedes-Benz does not want their customers to check the transmission fluid level on their vehicles. The reasons include, but are not limited to:
Mercedes-Benz defines the transmission fluid as “lifetime fill.” As a result, there is no reason in their minds for a customer to check the fluid level.
Transmission fluid level is critical to both good shift quality and long-term durability of the transmission. Improper fluid level can, and does, break a transmission or, in a worse case scenario, cause a fire.
Transmission hydraulic fluid has a high coefficient of thermal of expansion. This means the volume of fluid grows a lot as it heats up. This makes the fluid temperature a critical variable when checking the fluid level.
The hydraulic systems in modern automatic transmissions do not like dirt. So, it’s best not be sticking dirty dipsticks into the fluid. Mercedes-Benz engineers know this and discourage customers from checking the transmission fluid level.
If you believe you need to check the transmission fluid and you don't want to spend the money on a professional, here's how to do it yourself.
Materials Needed
Flat head screwdriver
Mercedes-Benz tranmsission fluid dipstick (Merced-Benz part # 140589152100)
Mercedes-Benz transmission fill tube cap locking tab (Mercedes-Benz part #1409910055)
Mercedes-Benz transmission fill tube cap (Mercedes-Benz part #140589152100)
Clean rags
Thermocouple probe wire (optional)
The Mercedes-Benz E-Class' transmission does not have a dipstick; you’ll have to buy one. The transmission fill tube cap has a small locking tab on it to keep prying hands away. The tab is to be removed in order to take the cap off of the transmission fill tube. It’s best to have a cap and locking tap on hand in case you break something or lose a part; it’s cheap insurance.
Step 1 – Drive the car and allow the engine to reach operating temperature
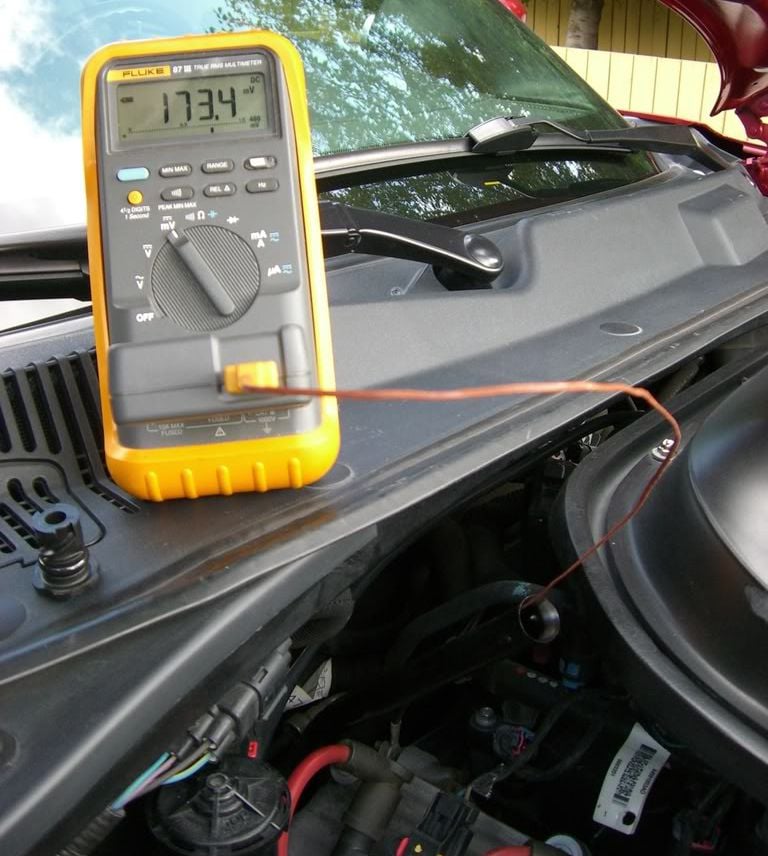
The engine being at "normal operating temperature" ensures the transmission fluid is at the proper temperature to check the level. The transmission fluid temperature should be at 175 degrees F for an accurate level measurement.
Pro Tip
If you have a long thermocouple probe wire, you can put it down the transmission fill tube and check the transmission fluid temperature. It's not absolutely necessary but may give some peace of mind.
Figure 1. Using a thermocouple probe wire (Mercedes not pictured).
Step 2 – Set the car on level ground
The car being on level ground is critical. The transmission MUST be at its "level" installation angle in order to get an accurate level measurement.
Step 3 – Leave the engine running
This ensures the transmission pump is running and the transmission’s hydraulic system is filled with fluid.
Pro Tip
If the engine is not running, then the transmission pump is not running and filling the hydraulic system. The transmission oil level is always checked with the transmission pump running and the hydraulic system pressurized.
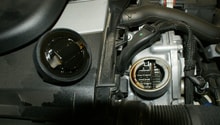
Step 4 – Find the transmission fill tube
It has a black cap and is behind the engine just in front of the fire wall and behind the engine cover. Don’t confuse this transmission fill tube with the engine oil tube in the front of the engine!
Figure 2. Location of transmission oil fill tube.
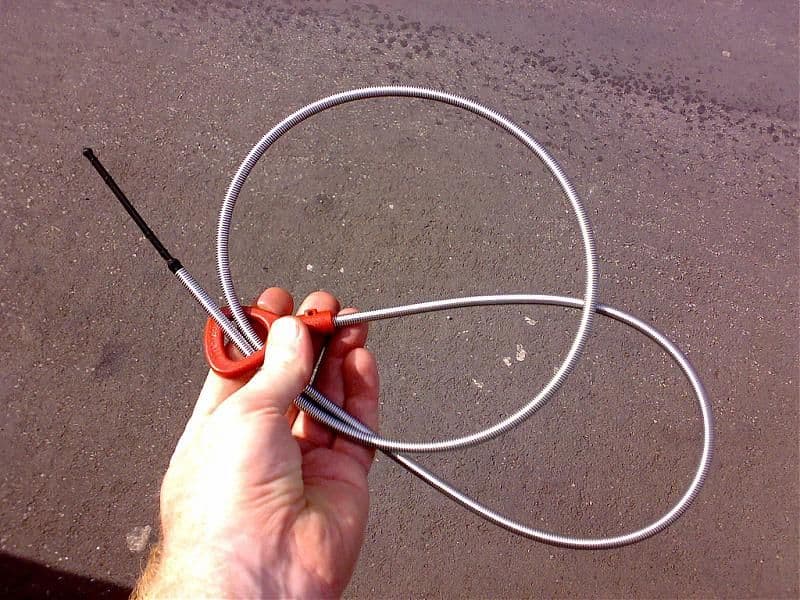
Step 5 – Remove locking tab
Remove the plastic locking tab by breaking off the tab on top and pushing the tab through the cap. Remove the fill tube.
Figure 3. Locking tab.
Pro Tip
The locking tab can be reused if you're extremely careful about sliding the tab only halfway through the slot in the fill cap. The cap can be removed and the tab is still in the cap. Otherwise, it's easier to push the tab all the way through and use a new locking tab.
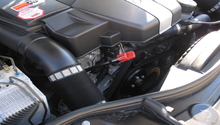
Step 6 – Make sure the dipstick is very clean
Cleanliness is very important inside a transmission. Insert the dipstick down the transmission fill tube. You may feel some resistance as the dipstick snakes its way down the fill tube. Also, because the dipstick is flexible, it can be difficult to know when the tip of the dipstick is touching the bottom of the transmission fluid pan.
Figure 4. Dipstick.
Step 7 – Stop when it hits
This is the point where you get the transmission fluid level in the transmission. The dipstick will not go all the way into the fill tube. There is approximately 6” of the dipstick visible when the tip of the dipstick is touching the bottom of the transmission pan.
Figure 5. Dipstick inserted into fill tube.
Step 8 – Slowly remove the dipstick and look at the tip
Is the fluid up to the middle of the red portion of the dipstick tip? That is the correct fill level for this transmission at 175 degrees F oil temperature and with the engine running.
Step 9 – Repeat steps 5, 6 and 7
Repeat Steps 5, 6 and 7 at least three more times until you’re satisfied with your work and just to make sure the levels are correct.
Step 10 – Finish up
When you're satisfied with your work, re-install the transmission fill tube cap and the cap locking tab.
How to Change Automatic Transmission Fluid
Almost all auto manufacturers label the transmission fluid as "lifetime fill." However, in many ways this is a marketing statement intended for sales. Changing the ...
How to Change Automatic Transmission Fluid
Keep your E-Class' transmission healthy by changing the automatic transmission fluid.
This article applies to the Mercedes-Benz E-Class w211/w212 (2002-Present).
While ...
Why Does My Car Jerk Between Gears?
Does your Mercedes-Benz E-Class make an uncomfortable and annoying jerk while shifting? Here are the potential causes for that jerk.
This article applies to the Mercedes-Benz ...
How to Change Your Oil and Oil Filter
Keep up on the maintenance for your E-Class, and minimize engine wear by changing your oil as well as oil the filter.
This article applies to the Mercedes-Benz w211/w212 ...
How to Change Oil
Is your change oil indicator light on? Take on the job yourself with the help of this how-to.
This article applies to the Mercedes-Benz C-Class (2007-2014).
Engine oil is pumped up from the oil ...
How to Replace Engine Oil
Benzwerks
Replacing the engine oil in your Mercedes-Benz E-Class is one of the most important maintenance tasks you can do.
This article applies to the Mercedes-Benz E-Class and E-Class AMG ...