
W203 HID Kit install
 06-24-2010, 12:58 PM
#1
Senior Member
Thread Starter
Hey guys, new to the forum here. It's good to be part of the community, but I was wondering if you guys could help me out..
I bought a HID kit for my w203 2003 C240, and I can't install it..
Heres the initial setup on one side: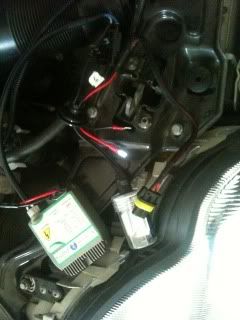
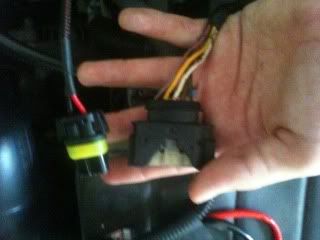
I connected everything, and the only thing left was this:
They said that yellow plug goes to the headlight? I mean, I noticed I could do this on our minivan, but Germans always have to be different and do it another way by putting all the wires in one clip. Is there anyway to "ghetto rig" this? Or should I take it back and get a different kit that doesnt neeed that yellow connector?
Then I stumbled upon this..
on the wiring chart, it says its "plug to car." I honestly think its a switch or something, but do you guys know? I'm sure I must have the wrong kit or something.
Any help would be gladly appreciated, Thank you.
I bought a HID kit for my w203 2003 C240, and I can't install it..
Heres the initial setup on one side:
I connected everything, and the only thing left was this:
They said that yellow plug goes to the headlight? I mean, I noticed I could do this on our minivan, but Germans always have to be different and do it another way by putting all the wires in one clip. Is there anyway to "ghetto rig" this? Or should I take it back and get a different kit that doesnt neeed that yellow connector?
Then I stumbled upon this..
on the wiring chart, it says its "plug to car." I honestly think its a switch or something, but do you guys know? I'm sure I must have the wrong kit or something.
Any help would be gladly appreciated, Thank you.
 06-24-2010, 01:36 PM
#2
Out Of Control!!
Join Date: Nov 2005
Location: OC
Posts: 18,677
Likes: 0
Received 9 Likes
on
9 Posts
a quarter mile at a time
From your SN, it sounds like you're good at working in tight spaces, so I'll help you out on this one.
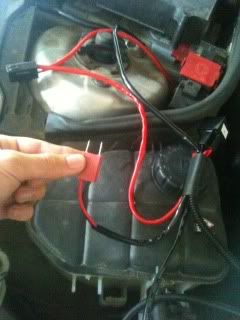
Undo all of the wiring associated with the wires in the 3rd pic. This is a relay connection and isn't needed, it's just going to cause problems.
Once that's done, plug the square connector in the second pic back into your headlight housing.
Now, look for a large round dust shield on the back of your headlight. Pop it open. You need to drill a 1" hole in to the back of the dust cover. Once that's done, route the bulb and make sure the grommet supplied with your kit makes a snug fit through the hole.
Next, plug in your bulb into your headlight, should be a H7 base to fit into the reflector housing. Now, in your first pic, there are 2 shiny flat connectors. You will plug these connectors into the plug you removed from the stock bulb. The black wire goes to brown and red goes to green. The rest of the kit should be plug and play from there.
Have you had your xenon=present set or are you using error cancelers? If not, you will get an error message and the car may cut power to your headlights after the kit is installed.
Good luck.
06-24-2010, 01:39 PM
#3
Senior Member
Wait what?
Take off the back of the headlight cover. Remove your low beam bulb. The connector that was once attatched to your low beam bulb is your power source.
You should have 2 cables coming out of the ballast to one of them goes the HID capsule. The other is the input (from your old headlight bulb connector). That cable should have an intermediate that connects the ballast cable to the headlight connector. One end will plug right in the other should have 2 spade connectors on it. The spade connectors plug into your headlight bulb socket. Yellow to red Brown to black.
06-24-2010, 02:01 PM
#4
Senior Member
Thread Starter
e1000: Will it cause an error only when it's plugged in? Suppose I get an error when installing the kit, and i switch back to my halogens, wil the error still be there?
zerocover/e1000: I know where the 2 flat shiny connectors go, but the original connetion to the headlight was the one on the right in the second picture. How am I supposed to put those two together if they aren't the same plug?! D:
zerocover/e1000: I know where the 2 flat shiny connectors go, but the original connetion to the headlight was the one on the right in the second picture. How am I supposed to put those two together if they aren't the same plug?! D:
06-24-2010, 02:26 PM
#5
Out Of Control!!
Join Date: Nov 2005
Location: OC
Posts: 18,677
Likes: 0
Received 9 Likes
on
9 Posts
a quarter mile at a time
plug the original connector back into the headlight. The plug on the left (assuming it's coming back out from the headlight housing) goes into your new HID ballast.
You'll only get the error when your hights are on. It checks each time you turn your headlights on. HID's don't use the proper current, and the car throws an error.
You'll only get the error when your hights are on. It checks each time you turn your headlights on. HID's don't use the proper current, and the car throws an error.
06-24-2010, 05:04 PM
#6
Senior Member
Thread Starter
plug the original connector back into the headlight. The plug on the left (assuming it's coming back out from the headlight housing) goes into your new HID ballast.
You'll only get the error when your hights are on. It checks each time you turn your headlights on. HID's don't use the proper current, and the car throws an error.
You'll only get the error when your hights are on. It checks each time you turn your headlights on. HID's don't use the proper current, and the car throws an error.
Nooo, the plug on the left is coming from the HID Bulb. the only wire thats connected to the housing is the one on the right in the second picture.
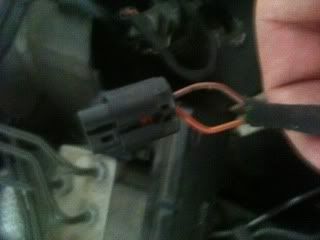
but I saw this on my driver side, by the light. I don't know what it is, but it wont plug into the slot, its too small, it has a brown and red wire.. look:
Noob question: Is it possible to do this without going to the battery for power?
06-24-2010, 05:19 PM
#7
Out Of Control!!
Join Date: Nov 2005
Location: OC
Posts: 18,677
Likes: 0
Received 9 Likes
on
9 Posts
a quarter mile at a time
Nooo, the plug on the left is coming from the HID Bulb. the only wire thats connected to the housing is the one on the right in the second picture.
but I saw this on my driver side, by the light. I don't know what it is, but it wont plug into the slot, its too small, it has a brown and red wire.. look:
Noob question: Is it possible to do this without going to the battery for power?
but I saw this on my driver side, by the light. I don't know what it is, but it wont plug into the slot, its too small, it has a brown and red wire.. look:
Noob question: Is it possible to do this without going to the battery for power?
Plug all that stuff back into the stock housing, don't mess with them. lol.
Trending Topics
06-24-2010, 05:33 PM
#9
Out Of Control!!
Join Date: Nov 2005
Location: OC
Posts: 18,677
Likes: 0
Received 9 Likes
on
9 Posts
a quarter mile at a time
Again, remove the extra relay harness that goes to the battery and back, it's not needed in a w203.
06-24-2010, 05:39 PM
#10
Senior Member
Thread Starter
I did it! Stupid dealer that sold me the kit said I needed the relay from the battery.. It woulda been really easy if I knew in the beginning I didn't need it.
Is it normal for the bulb to get really hot? the plastic case around it was really hot once it started flickering, once I turned on the engine, because I don't want it to melt the headlight.. Is that possible?
So a error canceler will do the trick? Is there a way to do it with out ordering online? like going to radioshack or something.. I saw others do it, but if theres no way, ill buy the cancelers for $20 online.
06-24-2010, 05:43 PM
#11
Out Of Control!!
Join Date: Nov 2005
Location: OC
Posts: 18,677
Likes: 0
Received 9 Likes
on
9 Posts
a quarter mile at a time
Yes, the bulbs get extremely hot. Yes it's normal and perfectly ok.
Yes an error canceler will do the trick. You can accomplish the same results with the proper resistor or capacitor, but it's a hit or miss. Just buy the cancelers doc. You can also find a dealer or MB shop in your area to set your car with the Xenon=Present setting in DAS (Mercedes Star) so it will not throw a code.
Yes an error canceler will do the trick. You can accomplish the same results with the proper resistor or capacitor, but it's a hit or miss. Just buy the cancelers doc. You can also find a dealer or MB shop in your area to set your car with the Xenon=Present setting in DAS (Mercedes Star) so it will not throw a code.
06-24-2010, 05:45 PM
#12
Out Of Control!!
Join Date: Nov 2005
Location: OC
Posts: 18,677
Likes: 0
Received 9 Likes
on
9 Posts
a quarter mile at a time
The reason they give you that battery relay harness is because some cars don't have the proper wiring to handle an aftermarket HID system. Luckily, the wiring in the w203 is adequate, and so that's why you can skip having to go all the way to the battery and back again.
06-24-2010, 05:48 PM
#13
Senior Member
Thread Starter
I can't thank you enough E1000, I appreciate all of your help, but is there a way to make a ghetto canceler with the relay I already have? Or how would you use a resistor or capacitor for his case?
06-24-2010, 05:55 PM
#14
Out Of Control!!
Join Date: Nov 2005
Location: OC
Posts: 18,677
Likes: 0
Received 9 Likes
on
9 Posts
a quarter mile at a time
Yes and no. The relay wiring harness is completely useless to you. Just remove it and keep it if you want, but you don't need it.
As for a ghetto canceler, you can try a 4700uF, 35v capacitor across the leads. You want to place it on the set of wires connected to the "yellow" plug. Don't mean to doubt your abilities doc, but capacitors can explode violently if not hooked up properly. Maybe best to stick to staring at women's private parts and just order some cancelers.
As for a ghetto canceler, you can try a 4700uF, 35v capacitor across the leads. You want to place it on the set of wires connected to the "yellow" plug. Don't mean to doubt your abilities doc, but capacitors can explode violently if not hooked up properly. Maybe best to stick to staring at women's private parts and just order some cancelers.
06-24-2010, 06:15 PM
#15
Senior Member
Thread Starter
Hahaha, I love your humor, and no, I'm not a Gynecologist :P I'll just stick with the ordinary person's choice: Cancelers. I appreciate all of your help, if you need any prostate problems, i'm here to help.
Kidding, lmao
Kidding, lmao


