
SL55/63/65/R230 AMG: DIY: SL R230 Side Mirrors Removal
 08-09-2011, 01:33 AM
#1
MBWorld Fanatic!
Thread Starter
Join Date: Mar 2009
Location: Chicago
Posts: 2,630
Likes: 0
Received 9 Likes
on
6 Posts
W215 V12TT Build by Speedriven, W221 S550 4Matic
DIY: SL R230 Side Mirrors Removal
So after wanting to remove my own mirrors and spending some time looking around on the forum and all over the internet for a DIY on removing the R230 SL side mirrors with no luck I decided to take this on myself, and write up a nice DIY for you guys in case you want to remove these in the future.
The purpose of my removal is to get the mirrors redone in Carbon Fiber in case someone is wondering why I'm doing this.
STEP ONE: (Removing the door panel)
First make sure that the windows on the car are down this will make things easier down the line.
Second make sure that you remove the triangle shaped piece from the inside of the car on the other side of the mirror located all the way in the corner of the door. (this simply snaps back and you have to pull up to get it out *very easy*)
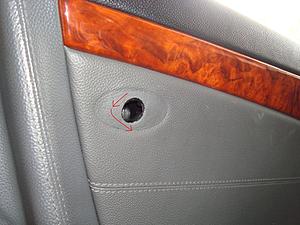
Third you will need to remove the bolt behind the SRS plastic cover on panel. You do this by turning it counter clock wise with your hand and pull it out when it stops turning. Once that is done there is a bolt that is inside and you will have to get out. Don't worry if the bolt falls down, the panel is coming off anyway so you will find it when you pull it off.
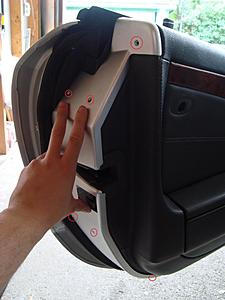
Fourth you will need to take all the bolts out of the side (silver) trim piece. There are 6 bolts that hold this on. Don't forget about the one all the way at the bottom that can't easily be seen like the others. I marked them all in this picture
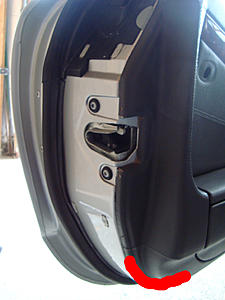
Fifth you will need to start pulling the side panel off. Start at the edge where I marked it in the next photo and do it with a flat head screw driver and pry it nice and slow going from the edge all the way across the bottom of the door. Once you got it off just a bit put your fingers in there and pull on it to make sure all the clips come loose from the actual door. Don't worry they clips will not break they simply snap off.
Sixth you will need to grab the bottom of the panel and push it up to get the panel to come off the door. After you push it up it will let loose and should come down. It will not completely come off since there are wires still attached to the door. You will not need to take it completely off so do not disconnect anything and let the panel hang on the door.
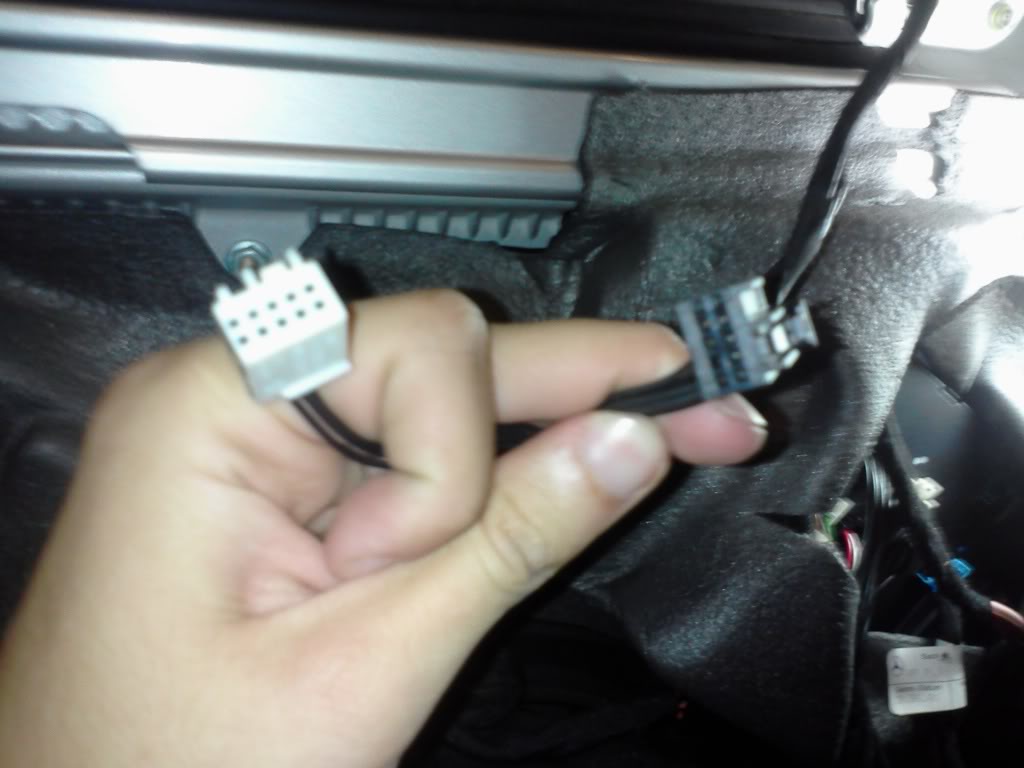
Your seventh step is to locate the wires coming from the mirror to the door and simply unplug them.

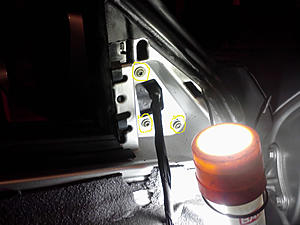
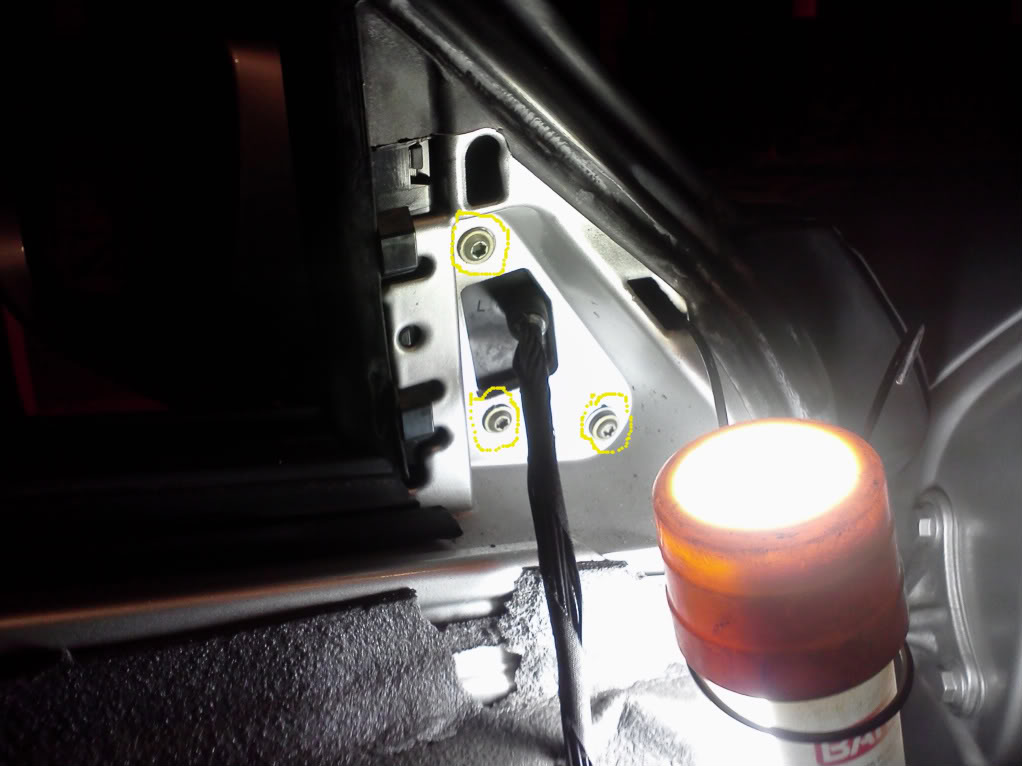
Your eight step is to locate the 3 screws that are on the other side of the mirror. You will use the same size tool as you did on the SRS bolt before to remove these 3. WARNING: WHEN YOU REMOVE THE BOLTS MAKE SURE YOU HOLD THE MIRROR FROM THE OTHER SIDE SO THAT IT DOES NOT FALL COMPLETELY OFF AND HIT THE GROUND.
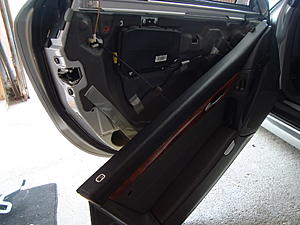
You are all done now. The finished product looks something like this

Repeat the same steps for the other side and good luck. This is not hard at all just need some practice. First door took me about 20 minutes and the second about 10 minutes.
GOOD LUCK GUYS

The purpose of my removal is to get the mirrors redone in Carbon Fiber in case someone is wondering why I'm doing this.
STEP ONE: (Removing the door panel)
First make sure that the windows on the car are down this will make things easier down the line.
Second make sure that you remove the triangle shaped piece from the inside of the car on the other side of the mirror located all the way in the corner of the door. (this simply snaps back and you have to pull up to get it out *very easy*)
Third you will need to remove the bolt behind the SRS plastic cover on panel. You do this by turning it counter clock wise with your hand and pull it out when it stops turning. Once that is done there is a bolt that is inside and you will have to get out. Don't worry if the bolt falls down, the panel is coming off anyway so you will find it when you pull it off.

Fourth you will need to take all the bolts out of the side (silver) trim piece. There are 6 bolts that hold this on. Don't forget about the one all the way at the bottom that can't easily be seen like the others. I marked them all in this picture

Fifth you will need to start pulling the side panel off. Start at the edge where I marked it in the next photo and do it with a flat head screw driver and pry it nice and slow going from the edge all the way across the bottom of the door. Once you got it off just a bit put your fingers in there and pull on it to make sure all the clips come loose from the actual door. Don't worry they clips will not break they simply snap off.

Sixth you will need to grab the bottom of the panel and push it up to get the panel to come off the door. After you push it up it will let loose and should come down. It will not completely come off since there are wires still attached to the door. You will not need to take it completely off so do not disconnect anything and let the panel hang on the door.

Your seventh step is to locate the wires coming from the mirror to the door and simply unplug them.
Your eight step is to locate the 3 screws that are on the other side of the mirror. You will use the same size tool as you did on the SRS bolt before to remove these 3. WARNING: WHEN YOU REMOVE THE BOLTS MAKE SURE YOU HOLD THE MIRROR FROM THE OTHER SIDE SO THAT IT DOES NOT FALL COMPLETELY OFF AND HIT THE GROUND.
You are all done now. The finished product looks something like this

Repeat the same steps for the other side and good luck. This is not hard at all just need some practice. First door took me about 20 minutes and the second about 10 minutes.
GOOD LUCK GUYS

The following users liked this post:
GVIZ (09-14-2023)
08-10-2011, 02:04 AM
#2
MBWorld Fanatic!
First, you can buy plastic pry tools for levering off the door panel which will not leave a mark and are much less likely to break the clips. Second. Carbon mirrors and the wood insert as a combination. Are you mad?!?!
08-10-2011, 02:15 AM
#3
MBWorld Fanatic!
Thread Starter
Join Date: Mar 2009
Location: Chicago
Posts: 2,630
Likes: 0
Received 9 Likes
on
6 Posts
W215 V12TT Build by Speedriven, W221 S550 4Matic
It is a good idea to use a plastic pry tool as well, I was really carefull and as soon as I got enought gap so my fingers would fit I did the pulling off with my hands.
 09-07-2011, 09:11 PM
#4
Newbie

Join Date: Sep 2011
Location: Georgetown, TX
Posts: 2
Likes: 0
Received 0 Likes
on
0 Posts
2005 SL500R, 2000 SLK230, F-150 FX4
Removal of the mirror looks simple, but how does the mirror disassemble? Does the side turn signal lens remove easily? I have a cracked lens to replace on an 2005 SL500 and I am attempting to figure out how to get it apart.
Thanks for any insight. Todd
Thanks for any insight. Todd
09-15-2011, 02:23 PM
#5
Newbie
Join Date: Sep 2011
Location: Georgetown, TX
Posts: 2
Likes: 0
Received 0 Likes
on
0 Posts
2005 SL500R, 2000 SLK230, F-150 FX4
Found a link.. https://mbworld.org/forums/sl-class-...s-cracked.html There is also a youtube video. 10 minutes a Signal light to replace.
Thanks anyway...
Thanks anyway...
09-15-2011, 06:29 PM
#6
MBWorld Fanatic!
Nice write up. My passenger mirror is starting to fail (looks like water spots on the mirror). I might just replace it myself.

Trending Topics
07-14-2014, 04:40 PM
#9
Super Member
I could prob. help you out ... but the wood is so special that it has to be matched with trim console .... what do you have at present?


