
'98 C230 Headliner Repair/Renew with Pix
 07-02-2012, 05:52 PM
#1
Senior Member
Thread Starter
'98 C230 Headliner Repair/Renew with Pix
Starting a separate thread on this particular job because from what I was able to find, there isn't that much detailed information including pictures that could answer some of the questions I had before I started. This is a work in progress, so far I have gotten the headliner out of the car and have started removing all the nasty orange foam bits. It is slow going and the weather here is in the 90's, so I have to take my time.
All the seats have been removed from the car. It's not that hard a job and it makes it easier to maneuver the headliner out of the car. And if the car was as dirty and junk filled as mine was, you really want to get the seats out so you can clear it out and clean the carpets underneath.
Here are some shots of the headliner still in the car, I pulled out about half the material, there wasnt much holding it up anyway.


Here you can see the clip locations on the A pillar. I found it was best to pull it up from the bottom as there is a hook tab on the top. Generally that seems to be the best way to remove the other pillar trim as well.

Here you can see the condition of the C pillar. It comes loose starting at the bottom edge near the seat and then working up. There are two clips that hook under the cover for the rear deck. You have to unfasten the seat belt at the bottom so you can thread it all out through the slot.

Here you can see the back of the panel with the clip tabs and one of the base hooks.

Here is the naked C pillar:

And here is the naked B pillar. You can see the clips (2 sets) on the top half and one set much closer to the bottom. I had to tug a bit to get the covers off, the clips tended to want to grab the fabric on the trim. Good thing I'm recovering it all anyway.

All the seats have been removed from the car. It's not that hard a job and it makes it easier to maneuver the headliner out of the car. And if the car was as dirty and junk filled as mine was, you really want to get the seats out so you can clear it out and clean the carpets underneath.
Here are some shots of the headliner still in the car, I pulled out about half the material, there wasnt much holding it up anyway.
Here you can see the clip locations on the A pillar. I found it was best to pull it up from the bottom as there is a hook tab on the top. Generally that seems to be the best way to remove the other pillar trim as well.
Here you can see the condition of the C pillar. It comes loose starting at the bottom edge near the seat and then working up. There are two clips that hook under the cover for the rear deck. You have to unfasten the seat belt at the bottom so you can thread it all out through the slot.
Here you can see the back of the panel with the clip tabs and one of the base hooks.
Here is the naked C pillar:
And here is the naked B pillar. You can see the clips (2 sets) on the top half and one set much closer to the bottom. I had to tug a bit to get the covers off, the clips tended to want to grab the fabric on the trim. Good thing I'm recovering it all anyway.
 07-02-2012, 06:08 PM
#2
Senior Member
Thread Starter
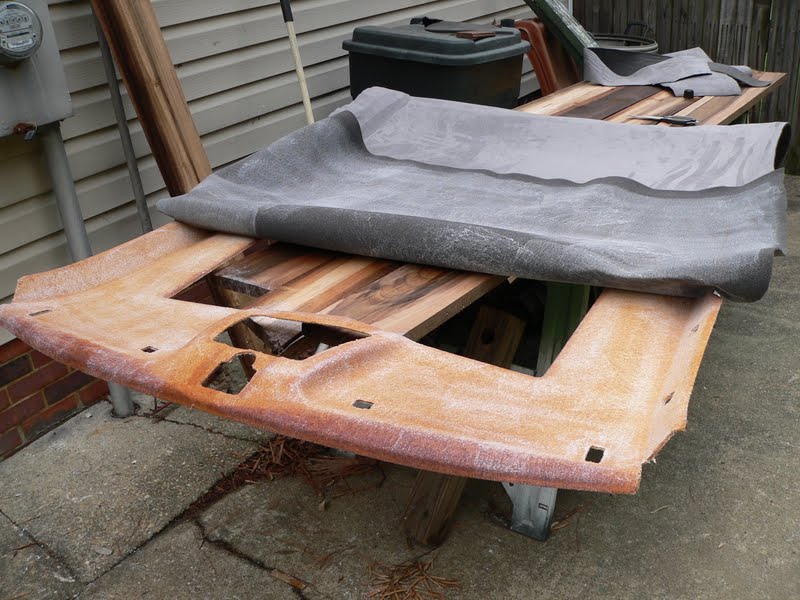
Continuing on. Rear dome light hanging loose. It just pops out of the metal insert ring. There is one hook right near the hole for it that holds it to the metal frame of the ceiling. There are also two metal fasteners that looked like they were originally glued to the back of the headliner board that stayed up in the ceiling. I will probably put some contact cement on those and the back of the board and hope they resume their former relationship...

Here you can see the headliner hanging down. Those two little "X" marks are the glue residue from the two former attachment points.

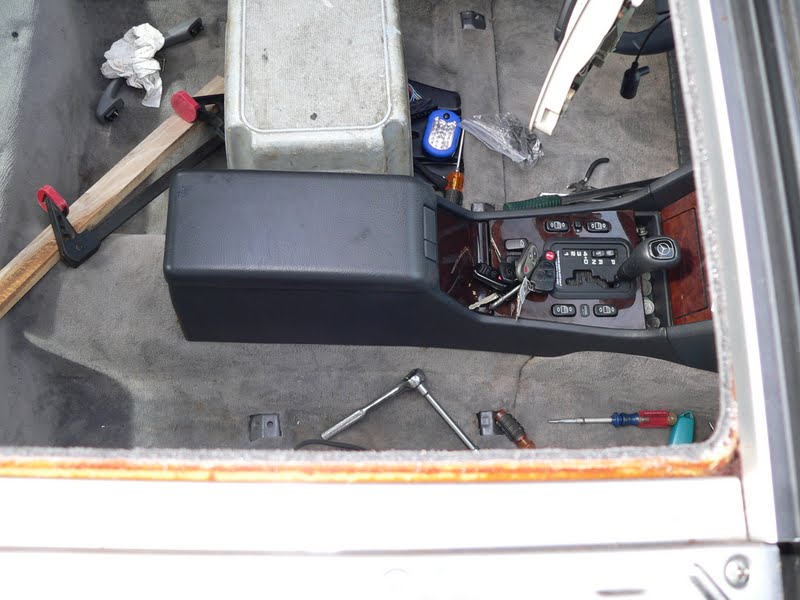
Getting the headliner board out was a bit tricky. You need an extra set of hands and somebody that can conceptualize how to maneuver this big board out of a small opening. So ask somebody other than your wife unless she is really good at that sort of thing. It was a very tight fit and while it did make it out the passenger front door, we did have to bend it very slightly so it would clear the console. As it was, I had to take the gear shift and move it all the way back for the board to get by. The board is fiberglass, but very thin and the edges are especially vulnerable to breaking. You have to take your time and go slow, but it will come out.

I'll post more photos as I go along. Started scraping off the foam residue outside. I'm hesitant to use any solvent, I don't want the residue reacting with the glue for the new material. That material should be here tomorrow, so hopefully more pix in a day or so. I also need to figure out how to get the sunroof panel board out without a major dismantle of the sunroof. If anybody has a question of comment feel free. If you want photos of a particular part, just let me know.
Bob
Here you can see the headliner hanging down. Those two little "X" marks are the glue residue from the two former attachment points.
Getting the headliner board out was a bit tricky. You need an extra set of hands and somebody that can conceptualize how to maneuver this big board out of a small opening. So ask somebody other than your wife unless she is really good at that sort of thing. It was a very tight fit and while it did make it out the passenger front door, we did have to bend it very slightly so it would clear the console. As it was, I had to take the gear shift and move it all the way back for the board to get by. The board is fiberglass, but very thin and the edges are especially vulnerable to breaking. You have to take your time and go slow, but it will come out.
I'll post more photos as I go along. Started scraping off the foam residue outside. I'm hesitant to use any solvent, I don't want the residue reacting with the glue for the new material. That material should be here tomorrow, so hopefully more pix in a day or so. I also need to figure out how to get the sunroof panel board out without a major dismantle of the sunroof. If anybody has a question of comment feel free. If you want photos of a particular part, just let me know.
Bob
 07-03-2012, 09:42 PM
#5
Senior Member
Thread Starter
Material came today, probably lighter than I would have picked otherwise, but should look nice. Spent some time yesterday in the evening scraping the headliner board. Got most of the foam residue off. Need to be gentle, the board is so thin and the base fibers are semi exposed with not all that much resin holding them together. Will probably not get to work on this till Friday. I also need to order at least a yard more of material to cover the trim pieces so I'm thinking I might order a slightly darker gray/charcoal color in a suede type finish. This would emulate the two tone treatment the car had with the original vinyl covering.
Headliner material I just got which is lighter than the trim gray:

Potential suede like material for trim in a darker charcoal:

Headliner material I just got which is lighter than the trim gray:
Potential suede like material for trim in a darker charcoal:
07-03-2012, 10:30 PM
#6
I like the grey interior much better than my tan/beige color. A lot more elegant in my opinion. The beige really dates the car. I think the lighter color grey would look a lot better.
The darker color would make it feel a bit claustrophobic in my opinion.
Anyway it's all just time wasting fun if your a fuss budget like I am.
I will post some photos of my PT Cruiser, and you can see how fussy I am.
When I am finished with the 230 I will post those as well.
Keep us tuned to you valiant effort in replacing the head liner.
07-04-2012, 10:36 PM
#7
Senior Member
Thread Starter
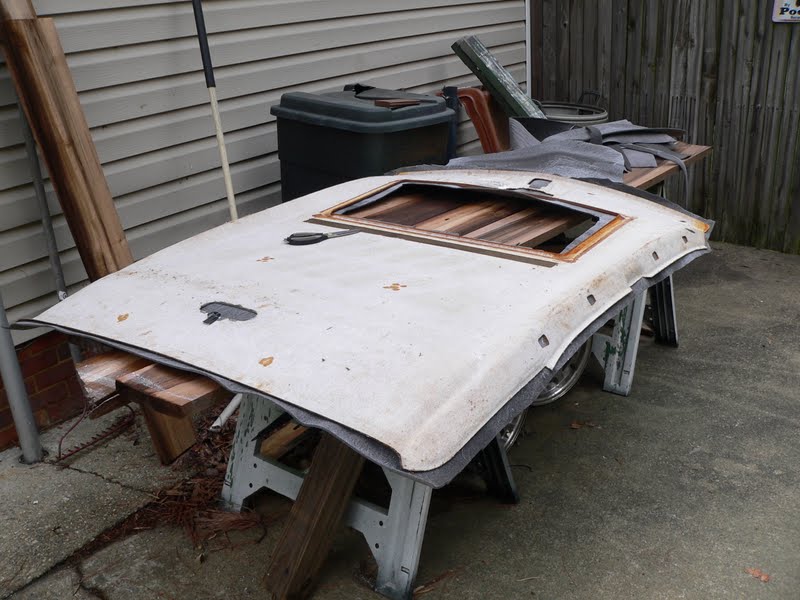
Made some progress this morning on getting the sunroof shade panel out. It was not inherently obvious, some searching on the web led to one posting about removing the two side bellows and a plastic piece up toward the front. After playing around with it for a half hour and getting nowhere, I went back and re-read the post again and came back out and decided to remove the plastic trim in the front that looks like this:

Like most of the plastic it was a bit brittle and even though I was as gentle as I could be one of the small tabs cracked. Guess if it doesnt go back snug a little silicone should help things a bit. The bellows refer to the two rubber side pieces that attach to the glass and the moving frame and keep rain out when the glass is tilted up. The top of the rubber slips into a channel alongside the glass and you can see there are a couple of small metal clips in the middle.


Toward the back, there is a small clip thing that you need to fit a small screwdriver in under the metal and pry it up a wee bit and the rubber bellows will slide inward free and clear. Then you can remove it out of the way.


After you get both rubber pieces out, then you lower the glass panel back down from the tilted position and slide it back retracting it about 2-3 inches from its furthest travel. At that point you can pull the inner panel forward and then tilt it up and out of the car. The basic mechanism of the sunroof hasn't been touched so no adjustment should be necessary.


I did start to clean it up a bit. There is actually a cloth layer that was attached to the base material which is again some sort of fiberglass panel. I removed that since it was not going to clean up smooth enough for the new material. I did try and push out one of the louver panels and it rewarded me by promptly cracking. 14 years sitting under a glass exposed to the southern sun, and it's a bit dry and crispy. Go figure. Not sure what I will do about it. I've never seen a sunroof panel with louvers in it before, I guess it was supposed to help avoid excess heat buildup in that area in between? Only Mercedes.
One thing I will do before I start to put everything back together is to pull the drain hoses for each of the 4 corners of the sunroof drain and flush them and make sure they are working. Easy enough with everything exposed.
More to come, stay tuned.
Like most of the plastic it was a bit brittle and even though I was as gentle as I could be one of the small tabs cracked. Guess if it doesnt go back snug a little silicone should help things a bit. The bellows refer to the two rubber side pieces that attach to the glass and the moving frame and keep rain out when the glass is tilted up. The top of the rubber slips into a channel alongside the glass and you can see there are a couple of small metal clips in the middle.
Toward the back, there is a small clip thing that you need to fit a small screwdriver in under the metal and pry it up a wee bit and the rubber bellows will slide inward free and clear. Then you can remove it out of the way.
After you get both rubber pieces out, then you lower the glass panel back down from the tilted position and slide it back retracting it about 2-3 inches from its furthest travel. At that point you can pull the inner panel forward and then tilt it up and out of the car. The basic mechanism of the sunroof hasn't been touched so no adjustment should be necessary.
I did start to clean it up a bit. There is actually a cloth layer that was attached to the base material which is again some sort of fiberglass panel. I removed that since it was not going to clean up smooth enough for the new material. I did try and push out one of the louver panels and it rewarded me by promptly cracking. 14 years sitting under a glass exposed to the southern sun, and it's a bit dry and crispy. Go figure. Not sure what I will do about it. I've never seen a sunroof panel with louvers in it before, I guess it was supposed to help avoid excess heat buildup in that area in between? Only Mercedes.
One thing I will do before I start to put everything back together is to pull the drain hoses for each of the 4 corners of the sunroof drain and flush them and make sure they are working. Easy enough with everything exposed.
More to come, stay tuned.
Trending Topics
07-04-2012, 10:41 PM
#8
Junior Member

Join Date: Aug 2011
Posts: 37
Likes: 0
Received 0 Likes
on
0 Posts
2016 SLK 300
Made some progress this morning on getting the sunroof shade panel out. It was not inherently obvious, some searching on the web led to one posting about removing the two side bellows and a plastic piece up toward the front. After playing around with it for a half hour and getting nowhere, I went back and re-read the post again and came back out and decided to remove the plastic trim in the front that looks like this:
Like most of the plastic it was a bit brittle and even though I was as gentle as I could be one of the small tabs cracked. Guess if it doesnt go back snug a little silicone should help things a bit. The bellows refer to the two rubber side pieces that attach to the glass and the moving frame and keep rain out when the glass is tilted up. The top of the rubber slips into a channel alongside the glass and you can see there are a couple of small metal clips in the middle.
Toward the back, there is a small clip thing that you need to fit a small screwdriver in under the metal and pry it up a wee bit and the rubber bellows will slide inward free and clear. Then you can remove it out of the way.
After you get both rubber pieces out, then you lower the glass panel back down from the tilted position and slide it back retracting it about 2-3 inches from its furthest travel. At that point you can pull the inner panel forward and then tilt it up and out of the car. The basic mechanism of the sunroof hasn't been touched so no adjustment should be necessary.
I did start to clean it up a bit. There is actually a cloth layer that was attached to the base material which is again some sort of fiberglass panel. I removed that since it was not going to clean up smooth enough for the new material. I did try and push out one of the louver panels and it rewarded me by promptly cracking. 14 years sitting under a glass exposed to the southern sun, and it's a bit dry and crispy. Go figure. Not sure what I will do about it. I've never seen a sunroof panel with louvers in it before, I guess it was supposed to help avoid excess heat buildup in that area in between? Only Mercedes.
One thing I will do before I start to put everything back together is to pull the drain hoses for each of the 4 corners of the sunroof drain and flush them and make sure they are working. Easy enough with everything exposed.
More to come, stay tuned.
All the money I had saved toward a new interior roof, just went to an instrument cluster. Back to saving again.
Keep up the photos of progress.
Thanks
07-05-2012, 06:21 AM
#10
Junior Member
Join Date: Aug 2011
Posts: 37
Likes: 0
Received 0 Likes
on
0 Posts
2016 SLK 300
It may be the same place you have sourced your fabric.
The only place I found them was through headlinerexpress in the internet.
The louvers are the last item when you select headliners, Mercedes. Bottom of page 4.
The only place I found them was through headlinerexpress in the internet.
The louvers are the last item when you select headliners, Mercedes. Bottom of page 4.
 07-09-2012, 09:05 PM
#12
Senior Member
Thread Starter
Headliner recovered
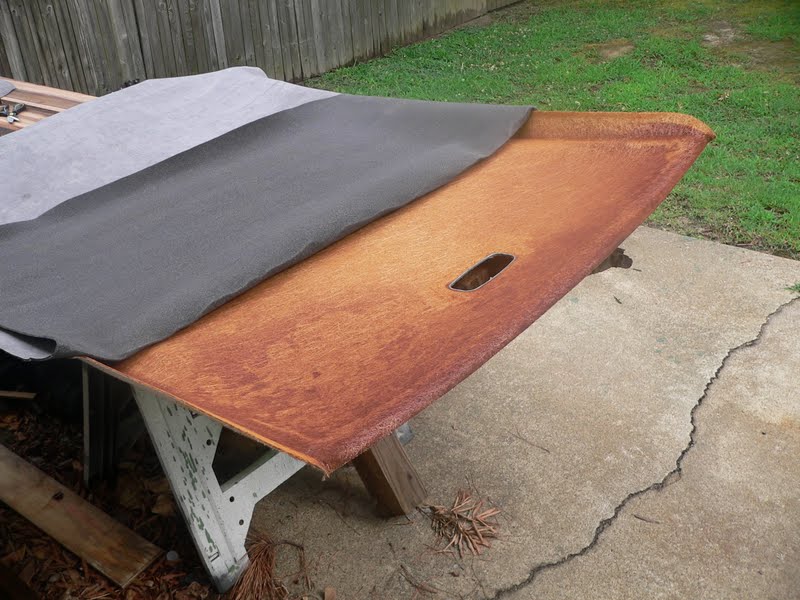
Well the material came today and I wasted no time getting to work on the headliner. I had previously cleaned up the board as best I could and even today did a bit more scraping and using the vac to pic up whatever loose bits of foam I could. I measured out the board and it was just a bit longer than 60" but since the material is 60" wide I ended up cutting a piece that was about 68" long so I would be sure to have enough, especially with the contours that needed to be covered. This material was a grey suede material that I got online from Miami corp for about 16 bucks a yard. I bought 4 yards to be sure I had enough for the headliner as well as all the trim pieces.
Here is the material laid out on the prepped board, cut oversize but not trimmed yet.
Applying the glue (second section):

Moving right along:
Flipped over, starting to trim:
Opening up for the dome lamp assembly:

Getting closer:

Done:

I also recovered the two A pillar trim pieces, no pix of those, was loosing light and wanted to get done. They were easier than the headliner since they were much smaller. Actually used scraps from the headliner section for both. Fairly happy with how they turned out and I like the suede material for looks as well as the darker shade of grey. I suppose if I were to do it again it would come out a bit better, there are a couple of areas with some creases, but not a bad first try. Used one can of spray adhesive for the headliner, hopefully the second can will do all the trim. More to come.
Here is the material laid out on the prepped board, cut oversize but not trimmed yet.
Applying the glue (second section):
Moving right along:
Flipped over, starting to trim:
Opening up for the dome lamp assembly:
Getting closer:
Done:
I also recovered the two A pillar trim pieces, no pix of those, was loosing light and wanted to get done. They were easier than the headliner since they were much smaller. Actually used scraps from the headliner section for both. Fairly happy with how they turned out and I like the suede material for looks as well as the darker shade of grey. I suppose if I were to do it again it would come out a bit better, there are a couple of areas with some creases, but not a bad first try. Used one can of spray adhesive for the headliner, hopefully the second can will do all the trim. More to come.
07-11-2012, 03:16 PM
#13
It just crossed my mind that since you have found a place to get your used parts, can you tell me if they may have a RR door sill/scuff plate?
Seems I am missing that one, and can't find one on any searches...
Thanks
Seems I am missing that one, and can't find one on any searches...
Thanks
07-12-2012, 09:30 PM
#14
Senior Member
Thread Starter
Not sure if it is there or what shape it is in, that is the side the car was hit on and the doors dont open. All the parts I have picked off this car were gotten by going in through the missing drivers door and were sitting inside. Rear window was gone and the 3rd brake light was hanging loose. Have you tried a wtb?, there is one guy over on benzworld that is parting out a c series, he may have it. I can pm you that info or go on the site and look in the forsale board.
07-12-2012, 09:59 PM
#15
Senior Member
Thread Starter
When things just don't go right...
OK, if you thought everything was going honky dory, think again. For some reason and I can't explain why, I cut the material off flush with the edge of the sunroof rather than rolling it over. I thought it would somehow tuck under the metal frame that remained in the car, glued to the roof. Well it didn't so now I had a raw edge of exposed board and unfinished material looking down through the roof.
After stewing about it I came up with a plan. I would apply some of that U channel edging they use to prevent door dings. Went out this morning and got a roll of it for about 11 bucks at the local advance auto. Like all good ideas, execution left something to be desired. But this wasn't the first trouble spot I ran into. I tried to cover one of the c pillars and it turned into a mess. Problem is that the cover has a fairly sharp drop off that turns into a concave area that caused the material to bunch up very badly. Fortunately we have a friend who is a very talented seamstress and can do just about anything with fabric. I asked her for some help on the c pillar and she came over this morning as I was struggling to get the molding on the sunroof opening edge. Long story short, she was able to manipulate the plastic edge so that it nicely covered up the edge and should hopefully hang in place as it has a glue strip inside in the middle. Moral of the story: if things go too easy, Murphy hasn't gotten here yet. Moral 2: Be very glad for your friends with special talents:

We still haven't gotten the C pillars done, but from this picture you can see why they are a bit problematic:

Glad I bought 4 yards, hopefully it will be enough for everything. And the pillar trim had no foam backing, it was only a cloth covering, so using this material with the foam is fine on the A pillar, should be fine on the B pillar and we will see how the C pillar turns out tomorrow.
Finally, I tried using some silicone to act as a glue to hold the headliner board up to the roof. Previously there was some glue residue on both the board and the roof, so I know that is how they held it there, besides the hand fixtures and the around the door trim. Well, this morning I found that the silicone let go and I easily peeled it out from the board. Now I need to find another type of adhesive to try.
Holding up the board to set the adhesive:

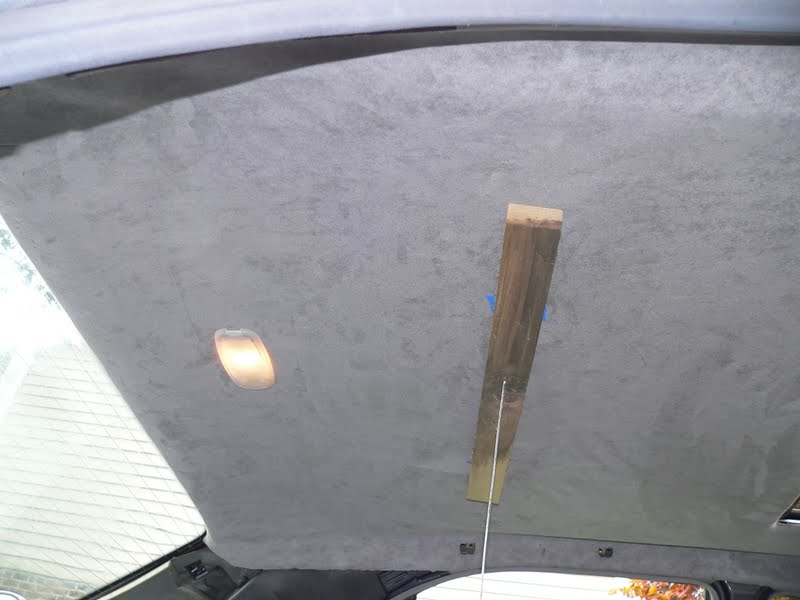
Stay tuned, it aint over yet.
After stewing about it I came up with a plan. I would apply some of that U channel edging they use to prevent door dings. Went out this morning and got a roll of it for about 11 bucks at the local advance auto. Like all good ideas, execution left something to be desired. But this wasn't the first trouble spot I ran into. I tried to cover one of the c pillars and it turned into a mess. Problem is that the cover has a fairly sharp drop off that turns into a concave area that caused the material to bunch up very badly. Fortunately we have a friend who is a very talented seamstress and can do just about anything with fabric. I asked her for some help on the c pillar and she came over this morning as I was struggling to get the molding on the sunroof opening edge. Long story short, she was able to manipulate the plastic edge so that it nicely covered up the edge and should hopefully hang in place as it has a glue strip inside in the middle. Moral of the story: if things go too easy, Murphy hasn't gotten here yet. Moral 2: Be very glad for your friends with special talents:
We still haven't gotten the C pillars done, but from this picture you can see why they are a bit problematic:
Glad I bought 4 yards, hopefully it will be enough for everything. And the pillar trim had no foam backing, it was only a cloth covering, so using this material with the foam is fine on the A pillar, should be fine on the B pillar and we will see how the C pillar turns out tomorrow.
Finally, I tried using some silicone to act as a glue to hold the headliner board up to the roof. Previously there was some glue residue on both the board and the roof, so I know that is how they held it there, besides the hand fixtures and the around the door trim. Well, this morning I found that the silicone let go and I easily peeled it out from the board. Now I need to find another type of adhesive to try.
Holding up the board to set the adhesive:
Stay tuned, it aint over yet.
07-13-2012, 08:43 AM
#16
Super Member

Join Date: Nov 2001
Location: Henrico, Virginia
Posts: 773
Likes: 0
Received 52 Likes
on
41 Posts
2014 ML350 4Matic
The headliner is NOT glued to the roof. There should be 2 clips that hold it to the back of the sunroof frame (in the area where your block of wood is holding it up). When you fit the headliner you need to slide it forward to engage the clips.
07-13-2012, 10:11 AM
#17
Senior Member
Thread Starter

You can see the glue lines on the back of the board:
Last edited by aquinob; 07-13-2012 at 10:15 AM.
07-13-2012, 05:57 PM
#18
Super Member
Join Date: Nov 2001
Location: Henrico, Virginia
Posts: 773
Likes: 0
Received 52 Likes
on
41 Posts
2014 ML350 4Matic
Disagree if you like. The headliners are made to be removed. Glue would defeat that. I have done two of these in the last year, and, as I stated, they were not glued (one so the Dent Wizard could push out a nasty dent courtesy of an errant golf ball and one to replace the entire sunroof assembly). The clips were still attached to the headliner as they should be. If your clips have come loose, re-attach them to the headliner with some epoxy and a bit of fiberglass cloth as reinforcement. Also, there are 2 clips on each side of the sunroof opening (Part #140 784 00 35). You disengage them through slots in the sunroof frame (they are a PITA). To do any of that you need to get the sunshade of of the way. Remove the glass, slide the shade out, reinstall the glass temporarily if need be. You need to get the shade out of the way to properly engage the lips of the assembly onto the metal frame around the sunroof opening.
Your car may have been worked on by someone who didn't know what they were doing at sometime in the past. That might explain the glue business. Perhaps they broke the clips off not knowing that the headliner needs to slide back to be removed, then tried to cover their screwup with glue. You're doing a nice job so make it right while you are at it.
You may also want to subscribe to the factory site www.startekinfo.com for 24 hours ($18.00). You can print the procedures for this job and anything else you can think of while you are at it.
07-14-2012, 10:45 AM
#19
Senior Member
Thread Starter
Thanks. Would you have any idea why the sunroof would only want to open and not close after I put the dome light console back in? Is it related to a computer or ecu reset?
07-14-2012, 12:03 PM
#20
Super Member
Join Date: Nov 2001
Location: Henrico, Virginia
Posts: 773
Likes: 0
Received 52 Likes
on
41 Posts
2014 ML350 4Matic
Does it move at all in the close direction? If so, try "bumping" it in the close direction, a step at a time, until it is fully closed. Then cycle it fully in each direction. It may go all the way to the "vent" position the first time. Usually this occurs after the battery goes dead or is disconnected.
07-14-2012, 04:13 PM
#21
I never thought joining this forum would be so interesting......
Lots of good stuff and interesting people with good ideas, and informative answers.
I have a PT Cruiser Convertible, with hardly any miles on it, so it gives me something to polish when frustrated. You should try that site for an answer!
Seems the only interesting things (to them) is how to blow the windows out with you stereo, and beef up the Turbo, so the engine will blow up.
I also have a Jeep Unlimited, and all they discuss is climbing up a hill in reverse, and other mundane topics.
This site is really excellent. Must be the price of the toys that brings out intelligent answers.
07-14-2012, 05:58 PM
#22
Senior Member
Thread Starter
Does it move at all in the close direction? If so, try "bumping" it in the close direction, a step at a time, until it is fully closed. Then cycle it fully in each direction. It may go all the way to the "vent" position the first time. Usually this occurs after the battery goes dead or is disconnected.
 07-15-2012, 03:16 PM
#24
Senior Member
Thread Starter
That's how I have been opening and closing it. Nothing really got disassembled on it in terms of the mechanism, that's why I was wondering if it had something to do with this ecu "reset" problem that occurs with the windows.


