
Finally fixing my balance shaft!
 09-26-2013, 10:44 AM
#51
Super Member
Thread Starter
Join Date: Dec 2008
Location: MD
Posts: 526
Likes: 0
Received 1 Like
on
1 Post
2007 C230 and 1985 Monte SS
Thanks a million!! I will try it out using 3 & 9:00 instead of 12:00 and report back.
I guess breaking the guide would give you enough room to get a pair of vice grips on the lower pin and slide hammer it out. There's no need to though unless you aren't replacing the timing chain. You can just barely jump teeth on the BS to set the timing with the guide in place.
I guess breaking the guide would give you enough room to get a pair of vice grips on the lower pin and slide hammer it out. There's no need to though unless you aren't replacing the timing chain. You can just barely jump teeth on the BS to set the timing with the guide in place.
Last edited by SickSpeedMonte; 09-26-2013 at 10:48 AM.
 09-26-2013, 11:57 AM
#52
Junior Member
Join Date: Sep 2007
Location: Ft Lauderdale, Florida
Posts: 51
Likes: 0
Received 1 Like
on
1 Post
1993 400E
Read page 3 closely, about chain tensioner installation.
http://benzbits.com/BalanceShaftTSB.pdf
d) Replace the chain tensioner. Caution! New timing chain tensioner must be installed and only after the engine head covers
(valve covers) are installed / bolted on. Failure to observe that, will result in the over tightening the timing chain which will ultimately lead to engine head damage. Noted the timing chain tensioner is a single use part. Once the tensioner is installed, it cannot be taken out or readjusted, doing so will result in over tightening of the timing chain as well.
.
Last edited by clarkz71; 09-26-2013 at 12:00 PM.
09-26-2013, 12:03 PM
#53
Junior Member
Join Date: Sep 2007
Location: Ft Lauderdale, Florida
Posts: 51
Likes: 0
Received 1 Like
on
1 Post
1993 400E
This is cool as well. Here's a thread with good information on this issue.
http://www.benzworld.org/forums/w203...detection.html
http://www.benzworld.org/forums/w203...detection.html
Last edited by clarkz71; 09-26-2013 at 12:12 PM.
09-29-2013, 02:06 PM
#54
Super Member
Thread Starter
Join Date: Dec 2008
Location: MD
Posts: 526
Likes: 0
Received 1 Like
on
1 Post
2007 C230 and 1985 Monte SS
Yea unfortunately the oil drain is elevated from the floor of the pan so all of those metal bits stayed in oil change after oil change and there was no indication of anything being off.
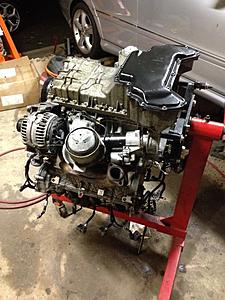
Got the chain installed. The links dont line up with anything. Hey are all 27 links apart from eachother so it doesnt matter which way it goes in. Maybe the chain os rhe same part for the M111/112 and thats why theres no info for the 272. All of the sprockets lined up nicely. When tryig to release the tensioner, I didnt feel or hear any distinct click but the chain seems semi-tight... The engine turned over twice with no problems.
Got the chain installed. The links dont line up with anything. Hey are all 27 links apart from eachother so it doesnt matter which way it goes in. Maybe the chain os rhe same part for the M111/112 and thats why theres no info for the 272. All of the sprockets lined up nicely. When tryig to release the tensioner, I didnt feel or hear any distinct click but the chain seems semi-tight... The engine turned over twice with no problems.
10-19-2013, 06:01 PM
#55
Super Member
Thread Starter
Join Date: Dec 2008
Location: MD
Posts: 526
Likes: 0
Received 1 Like
on
1 Post
2007 C230 and 1985 Monte SS
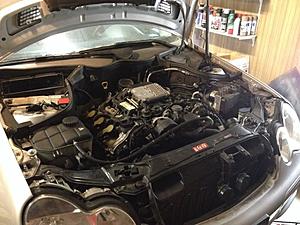
It's all back together. Now I need to get another 12 qts of Mobil 1 so that I can fill with oil and then change it after however many miles the TSB says. Also need to fill with coolant (anything special?) and top off the trans fluid somehow because some leaked out of the lines. The three bolts that connect the intermediate pipe to the rear section of the exhaust snapped so I need to get a few more of those too.
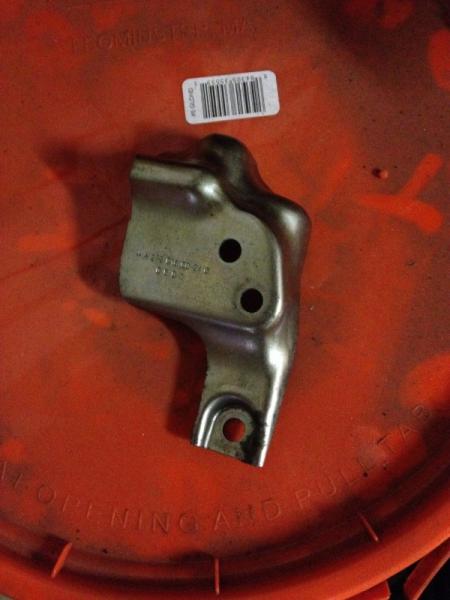
Anyone know what this is?
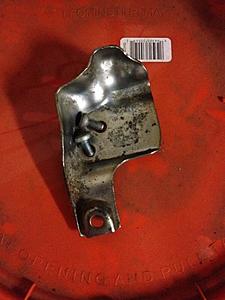
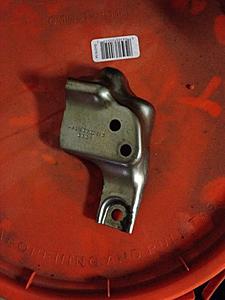
I can't figure out where it goes.
Here are a couple of videos I made when the engine was apart. Just a few tips about the tricky parts.


Anyone know what this is?


I can't figure out where it goes.
Here are a couple of videos I made when the engine was apart. Just a few tips about the tricky parts.
Last edited by SickSpeedMonte; 10-19-2013 at 06:46 PM.
10-20-2013, 09:06 AM
#56
Super Member
Thread Starter
Join Date: Dec 2008
Location: MD
Posts: 526
Likes: 0
Received 1 Like
on
1 Post
2007 C230 and 1985 Monte SS
Does anyone know why there are these little extensions on the wires to the cam position sensors? It seems like it would fit a lot better if I took them off.
10-20-2013, 11:09 AM
#57
Senior Member
I believe they are so that you have enough slack to loop them upwards or tie wrap them upwards so that you don't get the infamous gravity-drainage/capillary effect of oil into your harness if the cam sensors leak. That's been a campaign at least for the M271 engine, and can/will eventually lead to a loss of your ECU. The "fix" for this issue from MB consisted of a couple of harness extensions which when installed gave enough slack for the wiring to be tied/secured with some type of upwards loop so as to prevent any gravity drainage/capillary effect to allow engine oil to make it back to the ECU causing it to fail. Hope this helps!
10-20-2013, 03:55 PM
#60
MBWorld Fanatic!
Join Date: Dec 2006
Location: Toronto, Canada
Posts: 1,105
Likes: 0
Received 11 Likes
on
11 Posts
2019 C300 Wagon; '75 Triumph TR6; previous: 2004 C230 6spd sold after 17 years of driving
missing part, here you go:
how does one attach photos so that they show in the body and not as attached thumbnails? I am stumped by this for the past 7 years

how does one attach photos so that they show in the body and not as attached thumbnails? I am stumped by this for the past 7 years
Last edited by Glyn M Ruck; 10-22-2013 at 06:42 AM.
10-20-2013, 05:21 PM
#61
MBWorld Fanatic!
You need to paste a link to your picture there.
If you uploaded your picture through the forum, then copy the link address of the uploaded pic from the "Attach Files" area, and paste in into the IMG tags.
 10-21-2013, 11:46 AM
#62
Super Member
Thread Starter
Join Date: Dec 2008
Location: MD
Posts: 526
Likes: 0
Received 1 Like
on
1 Post
2007 C230 and 1985 Monte SS
Thanks for the diagram Boom Vang.
If you get the address of the image (by right clicking it, and clicking properties), "wrap" it in the "img" tags. I host my pictures on photobucket, and it gives you the code with the img tags already there. It also links them to photobucket for full-size viewing if you click the picture.
If you get the address of the image (by right clicking it, and clicking properties), "wrap" it in the "img" tags. I host my pictures on photobucket, and it gives you the code with the img tags already there. It also links them to photobucket for full-size viewing if you click the picture.
Last edited by SickSpeedMonte; 10-21-2013 at 11:48 AM.
10-21-2013, 10:31 PM
#64
Senior Member
Join Date: Aug 2013
Location: Toronto, ON
Posts: 283
Likes: 0
Received 2 Likes
on
2 Posts
2012 C300 Sport 4MATIC (current) 2006 C280 Elegance 4MATIC (sold)
It takes some ***** to such a job. Hats off to you sir. When I was changing the air filters and cleaning my MAF sensor I noticed a couple of green check marks and black silicone type sealer around the edges of entire front timing chain cover. Kind of makes me wonder if my car was one of the affected in the group and if the job has already been done by MBZ when the car had it's first owner. If so then good stuff.
10-22-2013, 06:45 AM
#65
Super Moderator

Boom. You can also right click on the image in your attachments & "copy image location". Then hit the "Insert Image" Icon & paste the link. Then it will show in the body as I have done here. If not taken from attachments but from thethumbnail then remember to open the image to full size first & then right click on it or you will just post another thumbnail.
Last edited by Glyn M Ruck; 10-22-2013 at 06:47 AM.
10-25-2013, 06:30 PM
#66
Super Member
Thread Starter
Join Date: Dec 2008
Location: MD
Posts: 526
Likes: 0
Received 1 Like
on
1 Post
2007 C230 and 1985 Monte SS
It takes some ***** to such a job. Hats off to you sir. When I was changing the air filters and cleaning my MAF sensor I noticed a couple of green check marks and black silicone type sealer around the edges of entire front timing chain cover. Kind of makes me wonder if my car was one of the affected in the group and if the job has already been done by MBZ when the car had it's first owner. If so then good stuff.
The timing cover was held on with that black RTV sealant from the factory (at least mine was). There is no gasket there.
I started it up the other night and had a ticking that scared me. It was also hunting for idle and surging. My buddy came over last night and said the ticking was just a lifter that handn't pumped up. He just revved it up a few times and that went away. It sounds great now.
I read that I have to drive it some to get the computer to relearn the throttle? I tried driving it just now and it was surging a lot and it stalled a couple of times. It doesn't like staying at the same throttle position for long and seems to do better if you keep changing throttle position. Alldata says that you have to do a re-learn with STAR... I sure hope that's not the only option. I had the MAF and ECM removed, as well as the battery disconnected to do the job. I reconnected the battery with the key out completely. Any tips?
Other good news: the windows and sunroof sync'd without issue

I still can't figure out exactly where that piece goes, even with the diagram. I don't see or feel any holes for it in that area. What purpose does it serve?
Last edited by SickSpeedMonte; 10-25-2013 at 06:33 PM.
10-26-2013, 12:08 PM
#67
Super Member
Thread Starter
Join Date: Dec 2008
Location: MD
Posts: 526
Likes: 0
Received 1 Like
on
1 Post
2007 C230 and 1985 Monte SS
I read that I have to drive it some to get the computer to relearn the throttle? I tried driving it just now and it was surging a lot and it stalled a couple of times. It doesn't like staying at the same throttle position for long and seems to do better if you keep changing throttle position. Alldata says that you have to do a re-learn with STAR... I sure hope that's not the only option. I had the MAF and ECM removed, as well as the battery disconnected to do the job. I reconnected the battery with the key out completely. Any tips?
I scanned the codes and there was a P0016 in there. P0016 and P0017 together indicate the balance shaft failure quite often (that was what started all of this for me). For some reason, 0016 was still in there. After clearing it and double checking my wiring, I found that one of the tangs was broken on the right intake cam sensor plug. I rigged up a zip-tie masterpiece and it is securely in there now. Started it back up, most of the readiness monitors came back up, and no code. It drives just fine now, no surging or missing.
 10-26-2013, 07:29 PM
#68
Super Member
Thread Starter
Join Date: Dec 2008
Location: MD
Posts: 526
Likes: 0
Received 1 Like
on
1 Post
2007 C230 and 1985 Monte SS
For some reason it's like a 50/50 chance whether it will fire up when starting. Sometimes it turns over until it quits, and other times it just fires up like normal. It seems to run fine once it starts.
10-27-2013, 04:40 AM
#69
MBWorld Fanatic!

Join Date: Jan 2005
Location: Orange County
Posts: 2,848
Likes: 0
Received 15 Likes
on
15 Posts
2005 C Wagon (No snickering please!)
Your gas may be a bit stale after 3 months sitting in the tank. If the fuel filter dried out there will be a wall of mud in there that will be difficult to dissolve.
I would use a bottle of Techron and a full tank of top tier gas with a new fuel filter. There is a regulator in the filter that some aftermarket companies have not mastered. Be sure to get oem or one made by the oe company.
I watched the videos you embedded and all I can say is
 10-27-2013, 07:21 AM
#70
Super Moderator
Yes ~ SSM I think we are all proud of you. It is a big job to DIY. Kudos to you.
10-27-2013, 08:24 AM
#71
Super Member
Thread Starter
Join Date: Dec 2008
Location: MD
Posts: 526
Likes: 0
Received 1 Like
on
1 Post
2007 C230 and 1985 Monte SS
I was thinking about bad gas as well. It's actually been close to 10 months. It was some time in December of 2012 that I had to stop driving it.
Thanks for the compliments I hope that I can be of help to someone else who wants to tackle this. It's really not that bad of a job if you know what you need before you get into it. I have pictures of a lot of the little seals sitting on top of the packaging that shows their part numbers so that we can figure out what is what.
In the video, I mentioned that I was going to try to reset the tensioner. I tried to reset my old one and was unsuccessful, so I ended up having to buy another. The procedure that I found for resetting was for a different style.
Thanks for the compliments
I hope that I can be of help to someone else who wants to tackle this. It's really not that bad of a job if you know what you need before you get into it. I have pictures of a lot of the little seals sitting on top of the packaging that shows their part numbers so that we can figure out what is what. In the video, I mentioned that I was going to try to reset the tensioner. I tried to reset my old one and was unsuccessful, so I ended up having to buy another. The procedure that I found for resetting was for a different style.


