DIY: coil pack connector removal and replacement
 07-10-2013, 11:26 AM
#1
MBWorld Fanatic!
Thread Starter
DIY: coil pack connector removal and replacement
Problem: The plastic connector on the coil packs can break quite easily. More specifically, the retaining clip on the connector can break very easily.
Solutions: There are a few ways around this failure. The first two ‘hackspeed’ methods are – a) leave as is (the connector has enough friction to likely stay in place, or b) use a zip tie to hold the connector in place. Neither of these appealed to my OCD self, and also the one connector was nearly destroyed, potentially exposing the contact on the coil to the elements. Therefore, the tidiest solution is c) replacement of the entire connector.
In the future, the most prudent course of action is probably just to leave the connector in place, as the engine bay heat likely makes the little plastic retaining clip even more brittle. However, doing so comes with its own cons – such as having the coil packs lying around the engine bay whilst you are trying to do something else.
So this is just a quick DIY to remove and replace the coil pack connectors on the engine wiring harness. It is based on my experience wrenching on my ’05 C55, but should be applicable to any M112/M113 engine car. I couldn’t find any DIYs on the subject with photos, just a few discussion threads:
https://mbworld.org/forums/showthread.php?p=4844553
http://www.benzworld.org/forums/r170-slk-class/1529312-anyone-replaced-clip-connectos-sparkplug-coil.html
http://www.benzworld.org/forums/w210-e-class/1638133-02-e430-broken-coil-pack-connector.html
The first step on commencing my spark plug and valve cover gasket replacement was to unclip the coil pack connectors. However, one of them quickly disintegrated in my fingers. Or rather, the retaining clip on the connector immediately failed. Upon closer inspection, several others were marginal or had failed too.
The retaining clip on the connector is all plastic, and the hinge area failed very easily. I found this to be quite a pain in the butt, because my ’99 C43 – same basic engine, same type of coil packs – had metal retaining clips, or at least a portion of the retaining clip was metal. I have had those clips on and off multiple times without one issue, but the very first time I went to disconnect the coil pack connectors on my C55 led to immediate failure.
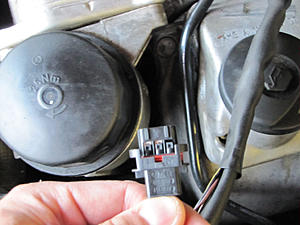
Here is a picture of connector. The retaining clip is in the middle, right above my thumb. This is the bit that breaks easily, as the hinge area behind it is just plastic. The photos show the connector mid install of the contacts. You can see one loose contact in the photo. Look closely and you can just make out the little metal retaining tab. Note the rubber seal and OE crimp on the contact - hard to replicate the crimp without special tools, and I don't mean the regular crimping tools available at the hardware/auto parts store.
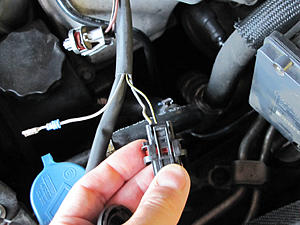
At any rate, if you can remove the contacts from the connector, then you can plug the contacts back into a new connector. I am sure there is a special tool, but I just used a very small screwdriver. The contacts are held in by two metal prongs that need to be depressed. Once depressed, then the contact will slide out.
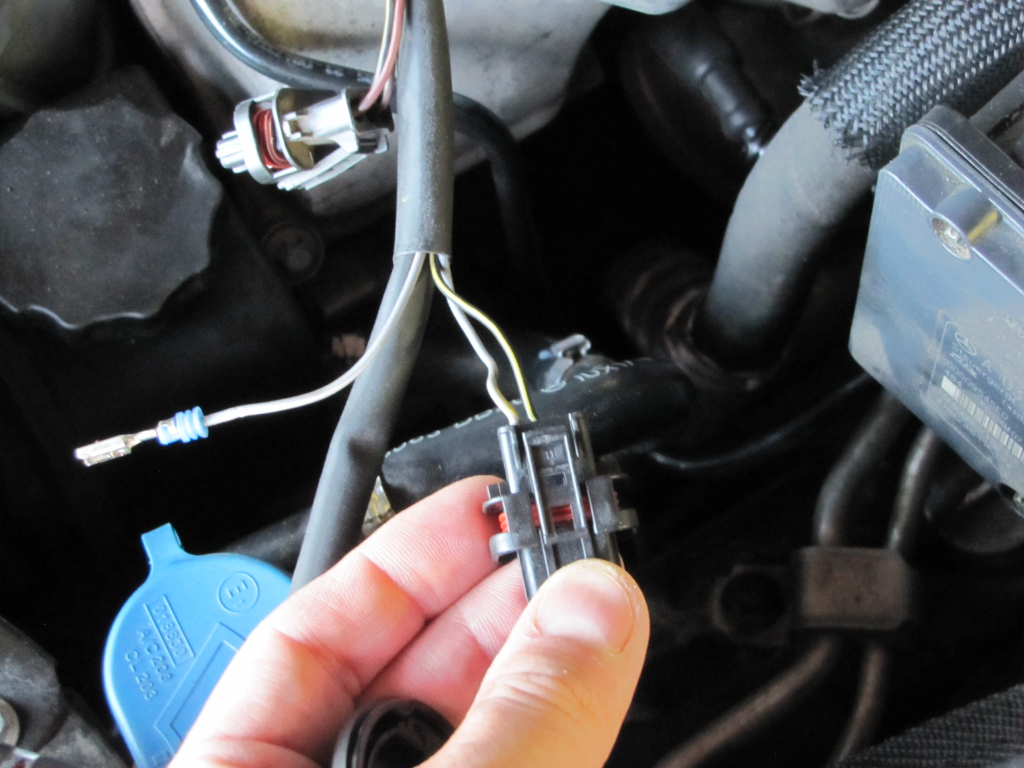
On one side, there are plastic tabs that hold the contact's metal prongs in place. The metal prong on the other side is hidden. What I did was basically destroy the plastic tab on the exposed side. Why not, right? The connector is going to be trashed anyway. Then I used the screwdriver to depress the metal prong on the other, hidden side. Otherwise, if you leave the exposed plastic tab in place, you would need to depress both metal prongs at once to allow the contact to be extracted.
The plastic tabs on the exposed side:
Basically, the screwdriver is inserted next to the contact, pressure applied, then the contact can be extracted by pulling gently, but firmly on the wire.
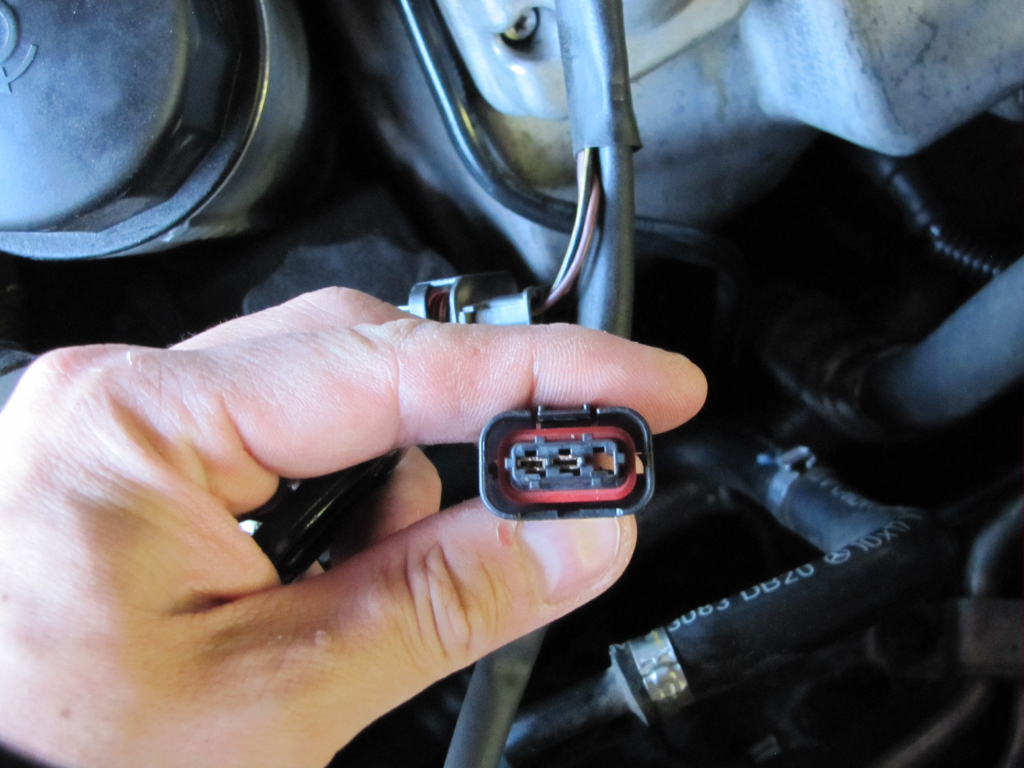
Insert the screwdriver in one of the slots on the end of the connector to depress the metal tab inside:

Careful not to damage the contact itself, otherwise the connector will not connect back up to the coil pack properly.
Installation is simple – just plug the contact back into the connector. However, be sure you put the contact into the correct place on the new connector! The mismatched wire should be in the middle, the outer ones are the same colour. I suspect it doesn’t matter if the outer wires are mixed up, but best not to take any chances. Suggestion – do a single contact at a time, ie. remove one, then insert into new connector immediately.
The part number for the new connector is 203 545 30 28. I paid about C$5.00 each from my local independent Mercedes shop. I’m sure they are cheaper in the US.
If you bugger up the contact, or if you have broken wires at the connector, you can order up the 'repair solution', part number 000 540 38 05. This is just a kit with generic wires with male and female contacts on each end, plus the rubber seals - all in place, crimped and ready to go. Just cut, solder (or use a very high quality butt connector, the type with the goo inside that keeps moisture out) and go.
Hope this DIY helps some people out there!
Solutions: There are a few ways around this failure. The first two ‘hackspeed’ methods are – a) leave as is (the connector has enough friction to likely stay in place, or b) use a zip tie to hold the connector in place. Neither of these appealed to my OCD self, and also the one connector was nearly destroyed, potentially exposing the contact on the coil to the elements. Therefore, the tidiest solution is c) replacement of the entire connector.
In the future, the most prudent course of action is probably just to leave the connector in place, as the engine bay heat likely makes the little plastic retaining clip even more brittle. However, doing so comes with its own cons – such as having the coil packs lying around the engine bay whilst you are trying to do something else.
So this is just a quick DIY to remove and replace the coil pack connectors on the engine wiring harness. It is based on my experience wrenching on my ’05 C55, but should be applicable to any M112/M113 engine car. I couldn’t find any DIYs on the subject with photos, just a few discussion threads:
https://mbworld.org/forums/showthread.php?p=4844553
http://www.benzworld.org/forums/r170-slk-class/1529312-anyone-replaced-clip-connectos-sparkplug-coil.html
http://www.benzworld.org/forums/w210-e-class/1638133-02-e430-broken-coil-pack-connector.html
The first step on commencing my spark plug and valve cover gasket replacement was to unclip the coil pack connectors. However, one of them quickly disintegrated in my fingers. Or rather, the retaining clip on the connector immediately failed. Upon closer inspection, several others were marginal or had failed too.
The retaining clip on the connector is all plastic, and the hinge area failed very easily. I found this to be quite a pain in the butt, because my ’99 C43 – same basic engine, same type of coil packs – had metal retaining clips, or at least a portion of the retaining clip was metal. I have had those clips on and off multiple times without one issue, but the very first time I went to disconnect the coil pack connectors on my C55 led to immediate failure.
Here is a picture of connector. The retaining clip is in the middle, right above my thumb. This is the bit that breaks easily, as the hinge area behind it is just plastic. The photos show the connector mid install of the contacts. You can see one loose contact in the photo. Look closely and you can just make out the little metal retaining tab. Note the rubber seal and OE crimp on the contact - hard to replicate the crimp without special tools, and I don't mean the regular crimping tools available at the hardware/auto parts store.
At any rate, if you can remove the contacts from the connector, then you can plug the contacts back into a new connector. I am sure there is a special tool, but I just used a very small screwdriver. The contacts are held in by two metal prongs that need to be depressed. Once depressed, then the contact will slide out.
On one side, there are plastic tabs that hold the contact's metal prongs in place. The metal prong on the other side is hidden. What I did was basically destroy the plastic tab on the exposed side. Why not, right? The connector is going to be trashed anyway. Then I used the screwdriver to depress the metal prong on the other, hidden side. Otherwise, if you leave the exposed plastic tab in place, you would need to depress both metal prongs at once to allow the contact to be extracted.
The plastic tabs on the exposed side:

Basically, the screwdriver is inserted next to the contact, pressure applied, then the contact can be extracted by pulling gently, but firmly on the wire.
Insert the screwdriver in one of the slots on the end of the connector to depress the metal tab inside:
Careful not to damage the contact itself, otherwise the connector will not connect back up to the coil pack properly.
Installation is simple – just plug the contact back into the connector. However, be sure you put the contact into the correct place on the new connector! The mismatched wire should be in the middle, the outer ones are the same colour. I suspect it doesn’t matter if the outer wires are mixed up, but best not to take any chances. Suggestion – do a single contact at a time, ie. remove one, then insert into new connector immediately.
The part number for the new connector is 203 545 30 28. I paid about C$5.00 each from my local independent Mercedes shop. I’m sure they are cheaper in the US.
If you bugger up the contact, or if you have broken wires at the connector, you can order up the 'repair solution', part number 000 540 38 05. This is just a kit with generic wires with male and female contacts on each end, plus the rubber seals - all in place, crimped and ready to go. Just cut, solder (or use a very high quality butt connector, the type with the goo inside that keeps moisture out) and go.
Hope this DIY helps some people out there!

The following users liked this post:
SergioBrazil (04-16-2021)
07-11-2013, 01:39 PM
#2
MBWorld Fanatic!
Thread Starter
Another thought - last evening I R&R'd a few more of the coil pack connectors. Instead of wasting effort (and potentially deforming the contact), I just destroyed the plastic connector to remove the contact instead.
Because of age and heat, it was pretty simple - the end of the contact came apart pretty easily with just some pressure from a small pair of pliers and side cutters. Once the plastic tab on the exposed side are removed, side cutters or pliers can be used to pick away at the end of the connector. Easy peasy, and the contacts slide right into the new connector right away.
Because of age and heat, it was pretty simple - the end of the contact came apart pretty easily with just some pressure from a small pair of pliers and side cutters. Once the plastic tab on the exposed side are removed, side cutters or pliers can be used to pick away at the end of the connector. Easy peasy, and the contacts slide right into the new connector right away.
The following users liked this post:
jtm65 (12-06-2023)
07-11-2013, 06:04 PM
#5
MBWorld Fanatic!
07-11-2013, 06:30 PM
#6
MBWorld Fanatic!
Thread Starter
Photobucket's been emailing me saying I'm over the free bandwidth limit. I guess I might have to subscribe and get more space. I'm too 'invested' with Photobucket to change - I think I have like 10 gigs of pictures there.
I might try deleting some ones, but one thing I can't stand with DIY links are no photos. I'll have to be sure not to delete any of the DIY particulars.
I might try deleting some ones, but one thing I can't stand with DIY links are no photos. I'll have to be sure not to delete any of the DIY particulars.
08-12-2013, 09:34 PM
#7
Junior Member
Join Date: May 2013
Posts: 20
Likes: 0
Received 0 Likes
on
0 Posts
2005 slk amg 5.5
MY GUY AT EUROCARE HAS MADE SURE ALL THE CLIPS ARE TIGHT AND IT RUNS GREAT AFTER FULLY WARMED UP. HOWEVER, ON A COLD START THE CHECK ENGINE LIGHT COMES ON AND IT SPUTTERS. ONLY #5 SHOWS AS MISFIRING. COULD IT BE A SHORT IN THE HARNESS THAT GOES AWAY WITH ENGINE HEAT ? THE COILS ARE FINE AFTER SWAPPING THOSE. I HAVE A 2005 SLK AMG 5.5.
I AM BRUCE AT rrman9999@yahoo.com and rrman9999 on this forum. Any thoughts ?? Thanks.
I AM BRUCE AT rrman9999@yahoo.com and rrman9999 on this forum. Any thoughts ?? Thanks.
Trending Topics
08-14-2013, 06:58 PM
#8
Super Moderator Alumni
08-14-2013, 09:09 PM
#9
MBWorld Fanatic!


