
upper intake removal m113?
 12-19-2008, 03:10 PM
#1
MBWorld Fanatic!
Thread Starter
Join Date: Dec 2007
Location: Rochester, MN
Posts: 1,100
Likes: 0
Received 0 Likes
on
0 Posts
sounds like airplane
upper intake removal m113?
is it as easy as it looks- just remove the tabs from the fuel rail and the bolts?
any advice?
I want to tackle this tonight if possible.
any advice?
I want to tackle this tonight if possible.
 12-19-2008, 04:28 PM
#2
Former Vendor of MBWorld

Join Date: Nov 2007
Location: Dunellen, NJ
Posts: 717
Likes: 0
Received 1 Like
on
1 Post
Chrysler Crossfire
If you are looking to seperate the top part of the intake from the bottom be very careful with the silicon seal holding them in place. MB does not sell a replacement gasket or any replacement parts for the inside, it is all a one piece unit.
I would suggest finding a spare one to play with. I learned this after I took mine apart.
I would suggest finding a spare one to play with. I learned this after I took mine apart.
12-19-2008, 06:28 PM
#3
MBWorld Fanatic!

Join Date: Feb 2004
Location: Portsmouth, NH
Posts: 1,559
Likes: 0
Received 0 Likes
on
0 Posts
none
Its pretty straight forward. Be careful removing the brake vacuum line on the firewall side, its tricky. The fuel rail and injectors were already off of mine at the time when I took it off. Shouldn't be much more difficult though.
12-19-2008, 08:01 PM
#4
Super Member

Join Date: Oct 2008
Location: seattle
Posts: 837
Likes: 0
Received 22 Likes
on
20 Posts
1990 300ce supercharged and intercooled
I am curious what you are doing? TVT is correct that resealing the upper and lower intake halves is difficult. You have to do a magnificent job cleaning the groove out and get a perfect bead of sealant in there. There should not be any reason to take it apart unless it is leaking. There are no serviceable parts in the intake.
Taking the whole intake off is not difficult. Once the fuel rail is off there is simply the egr, throttle actuator plug and the obvious bolts. Sometimes the secondary air injection valves get stuck in though, but they can come off with the intake.
Taking the whole intake off is not difficult. Once the fuel rail is off there is simply the egr, throttle actuator plug and the obvious bolts. Sometimes the secondary air injection valves get stuck in though, but they can come off with the intake.
12-19-2008, 08:34 PM
#5
MBWorld Fanatic!
Thread Starter
Join Date: Dec 2007
Location: Rochester, MN
Posts: 1,100
Likes: 0
Received 0 Likes
on
0 Posts
sounds like airplane
i was hoping to take it apart to the point of being ably to get it powdercoated... is that not logical/easily possible ?
I've put this off until you guys shed some more light on the situation.
I took the obvious screws off the fuel rail- what's the next step there? is there some trick? it seems very solid still.
will this actually be possible to do as I want to? I hadn't realized there were issues with putting th etwo pieces back together down the road.
like i said- all I really want to do is powdercoat the upper piece...
Last edited by silence; 12-19-2008 at 10:23 PM.
12-19-2008, 10:50 PM
#6
MBWorld Fanatic!
Thread Starter
Join Date: Dec 2007
Location: Rochester, MN
Posts: 1,100
Likes: 0
Received 0 Likes
on
0 Posts
sounds like airplane
btw- these are all questions I could easily consult my chilton's/hayne's manual for were this for any of my other/past vehicles- where can I get this sort of information for our cars in an easier/less annoying for ya'll way?
Trending Topics
12-20-2008, 03:09 AM
#8
Member
Join Date: Mar 2007
Location: Portland, OR
Posts: 204
Likes: 0
Received 0 Likes
on
0 Posts
2001 E55K
Guess I should explain a little better... Mercedes has 2 workshop systems.
I looked at an old intake manifold I have in the garage... There were two part numbers. One of them brought up nothing, the other was the entire intake manifold assembly. So I'm not exactly sure how you take them apart. I've included a picture of the 10 fasteners that look like they hold in the upper portion.

Hope this helps. PM if you want any more pictures or anything of the intake manifold.
- EPC.net is for part numbers look-up. It's free. Click here
- WIS is for step by step for pretty much anything. It's not free. Click here or PM me for more info
I looked at an old intake manifold I have in the garage... There were two part numbers. One of them brought up nothing, the other was the entire intake manifold assembly. So I'm not exactly sure how you take them apart. I've included a picture of the 10 fasteners that look like they hold in the upper portion.
Hope this helps. PM if you want any more pictures or anything of the intake manifold.
12-20-2008, 08:55 AM
#9
MBWorld Fanatic!
Thread Starter
Join Date: Dec 2007
Location: Rochester, MN
Posts: 1,100
Likes: 0
Received 0 Likes
on
0 Posts
sounds like airplane
thank you-
I wonder if that seal can't handle the temperatures needed for powdercoating without breaking it? I mean, it is on the motor.
can you detail how to actually remove the fuel rails? I think that's the only place I'm really stuck.
It looks real straight forward to pull the whole assembly once the fuel rail is out of the way--- although I'm sure it may be hard to get it to lift off the car once it's "loose".
I'm hoping I can do it without removing the entire wiring harness that sort of clips around/over it- it looks possible, but feedback on whether that is or not would be cool.
for what it's worth- this is the only part I'm still waiting on figuring out. Everythign else is ready to be mailed out for work (supercharger to be ported etc., many parts for powdercoating, other parts I'm painting myself etc.)
thanks for your time
-Drew
12-20-2008, 10:19 AM
#10
MBWorld Fanatic!
Join Date: Feb 2004
Location: Portsmouth, NH
Posts: 1,559
Likes: 0
Received 0 Likes
on
0 Posts
none
I don't see why it doesn't just come off? Mine came right off(consider the fuel rail was already off) and taking the actual intake apart isn't bad. Get the WIS program, it has infinite value. You'll need some torx bits for it. The multipiece intake comes apart section by section pretty straight forward. There is maybe an epoxy used also as I found what looked to be some holding a piece or two inside. I was able to take mine apart with my hands and a screw gun. As far as the seals go everyone is right, they don't make a replacement. From the looks of what was inside mine I think most would getting into this will be able to clean the channels and lay down an effective bead of RVT. I bothered Rich"mbenzman" weekly when I was messing with mine. Search up his "project chrome dome" post. Shoot him a PM maybe?
I lifted mine to install the phelonic spacers and the one I took apart was the extra that I've been porting/polishing ala' mbenzman's project, and I do consider sending it to you everyday I trip over it.") still think I'm going to finish it for some reason....
still think I'm going to finish it for some reason....
The powdercoating would look nice. I'd just remove the top cap of the intake if thats all your doing. I ditched the idea of polishing the outside as its magnesium and dulls quickly. I think you can leave the rest of the manifold in place if you just remove the top piece of the 6 total pieces.
I lifted mine to install the phelonic spacers and the one I took apart was the extra that I've been porting/polishing ala' mbenzman's project, and I do consider sending it to you everyday I trip over it.
still think I'm going to finish it for some reason....The powdercoating would look nice. I'd just remove the top cap of the intake if thats all your doing. I ditched the idea of polishing the outside as its magnesium and dulls quickly. I think you can leave the rest of the manifold in place if you just remove the top piece of the 6 total pieces.
Last edited by NitrogenBalance; 12-20-2008 at 10:21 AM.
12-20-2008, 12:27 PM
#11
MBWorld Fanatic!
Thread Starter
Join Date: Dec 2007
Location: Rochester, MN
Posts: 1,100
Likes: 0
Received 0 Likes
on
0 Posts
sounds like airplane
I will poke around in there more- it's been cold, so the second I get at all stuck I run inside and post. Plus I've been trying to get 8+ hrs per week in on my bike trainer.
Your right that I should be able to just pull only the top piece.
I've decided to do a lot of the underhood stuff in a bright aluminum looking powdercoat finish.
I'm currently still stuck on the fuel rails- but I have the rest of the tools etc. that should be necessary.
Your right that I should be able to just pull only the top piece.
I've decided to do a lot of the underhood stuff in a bright aluminum looking powdercoat finish.
I'm currently still stuck on the fuel rails- but I have the rest of the tools etc. that should be necessary.
12-20-2008, 12:53 PM
#12
Former Vendor of MBWorld
Join Date: Nov 2007
Location: Dunellen, NJ
Posts: 717
Likes: 0
Received 1 Like
on
1 Post
Chrysler Crossfire
You will need to unhook the injectors from the harness. Sometimes the injectors are stuck pretty tight in there and really need to be pried up.
You can remove the entire manifold from the heads and just bring that to get powdercoated. Quite a few have been done and it holds up well.
You can remove the entire manifold from the heads and just bring that to get powdercoated. Quite a few have been done and it holds up well.
12-20-2008, 01:12 PM
#13
Super Member
Join Date: Oct 2008
Location: seattle
Posts: 837
Likes: 0
Received 22 Likes
on
20 Posts
1990 300ce supercharged and intercooled
You should definitely just take the whole intake off and to do what you are doing. Just pry up on the fuel rail to get the injectors out and then take the big inverted torxs out to take the intake manifold off. Splitting the manifold is a mistake. They are over 1000.00 new for a replacement. You can tape off the parts of the intake you do not want coated.
12-22-2008, 09:29 AM
#14
MBWorld Fanatic!
Join Date: Feb 2004
Location: Portsmouth, NH
Posts: 1,559
Likes: 0
Received 0 Likes
on
0 Posts
none
Any progress on this? Injectors/fuel rail ever come out?
Have you thought about any of the coatings that Swaintech offers? Just thinking outloud, they aren't pretty but I know they have some with interesting properties. Its a huge piece so maybe thermal coat the bottom half? no one sees it.
Order some phelonics from PTE, If it didn't make me uncomfortable I'd send you my extra set but like I said I stored them like a fool and they aren't straight.
12-22-2008, 05:33 PM
#15
MBWorld Fanatic!
Thread Starter
Join Date: Dec 2007
Location: Rochester, MN
Posts: 1,100
Likes: 0
Received 0 Likes
on
0 Posts
sounds like airplane
got info for pte? I did look around a bit and the prices from the other vendors were just too high for what it is.
i've been too busy with the holidays and this-
let me, ahem, redeem myself


it was -12 F btw
i've been too busy with the holidays and this-
let me, ahem, redeem myself
it was -12 F btw
12-22-2008, 07:09 PM
#16
MBWorld Fanatic!

I've been busy out riding the motorcycle in the 75 degree sunny weather 
I'll take a day or two of snow, but that's about all I want. I'll admit that it does look like a lot of fun though.
I'll take a day or two of snow, but that's about all I want. I'll admit that it does look like a lot of fun though.
12-26-2008, 10:01 PM
#17
MBWorld Fanatic!
Thread Starter
Join Date: Dec 2007
Location: Rochester, MN
Posts: 1,100
Likes: 0
Received 0 Likes
on
0 Posts
sounds like airplane
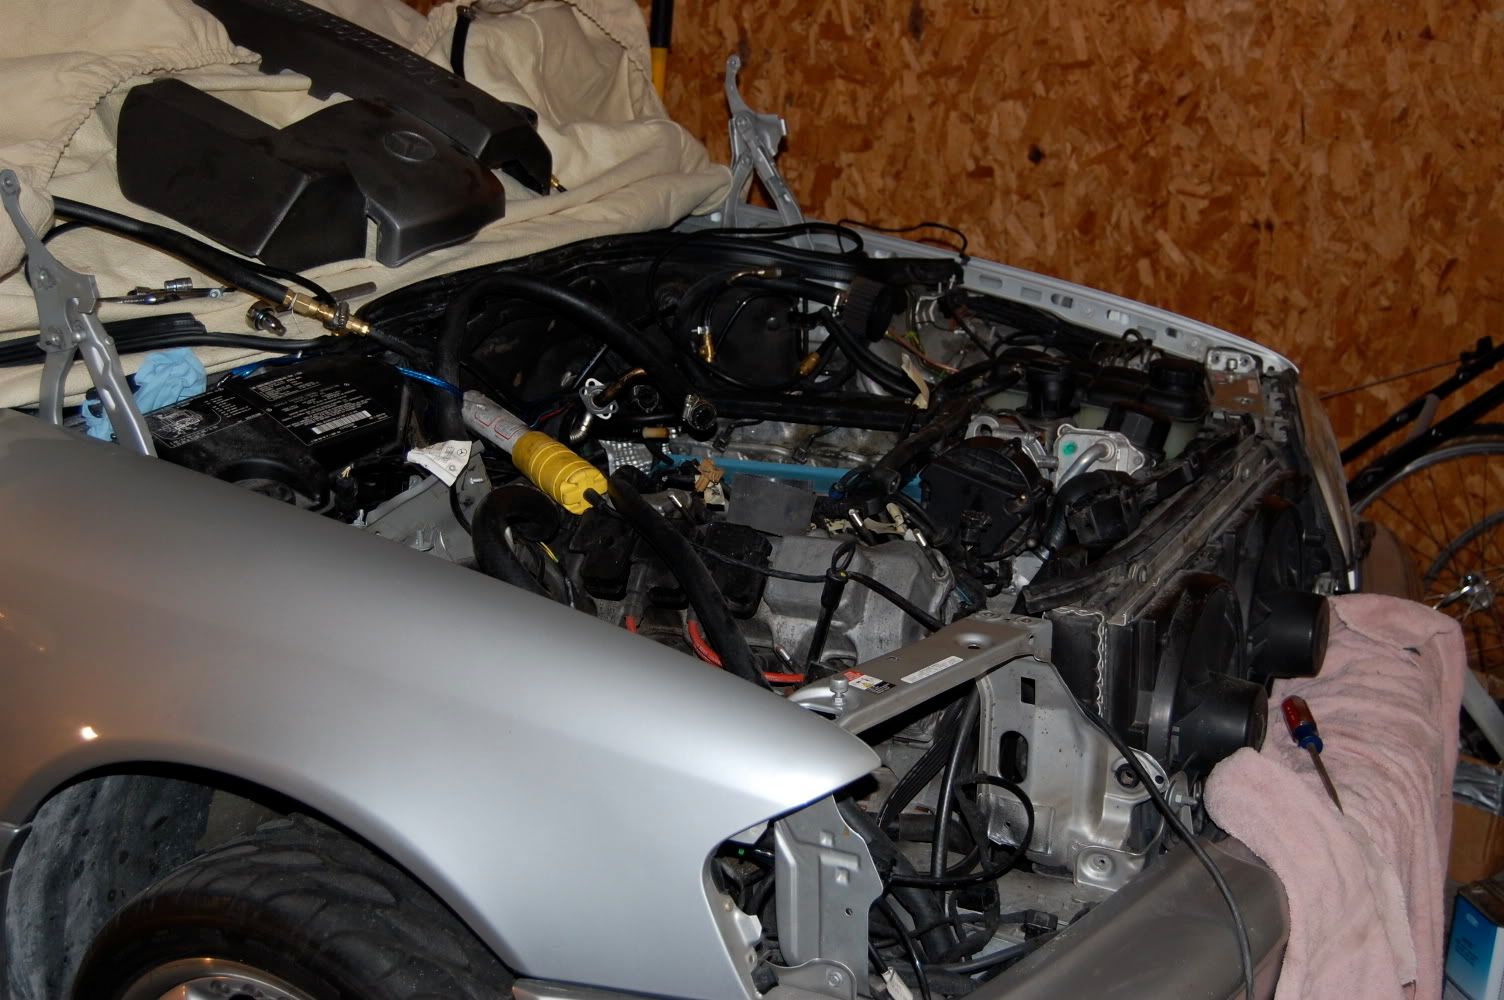
ok, finally got back around to working on this.
have the intake off- now I'm a little stuck on how to remove the vacuum hose from the bottom front of the intake and the plastic quick release from the back drivers side...? also, is there a trick to removing the vacuum actuator thing or is it as straight forward as it looks?
have the intake off- now I'm a little stuck on how to remove the vacuum hose from the bottom front of the intake and the plastic quick release from the back drivers side...? also, is there a trick to removing the vacuum actuator thing or is it as straight forward as it looks?
 12-27-2008, 11:16 AM
#19
Super Member
Join Date: Oct 2008
Location: seattle
Posts: 837
Likes: 0
Received 22 Likes
on
20 Posts
1990 300ce supercharged and intercooled
You cannot remove the rubber vacuum hose from the intake. It is not available separately. I had not thought of this. I am pretty sure that the vaccum fitting for the brake booster line cannot be removed either.
12-27-2008, 11:50 AM
#20
MBWorld Fanatic!
Join Date: Feb 2004
Location: Portsmouth, NH
Posts: 1,559
Likes: 0
Received 0 Likes
on
0 Posts
none
Your dead on, neither can be removed or better said shouldn't be removed. I think the plastic nipple with the tabs on it is pressed into the piece somehow. Looking at the one I cracked open the vac line has a barb shape to the end so it can't be pulled out through the bottom.
Would this interfere with the powdercoating? I think using one of swaintechs coatings would be cool, still wonder if those pieces would prevent any of this?
As far as PTE goes I have always PM'd him or used his email, which I do have. What prices where you quoted for phelonics? He sent me all the new hardware too. I have a link to a company who sells phelonic material if you were interested in cutting your own?
Hows the inside of the manifold look? They all seem to be filthy. Nice work
12-27-2008, 12:05 PM
#22
MBWorld Fanatic!
Thread Starter
Join Date: Dec 2007
Location: Rochester, MN
Posts: 1,100
Likes: 0
Received 0 Likes
on
0 Posts
sounds like airplane
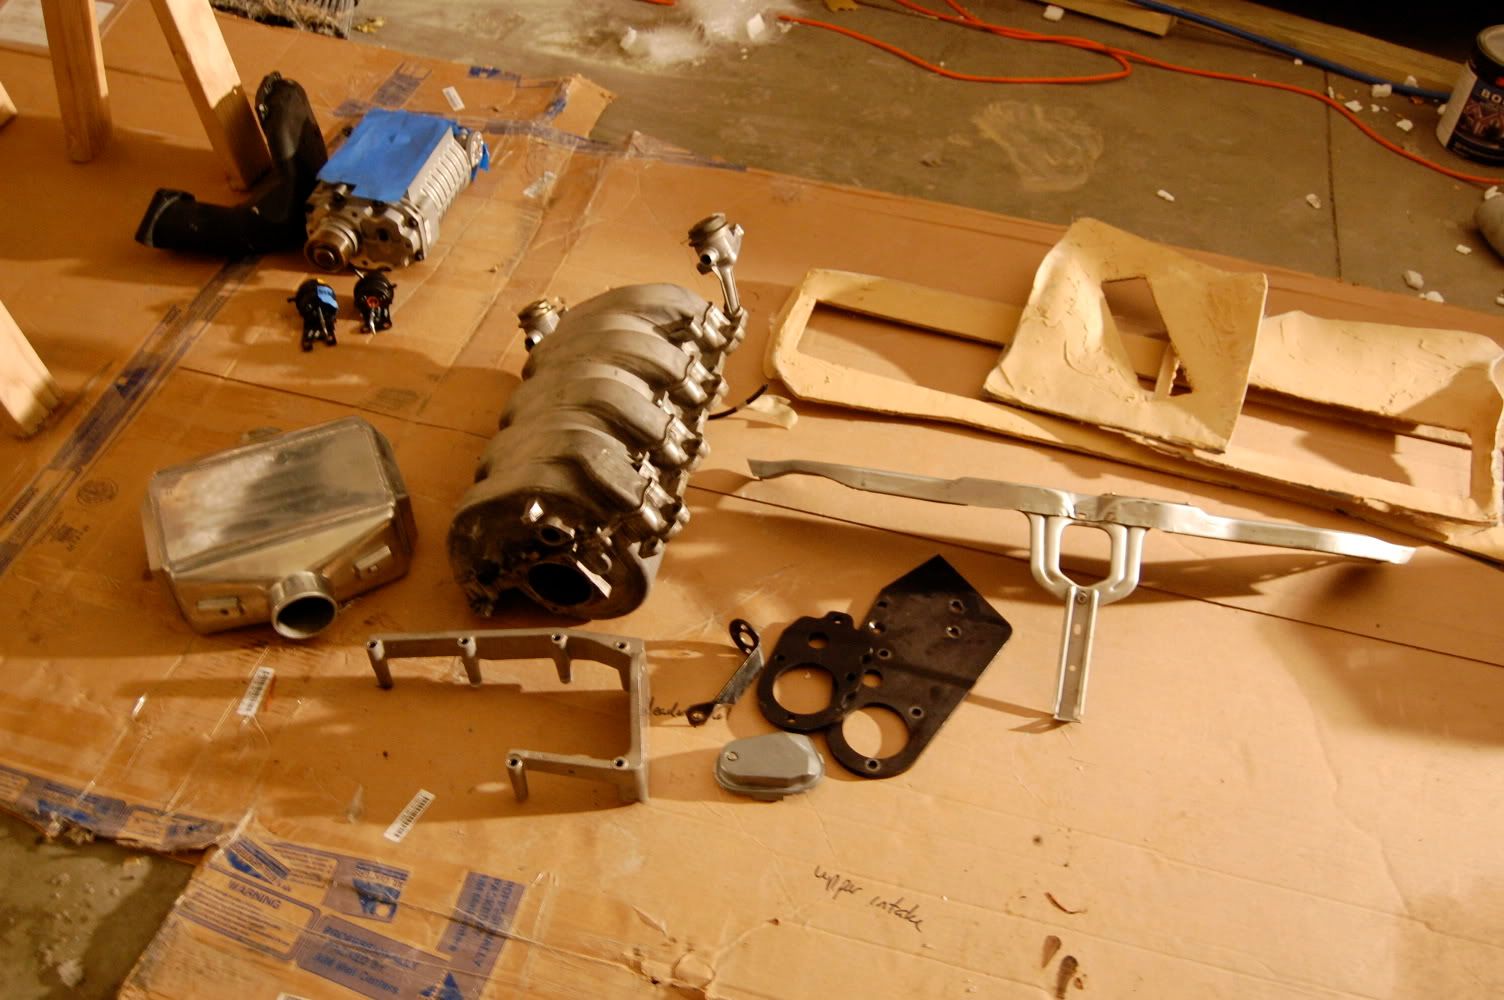
i wll talk to the pc guy and swaintech etc. to see about what might work. how do i best clean under there? i found a roasted chipmunk in the hollow between banks of the engine (almost puked) and its generally quite dirty there, im trying to decide if i want to do something with valve covers as well... inside of intake has oil film (but hardly any oil between there and the back of the sc, tb is taken apart just to get the one piece coated, i may be getting a new sc inlet designed/made which may ultimately mean larger maf and tb tho- m working with the guys who are doing the sc on that possiblity. do u have a part number for the new idler pulley u used? mine is grimy and i would like to replace with a bit larger one and move it one 'hole' over. sorry this message is a mess=from lunch on my way to go biking and from phone
12-27-2008, 02:11 PM
#23
MBWorld Fanatic!
Join Date: Feb 2004
Location: Portsmouth, NH
Posts: 1,559
Likes: 0
Received 0 Likes
on
0 Posts
none
The idler pulley that came with the kit is 90mm. I would stick with the 90mm if you are going to move it over to the second hole. That would be plenty of wrap. If you wanted to use the current mounting hole you could also move up to a 100mm idler which wouldn't be as much of a difference.
I got mine from billetflow. They have them in both 90 and 100mm in a few different colors. Much nicer than the stamped steal one that HPS supplies.
I got mine from billetflow. They have them in both 90 and 100mm in a few different colors. Much nicer than the stamped steal one that HPS supplies.
12-30-2008, 12:26 AM
#24
MBWorld Fanatic!
Thread Starter
Join Date: Dec 2007
Location: Rochester, MN
Posts: 1,100
Likes: 0
Received 0 Likes
on
0 Posts
sounds like airplane
PC= 375-400 degrees
I haven't gotten answers from swaintech
I'm assuming I can't PC it unless I find a way to remove those things...
so- back to taking it further apart?
should I just go that route?
I haven't gotten answers from swaintech
I'm assuming I can't PC it unless I find a way to remove those things...
so- back to taking it further apart?
should I just go that route?
12-31-2008, 09:21 AM
#25
MBWorld Fanatic!
Join Date: Feb 2004
Location: Portsmouth, NH
Posts: 1,559
Likes: 0
Received 0 Likes
on
0 Posts
none
Well, if your set on coating it I guess the pieces would need to come off. I personally would ditch the idea if it prevents it. I have a feeling the larger one would break or you wouldn't be able to get it back in. The other thing is that you could remove just the top cap of the manifold and have that coated. You would have to then dig out the old gasket and replace the gasket material with VHT or such in the channels. It can be done if your careful and meticulous. Besides, just resealing the top isn't bad, its resealing all six pieces that proves tricky. It has and can be done though. Removing those pieces, I think your on your own.
Check out the gold heat blanket stuff that DEI makes. www.deiengineering.com It is very thin and I've heard/think they make great stuff. Using their adhesive maybe you could blanket the whole bottom half of the manifold to fight off heat from the block below? There is alot of surface area to the bottom half of the manifold which I'm sure absorbs a good amount of heat. Then maybe just coat the top part...maybe I drank too much coffee this morning..rant over.
Check out the gold heat blanket stuff that DEI makes. www.deiengineering.com It is very thin and I've heard/think they make great stuff. Using their adhesive maybe you could blanket the whole bottom half of the manifold to fight off heat from the block below? There is alot of surface area to the bottom half of the manifold which I'm sure absorbs a good amount of heat. Then maybe just coat the top part...maybe I drank too much coffee this morning..rant over.


