SL/R230: Instructions - Side Marker Light Out
 07-27-2012, 06:39 PM
#1
Junior Member
Thread Starter

Instructions - Side Marker Light Out
A few days ago I received the dreaded Side Marker Light out error on my 2005 SL500. After doing some research, it looks like there are (at least) 4 options to remove / replace:
1 - Go in from the wheel well: Remove the screws holding part of the inner wheel liner, pull it back to enable you to get a hand in to turn, remove / replace the bulb
2 - Go in from under that side of the car by removing the plastic panel below
3 - Try to pry out the light housing (note that you can't just pop out the amber lens - it's part of the housing) to enable you to turn the bulb 90 degrees to remove / replace. You could do this by possibly prying back the plastic strip that I've included photos of, or try to get a tool in under the housing directly, then sliding a tool in to push the tab forward (towards the front of the car) to release the housing. The problem I encountered was that I didn't think there wasn't enough slack on the wire to the bulb to allow for the assembly to come out enough.
4 - Do what I did and
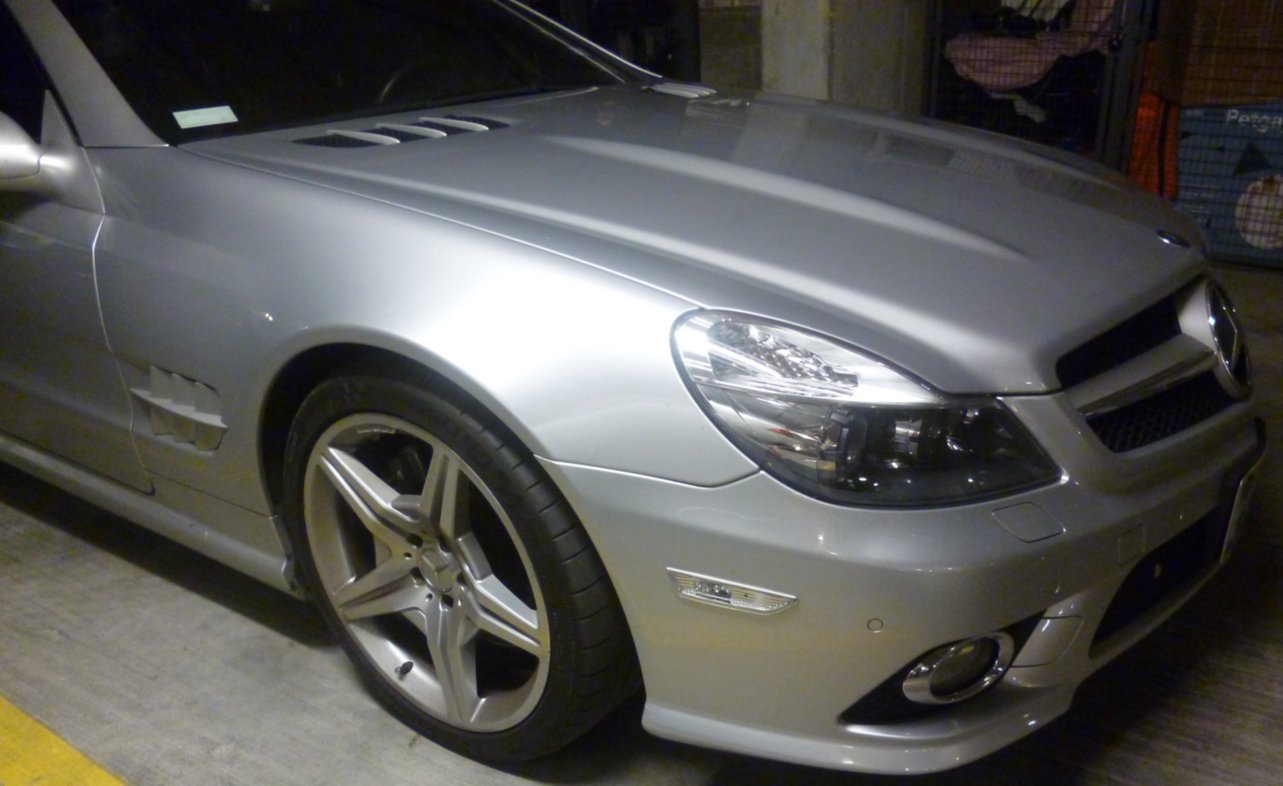
(Picture 1) get a plastic spatula and start from the front of the car and slowly slide it around on top and bottom to release the integrated plastic clips. Then (and there wasn't much slack) get your fingers in and release the light bulb.
(Picture 2) shows the released bulb
(Picture 3) Shows the plastic strip upsidedown. Notice the hinged tab on the left side of the light housing which locks the amber lens / housing in the plastic bumper strip. Pushing that hinge in releases the housing.
(Picture 4) Shows the released housing. Not necessary, but wanted to provide a better look at what you're dealing with.
Summary: You have a couple of options. This wasn't too bad. Going in through the wheel well (or from under) might have involved less. I still think it's more work than it should be to replace a bulb...
Hope this helps "shed some light" on the situation.
David
1 - Go in from the wheel well: Remove the screws holding part of the inner wheel liner, pull it back to enable you to get a hand in to turn, remove / replace the bulb
2 - Go in from under that side of the car by removing the plastic panel below
3 - Try to pry out the light housing (note that you can't just pop out the amber lens - it's part of the housing) to enable you to turn the bulb 90 degrees to remove / replace. You could do this by possibly prying back the plastic strip that I've included photos of, or try to get a tool in under the housing directly, then sliding a tool in to push the tab forward (towards the front of the car) to release the housing. The problem I encountered was that I didn't think there wasn't enough slack on the wire to the bulb to allow for the assembly to come out enough.
4 - Do what I did and
(Picture 1) get a plastic spatula and start from the front of the car and slowly slide it around on top and bottom to release the integrated plastic clips. Then (and there wasn't much slack) get your fingers in and release the light bulb.
(Picture 2) shows the released bulb
(Picture 3) Shows the plastic strip upsidedown. Notice the hinged tab on the left side of the light housing which locks the amber lens / housing in the plastic bumper strip. Pushing that hinge in releases the housing.
(Picture 4) Shows the released housing. Not necessary, but wanted to provide a better look at what you're dealing with.
Summary: You have a couple of options. This wasn't too bad. Going in through the wheel well (or from under) might have involved less. I still think it's more work than it should be to replace a bulb...
Hope this helps "shed some light" on the situation.
David
 12-04-2013, 05:13 PM
#2

I replaced the whole sidemarker light assembly with a clear version I got for about $60 on ebay. My car is an '09 and the bumber is different from the pics above. There sidemarker isn't part of that long strip that's in the bumper. It's in the bumper itself.
But this was really easy. Just removed the 2 screws on the bottom along the edge of the bumper and 2 on the side splash guards. Then 2 of the plastic "rivets". Just carefully pull the pin out from the middle and then pull the whole splash guard away. After that you can pry it out from behind the bumper so you can get your hand inside.
Then it's just a matter of removing the bulb, pushing the tab to release the lens assembly and pulling it out from the outside. To install the new one line up 2 tabs toward the front of the car and pop the release tab behind the bumper and into the plastic piece on the inside that holds the lens assembly in place. This can be a little bit of pain.
Once the lens assembly is snapped back into place you can put in a new bulb (orange in my case) and reverse the rest of the steps.
Getting rid of that orange side marker makes the car look so much cleaner!
Last edited by brownboy; 12-04-2013 at 11:32 PM. Reason: added link to pic
01-26-2014, 02:06 AM
#3
Easier way
There is an easier way to do this on R230. Slide credit card between the bumper and the plastic strip, push the locking pin on the housing and it pops out (tape the bumper if you are afraid to scratch it).
A few days ago I received the dreaded Side Marker Light out error on my 2005 SL500. After doing some research, it looks like there are (at least) 4 options to remove / replace:
1 - Go in from the wheel well: Remove the screws holding part of the inner wheel liner, pull it back to enable you to get a hand in to turn, remove / replace the bulb
2 - Go in from under that side of the car by removing the plastic panel below
3 - Try to pry out the light housing (note that you can't just pop out the amber lens - it's part of the housing) to enable you to turn the bulb 90 degrees to remove / replace. You could do this by possibly prying back the plastic strip that I've included photos of, or try to get a tool in under the housing directly, then sliding a tool in to push the tab forward (towards the front of the car) to release the housing. The problem I encountered was that I didn't think there wasn't enough slack on the wire to the bulb to allow for the assembly to come out enough.
4 - Do what I did and
(Picture 1) get a plastic spatula and start from the front of the car and slowly slide it around on top and bottom to release the integrated plastic clips. Then (and there wasn't much slack) get your fingers in and release the light bulb.
(Picture 2) shows the released bulb
(Picture 3) Shows the plastic strip upsidedown. Notice the hinged tab on the left side of the light housing which locks the amber lens / housing in the plastic bumper strip. Pushing that hinge in releases the housing.
(Picture 4) Shows the released housing. Not necessary, but wanted to provide a better look at what you're dealing with.
Summary: You have a couple of options. This wasn't too bad. Going in through the wheel well (or from under) might have involved less. I still think it's more work than it should be to replace a bulb...
Hope this helps "shed some light" on the situation.
David
Last edited by CMEP4; 01-26-2014 at 02:16 AM.
The following users liked this post:
WurlitzBurg (06-02-2020)
04-25-2014, 05:00 PM
#4
Newbie

On the credit card release suggestion, I can push the credit card behind the bumper pad as shown in your photo, but the amber lens does not release. Maybe I'm expecting it to "pop" out, which is way too naive. Can you give me an idea what to expect with regard to the amber lens release when the credit card is inserted as shown. Thanks and appreciate your efforts to share your knowledge with the community.
05-14-2014, 07:37 PM
#5
Look at the db2001 pics --
https://mbworld.org/forums/attachmen...tripmarker.jpg
https://mbworld.org/forums/attachmen...nvertstrip.jpg
Press against the lock and it should unlock and and come out easily. Perhaps it's stuck there for some other reason. Let me know what was the problem.
https://mbworld.org/forums/attachmen...tripmarker.jpg
https://mbworld.org/forums/attachmen...nvertstrip.jpg
Press against the lock and it should unlock and and come out easily. Perhaps it's stuck there for some other reason. Let me know what was the problem.
The following users liked this post:
WurlitzBurg (06-02-2020)
05-19-2014, 03:17 PM
#6
Member

Join Date: Jan 2011
Location: Bartlett TN
Posts: 103
Likes: 0
Received 7 Likes
on
6 Posts
2005 SL500
Well, I should have researched this topic before I tried to do this myself and ended up breaking the amber portion of my marker. I even busted the bulb out of frustration!! I eventually got one out, but can't disconnect the bulb because the wire is too short!!!!
I will remove the bumper trim and go from there...
I will remove the bumper trim and go from there...
Trending Topics
06-26-2014, 08:42 AM
#8
Newbie
Another Option to change the side marker light
Another easy option to change the side marker light bulb (You DO NOT have to remove the wheels):
I tried the credit card or screwdriver insert suggestion to release the amber lens to get to the light bulb, but it would not release for me. I took it to an indy friend, and they had it changed in less than 5 minutes. Here's how.
Be sure you have the new bulb ready, because this is EASY PEASEY.
Turn the steering wheel to move the front wheel of the "dead side marker" toward the engine to expose the back plastic weather shield inside cover between the tire and the fender well.
Remove the sheet metal screw holding the plastic shield to the fender. This is the screw 1/2 way up the fender well. There are other screws on the bottom of the plastic shield, but you do not have to remove them unless you want more work room between the released shield and the fender. (This sheet metal screw inserts into a metal clip that is attached to the fiber glass fender inside the shield. This clip can fall off easily. Be aware that you will not be able to fasten the sheet metal screw back into place if this clip falls off and you lose it, which I almost did ! )
)
Now remove the 10mm plastic nut that is visible holding the plastic weather shield to the fender. It is midway up the shield and about 6 inches toward the engine. It is clearly visible. This is a friction fit plastic nut.
With these two pieces removed, pull the plastic weather shield away from the fender starting at the bottom of the fender well. Mine just popped out from behind the fender. Hold the shield out of the way with one hand.
With a flashlight, you can now see into the fender well and locate the electrical supply wire and plastic bulb housing that holds the bulb into the amber lens.
Turn the plastic bulb housing 1/2 turn toward you, and it will release with the bulb. Pull the dead bulb straight out of the housing and re-insert the new bulb by pushing it straight into the housing.
Re-insert the bulb housing into the amber lens and turn the assembly 1/2 turn away from you to lock it into place.
Now test the light before you put the screw and nut back into place.
With the sheet metal screw clip in place on the fender, pop the plastic shield back under the fender lip and replace the screw and the 10mm nut.
You are DONE. 10 minutes the first time. 5 minutes after that per side. No paint scratches or broken lens.
I tried the credit card
or screwdriver insert suggestion to release the amber lens to get to the light bulb, but it would not release for me. I took it to an indy friend, and they had it changed in less than 5 minutes. Here's how. Be sure you have the new bulb ready, because this is EASY PEASEY.
Turn the steering wheel to move the front wheel of the "dead side marker" toward the engine to expose the back plastic weather shield inside cover between the tire and the fender well.
Remove the sheet metal screw holding the plastic shield to the fender. This is the screw 1/2 way up the fender well. There are other screws on the bottom of the plastic shield, but you do not have to remove them unless you want more work room between the released shield and the fender. (This sheet metal screw inserts into a metal clip that is attached to the fiber glass fender inside the shield. This clip can fall off easily. Be aware that you will not be able to fasten the sheet metal screw back into place if this clip falls off and you lose it, which I almost did !
)Now remove the 10mm plastic nut that is visible holding the plastic weather shield to the fender. It is midway up the shield and about 6 inches toward the engine. It is clearly visible. This is a friction fit
plastic nut.With these two pieces removed, pull the plastic weather shield away from the fender starting at the bottom of the fender well. Mine just popped out from behind the fender. Hold the shield out of the way with one hand.
With a flashlight, you can now see into the fender well and locate the electrical supply wire and plastic bulb housing that holds the bulb into the amber lens.
Turn the plastic bulb housing 1/2 turn toward you, and it will release with the bulb. Pull the dead bulb straight out of the housing and re-insert the new bulb by pushing it straight into the housing.
Re-insert the bulb housing into the amber lens and turn the assembly 1/2 turn away from you to lock it into place.
Now test the light before you put the screw and nut back into place.
With the sheet metal screw clip in place on the fender, pop the plastic shield back under the fender lip and replace the screw and the 10mm nut.
You are DONE. 10 minutes the first time. 5 minutes after that per side. No paint scratches or broken lens.
07-03-2014, 12:17 AM
#9
Member
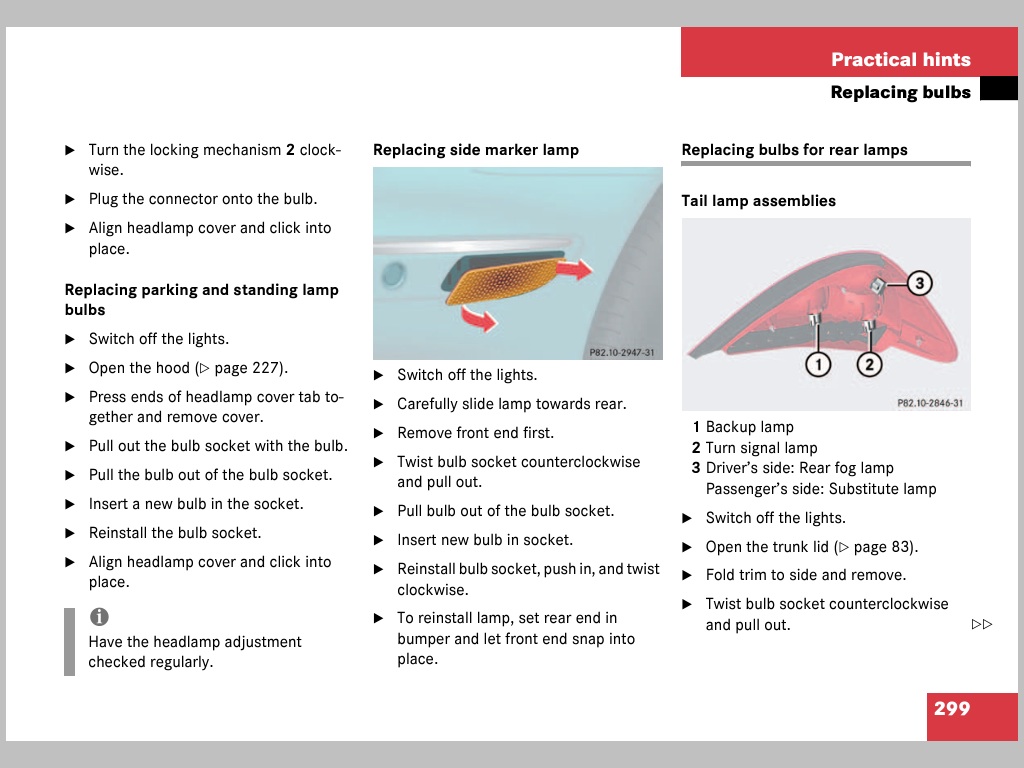
I swapped my sidemarkers to the clear versions a few weeks ago. It quite literally took just a few seconds to remove the 03-08 marker on each side - the instructions are right in the owners manual (see bulb replacement section)
No need to go through the wheel well, or remove any other piece - they pop right out of the front.
I used a nylon interior pry tool which made things even easier
Manual screenshot attached
No need to go through the wheel well, or remove any other piece - they pop right out of the front.
I used a nylon interior pry tool which made things even easier
Manual screenshot attached
The following users liked this post:
Das Geld 2 (07-22-2021)
05-13-2015, 11:46 PM
#10
Does anyone know where to get a replacement bulb (orange) after changing to these clear side marker lenses? I got caught in a huge storm and it went out. The problem may not be the bulb but it's easy to change so I'd like to try that but I can't find the bulb separately. TIA!
03-16-2016, 05:58 PM
#11
Junior Member

Sidemarker Replacement
To replace sidemarkers (reflector) on a 2007 SL550, do the following:
1. Turn the wheel right (for left reflector) visa versa for right reflector. This will give you room to work with the wheel out of the way.
2. Remove the plugs (2) that are holding the wheel well cover attached to the front bumper (be sure to pull the pin inside the plug first, then pull the whole plug out). Use needle nose pliers to pull the pin.
3. Pull back the wheel well cover. Use something to hold it in place so it stays out of your way.
4. Remove the bulb from the sidemarker housing (twist and pull).
5. Unscrew the screw (phillips head) holding the sidemarker in place (it will be visible near the bulb hole). You'll need a relatively short phillips head screw driver.
6. Push the clip holding the sidemarker in the housing forward then push the sidemarker out. (the clip is located between the screw hole and the bulb hole).
7. The sidemarker housing will detach from the reflector so hold the back of the housing while the reflector is removed so it doesn't fall.
8. Clip the new reflector into the old sidemarker housing (align the front two prongs then push the back in until it clicks).
9. Screw the new sidemarker into the housing (opposite of #5).
10. Replace sidemarker bulb (if necessary). Insert and turn.
11. Push the wheel well cover back behind the bumper and put the plugs & pins back in (plug first, then pin).
That's it! The project should take you about 10-15 minutes total. Hope this helps. If you just need to replace the sidemarker bulbs, follow steps 1-4 & 10-11. The bulb size is a 168/194/2825.
Last edited by brentsl550; 03-16-2016 at 07:26 PM.
 03-16-2016, 07:25 PM
#13
Junior Member
Do you have Inovit Speedy wheels? I think we have the same but I wanted to see if you had issues with the front wheels clearing your calipers. I had to put hub centric spacers in to fix this but there's still not enough room to snap center caps in. The hub sticks out a little too much.
02-09-2020, 12:32 PM
#14

To replace sidemarkers (reflector) on a 2007 SL550, do the following:
1. Turn the wheel right (for left reflector) visa versa for right reflector. This will give you room to work with the wheel out of the way.
2. Remove the plugs (2) that are holding the wheel well cover attached to the front bumper (be sure to pull the pin inside the plug first, then pull the whole plug out). Use needle nose pliers to pull the pin.
3. Pull back the wheel well cover. Use something to hold it in place so it stays out of your way.
4. Remove the bulb from the sidemarker housing (twist and pull).
5. Unscrew the screw (phillips head) holding the sidemarker in place (it will be visible near the bulb hole). You'll need a relatively short phillips head screw driver.
6. Push the clip holding the sidemarker in the housing forward then push the sidemarker out. (the clip is located between the screw hole and the bulb hole).
7. The sidemarker housing will detach from the reflector so hold the back of the housing while the reflector is removed so it doesn't fall.
8. Clip the new reflector into the old sidemarker housing (align the front two prongs then push the back in until it clicks).
9. Screw the new sidemarker into the housing (opposite of #5).
10. Replace sidemarker bulb (if necessary). Insert and turn.
11. Push the wheel well cover back behind the bumper and put the plugs & pins back in (plug first, then pin).
That's it! The project should take you about 10-15 minutes total. Hope this helps. If you just need to replace the sidemarker bulbs, follow steps 1-4 & 10-11. The bulb size is a 168/194/2825.
1. Turn the wheel right (for left reflector) visa versa for right reflector. This will give you room to work with the wheel out of the way.
2. Remove the plugs (2) that are holding the wheel well cover attached to the front bumper (be sure to pull the pin inside the plug first, then pull the whole plug out). Use needle nose pliers to pull the pin.
3. Pull back the wheel well cover. Use something to hold it in place so it stays out of your way.
4. Remove the bulb from the sidemarker housing (twist and pull).
5. Unscrew the screw (phillips head) holding the sidemarker in place (it will be visible near the bulb hole). You'll need a relatively short phillips head screw driver.
6. Push the clip holding the sidemarker in the housing forward then push the sidemarker out. (the clip is located between the screw hole and the bulb hole).
7. The sidemarker housing will detach from the reflector so hold the back of the housing while the reflector is removed so it doesn't fall.
8. Clip the new reflector into the old sidemarker housing (align the front two prongs then push the back in until it clicks).
9. Screw the new sidemarker into the housing (opposite of #5).
10. Replace sidemarker bulb (if necessary). Insert and turn.
11. Push the wheel well cover back behind the bumper and put the plugs & pins back in (plug first, then pin).
That's it! The project should take you about 10-15 minutes total. Hope this helps. If you just need to replace the sidemarker bulbs, follow steps 1-4 & 10-11. The bulb size is a 168/194/2825.
Just quoting to say thanks and that I also had to peel back the wheel well liner on my 2008 SL55. Undid the two plugs as well as several 10mm screws/nuts. The side marker bulb housing is a bit far in but it rotates easily out of the housing itself, and then the bulb (W5W) can be pulled out.
07-22-2021, 12:53 PM
#15
MBWorld Fanatic!
I swapped my sidemarkers to the clear versions a few weeks ago. It quite literally took just a few seconds to remove the 03-08 marker on each side - the instructions are right in the owners manual (see bulb replacement section)
No need to go through the wheel well, or remove any other piece - they pop right out of the front.
I used a nylon interior pry tool which made things even easier
Manual screenshot attached
No need to go through the wheel well, or remove any other piece - they pop right out of the front.
I used a nylon interior pry tool which made things even easier
Manual screenshot attached