


 I read the diy for the front bumper, but what do u do when you have a bumper with the headlight washers? how do you get that cap off, does it slide off?

W208 How To's

Senior Member
Joined: Feb 2003
Posts: 344
Likes: 0
From: So. Cali
2002 CLK 430/2002 325i
washer removal
you need someone to push the washer button on the inside and when the washers extend you grab them and then you can remove the screw to the assembly of the cover. If you look closely, you will also have to remove another screw that secures the front bumper.
Super Member
Joined: Sep 2003
Posts: 946
Likes: 1
From: BC
'79 300D, '85 300Dt, '99 CLK430
Originally Posted by CLK430girl
to install the front bumper insert--do you need to take the bumper off or can you install it pretty effortlessly?

Junior Member


Joined: Apr 2006
Posts: 72
Likes: 19
From: 33004
2017 X166 GLS550 & (R230) SL550 2007 & 2012 S550
Post 21 is VERY useful....
My a/c seemed to blow too little, it was the cabin air filter.
I'd say if yu have 45,000 or so miles and about 4 years IT'S
a ABSOLUTELY DUE FOR A CHANGE, and it's likely not been done by anyone before as it is EASY TO OVERLOOK.
My a/c seemed to blow too little, it was the cabin air filter.
I'd say if yu have 45,000 or so miles and about 4 years IT'S
a ABSOLUTELY DUE FOR A CHANGE, and it's likely not been done by anyone before as it is EASY TO OVERLOOK.
Member
Joined: Feb 2006
Posts: 149
Likes: 0
From: Maryland
2000 CLK 430
Simple question--change time
This may seem a little retarded, but how do I change my time in my car? The manual states that there should be a "h" and "m" button on the right near the clock in the dash, but my car doesn't have that...just up and down arrows on the left side near the temperature indicator  ....Thanks guys!
....Thanks guys!
MBWorld Fanatic!


Joined: Jan 2005
Posts: 1,064
Likes: 5
From: Northern Virginia / D.C.
01 LORINSER CLK 430 - 02 KLEEMANN CLK55 - 88 Euro / Jap AMG 560 SEC Widebody - 16 AMG GTS
Originally Posted by CLK430girl
This may seem a little retarded, but how do I change my time in my car? The manual states that there should be a "h" and "m" button on the right near the clock in the dash, but my car doesn't have that...just up and down arrows on the left side near the temperature indicator ....Thanks guys!
....Thanks guys!1. Press the "Menu" selector button on your steering wheel until your screen displays "settings can be set at standstill"
2. Press the up or down arrow buttons ON YOUR STEERING WHEEL until you get to the "hour" or "minute" display on your screen.
3. Press the "+" or "-" button on your steering wheel to adjust the setting as needed.
4. Have a drink
5. Sit back and watch the time pass
Good luck...

MB World Stories
The Best of Mercedes & AMG

6 Mercedes Models That Did NOT Age Well (But Are Somehow Still Cool)
Verdad Gallardo
Manual Mercedes? 6 Times Sindelfingen Let Drivers Have All The Fun
Verdad Gallardo
Mercedes SLR McLaren 722 S Is Extremely Rare Example Modified by McLaren
Verdad Gallardo
8 Classic Boxy Mercedes Designs That Have Aged Like Fine Wine
Verdad Gallardo
Flawlessly Restored Mercedes 190E Evo II Heads to Auction
Verdad Gallardo
Electric Mercedes C-Class Unveiled: 11 Things You Need to Know
Verdad Gallardo
Mercedes EQS Gets A Major Update: Everything You Need to Know
Verdad Gallardo
5 Underrated Mercedes-Benz Models That Don't Get the Love They Deserve
Verdad Gallardo
Mercedes 300D Has Pushed Well Past 1 Million Miles and It Ain't Stopping
Verdad GallardoSuper Member
Joined: Sep 2003
Posts: 946
Likes: 1
From: BC
'79 300D, '85 300Dt, '99 CLK430
Originally Posted by jtbeche
One.....your car is a 2003, so you have a W209 model. You are in the W208 forum.
Moderators.....can you delete his reply and mine once he sees this? Thanks.....
Moderators.....can you delete his reply and mine once he sees this? Thanks.....


Member
Joined: May 2005
Posts: 131
Likes: 0
From: Socal
w208
Originally Posted by B-Mac
Valentine 1 Hardwire from MMgrad:
They are in there a ways down, and there used to be pictures.
MMgrad Directions
My own experience: I have a 320.
I got the plastic trim out, the wood in my center console really needed some pulling on to get it to pop out but it did without breaking. I unscrewed the two screws for the ashtray. The ashtray did require allot of maneuvering to get out, but it will come out (it goes back in easier than it comes out). This is where things were a little different than explained in some other threads. I was expecting to find a black wire with a yellow stripe leading to the cigarette lighter but there was no black wire with a yellow stripe. There were two gray wires leading to the light for the ashtray, a brown wire leading to the lighter and two pink wires with green stripes that lead into one connection for the lighter. I suspected that the pink wires with the green stripe (could have been green with a pink stripe) were the 12V switched and that the brown was ground (a friend who has done stereos in German cars for sometime said that brown should always be the ground in a German car unless they went and changed the complete wiring system). I went and bought a voltmeter at Wally World and verified that it was correct. I used the t-connector and taped onto one of the pink/w green striped wires. I grounded it to one of the screws that requires an alan head to the left of the gear selector and everything worked great!!. I mounted the concealed display to my upper left on top of the driver air vent and it sits pretty well without any sticky tape. It is angled perfectly towards my eyes. Radar dectors are not illegal in NC and you will only see it if you are passing me. I was going to mount it in the instrument cluster but if the steering wheel is turned (I dirive on a twisty road quite a bit) it gets in the way of my line of sight. To get the concealed unit wire under the drivers leg compartment I used the air vent like the one on the passenger side and fed the wire up and around (behind the petals and over a few objects so that it will never hang down. I then just fished it up beside the dash like on the passenger side. Everything assembled easier than it came out and it looks great. I went on a road trip over the weekend and it kept me from getting a ticket where I think my old cheap unit would not have.
Super Member
Joined: Apr 2006
Posts: 555
Likes: 0
From: Somewhere in Maryland
2000 CLK 430 Cabriolet
Originally Posted by blackbenzz
Does anyone have a better pic of where the crankshaft position sensor is on a clk430? That pic is so tiny I cant see anything!
Ditto for me. I need to see where that damn crankshaft position sensor is. I think I need one. What are the symptoms of one of these sensors going bad? My mechanic is telling me it is. The car cuts off when 'warm'. It's happened at a trafffic light (twice) and after cutting it off to run into a store (twice). Come out of the store and the car won't start. The engine 'turns' but won't VAAROOOM! I can't be cuttin off in traffic so I'm taking it to the shop tomorrow. Thoughts? Comments?
Super Member
Joined: Apr 2006
Posts: 555
Likes: 0
From: Somewhere in Maryland
2000 CLK 430 Cabriolet
Gotta better pic?
[QUOTE=TresX]Crankshaft Position Sensor:
-Remove engine cover
-Locate Torx screw/bolt holding CPS (See pic)
-Remove screw
-Remove sensor
-Install in opposite order
Is there a better, bigger picture of the CPS location?
-Remove engine cover
-Locate Torx screw/bolt holding CPS (See pic)
-Remove screw
-Remove sensor
-Install in opposite order
Is there a better, bigger picture of the CPS location?

Out Of Control!!


Joined: Feb 2003
Posts: 13,489
Likes: 96
haters crazy
Your symptoms are definitely diagnostic of a CPS. Its located way down toward the back/bottom of the engine and you need an extension to reach it. Its close to where the engine connects to the transmission. If you have the new one you can identify the old one by looking in that general area. If you need more help let me know and maybe we can meet up and I'll show you where it is.
Super Member
Joined: Apr 2006
Posts: 555
Likes: 0
From: Somewhere in Maryland
2000 CLK 430 Cabriolet
Originally Posted by blackbenzz
Your symptoms are definitely diagnostic of a CPS. Its located way down toward the back/bottom of the engine and you need an extension to reach it. Its close to where the engine connects to the transmission. If you have the new one you can identify the old one by looking in that general area. If you need more help let me know and maybe we can meet up and I'll show you where it is.
Out Of Control!!
Joined: Feb 2003
Posts: 13,489
Likes: 96
haters crazy
Originally Posted by Whodat
Thanks, but I couldn't wait. No time this week. So I had your guy Biz put it in. But if you don't mind, I'd like to take you up on your kind offer to swap out the MAF!
Almost a Member!
Joined: Jul 2006
Posts: 38
Likes: 0
From: way south
2002 CLK320, 2006 4.8is X5
Easy way to extraxt instrument cluster
For extracting the instrument cluster I use a suction cup (like the ones the mechanics use for fixing dents on the car panels). It's an easy way to pull out the cluster without harming the dashboard or the cluster itself. You can then change the bulbs easily. Remember to pull out the driving wheel as far out as possible, and detach the two clips on the back of the cluster.
Picture of the suction cup attached.
Picture of the suction cup attached.
MBWorld Fanatic!
Joined: Oct 2006
Posts: 1,745
Likes: 2
From: NJ
w208
Hardwiring of Escort Passport 8500 X50 to domelight
MBWorld Fanatic!
Joined: May 2005
Posts: 1,843
Likes: 4
From: KCMO, but Houston is my home.
01 CLK 430
Rear Deck Removal
The infamous hat tray (or rear deck). This thing kicked my *** until a got a good set of instructions. Then, it came apart within 15 minutes.
Here�s what NOT to do: DO NOT try and remove the carpeting from around the back seats (the hole when seats are down). This carpeting goes under the rear tray and does not need to come apart. DO NOT force the deck up. It slides out easily if you get everything disconnected correctly
There is a little push clip in the center bottom of the first aid kit. Remove this. There�s another straight forward, just on the edge of the deck. Remove this also.
Remove the head rests. This will require a small screwdriver and a small head to see (if your back window�s too dark to see through. A good job for little brother to feel useful. There�s a little plastic piece that you simply depress next to the unit that holds the head rest in. Push it down and pull the chrome bars out. The plastic rings attached to the deck pop out very easily. Bad picture� Sorry � too close to focus.
Remove the side panels above the rear deck. They simply pop off and slide forward:
Pull the seatbelt all the way out and place the panels outside the car to give yourself more room.
Unplug the rear breaklight � kind of a pain in the *** if you�ve got fat fingers � again, little brother or girlfriend maybe can help. If you�re married � good luck � you know she won�t help.
Now, I�ve read that you should unbolt the rear sunscreen. I did, although I�m not quite sure I actually needed to. It seems as though it wasn�t connected to the rear deck � or, maybe it was and I just broke it?...
Next is to loosen the side panels (next to rear seats). You may remove them completely, but I knew that mine was a 2 day project and I didn�t want to remove them all the way yet. So, I just pulled the top rear enough to dislodge the deck.
Once you get the rear deck out � this is a really good chance to clean it.
Almost a Member!
Joined: May 2006
Posts: 74
Likes: 4
02CLK320
Here is a complete and CORRECT list of all wires in the Amplifier plug  (see attached pictures too!):
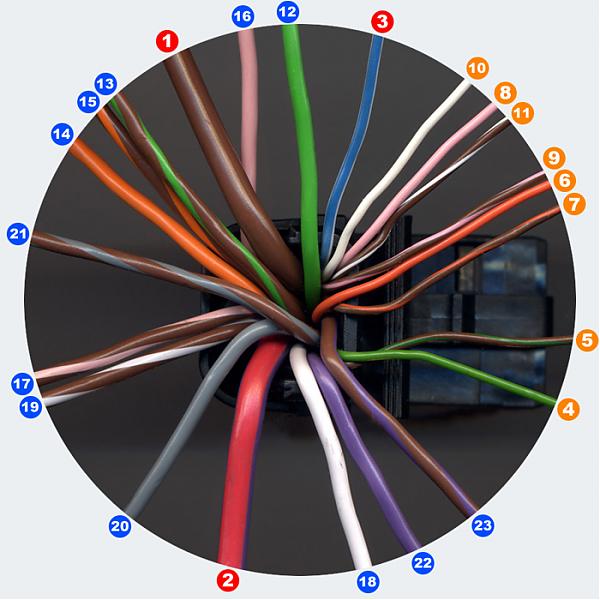
1. BROWN (big wire): Chassis Ground
2. RED with VIOLET strip (big wire): 12 Volt Ignition/Acc
3. BLUE with WHITE strip: Amp Turn-On (Remote)
INPUTS (from Headunit to Amplifier) - 8 THIN wires:
4. GREEN: + Left Front (input)
5. BROWN with GREEN strip: - Left Front (input)
6. ORANGE: + Right Front (input)
7. BROWN with ORANGE strip: - Right Front (input)
8. PINK: + Left Rear (input)
9. BROWN with PINK strip: - Left Rear (input)
10. WHITE: + Right Rear (input)
11. BROWN with WHITE strip: - Right Rear (input)
OUTPUTS (from Amplifier to Speakers) - 10 THICK wires:
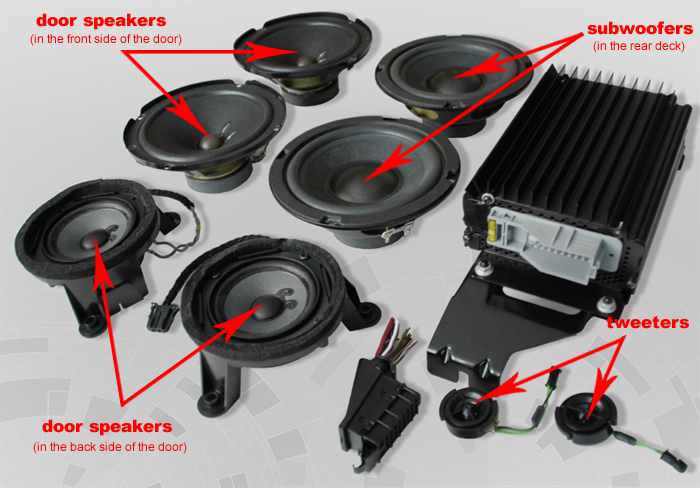
12. GREEN: + Left Speaker and Tweeter in the Front side of the door (output)
13. BROWN with GREEN strip: - Left Speaker and Tweeter in the Front side of the door (output)
14. ORANGE: + Right Speaker and Tweeter in the Front side of the door (output)
15. BROWN with ORANGE strip: - Right Speaker and Tweeter in the Front side of the door (output)
16. PINK: + Left Speaker in the Back side of the door (output)
17. BROWN with PINK strip: - Left Speaker in the Back side of the door (output)
18. WHITE: + Right Speaker in the Back side of the door (output)
19. BROWN with WHITE strip: - Right Speaker in the Back side of the door (output)
20. GRAY: + Left Speaker(subwoofer) in the rear deck (output)
21. BROWN with GRAY strip: - Left Speaker(subwoofer) in the rear deck (output)
22. VIOLET: + Right Speaker(subwoofer) in the rear deck (output)
23. BROWN with VIOLET strip: - Right Speaker(subwoofer) in the rear deck (output)
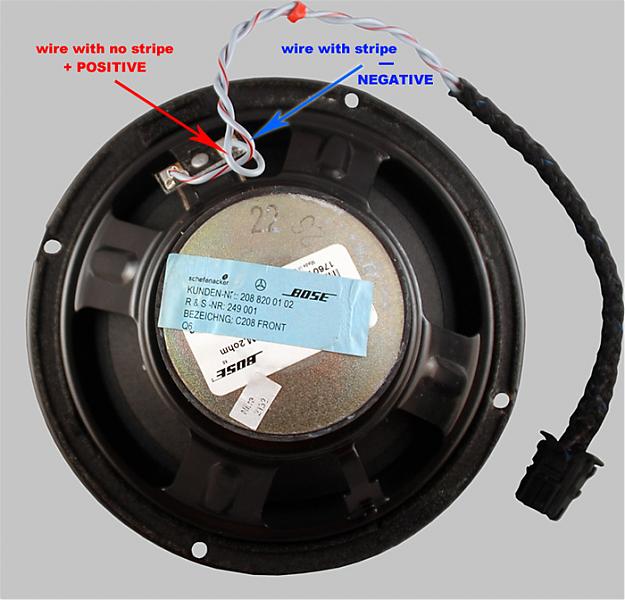
All speakers have two wires: one with a strip (Negative) and one with no strip (Positive):
1. BROWN (big wire): Chassis Ground
2. RED with VIOLET strip (big wire): 12 Volt Ignition/Acc
3. BLUE with WHITE strip: Amp Turn-On (Remote)
INPUTS (from Headunit to Amplifier) - 8 THIN wires:
4. GREEN: + Left Front (input)
5. BROWN with GREEN strip: - Left Front (input)
6. ORANGE: + Right Front (input)
7. BROWN with ORANGE strip: - Right Front (input)
8. PINK: + Left Rear (input)
9. BROWN with PINK strip: - Left Rear (input)
10. WHITE: + Right Rear (input)
11. BROWN with WHITE strip: - Right Rear (input)
OUTPUTS (from Amplifier to Speakers) - 10 THICK wires:
12. GREEN: + Left Speaker and Tweeter in the Front side of the door (output)
13. BROWN with GREEN strip: - Left Speaker and Tweeter in the Front side of the door (output)
14. ORANGE: + Right Speaker and Tweeter in the Front side of the door (output)
15. BROWN with ORANGE strip: - Right Speaker and Tweeter in the Front side of the door (output)
16. PINK: + Left Speaker in the Back side of the door (output)
17. BROWN with PINK strip: - Left Speaker in the Back side of the door (output)
18. WHITE: + Right Speaker in the Back side of the door (output)
19. BROWN with WHITE strip: - Right Speaker in the Back side of the door (output)
20. GRAY: + Left Speaker(subwoofer) in the rear deck (output)
21. BROWN with GRAY strip: - Left Speaker(subwoofer) in the rear deck (output)
22. VIOLET: + Right Speaker(subwoofer) in the rear deck (output)
23. BROWN with VIOLET strip: - Right Speaker(subwoofer) in the rear deck (output)
All speakers have two wires: one with a strip (Negative) and one with no strip (Positive):


MBWorld Fanatic!
Joined: May 2006
Posts: 1,486
Likes: 4
From: San Antonio, Tx
2000 CLK430
HOW TO: Rear Differential DIFF leak fix
I have to take my car back up and take some pics but as far as parts go all you will need is some special sealant that you can get from the dealership. It does not use a gasket as I found out myself.
Basically all you have to do is:
1. Take off the 2 bolts that are at the rear of the diff. They are the ones that look like ??Bells??. All this is a rubber mount held in a steel housing.
2. Take off the 6 bolts off each left and right side of the diff that go to the wheels. They have that blue loc-tite on it so it will be tough to take off but put some elbow grease into it. It will be much easier if you leave the car in neutral and have the car on a lift so that the rear wheels turn freely.
3. Now take off the bolts that connect the diff to the axle (4 Big bolts I think). You will need a rachet and a closed wrench because you have to grab both sides.4. Now you are ready to take off the one center bolt still holding it up. The bolt is located on the middle of the housing and towards the passenger side. You cant miss it.
5. You will have to tug and pull to get this bad boy off cause after you have all the bolts off there is still a one inch rod that comes out of the diff and connects to the axle so you will need a friend to pull the axle towards the front of the car while you pull on the diff to get it out. Oh and this diff is about 80 lbs so it is VERY HEAVY so it would be wise to use a tranny lift or a lft of some type or you will get tired QUICK LOL.
6. Once you have it off take the bolts out from the diff plate and take the old fluid out and clean it well. Then make sure the old gasket is removed and then put the new sealant back on and put the cover back on. You will have to wait about an hour or so before you are able to put new fluid in but after the alloted time you can the take off the bolt on the side of the diff and fill it with fluid. Do not over-fill you will know its good when you can stick your finger in the hole and fell the diff fluid. The DIFF must be level when doing this.
Then just put it back on.
I will hopefully take some pics in one week so I hope this helps someone out for now.
GREG


