


DIY: Interior Light Removal (with pictures)!
Thread Starter
MBWorld Fanatic!
Joined: Sep 2009
Posts: 2,108
Likes: 7
From: Dix Hills, New York
2012 C250 Coupe
Ok, so here are the following lights that you can replace on the interior compartments of the C250/C350 coupes. All bulbs are W5W (halogen bulb type) or 194 LED bulb type. For LED I recommend ANZ optics, they have built-in resistors, won't blink. As for halogens, I use Polarg M4 bulbs, give a NICE white look, cheaper than LED, and won't have to worry about resistor contact, causing premature failure in LED. But everyone has different tastes/preferences, and thats why Baskin Robbins offers 33 different flavors (or something like that.
Here is the list:
- front dome light (two bulbs)
- front vanity lights (two bulbs, one for each mirror)
- rear dome light (one bulb)
- rear trunk lights (two bulbs) one on the right side near the tailight, and one on the part of the trunklid that opens and shines down (when the trunk is open it is up and to the left. It is one bulb for a dual reflector - one red and one clear. And yes, even with a white light, the red is still red and the clear is white.
Here is a list of things you will need:
- Fingers (the smaller/skinnier the better)
- Credit Card (one with the most debt, so if the magnetic strip stops working for some reason, or if there is some minor cosmetic damage, you won't mind too much.
- For the trunk light on the trunk lid (with the dual reflectors) you will also need: T10 Torx Bit or T10 torx screw driver.
- You may also want to keep a flathead screwdriver handy to help with some "tough areas".
Also, these bulbs get HOT and fast, so try to keep the lights off manually when possible, or work quickly when they are on, or just suck it up. Don't get burned though.
Ok, up first, front dome lights:
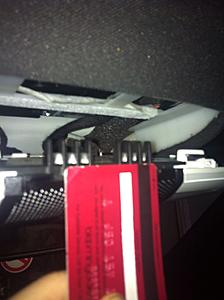
1) Insert the credit card into the housing as pictured, there are tabs only where the black mesh is that must be released, you will see these in the second picture:
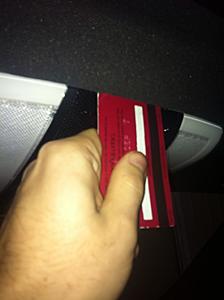
If done properly, it should pop-down and look like this:
If it doesn't pop down, pull the card out, and push back up either further left or right (or both if needed).
Now, BE CAREFUL with this next step. Some people have pulled it down too far and some have reported cracking some lenses. If oyu ask me, you really have to be aggressive or impatient to do this, but you have been warned, don't want to be held responsible for any cracked dome housings.
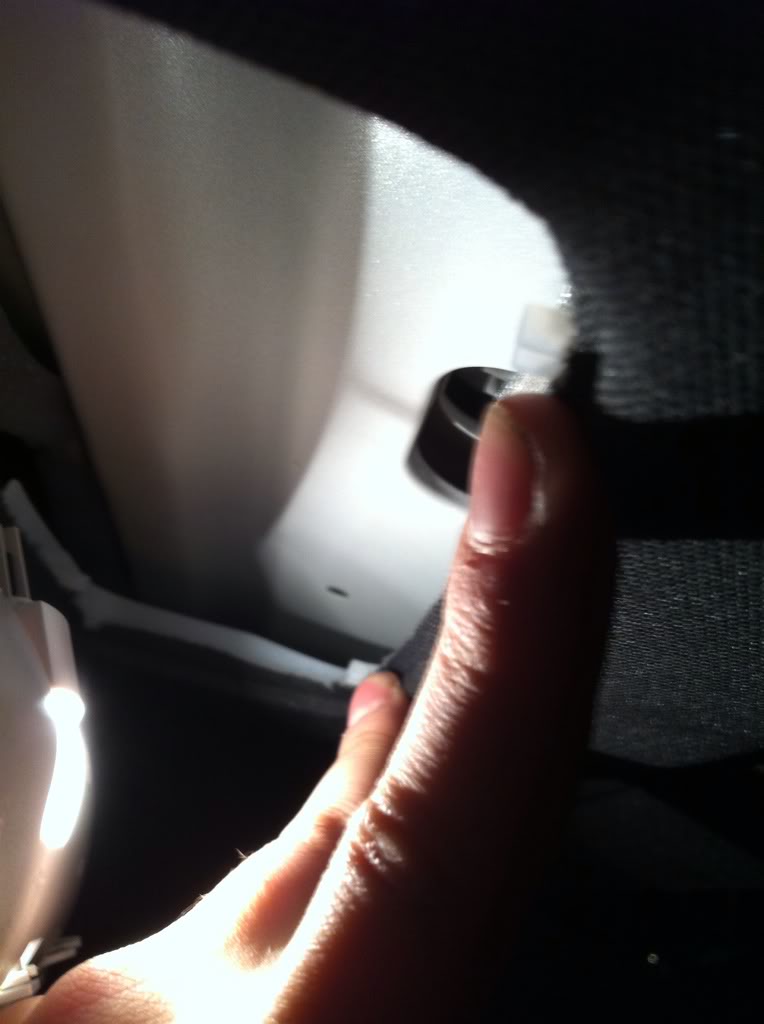
You will see two circle holders as pictured (one on the left side, one on the right side):
These need to be taken out. I have found it easiest to use your two pointer fingers. Remember, righty tighty, lefty loosey. After you have turned it 1/4 turn to the left (so that the raised section is now pointing from the front of the car to the back) then you can lift up the holders to remove the bulbs.
AGAIN, be careful, this is probably where most people end up cracking housings (for the very small amount that do). You will have a tendency to want to pull the entire dome housing down further to get better leverage or visibility (especially if you have big hands). Only one side of the dome housing has been unclipped (I don't, & I don't think anyone else knows how to remove/unclip the far side). It would probably be useful to support the far end of the dome light with one hand as you try to pull out the holder (a friend and/or brother/sister's hand works best).
When you pull it out, the stock bulbs look like this:

Pull out the bulb by placing your thumb and pointer finger on the bulb on one hand, and hold the housing with your other hand and pull it out. If you have gloves, it can prevent oil from your hands getting on the bulb, causing excess heat and possible premature failure. But I have found that wearing gloves just makes it THAT much harder/borderline impossible. And I haven't had any issues with bulbs going out or anything either, so you don't have to (and even if they did, it is relatively easy to replace.
Also, be careful not to break the bulb, it is glass. Again, just a precaution, rather safe than sorry and I don't want to be responsible for cuts and such. But you really would have to be some type of ogre to break it...
After you pull it out, plug in the new bulbs. I chose Polarg M4's as the LED are too long for the front dome lights and won't let you tighten it all the way.
The new bulb will look like this:
If you use LED, the bulb can be tighten (just barely) by like 1/8th of a turn in the housing and still light up. But it presses on the lens and probably causes resistor plate contact, causing excess heat and component separation - leading to premature failure. Pretty much, I am saying DON'T use AZN Optics (or any other LED) for the front or rear dome lights, it won't fit "right". Use Polarg M4's.
After the bulb is replaced, push back up the housing. You would think that you can just push up the part where you placed the credit card right in the middle. Do that first, but it won't be fully secure. Don't freak out. Just push it on each lens too, like this:
Congrats, you have replaced the front dome lights. If you just scrolled down to here because the process looks too long/hard. It really isn't, it probably takes 5 minutes, if that. It is just filled with dummy proof directions and many precautions. I won't be re-writing these no-brainer precautions on every bulb replacement to save time and space.
Here is the list:
- front dome light (two bulbs)
- front vanity lights (two bulbs, one for each mirror)
- rear dome light (one bulb)
- rear trunk lights (two bulbs) one on the right side near the tailight, and one on the part of the trunklid that opens and shines down (when the trunk is open it is up and to the left. It is one bulb for a dual reflector - one red and one clear. And yes, even with a white light, the red is still red and the clear is white.
Here is a list of things you will need:
- Fingers (the smaller/skinnier the better)
- Credit Card (one with the most debt, so if the magnetic strip stops working for some reason, or if there is some minor cosmetic damage, you won't mind too much.
- For the trunk light on the trunk lid (with the dual reflectors) you will also need: T10 Torx Bit or T10 torx screw driver.
- You may also want to keep a flathead screwdriver handy to help with some "tough areas".
Also, these bulbs get HOT and fast, so try to keep the lights off manually when possible, or work quickly when they are on, or just suck it up. Don't get burned though.
Ok, up first, front dome lights:
1) Insert the credit card into the housing as pictured, there are tabs only where the black mesh is that must be released, you will see these in the second picture:

If done properly, it should pop-down and look like this:

If it doesn't pop down, pull the card out, and push back up either further left or right (or both if needed).
Now, BE CAREFUL with this next step. Some people have pulled it down too far and some have reported cracking some lenses. If oyu ask me, you really have to be aggressive or impatient to do this, but you have been warned, don't want to be held responsible for any cracked dome housings.
You will see two circle holders as pictured (one on the left side, one on the right side):
These need to be taken out. I have found it easiest to use your two pointer fingers. Remember, righty tighty, lefty loosey. After you have turned it 1/4 turn to the left (so that the raised section is now pointing from the front of the car to the back) then you can lift up the holders to remove the bulbs.
AGAIN, be careful, this is probably where most people end up cracking housings (for the very small amount that do). You will have a tendency to want to pull the entire dome housing down further to get better leverage or visibility (especially if you have big hands). Only one side of the dome housing has been unclipped (I don't, & I don't think anyone else knows how to remove/unclip the far side). It would probably be useful to support the far end of the dome light with one hand as you try to pull out the holder (a friend and/or brother/sister's hand works best).
When you pull it out, the stock bulbs look like this:
Pull out the bulb by placing your thumb and pointer finger on the bulb on one hand, and hold the housing with your other hand and pull it out. If you have gloves, it can prevent oil from your hands getting on the bulb, causing excess heat and possible premature failure. But I have found that wearing gloves just makes it THAT much harder/borderline impossible. And I haven't had any issues with bulbs going out or anything either, so you don't have to (and even if they did, it is relatively easy to replace.
Also, be careful not to break the bulb, it is glass. Again, just a precaution, rather safe than sorry and I don't want to be responsible for cuts and such. But you really would have to be some type of ogre to break it...
After you pull it out, plug in the new bulbs. I chose Polarg M4's as the LED are too long for the front dome lights and won't let you tighten it all the way.
The new bulb will look like this:
If you use LED, the bulb can be tighten (just barely) by like 1/8th of a turn in the housing and still light up. But it presses on the lens and probably causes resistor plate contact, causing excess heat and component separation - leading to premature failure. Pretty much, I am saying DON'T use AZN Optics (or any other LED) for the front or rear dome lights, it won't fit "right". Use Polarg M4's.
After the bulb is replaced, push back up the housing. You would think that you can just push up the part where you placed the credit card right in the middle. Do that first, but it won't be fully secure. Don't freak out. Just push it on each lens too, like this:

Congrats, you have replaced the front dome lights. If you just scrolled down to here because the process looks too long/hard. It really isn't, it probably takes 5 minutes, if that. It is just filled with dummy proof directions and many precautions. I won't be re-writing these no-brainer precautions on every bulb replacement to save time and space.
Thread Starter
MBWorld Fanatic!
Joined: Sep 2009
Posts: 2,108
Likes: 7
From: Dix Hills, New York
2012 C250 Coupe
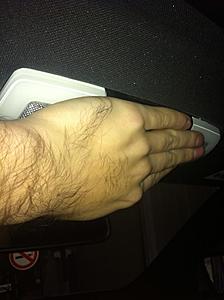
Rear dome light (1 bulb):
Once again you will need your credit card. There are four tabs total. None are on the left and right side (where the windows are) two are on the front side (by the front seats, with one on each end (far left and far right). Two more are on the back side (by the rear seats) with one on each end.
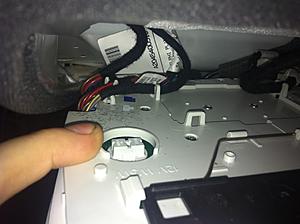
Insert your credit card into each of these four points and push upwards towards the roof, right where my finger points, and then on the other three points:
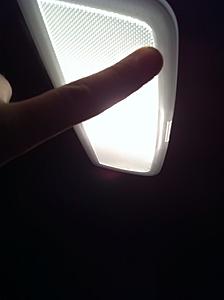
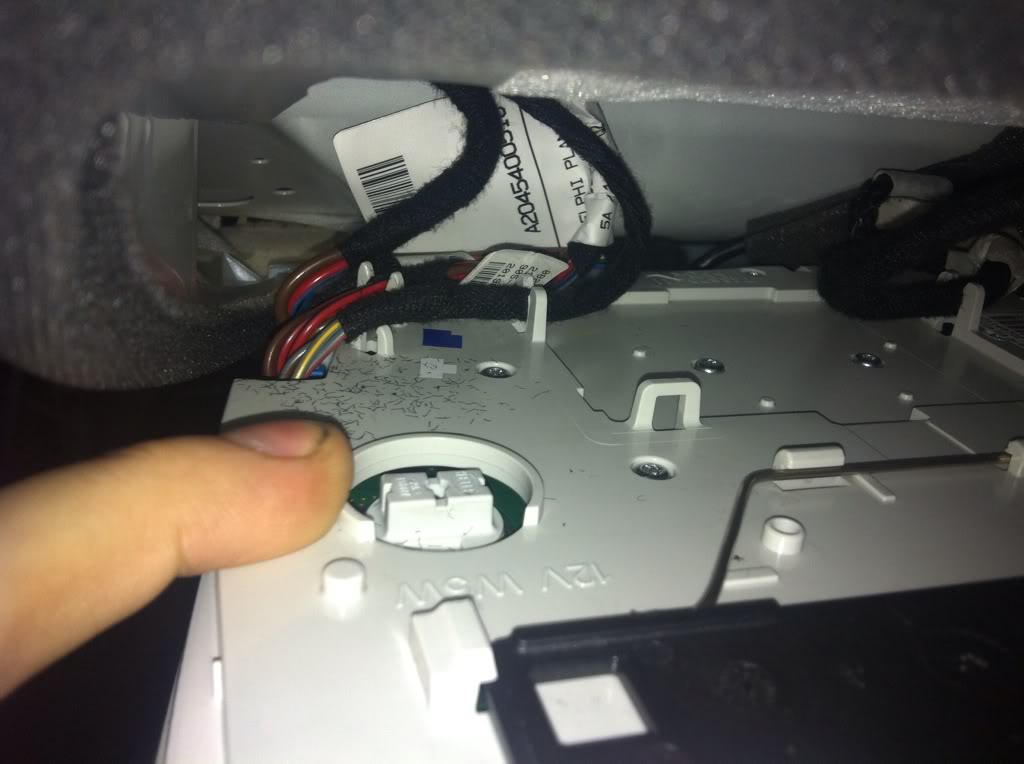
If done correctly, the dome light should pop down - it won't fall to the ground, it is held in place by the bulb. You can see the way it is secured with these pictures:
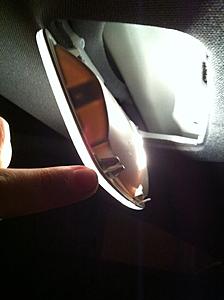
Those are 2 of the four clips (two are on the other side). But it falls down like this because the bulb and wire are ran from the front of the car and are supporting it.
You can see the two (of four total) protruding white circles that thes tabs cling to for support in this next picture:
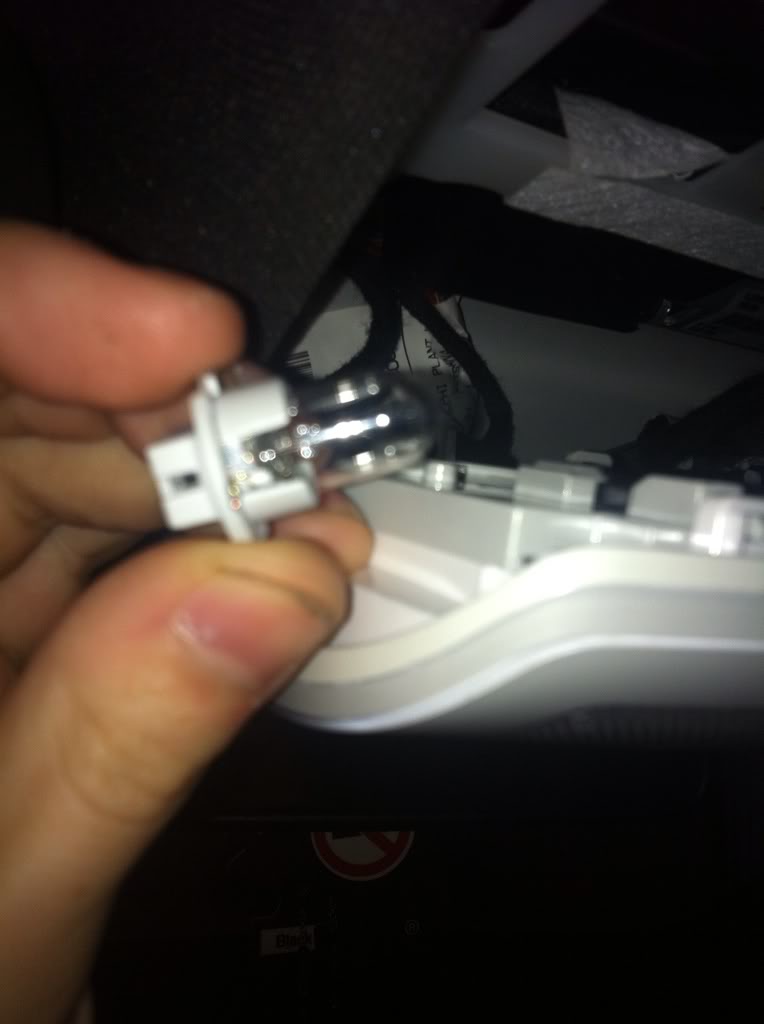
After that, you have access to the bulb. You can either pull it out, and replace, or if you need more room, you can first remove the holder from the lens by twisting it off. Remember, righty tighty, lefty loosey. You can then pull out the bulb holder from the lens for easier access to the bulb. Replacement is the same as the front dome, as well as every other bulb. Halogens don't matter which side you plug in.
But if you didn't listen to my warning and went LED, they are polarity specific. Meaning plug it in, turn on the light. If it doesn't light, take it out, flip it over and plug it back in and it will work now. Also, you should be careful to make sure that the resistor plates (these are rectangular silver metal plates) are not in contact with the power plates inside the holders. You can ensure this by plugging them in all the way, then pulling them out a little bit. Also, the LED's are supposed to get warm, but if they got HOT, like the halogens, this means that the resistor plates are in contact, and you need to pull them out further.
After you have the bulb replaced, put the holder back into the lens and tighten (if you even removed it) and then push back up in those four corners with pressure to reclip the mounts (sorry, forgot to take a picture, but I am sure will can manage to figure it out... )
)
Congrats, you have now replaced your rear dome light!
Once again you will need your credit card. There are four tabs total. None are on the left and right side (where the windows are) two are on the front side (by the front seats, with one on each end (far left and far right). Two more are on the back side (by the rear seats) with one on each end.
Insert your credit card into each of these four points and push upwards towards the roof, right where my finger points, and then on the other three points:

If done correctly, the dome light should pop down - it won't fall to the ground, it is held in place by the bulb. You can see the way it is secured with these pictures:
Those are 2 of the four clips (two are on the other side). But it falls down like this because the bulb and wire are ran from the front of the car and are supporting it.
You can see the two (of four total) protruding white circles that thes tabs cling to for support in this next picture:
After that, you have access to the bulb. You can either pull it out, and replace, or if you need more room, you can first remove the holder from the lens by twisting it off. Remember, righty tighty, lefty loosey. You can then pull out the bulb holder from the lens for easier access to the bulb. Replacement is the same as the front dome, as well as every other bulb. Halogens don't matter which side you plug in.
But if you didn't listen to my warning and went LED, they are polarity specific. Meaning plug it in, turn on the light. If it doesn't light, take it out, flip it over and plug it back in and it will work now. Also, you should be careful to make sure that the resistor plates (these are rectangular silver metal plates) are not in contact with the power plates inside the holders. You can ensure this by plugging them in all the way, then pulling them out a little bit. Also, the LED's are supposed to get warm, but if they got HOT, like the halogens, this means that the resistor plates are in contact, and you need to pull them out further.
After you have the bulb replaced, put the holder back into the lens and tighten (if you even removed it) and then push back up in those four corners with pressure to reclip the mounts (sorry, forgot to take a picture, but I am sure will can manage to figure it out...
)Congrats, you have now replaced your rear dome light!
Thread Starter
MBWorld Fanatic!
Joined: Sep 2009
Posts: 2,108
Likes: 7
From: Dix Hills, New York
2012 C250 Coupe
Ok, now onto the trunk lights!
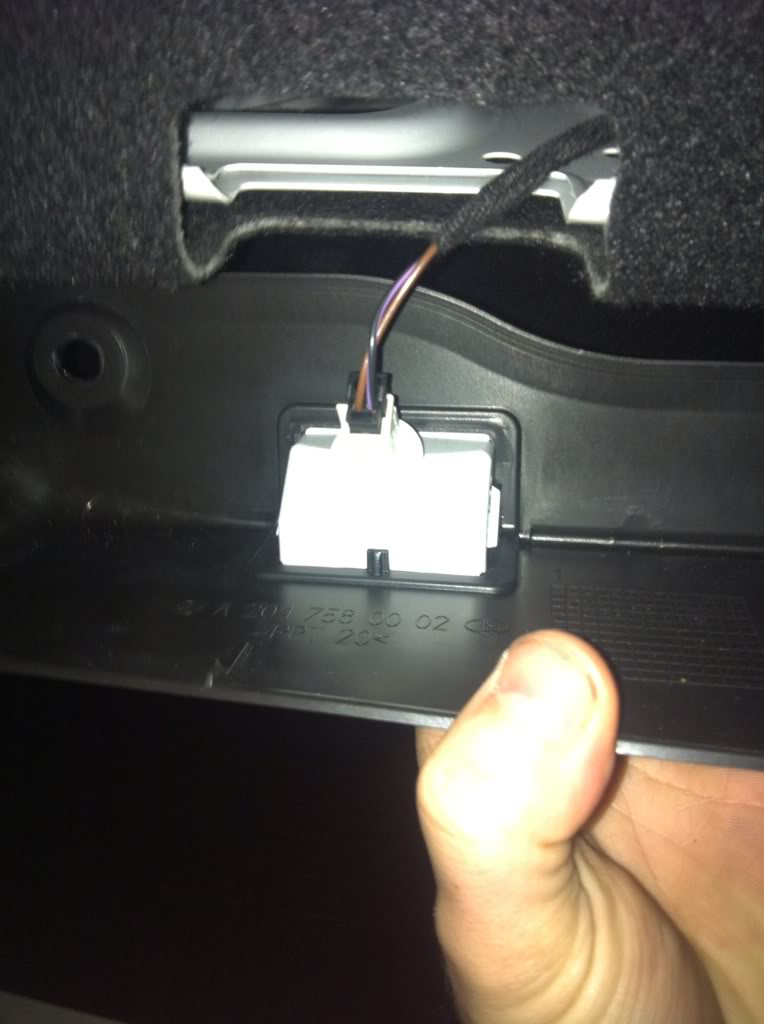
First up (and most complicated of them all) is the dual reflector bulb on the trunklid.
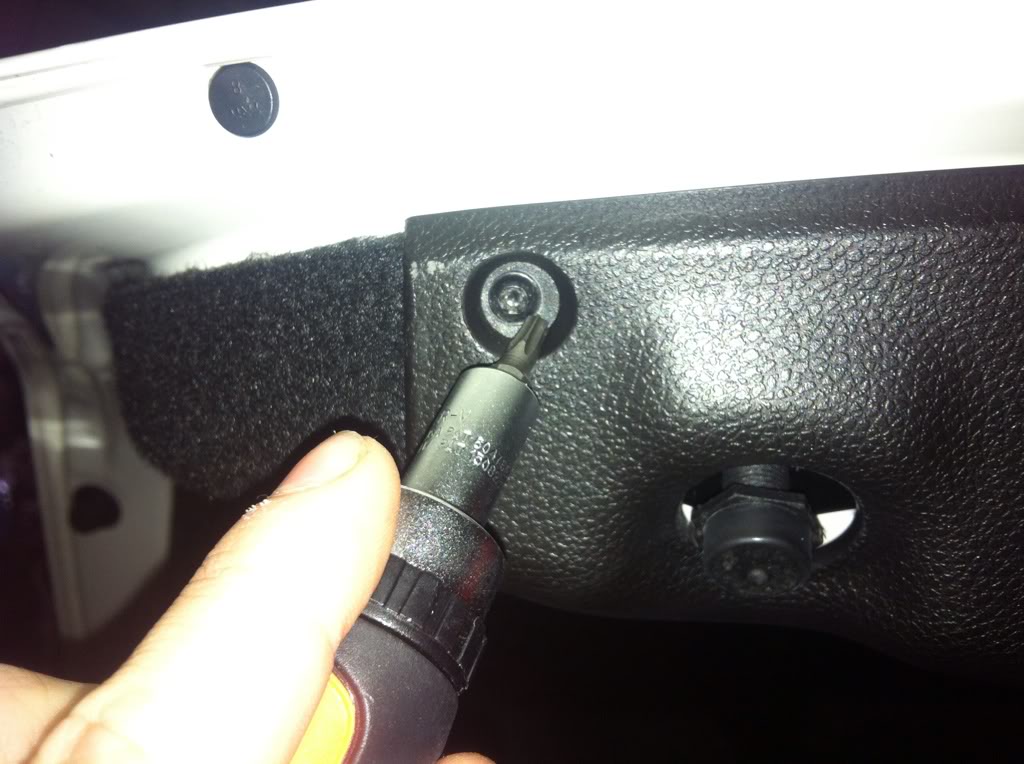
When you open the trunk and look at the trunklid that has the locking mechanism on it, you will see 4 Torx screws. These are size T10 (a torx size). Here are pictures for your reference, two in the middle next to the locking mechanism, and one on the far left and right of that:
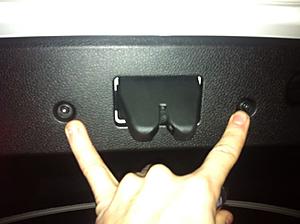
Far left:

Far right:

Now, after you take these four screws out (Don't lose them!!) there are three plastic tabs that use a male/female locking system. I hope you didn't cut your nails before attempting this task. If you did, this is where that flathead screwdriver comes in handy!
*NOTE*: I have realized that me and my brother have two different types of securing tabs. Mine are a peg and circle type, and my brothers has just a tab with 3 slits in it. I have not yet determined a good method for taking these out. But I will update the DIY when I do...
Here are pictures of the three plastic tab locations. If the pictures confuse you, imagine you are laying in your trunk on your back, with your head by the seats and your feet hanging out of the trunk, you will see them. You only have to remove the four that are surrounded by the hard plastic. The other ones are to remove the trunk liner (which if you want to install a rear-view camera, or LED license plate lights (good thing these come standard now) you would have to remove those for access.
Here are the pics:
Middle(ish):
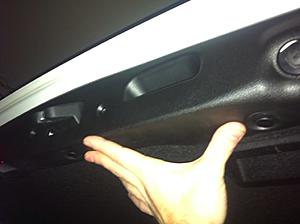
One on the far right (if you are looking facing the trunk with the car in front of you):
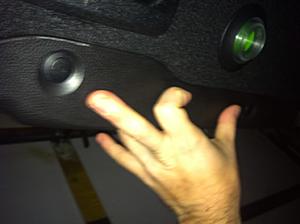
And the third one on the far left:
If you have never encountered these types of tabs before, I will show you how they look like apart and describe how to remove them. Here is the picutre :
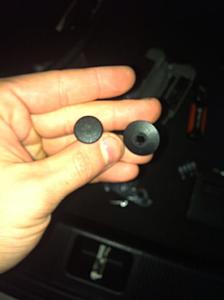
The long skinny plastic piece (the male) has to be pulled out of the female plastic piece (the female)... Let's all try to be adults here
I like to use my fingernails to get underneath the small peg to pull it out. After the peg is fully pulled out, you can then use your fingernails to work out the circle female piece. I find it easiest to work around it in a circular motion, or by pulling up on direct opposite sides at the same time. All four come out the same.
After all the pegs are removed, you can then pull out the hard plastic piece for access to the bulb. Wiggle, Wiggle, Wiggle, Wiggle, Wiggle - Yeah!
This is what the bulb looks like - similar to the holder in the rear dome, but not identical:

To remove this bulb, you must turn the holder to expose the bulb, and then replace as ususal. Remember, righty tighty, lefty loosey. I have not tried to test fit an LED into this housing. It may or may not fight, so don't blame me if it doesn't.
Now, reinstall in the reverse order. Tighten the housing by turning it to the right, replace the hard black plastic cover, then plug each tab with the female plug first, then the male into that once it is in. The male peg can't be inside the female opening when you try to insert it or it won't fit. This is how it "locks" or secures". By making the female wider, preventing it from fitting through the hole.
After all the clips are replaced, then put back in the 4 torx screws. It might be hard to get the holes to line up perfectly, especially if you don't have a helper. What I do is just start to screw them in at an angle to get it in. Don't worry, the screw will eventually straighten out and help put the black plastic piece in place, even though you might have to start screwing at a pretty severe angle, just trust me (have I led you wrong so far?).
Congrats, you are done with the hardest part of the bulb replacements so far!
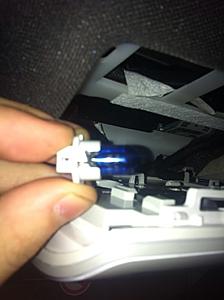
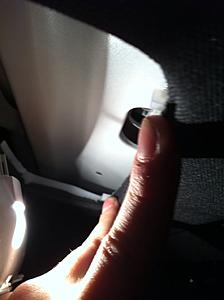
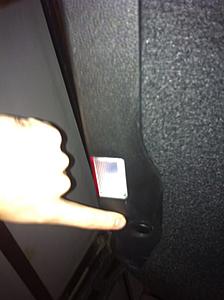
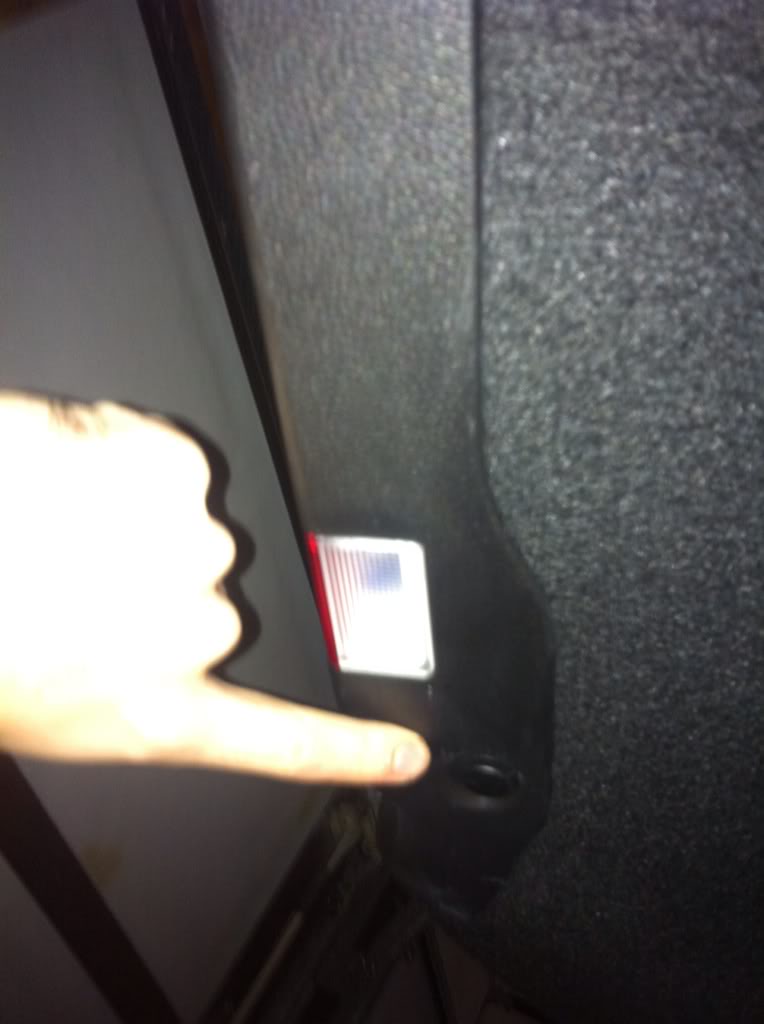
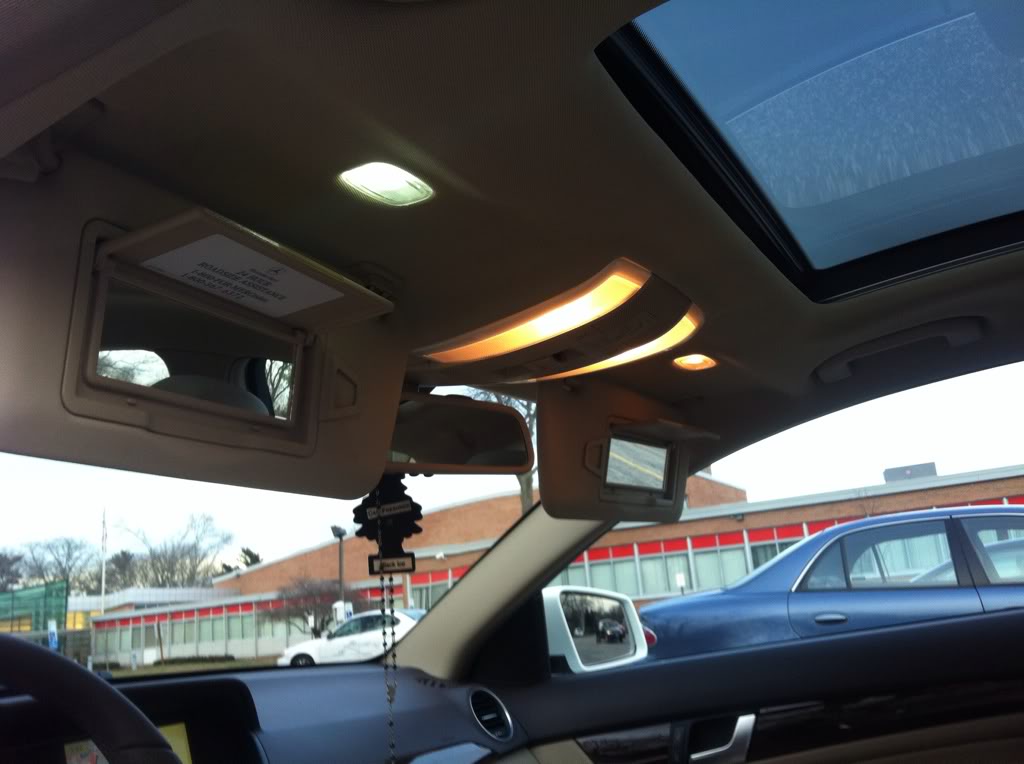
All that is left now are the two vanity lights and the one trunk light on the riht side near the tail light. These are the easiest of all the bulbs to replace. And best of all, the LED's definitely fit! I highly recommend them, extremely bright! But again, use caution to make sure that the resistor plates aren't in contact to ensure long-life. Also, they are polarity specific, so test it before you pop the housing back in.
When you look at the lens, it is somewhat rectangular. On one of the two shorter sides, you will notice that there is a shaved away portion, allowing you to get in a narrow flat head screwdriver. This is what you can use. Otherwise, I have found that the little silver key that fits inside the car key is also well-suited for this task.
You insert it into this thinner area, try not to pull down too hard, you want to kind of push it in at an angle (I would say 45 degrees) because there are two prongs that latch in on the inside to secure it. So you have to go in at an angle to push them away, while simuletaneously pulling down (but not like an ogre or you might break them) If you hit the prongs correctly they should pop right out.
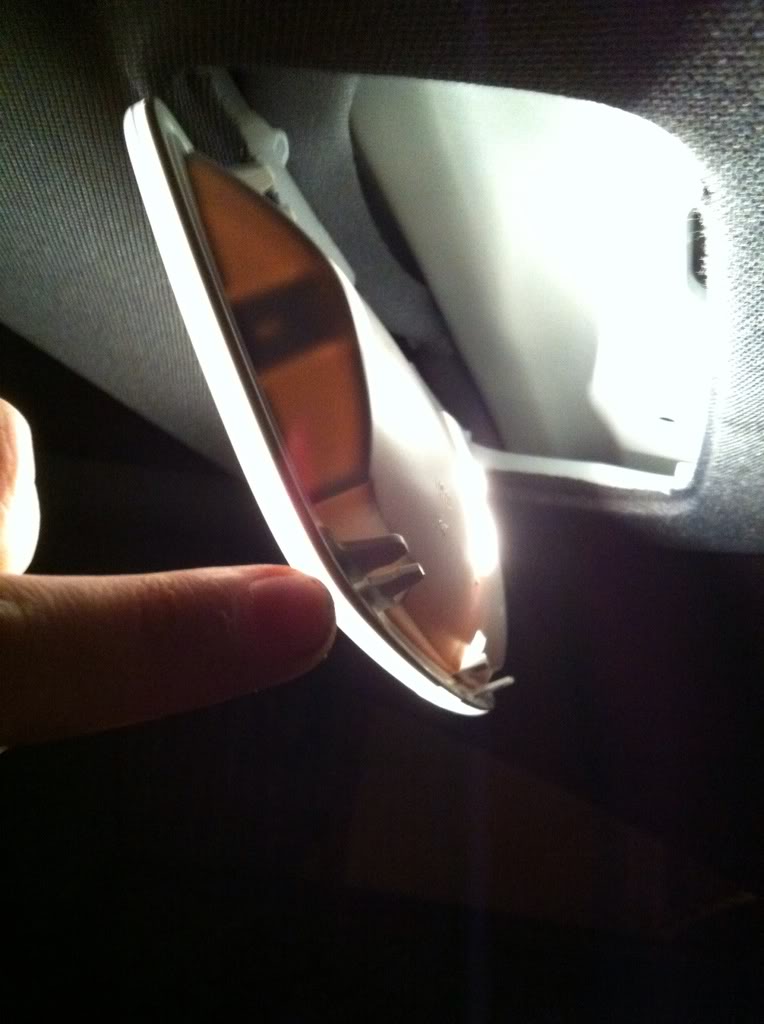
The housing/lens looks like this:

Best picutre I had, forgot to take pictures of this process, hopefully I can do it tomorrow for those of you not able to figure it out. The one in the trunk you can remove the housing form the lens by turning left (like the rear dome and other trunk light) for ease of install.
However, with the two vanity lights (at least in my car) the cable wasn't long enough to get the lens off, so you have to work around it, kinda a PITA (Pain in the ****) and extra hassle for no reason.
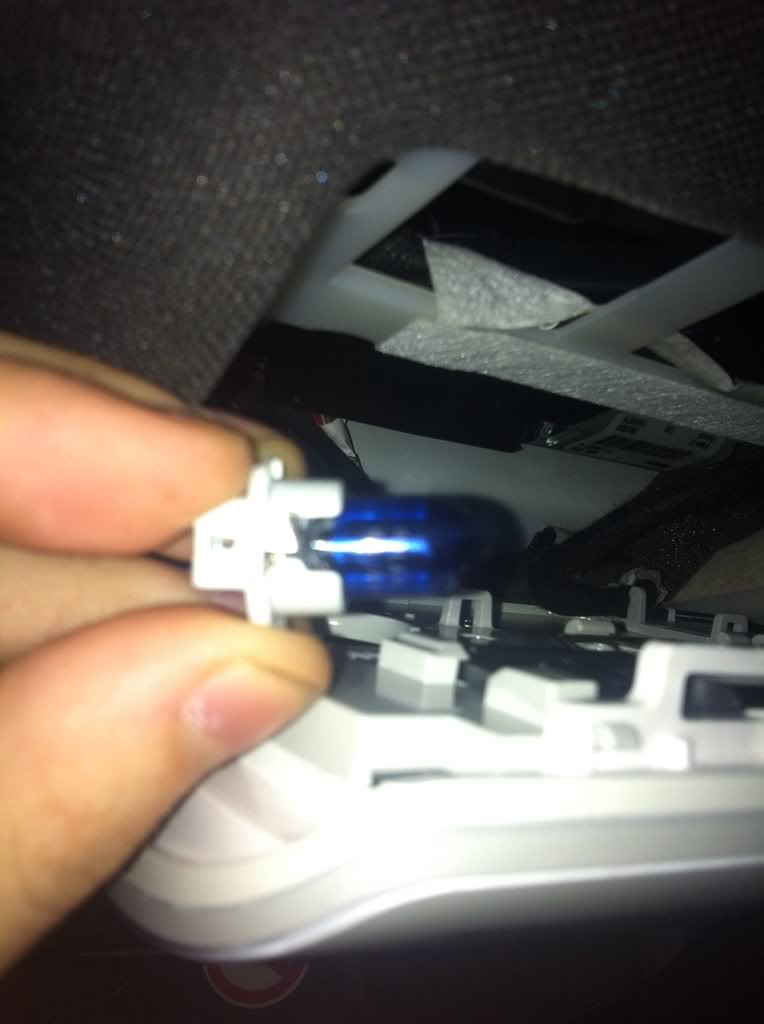
For those of you wondering, that is a picture of an LED (Azn Optics) in the vanity light, compared to stock bulbs.
Hope you enjoyed my DIY for the interior lights. Up next, headlights!
If you have any questions/comments or concerns, please, feel free to post!
First up (and most complicated of them all) is the dual reflector bulb on the trunklid.
When you open the trunk and look at the trunklid that has the locking mechanism on it, you will see 4 Torx screws. These are size T10 (a torx size). Here are pictures for your reference, two in the middle next to the locking mechanism, and one on the far left and right of that:

Far left:
Far right:

Now, after you take these four screws out (Don't lose them!!) there are three plastic tabs that use a male/female locking system. I hope you didn't cut your nails before attempting this task. If you did, this is where that flathead screwdriver comes in handy!
*NOTE*: I have realized that me and my brother have two different types of securing tabs. Mine are a peg and circle type, and my brothers has just a tab with 3 slits in it. I have not yet determined a good method for taking these out. But I will update the DIY when I do...
Here are pictures of the three plastic tab locations. If the pictures confuse you, imagine you are laying in your trunk on your back, with your head by the seats and your feet hanging out of the trunk, you will see them. You only have to remove the four that are surrounded by the hard plastic. The other ones are to remove the trunk liner (which if you want to install a rear-view camera, or LED license plate lights (good thing these come standard now) you would have to remove those for access.
Here are the pics:
Middle(ish):

One on the far right (if you are looking facing the trunk with the car in front of you):

And the third one on the far left:
If you have never encountered these types of tabs before, I will show you how they look like apart and describe how to remove them. Here is the picutre :

The long skinny plastic piece (the male) has to be pulled out of the female plastic piece (the female)... Let's all try to be adults here
I like to use my fingernails to get underneath the small peg to pull it out. After the peg is fully pulled out, you can then use your fingernails to work out the circle female piece. I find it easiest to work around it in a circular motion, or by pulling up on direct opposite sides at the same time. All four come out the same.
After all the pegs are removed, you can then pull out the hard plastic piece for access to the bulb. Wiggle, Wiggle, Wiggle, Wiggle, Wiggle - Yeah!
This is what the bulb looks like - similar to the holder in the rear dome, but not identical:
To remove this bulb, you must turn the holder to expose the bulb, and then replace as ususal. Remember, righty tighty, lefty loosey. I have not tried to test fit an LED into this housing. It may or may not fight, so don't blame me if it doesn't.
Now, reinstall in the reverse order. Tighten the housing by turning it to the right, replace the hard black plastic cover, then plug each tab with the female plug first, then the male into that once it is in. The male peg can't be inside the female opening when you try to insert it or it won't fit. This is how it "locks" or secures". By making the female wider, preventing it from fitting through the hole.
After all the clips are replaced, then put back in the 4 torx screws. It might be hard to get the holes to line up perfectly, especially if you don't have a helper. What I do is just start to screw them in at an angle to get it in. Don't worry, the screw will eventually straighten out and help put the black plastic piece in place, even though you might have to start screwing at a pretty severe angle, just trust me (have I led you wrong so far?).
Congrats, you are done with the hardest part of the bulb replacements so far!
All that is left now are the two vanity lights and the one trunk light on the riht side near the tail light. These are the easiest of all the bulbs to replace. And best of all, the LED's definitely fit! I highly recommend them, extremely bright! But again, use caution to make sure that the resistor plates aren't in contact to ensure long-life. Also, they are polarity specific, so test it before you pop the housing back in.
When you look at the lens, it is somewhat rectangular. On one of the two shorter sides, you will notice that there is a shaved away portion, allowing you to get in a narrow flat head screwdriver. This is what you can use. Otherwise, I have found that the little silver key that fits inside the car key is also well-suited for this task.
You insert it into this thinner area, try not to pull down too hard, you want to kind of push it in at an angle (I would say 45 degrees) because there are two prongs that latch in on the inside to secure it. So you have to go in at an angle to push them away, while simuletaneously pulling down (but not like an ogre or you might break them) If you hit the prongs correctly they should pop right out.
The housing/lens looks like this:
Best picutre I had, forgot to take pictures of this process, hopefully I can do it tomorrow for those of you not able to figure it out. The one in the trunk you can remove the housing form the lens by turning left (like the rear dome and other trunk light) for ease of install.
However, with the two vanity lights (at least in my car) the cable wasn't long enough to get the lens off, so you have to work around it, kinda a PITA (Pain in the ****) and extra hassle for no reason.
For those of you wondering, that is a picture of an LED (Azn Optics) in the vanity light, compared to stock bulbs.
Hope you enjoyed my DIY for the interior lights. Up next, headlights!
If you have any questions/comments or concerns, please, feel free to post!
Last edited by jctevere; Jan 5, 2012 at 11:52 PM.

Junior Member
Joined: Nov 2012
Posts: 19
Likes: 0
From: Bay Area, Cali.
2013 C250 COUPE
Trending Topics
MB World Stories
The Best of Mercedes & AMG

Manual Mercedes? 6 Times Sindelfingen Let Drivers Have All The Fun
Verdad Gallardo
Mercedes SLR McLaren 722 S Is Extremely Rare Example Modified by McLaren
Verdad Gallardo
8 Classic Boxy Mercedes Designs That Have Aged Like Fine Wine
Verdad Gallardo
Flawlessly Restored Mercedes 190E Evo II Heads to Auction
Verdad Gallardo
Electric Mercedes C-Class Unveiled: 11 Things You Need to Know
Verdad Gallardo
Mercedes EQS Gets A Major Update: Everything You Need to Know
Verdad Gallardo
5 Underrated Mercedes-Benz Models That Don't Get the Love They Deserve
Verdad Gallardo
Mercedes 300D Has Pushed Well Past 1 Million Miles and It Ain't Stopping
Verdad Gallardo
10 Most Reliable Mercedes-Benz Models You Can Buy Used
Verdad Gallardo
Junior Member
Joined: Dec 2015
Posts: 60
Likes: 0
From: Tampa, FL
c250 Coupe Sport

I got this 5 bulb set of blue led bulbs from user motoringmax on ebay who uses iJDMToy bulbs for $20 which is cheaper than directly off iJDMToy

They provided 2 bulbs for vanity, 2 for bulbs dome lighting in front, and 1 for dome light in the rear
For 15% off, use promo code RC15JYN
what kind of bulb controls the ambient lighting that lights onto the shifter and center console from the bottom of the mirror?
it is currently amber and i'd like to do a blue if possible.
Last edited by fl0wmastr; Jan 4, 2016 at 10:54 AM.


