
New project...Retrofit OEM BiXenon housings :-)
 07-17-2013 | 12:16 PM
#26

Thread Starter
Super Member
Joined: Oct 2011
Posts: 690
Likes: 84
From: GA
X3 M40i
Thanks Damien, I'll sort out the wiring with a multimeter 
I always was curious about the DRL auto dimming and where the source of the voltage drop was coming from, I suppose now we know
Reading your previous posting I thought it would've been easier to do my planned mod by simply tapping into the C light power supply, looks like I'll be sticking instead to my previous wiring/relay/rectifyers and separate switch arrangement I'd already planned for this mod, I certainly don't want to be blowing anything on my fully optioned OEM bi-xenons assembly and as previously stated wiring up the DRL's to the C light would also muck up the left/right courtesy park light feature, because it would also fire up the DRL unnecessarily.
Sorry to hear about your probs and hopefully it dosn't cost too much to get the blown lights replaced or fixed, make sure you show us all the finished result
 ) so I can control the C lights separately.
07-17-2013 | 12:59 PM
) so I can control the C lights separately.
07-17-2013 | 12:59 PM
#27
Thread Starter
Super Member
Joined: Oct 2011
Posts: 690
Likes: 84
From: GA
X3 M40i
AR82.10-P-4655CW Remove/install Signaling Lights Actuation Module
• MODEL 204.0 /2 /3
• with CODE (614) Bi-xenon headlamp unit
• with CODE (618) Bi-xenon headlamps
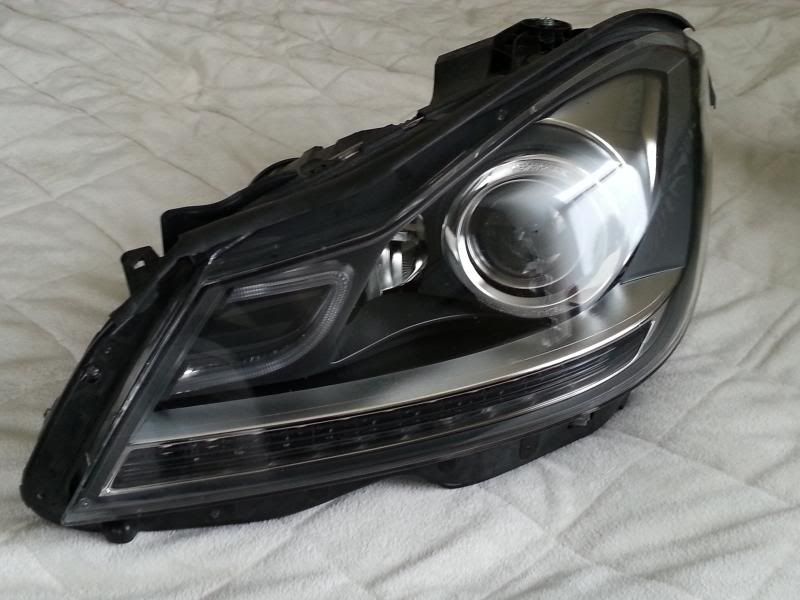
I attached a picture of the Bi-Xenon headlamp unit displaying the Actuator module for reference so others can see what we are talking about.
The module on the left is the HID Ballast and the one on the right is the Actuator module that controls current/signal flow to LEDs. Obviously, the people who have halogen headlamps will not have the HID Ballast or Actuator module.
Last edited by DameMD; 07-17-2013 at 01:09 PM.
07-17-2013 | 01:24 PM
#28
Super Member
Joined: Sep 2007
Posts: 804
Likes: 1
2008 C350
I am not using the actuator modules as they are regulated by a different wire harness (used by lighting package) back to the car's computer, and have to be programmed by Star Diagnosis tool. The current connector that goes to the halogen lamps from wire harness, pin layout is also different. Since I am upgrading the Bixenon lights to my own HID kit, and the "C" LED and turnsignals to my own relay switch and resistor, there will be no need for the actuator unit. Plus, I don't see them on ebay at all. The dealer could order them but they are probably expensive. I am trying to cut corners and save cost.
AR82.10-P-4655CW Remove/install Signaling Lights Actuation Module
� MODEL 204.0 /2 /3
� with CODE (614) Bi-xenon headlamp unit
� with CODE (618) Bi-xenon headlamps
I attached a picture of the Bi-Xenon headlamp unit displaying the Actuator module for reference so others can see what we are talking about. The module on the left is the HID Ballast and the one on the right is the Actuator module that controls current/signal flow to LEDs. Obviously, the people who have halogen headlamps will not have the HID Ballast or Actuator module.
AR82.10-P-4655CW Remove/install Signaling Lights Actuation Module
� MODEL 204.0 /2 /3
� with CODE (614) Bi-xenon headlamp unit
� with CODE (618) Bi-xenon headlamps
I attached a picture of the Bi-Xenon headlamp unit displaying the Actuator module for reference so others can see what we are talking about.
The module on the left is the HID Ballast and the one on the right is the Actuator module that controls current/signal flow to LEDs. Obviously, the people who have halogen headlamps will not have the HID Ballast or Actuator module.I would think the headlight harness on the chassis side be compatible this headlight.
I seen the ballast on ebay all day but I can't find the led control unit.
07-17-2013 | 01:41 PM
#29
Thread Starter
Super Member
Joined: Oct 2011
Posts: 690
Likes: 84
From: GA
X3 M40i
GF82.10-P-3008CE Turn Signal Indicator Actuation, Function
GF82.10-P-3008CE Turn Signal Indicator Actuation, Function
Function requirements, general
• No overvoltage or undervoltage (operating voltage range >=U 7 <=17.5 V)
Turn signal actuation in general
The turn signal light actuation consists of all functions for output of the turn signal, various warnings and feedback. The master control unit for all
turn signal functions is the front SAM control unit with fuse and relay module (N10/1).
The front SAM control unit prioritizes all flashing requests and transmits a flasher frequency with a time period of the bright phase of the turn
signal lamps over the interior CAN (CAN B) to the corresponding control units.

 Looks like the SAM Unit in the front is the same, however the connectors and wires back to the unit on the halogen lamp vs BiXenon lamps are different. When I get home I will take a picture of the connectors that I am referring too. If you are right (crossing fingers), then connecting the Actuator module, to the headlamp unit should regulate the current flow to keep the LEDs and Turnsignals working correctly. Per the diagrams, and literature, you would still need to program the functions with the Star tool. I could be wrong but wouldn't the Camera sensors ILS, motor controls for ILS, headwashers controls and other stuff needed for BiXenon lamps be connected to a different harness "not" used by the halogen lamps? Or are they using the same harness and all of these functions can be wired to existing harness and be turned on by the Star tool?
07-21-2013 | 02:46 PM
Looks like the SAM Unit in the front is the same, however the connectors and wires back to the unit on the halogen lamp vs BiXenon lamps are different. When I get home I will take a picture of the connectors that I am referring too. If you are right (crossing fingers), then connecting the Actuator module, to the headlamp unit should regulate the current flow to keep the LEDs and Turnsignals working correctly. Per the diagrams, and literature, you would still need to program the functions with the Star tool. I could be wrong but wouldn't the Camera sensors ILS, motor controls for ILS, headwashers controls and other stuff needed for BiXenon lamps be connected to a different harness "not" used by the halogen lamps? Or are they using the same harness and all of these functions can be wired to existing harness and be turned on by the Star tool?
07-21-2013 | 02:46 PM
#30
Thread Starter
Super Member
Joined: Oct 2011
Posts: 690
Likes: 84
From: GA
X3 M40i
Another update!
Since I have the lights open I decided to take apart everything since I blew out the LED that runs the "C" light. The picture below shows the LED's that power the front turn-signal and the "C" LED. Obviously the one LED is what powers the "C" LED along with the magnified glass, which illuminates the "C" glass. The foot long base is the LED base that powers the turn-signal which has 12 LEDs.
[IMG]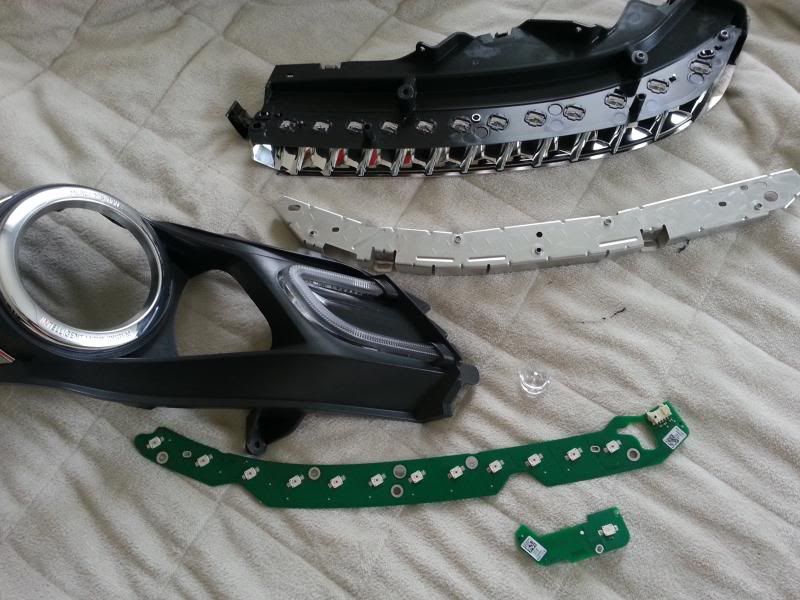 [/IMG]
I was quite surprised that the small LED is what powers the "C" light. I am replacing the burnt out "C" LED with this ->http://www.oznium.com/prewired-surface-mount-led it's a 12v LED which means I can power it to any 12v source without overpowering the circuit or LED. Also, this light is way brighter than the OEM LED which means my "C" light will be as bright as the DRL.
Also, I am replacing the turn-signal LEDs with this ->http://www.oznium.com/led-ribbon foot long LED Amber strip.
The reason why I went this route is to use the existing connector that is plugged into the halogen housing. The halogen housing use a regular amber bulb which is powered to a 12v source. The Bi-Xenon LEDs use an Actuator module which regulates the voltage from 12v to 3-5v. With my new set of pre-wired LEDs, I can now use the existing 12v sources and not have any problems with STAR warning issues Hopefully when I receive my LEDs I can finish the install and maybe paint my housings black.
[IMG]
 [/IMG]
I was quite surprised that the small LED is what powers the "C" light.
I am replacing the burnt out "C" LED with this ->http://www.oznium.com/prewired-surface-mount-led it's a 12v LED which means I can power it to any 12v source without overpowering the circuit or LED. Also, this light is way brighter than the OEM LED which means my "C" light will be as bright as the DRL. Also, I am replacing the turn-signal LEDs with this ->http://www.oznium.com/led-ribbon foot long LED Amber strip.
The reason why I went this route is to use the existing connector that is plugged into the halogen housing. The halogen housing use a regular amber bulb which is powered to a 12v source. The Bi-Xenon LEDs use an Actuator module which regulates the voltage from 12v to 3-5v. With my new set of pre-wired LEDs, I can now use the existing 12v sources and not have any problems with STAR warning issues
Hopefully when I receive my LEDs I can finish the install and maybe paint my housings black.
08-17-2013 | 12:33 AM
#31

Member
Joined: Sep 2008
Posts: 131
Likes: 0
From: Ohio
2009 C300, 2012 GLK350, 2012 C350C
@DameMD
Do you have any updates on your project. We are eager to hear that you have your setup complete and working as you wanted?
Also, any harness re-wiring DIY info that you can pass on for the not so-savvy electricians?
I will be starting this very same project very soon.
Thanks!!!
Do you have any updates on your project. We are eager to hear that you have your setup complete and working as you wanted?
Also, any harness re-wiring DIY info that you can pass on for the not so-savvy electricians?
I will be starting this very same project very soon.
Thanks!!!
08-21-2013 | 02:17 PM
#32

Junior Member
Joined: Apr 2013
Posts: 31
Likes: 0
Mercedes c350 coupe
where did you buy this?
Well the 2012+ OEM Bixenon housings are now showing up every where and they are not as expensive as like a year ago. I got the driver's side which is the most expensive for dirt cheap. Anyway, if I can get the driver's side light to work then I will go buy the passenger side. Now for the people that will say, I will lose the ILS, I don't care for it, as I had this option on my other cars i.e. G37S coupe, and Lexus SC430 and to me it's a gimmick. Also, infiniti did away with ILS feature on later models. Also, for the people who will say you lose head light washing, well... all my previous cars had OEM HID and the only car I ever had headlight washers was on my Lexus SC430. I used the feature maybe 3 times since I bought the car.
My real goal is to: 1) Get rid of the fugly OEM halogen look 2) Get the C LED light to work independent of the lights being on meaning, have the C LED running with the DRL on bumper :-) 3) use my current HID kit in the projector housing which has a better brightness then the OEM HID 4) The Highbeams are seperate bulbs...whoever said that the housing had only one light is I can use my existing high-beam bulbs with no problems.
No need for a new wiring harness as I am not using using ILS or headlight washers. My good friend is a car electronics/mechanic guru so we are going to play with fuses, tapping in other wires and fun stuff to get everything to work. I also want to be able to remove the lights in the event I have to go to the dealer to do any warranty or service visits. I will let you guys know my progress as I start digging in.

My real goal is to: 1) Get rid of the fugly OEM halogen look 2) Get the C LED light to work independent of the lights being on meaning, have the C LED running with the DRL on bumper :-) 3) use my current HID kit in the projector housing which has a better brightness then the OEM HID 4) The Highbeams are seperate bulbs...whoever said that the housing had only one light is
I can use my existing high-beam bulbs with no problems. No need for a new wiring harness as I am not using using ILS or headlight washers. My good friend is a car electronics/mechanic guru so we are going to play with fuses, tapping in other wires and fun stuff to get everything to work. I also want to be able to remove the lights in the event I have to go to the dealer to do any warranty or service visits. I will let you guys know my progress as I start digging in.
 08-29-2013 | 01:59 AM
#33
Member
Joined: Sep 2008
Posts: 131
Likes: 0
From: Ohio
2009 C300, 2012 GLK350, 2012 C350C
@DameMD
Do you have any updates on your project. We are eager to hear that you have your setup complete and working as you wanted?
Also, any harness re-wiring DIY info that you can pass on for the not so-savvy electricians?
I will be starting this very same project very soon.
Thanks!!!
Do you have any updates on your project. We are eager to hear that you have your setup complete and working as you wanted?
Also, any harness re-wiring DIY info that you can pass on for the not so-savvy electricians?
I will be starting this very same project very soon.
Thanks!!!
12-08-2013 | 11:42 AM
#34
Thread Starter
Super Member
Joined: Oct 2011
Posts: 690
Likes: 84
From: GA
X3 M40i
UPDATE!! Hey guys--- as some of you may know by now, I have a newborn that is two months old now and I haven't had much time to visit the forums or reply to threads with much info. I have some time today so I will try to cover as much as possible about the Bi-Xenon project I started.
First, I would like to say that I did not finish the install as I bought a 13 C350 sedan which has Bi-Xenons. Since I have my son and a new car with said mod (xenons) I put this project on hold. With that being said, i will provide info up to the point where I stopped the project.
Things to note:
1. The OEM "C" LED will burnout if its now wired to a voltage regulator source to keep it at a constant 3-5V. It's 3.5v and most of the car is set for 12v. I tried running the wires from the C LED to the DRLs and they blew out. Reason being is that the DRLs run at 12V in the day to stay bright, and when on at night, the DRLs voltage is lowered to 3-5V. The fluctuation between wattage blew out the C LEDs leading to a little smoke coming out of my Headlights. To fix this problem, you need to buy a small LED from a LED distributor.
2. I could not rewire the OEM amber light as it was connected to an actuator and control module. I went ahead and bought another set of LED lights and put them on top of the OEM amber light control board.
3. You will lose the High Beam function unless you bought an HID Kit that can function as low-beam and high beam. For me, I did not care for high beam as I live in the inner city and there was no use for high beams.
If you are ok with notes then proceed. If you are worried then do not proceed.
I will not be responsible for "your" install errors or blowing out your lights or any vehicle malfunction.
Proceed to next thread post....
03-06-2015 | 09:58 AM
#35

Junior Member
Joined: Jan 2011
Posts: 47
Likes: 1
W212
Very Nice works you've done
Does anyone know how to get the highbeam shutter to works on the new W204 headlights ? 
Thanks
Thanks
04-07-2015 | 08:37 AM
#36

Newbie
Joined: Apr 2015
Posts: 5
Likes: 0
2012 C300
Recently I purchased a 2012 C300 and love it.....except for one thing. The headlights. To be honest they suck. My previous car was an 2010 Acura and it had BiXenon headlights. I feel like i'm back in the 60's. Anyway I found a company called The Lighting Firm, out of Michigan. Here's the deal.. I send back my headlight units and they refit them with HID projectors. Total $475. Only problem is, getting them out of the car requires removing the front bumper, which I won't attempt. So there's that cost as well. If anyone has a better way of dealing with this issue, I'd love to hear it. One other thing, The Lighting Firm does custom lighting. Get on their website and look at their work...pretty impressive.


