


1998 C230 owned by little old lady who only drove it on Sunday with a few questons

Senior Member
Joined: May 2012
Posts: 453
Likes: 12
C230
Just a couple of questions.......
What model Polk speakers did you buy?
I know the front seats were removed when you were doing the head liner, and if you can remember the sequence, and you give me a step by step on it?
I just received my new bottom seat covers from GAHH in California,
http://www.gahh.com/seatcoverskits.php so I am ready to pull the seats.
I bought a set of the TORX sockets, so I wouldn't butcher the bolt heads.
All my other "junk" will be here Thursday, so I can get the new radio installed and start putting it back together. I still need the sill plate, and the 2 rear package shelf speaker covers that disintegrated from heat and age when I popped them off.
Thread Starter
Senior Member
Joined: Jun 2012
Posts: 431
Likes: 44
From: Portsmouth, VA
2010 E350, Sold 1998 C230
Just a couple of questions.......
What model Polk speakers did you buy?
I know the front seats were removed when you were doing the head liner, and if you can remember the sequence, and you give me a step by step on it?
I just received my new bottom seat covers from GAHH in California,
http://www.gahh.com/seatcoverskits.php so I am ready to pull the seats.
I bought a set of the TORX sockets, so I wouldn't butcher the bolt heads.
All my other "junk" will be here Thursday, so I can get the new radio installed and start putting it back together. I still need the sill plate, and the 2 rear package shelf speaker covers that disintegrated from heat and age when I popped them off.
What model Polk speakers did you buy?
I know the front seats were removed when you were doing the head liner, and if you can remember the sequence, and you give me a step by step on it?
I just received my new bottom seat covers from GAHH in California,
http://www.gahh.com/seatcoverskits.php so I am ready to pull the seats.
I bought a set of the TORX sockets, so I wouldn't butcher the bolt heads.
All my other "junk" will be here Thursday, so I can get the new radio installed and start putting it back together. I still need the sill plate, and the 2 rear package shelf speaker covers that disintegrated from heat and age when I popped them off.
There are 4 torx head bolts on each seat, there is a plastic trim piece that is a PIA when it comes to getting access to the head of each bolt, but you will figure it out. Just take them all out and it's free and clear. On both seats you will have to remove the electrical connections for power and seat belts but its easy if you tilt them up by the front. Then just maneuver them out and its done. Don't forget the seat belt bolt on either side, the plastic cover snaps out like everything else on the car. Back seat has two tabs on either side on the base by the door and it picks up from the front. Rear seat has 3 bolts and then it is out.
I haven't messed with the rear deck precisely since I know everything will disintegrate if I touch it. I think I would probably just pull the panel out and recover over the holes for the speaker grills. The headliner material is probably acoustically transparent so it may work just fine, or you could do something with some gray carpet like material.
Hope this helps, shoot some pix if you can. I've been driving mine now for a week or so, going to start doing brakes maybe next week if I have the time and all the parts are in and it isn't terribly hot.
Just to add: I didn't replace the little black plastic trim pieces on the rails, they cracked when they came out and they aren't really noticeable gone.
Last edited by aquinob; Jul 21, 2012 at 01:23 PM.
Senior Member
Joined: May 2012
Posts: 453
Likes: 12
C230
Wow......You just gave me the answer that I hadn't even thought of.
Just recover the back package shelf, and forget the speaker grills.
I wasn't even going to install speakers back there anyway.
Good thinking!!!!
I think I will use a vinyl to do it, as I should be able to get a closer color match.
I will still leave the First Aid box and cover, as it's kind of a neat feature.
I still have all the original things that came in it.
I thought that the stock speakers were 6 inch, not 6.5 ???? Am I wrong about that ?
The rear Torx bolts are easily accessible, it was the front ones that looked like a ***** to get at.
I hope my upholsterer will not screw up the installation, as those covers were just a bit less than $400.00 each.
I will try to do pictures with my I phone, but I am not too bright on uploading. My son can do that for me.
Also, how are you making out with the sun roof ?
You indicated that the pot metal was "going to pot" using the tool to close.
Thread Starter
Senior Member
Joined: Jun 2012
Posts: 431
Likes: 44
From: Portsmouth, VA
2010 E350, Sold 1998 C230
Yeah, its been a few days, had three 7-7 night shifts in a row and finished it this morning. I did make some progress on the whole interior thing, will post some onto that thread in the next day. Will probably have to find another sunroof motor and hope that its an easy swapout. I did recover the sliding panel and covered right over the louvered vents. You cant even tell from the interior side they are there. I'm not paying 30-40 bucks a pop for two skinny little pieces of plastic just to be "factory". I'm all about utility and comfort but want it to look decent as well.
The speakers may have been 6", but these 6.5 fit fine in the method I used. The front bolts on the seats were not any worse than the rear ones, but the plastic trim tends to get in the way and by the time you bend part of it back for access, it has snapped. I left them off and it isn't really noticeable.
400 per seat? Wow, and I was stressing over putting about 500 in this one so far. I've got a pair of Brembo rotors for the front, Zimmermans for the rear and wagner shoes for both. Picked up a mityvac tool to bleed the brakes one handed, may do that tomorrow or Monday.
Senior Member
Joined: May 2012
Posts: 453
Likes: 12
C230
Yes, actually $379.00 each, but I am a bit of a freak when it comes to having things nitido (ask your wife what that means)
I did find 6 inch Boston Acoustics speakers for $50.00 a pair.
http://www.sonicelectronix.com/item_...65RC.html#tabs
I have a lot more in my car than $500.00, as I went over everything with a fine tooth comb, and if it needed it, I did it.
Cheapest thing is brakes and rotors so far.
I have a new MAF that I will be installing when it gets here, and I am going to do a complete tranny fluid change.
Also, and you may want to do it, is remove the drink holder. I read a note about it holding things a bit better if you just use the cavity, but the holder is a mechanical work of art.
Thread Starter
Senior Member
Joined: Jun 2012
Posts: 431
Likes: 44
From: Portsmouth, VA
2010 E350, Sold 1998 C230
If money weren't an issue, I probably would have spent more up front on the car and gotten one that didn't need as much tlc and maybe 5 years newer. As it is, besides the headliner I have put in the new radio and front speakers, replaced the passenger mirror and have the driver side to do next (bought for 70 bucks used, not too bad but not as good a deal as the first). I also had to fix the lights in the back and the lovely 130 seat belt buckle too. Brakes and rotors will be it for a while, though probably I will do shocks in a month or two or three. Also planning on the tranny fluid change and maybe looking at some new bushings up front. It drives straight as an arrow but something just doesnt feel as tight as it should and we know how these cars are with 14 year old rubber and plastic. I also picked up two relatively curb rash free rims that I will swap out for the two existing fronts, but I will have to remove the clearcoat and then respray them before I swap the tires. It has a pristine rim in the trunk and I will either recycle the best rim on it now or buy one more. The rims are cheap, nobody wants 15" rims on their cars anymore except us cheapskates. I also did pick up one of those cupholders, mine was missing. After cleaning out the gunk in it and the space it sits in, I like it. Really cant hold but one water bottle in there without it, but it holds two or a 7-11 coffee.
I'd also like to touch up the lower trim, has some scratches and the clearcoat is worn off in spots. Needs a new windshield too, scratches from the idiot PO who ran it metal on glass.
I'd also like to touch up the lower trim, has some scratches and the clearcoat is worn off in spots. Needs a new windshield too, scratches from the idiot PO who ran it metal on glass.
Senior Member
Joined: May 2012
Posts: 453
Likes: 12
C230
Seems I was wrong on the speakers, and the rear package shelf speakers were 6 X 2, and the front doors are 5.5 X 2.5.
Now I have to figure out how to get at the dash speakers. I imagine that will be no easy task, as nothing else seems to be!
I am assuming that the plug in for the radio will allow me to use the wiring to the the stock speakers and can be traced, and then just adapt to the new radio speaker wires?
It about 2:00 pm Sunday here, so time to get off my lazy ****, and do a bit of work.
I also agree that I should have shopped around a bit more, and maybe paid a little more for a car without all the nit picky problems, but that is water under the bridge.....
Thread Starter
Senior Member
Joined: Jun 2012
Posts: 431
Likes: 44
From: Portsmouth, VA
2010 E350, Sold 1998 C230
MB World Stories
The Best of Mercedes & AMG

6 Mercedes Models That Did NOT Age Well (But Are Somehow Still Cool)
Verdad Gallardo
Manual Mercedes? 6 Times Sindelfingen Let Drivers Have All The Fun
Verdad Gallardo
Mercedes SLR McLaren 722 S Is Extremely Rare Example Modified by McLaren
Verdad Gallardo
8 Classic Boxy Mercedes Designs That Have Aged Like Fine Wine
Verdad Gallardo
Flawlessly Restored Mercedes 190E Evo II Heads to Auction
Verdad Gallardo
Electric Mercedes C-Class Unveiled: 11 Things You Need to Know
Verdad Gallardo
Mercedes EQS Gets A Major Update: Everything You Need to Know
Verdad Gallardo
5 Underrated Mercedes-Benz Models That Don't Get the Love They Deserve
Verdad Gallardo
Mercedes 300D Has Pushed Well Past 1 Million Miles and It Ain't Stopping
Verdad Gallardo
Senior Member
Joined: May 2012
Posts: 453
Likes: 12
C230
Question for you.....I am now ready to install my new radio and speakers.
I pulled the old radio a few weeks ago, and today, I dug out the wires I disconnected when I did that. There are 3 wire groups that plugged into the old stock unit. One of them is 8 wires twisted together in four bundles of 2 wires each, I checked the color coding at the speakers, and the rears (not including the rear package shelf speakers) match 2 of the bundled wires color markings. The front ones don't. I am thinking that somewhere down the line, maybe the front wires were changed, but ?????
Another group of wires has a big red and brown, and the rest are lesser diameter. I am assuming the red and brown are power and ground??? The others I have no clue...
The remaining group are thin wires of various colors, but where and what they do are a mystery. The new radio has a wiring diagram for 4 speakers and are well color coded to show where they go as far a front right, front left etc.
I am assuming that I can just "splice" into the old coded wires, and it should work????
The other thing, as I haven't moved forward yet, is the DIN sleeve. Does this just slide in to the old space, or is there some modification required???? I am concerned with the factory lock mechanism to remove the original radio may catch a hold of something in the new unit, and then I am screwed if I try to remove it????
As you did the change up recently, I am looking for some advice before I screw it up, or blow it up.....
Thread Starter
Senior Member
Joined: Jun 2012
Posts: 431
Likes: 44
From: Portsmouth, VA
2010 E350, Sold 1998 C230
Question for you.....I am now ready to install my new radio and speakers.
I pulled the old radio a few weeks ago, and today, I dug out the wires I disconnected when I did that. There are 3 wire groups that plugged into the old stock unit. One of them is 8 wires twisted together in four bundles of 2 wires each, I checked the color coding at the speakers, and the rears (not including the rear package shelf speakers) match 2 of the bundled wires color markings. The front ones don't. I am thinking that somewhere down the line, maybe the front wires were changed, but ?????
Another group of wires has a big red and brown, and the rest are lesser diameter. I am assuming the red and brown are power and ground??? The others I have no clue...
The remaining group are thin wires of various colors, but where and what they do are a mystery. The new radio has a wiring diagram for 4 speakers and are well color coded to show where they go as far a front right, front left etc.
I am assuming that I can just "splice" into the old coded wires, and it should work????
The other thing, as I haven't moved forward yet, is the DIN sleeve. Does this just slide in to the old space, or is there some modification required???? I am concerned with the factory lock mechanism to remove the original radio may catch a hold of something in the new unit, and then I am screwed if I try to remove it????
As you did the change up recently, I am looking for some advice before I screw it up, or blow it up.....
I pulled the old radio a few weeks ago, and today, I dug out the wires I disconnected when I did that. There are 3 wire groups that plugged into the old stock unit. One of them is 8 wires twisted together in four bundles of 2 wires each, I checked the color coding at the speakers, and the rears (not including the rear package shelf speakers) match 2 of the bundled wires color markings. The front ones don't. I am thinking that somewhere down the line, maybe the front wires were changed, but ?????
Another group of wires has a big red and brown, and the rest are lesser diameter. I am assuming the red and brown are power and ground??? The others I have no clue...
The remaining group are thin wires of various colors, but where and what they do are a mystery. The new radio has a wiring diagram for 4 speakers and are well color coded to show where they go as far a front right, front left etc.
I am assuming that I can just "splice" into the old coded wires, and it should work????
The other thing, as I haven't moved forward yet, is the DIN sleeve. Does this just slide in to the old space, or is there some modification required???? I am concerned with the factory lock mechanism to remove the original radio may catch a hold of something in the new unit, and then I am screwed if I try to remove it????
As you did the change up recently, I am looking for some advice before I screw it up, or blow it up.....
I also discovered you can't believe everything you read on the web. I had downloaded wiring data for this year and class stereo hookup and it had said the pink/green wire was 12v constant and the blue/red was switched. I knew there was a problem because the radio never remembered its last settings. I spent well over an hour troubleshooting fuses to no avail. Finally happened to chance checking what I thought was the switched wire when the ignition was off only to find it had power. Hmmmmm..... So I then switched the ignition on and the "constant" wire now had power. So somewhere along the line either my car got screwed up or more likely somebody transposed those two wires in the listings and nobody has yet caught it.
This is the wiring schema I downloaded:
1998 Mercedes C230 Car Radio Installation Guide
Car Radio Battery Constant 12v+ Wire: Pink/Green
Car Radio Accessory Switched 12v+ Wire: Red/Blue
Car Radio Ground Wire: Brown
Car Radio Illumination Wire: N/A
Car Stereo Dimmer Wire: Gray/Blue
Car Stereo Antenna Trigger Wire: Blue/White
Car Stereo Amp Trigger Wire: N/A
Car Stereo Amplifier Location: N/A
Car Audio Front Speakers Size:
Car Audio Front Speakers Location: Doors
Left Front Speaker Positive Wire (+): Green
Left Front Speaker Negative Wire (-): Brown/Green
Right Front Speaker Positive Wire (+): Orange
Right Front Speaker Negative Wire (-): Brown/Orange
Car Audio Rear Speakers Size:
Car Audio Rear Speakers Location: Rear Deck
Left Rear Speaker Positive Wire (+): Pink
Left Rear Speaker Negative Wire (-): Brown/Pink
Right Rear Speaker Positive Wire (+): White
Right Rear Speaker Negative Wire (-): Brown/White
As I said, everything was accurate except for the switched and constant wires. Splice the new harness to the old wires. I use a soldered inline connection with heatshrink tubing. The Din sleeve should just slide in where the old radio sat and you should be able to lock it in. Then your new radio slides into that sleeve. Trim bezel should go on last. Dont forget your antenna adapter.
Just finished up a 12 hour night shift, so I'm going to bed. Good Luck.
Senior Member
Joined: May 2012
Posts: 453
Likes: 12
C230
Thanks for the info. I guess I missed it.
My car does not have an external antenna, but there is an antenna connection. I assume there is one, but hidden somewhere in the body?
Have a good snooze....................
My car does not have an external antenna, but there is an antenna connection. I assume there is one, but hidden somewhere in the body?
Have a good snooze....................
Senior Member
Joined: Nov 2008
Posts: 488
Likes: 0
From: Michigan
W203-4M W163
Great work! My first MB was a '98 C230, and I loved the car, but RWD (even with snow tires) was really not fun with some of the Northern Michigan travel I was doing, otherwise I would have kept it.
Great thread...nice work on the speaker mods, looking forward to more.
Great thread...nice work on the speaker mods, looking forward to more.
Thread Starter
Senior Member
Joined: Jun 2012
Posts: 431
Likes: 44
From: Portsmouth, VA
2010 E350, Sold 1998 C230
The antenna is a thin wire that runs around the perimeter of the windshield, hidden by the interior trim. FM doesnt need much of an antenna, AM, what's that?
Thread Starter
Senior Member
Joined: Jun 2012
Posts: 431
Likes: 44
From: Portsmouth, VA
2010 E350, Sold 1998 C230
Great work! My first MB was a '98 C230, and I loved the car, but RWD (even with snow tires) was really not fun with some of the Northern Michigan travel I was doing, otherwise I would have kept it.
Great thread...nice work on the speaker mods, looking forward to more.
Great thread...nice work on the speaker mods, looking forward to more.
So for an update, I did the brakes this past week. Ended up with a set of Brembo rotors up front and Zimmerman's in the back. Also Wagner metallic pads forward and semi-metallic in the rear. I've done pads and rotors on other vehicles before, this one was somewhere in the middle of the difficulty scale. The rotors all had to be original 14yo parts and the rears didn't want to budge. I thought about some sort of puller, but ended getting them off by striking them with a hand maul which eventually broke the bond. I previously tried using a dead blow plastic hammer, but it just did not have the sharp jolt necessary to loosen it. And since I was replacing the rotors anyway, I really didnt care if they got ruined. You could replace the pads in the rear without removing the caliper by just pushing out a pin that holds them in place, for me, the caliper had to come off to swap the rotors. Fronts were not too bad, rotors came off easy, but the caliper bolts were very snug. Used a pipe over the ratchet handle to get the bolts moving. Fronts also have a wear sensor, you have to carefully extract out the connector in the old pad and then push it into the new pad. Not too hard to figure out when it's all in your hands.
I also bled the brakes. Bought a Mityvac tool from Harborfreight. I had read some negative reviews on it for brake bleeding saying that it draws in too much air around the bleed screw to be effective. Well they were right, it doesn't work at all like that. But if you read the instruction manual with the pump, it says to remove the screw and then wrap some teflon tape around the treads which will seal it up. Did that and it worked great. You don't really introduce much if any air into the lines by pulling the bleed screw, I got some leaking on one front wheel, so I put a paper towel on it to minimize the dripping. Once you seal up the air leaks, then crack it open a quarter turn and the constant vacuum of the pump just pulls out the fluid into a small sealed container cup. Made the job pretty painless. I used some synthetic fluid certified for dot3 and 4 to flush the system.
I also ran the car w/o the rear wheels while it was sitting on jackstands. I had been hearing some sort of rumble/noise when on the highway and I wasn't really sure where it was coming from, I had hoped it was related to the brakes. I still heard a rumble on the driver side, so my first thought was the half shaft/cv joints. I ended up calling several local indy shops that said they work on Mercedes. One place was convinced I had to have a FWD car or I must not know what my model is, even though I told them I had a '98 C230. Another told me the half shaft alone is 1000 plus labor, I told them I could get one for about 350 or less, another dead end. Finally called a shop in Norfolk that is exclusively Mercedes and the lady there told me that it may not be the half shaft but more likely the wheel bearings. Cost to do both bearings is probably in the 400 dollar range for both wheels. That is reasonable to me, will try and get it in this week for them to look at it. I may have them do the transmission fluid/filter change as well, depending on what they charge. I've heard about some horror stories after folks have changed fluids on trannies, I may just let them do this one for the peace of mind.
Finally I replaced the evap temp sensor for the AC. That was a shotgun fix, and I can't say it was needed or not. I had the ac staying on by keeping it set on "Lo", so I will watch it over the next week or so and see how it behaves. Was easier to pull out but putting it back was hard to see where it snapped back in. I ended up firing up the motor and running the ac, then I could feel the cool air coming out and plugged the new sensor in that hole. Easy Cheesy.

Thread Starter
Senior Member
Joined: Jun 2012
Posts: 431
Likes: 44
From: Portsmouth, VA
2010 E350, Sold 1998 C230
Took the car in today to the indy shop in Norfolk. Says there is nothing really wrong with it that he can see at this point, says it drives like a typical C class. The noise I had been hearing seems to have disappeared with the new brakes so maybe what I was hearing was the brakes initial wear in. Says he did hear some noise from the differential but felt it was fairly typical and normal for this model Merc. I'm putting miles on it now so that is all good. AC seems to be staying up and running as well, so I'm thinking the evap temp sensor was at least partially the culprit if not the perpetrator. He also told me that I should be able to pull the sunroof motor out and even move the sunroof back and forth manually without any problems of dislocating something in the linkage. So far, so good.
Thread Starter
Senior Member
Joined: Jun 2012
Posts: 431
Likes: 44
From: Portsmouth, VA
2010 E350, Sold 1998 C230
Yesterday put in a new Magellan 7" GPS. Why Magellan and not Garmin? Size, it is huge, my eyes need all the help they can get and it can take a video input so I can go buy a cheapo backup camera and wire it in and will have an automatic backup camera whenever the reverse lights are on.
This particular unit is the Roadmate 1700-LM and has the lifetime maps option. Got it on Amazon's warehouse deals outlet as used but like new for 94 bucks with free shipping since I'm a prime member and used the 22 bucks in loose change I pulled out from under the seat to get a gift card bringing my cost down to 72 bucks. Magellan RoadMate 1700-LM I do have a full year warranty on it as well. This unit just fits between the sides below the radio where the cassette holder still sits. (I carefully measured before I ordered it) I went ahead and used some industrial strength velcro to hold it up. I can always remove it when I need to upgrade the map or if I need to remove it permanently. I did wire the adapter to the back of the cigar lighter so the unit automatically comes on and off with the ignition and it is all sitting right under the wood window switch panel next to the shifter.
It has a built in battery that will run it about 30 mins. And it seems to work just fine that low in the car, must be the sunroof letting all that satellite signal in. On my truck I have the GPS also low mounted on the transmission hump, but it uses an external antenna. Very happy with this little addition:
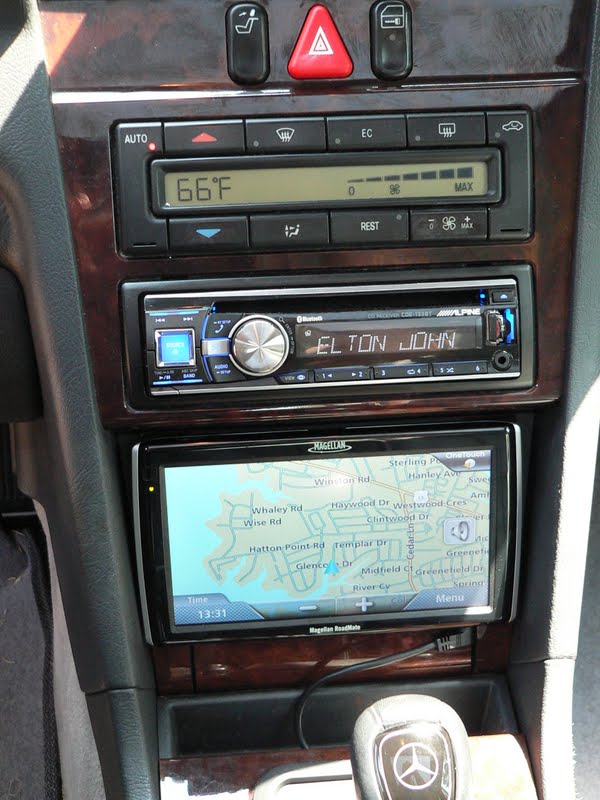

BTW, I also picked up one of the tiniest USB drives I've ever seen, its mounted in the front of the radio on the right side, you would never know its there without trying to see it. 16 gigs for 11 bucks, didn't pay to go with an 8, it was only a couple of dollars cheaper. I think I don't even have about a third of it's capacity used.
Plan for next week is going to be changing out the differential oil. That should cost less than 20 bucks for 2 quarts over at walmart. I'm probably going to start cleaning up the two extra rims I got from the junkyard. Will have to pressure wash them front and back then spray some aircraft paint remover on the clearcoat, strip that off and then quickly respray the clearcoat on again. I really could use one more donor wheel, but budget is getting kinda dry right now. Probably about 25 a wheel to remount the tires and spin balance as well.
C pillar panels are done but not installed. Had to do them in two parts, not as I would like it, but no way to get around the un-streatchiness of the fabric vs. the shape of the part. Would have looked worse. Will post on that separately when I get them put back in, maybe Sunday early when its cool. Really looking toward the fall with it's cooler weather. This heat is for the birds.
This particular unit is the Roadmate 1700-LM and has the lifetime maps option. Got it on Amazon's warehouse deals outlet as used but like new for 94 bucks with free shipping since I'm a prime member and used the 22 bucks in loose change I pulled out from under the seat to get a gift card bringing my cost down to 72 bucks. Magellan RoadMate 1700-LM I do have a full year warranty on it as well. This unit just fits between the sides below the radio where the cassette holder still sits. (I carefully measured before I ordered it) I went ahead and used some industrial strength velcro to hold it up. I can always remove it when I need to upgrade the map or if I need to remove it permanently. I did wire the adapter to the back of the cigar lighter so the unit automatically comes on and off with the ignition and it is all sitting right under the wood window switch panel next to the shifter.
It has a built in battery that will run it about 30 mins. And it seems to work just fine that low in the car, must be the sunroof letting all that satellite signal in. On my truck I have the GPS also low mounted on the transmission hump, but it uses an external antenna. Very happy with this little addition:
BTW, I also picked up one of the tiniest USB drives I've ever seen, its mounted in the front of the radio on the right side, you would never know its there without trying to see it. 16 gigs for 11 bucks, didn't pay to go with an 8, it was only a couple of dollars cheaper. I think I don't even have about a third of it's capacity used.
Plan for next week is going to be changing out the differential oil. That should cost less than 20 bucks for 2 quarts over at walmart. I'm probably going to start cleaning up the two extra rims I got from the junkyard. Will have to pressure wash them front and back then spray some aircraft paint remover on the clearcoat, strip that off and then quickly respray the clearcoat on again. I really could use one more donor wheel, but budget is getting kinda dry right now. Probably about 25 a wheel to remount the tires and spin balance as well.
C pillar panels are done but not installed. Had to do them in two parts, not as I would like it, but no way to get around the un-streatchiness of the fabric vs. the shape of the part. Would have looked worse. Will post on that separately when I get them put back in, maybe Sunday early when its cool. Really looking toward the fall with it's cooler weather. This heat is for the birds.
Last edited by aquinob; Aug 3, 2012 at 02:17 PM.
Senior Member
Joined: May 2012
Posts: 453
Likes: 12
C230
So, that settles the Cassette tape situation.
You have some great ideas...
I passed on the vinyl idea for covering rear package shelf. Super idea, but when I had a hard look, there were too many curves and angles to try and get a decent fit.
I did stumble on 2 rear package shelf speaker grates on Ebay that were the exact color for a decent price, and I also found the sill plate on Ebay in the exact color.
My front seats are finished and I pick them up on Sunday. I am almost there, except for the radio installation, which I will do hopefully this weekend.
When I removed the seats, I did snap off the plastic tab covering the front Torx bolts, but you would never see it anyway. I did score .51 cents, and and old cookie when I took them out.
I will do a carpet shampoo probably Sunday as well.
Once it's all together, I will send you some photos.
Regards
Senior Member
Joined: May 2012
Posts: 453
Likes: 12
C230
Thanks for your note about the radio wiring. I guess I will need an antenna adapter for the after market radio to the old Mercedes antenna, as you mentioned in your note.
Can you tell me where I can find this?
I looked on Ebay, and I am not sure exactly what I want. As I want to use the original that you said runs around the windshield, I assume that is what you did also.
Got my front seats back today, and I am doing the carpets before I reinstall.
Seems the previous owner had the shakes, as there is a lot of Coffee stains around the sides of the seat carpet. Other than that, they are in good shape, and should clean up nicely.
Thanks for your help.
Brian Wilson
Thread Starter
Senior Member
Joined: Jun 2012
Posts: 431
Likes: 44
From: Portsmouth, VA
2010 E350, Sold 1998 C230
I ordered the adapter from Amazon, it's also used in VW's as well, must be some sort of German standard.
Glad to hear its all coming together. I've been enjoying mine for the last couple of weeks, now it's time to start spacing out some of the work instead of the ***** to the walls of the initial couple of weeks when I got the car. Differential this week and maybe the two replacement rims. Eventually it will just be transportation but for now it's a hobby.
Glad to hear its all coming together. I've been enjoying mine for the last couple of weeks, now it's time to start spacing out some of the work instead of the ***** to the walls of the initial couple of weeks when I got the car. Differential this week and maybe the two replacement rims. Eventually it will just be transportation but for now it's a hobby.
Senior Member
Joined: May 2012
Posts: 453
Likes: 12
C230
More stupid questions....I re read your note on the radio installation, and you mentioned you tried an adapter, but that didn't work. So, from what I gather, you cut the wires from the original plug in block, and adapted the after market wires to the original wires direct. I just followed the wire coding you sent, and all the colors match up for the speakers, but the front door panel area where the speakers connect, are not the same color as at the block?
Now I need to find out the - and + where they connect to the speakers.
How did you join the wires? I remember you mentioned you used heat shrink at the connections, so did you use a male and female connector on the wires and heat shrink over those?
I was thinking of just putting male pins on the aftermarket wires, an stuffing them into the original block.
I am sure I am making this over complicated, but electrical wiring is not my forte.
The DIN box went in fairly tight, but it went in, so that's a plus
Any info would be appreciated.
Thanks
Thread Starter
Senior Member
Joined: Jun 2012
Posts: 431
Likes: 44
From: Portsmouth, VA
2010 E350, Sold 1998 C230
You probably don't need to worry about the wiring down at the speakers, as long as the wiring for the radio matches. As far as the radio goes, there are just four outputs, RF, LF, RR, LR and each has two wires for a total of 8 wires. If they go to more than one speaker (like the rears go to both a door speaker and the rear shelf), it really doesn't matter. Whatever colors are down by the speakers are irrelevant.
As for the splices, all I do is strip back about 1/2 to 3/4" of insulation on both ends to be connected. I cut a piece of heat shrink about 1/2 to 2" long overall. I slide that heat shrink over one of the wires (whichever is the longer to get it away from the heat, and as far back as I can) and then twist the two bare ends together so they overlap each other (maybe 3-4 turns) but are still part of the same line as the original wire. I then hold the soldering iron to the joint, heat it up a bit and apply the solder so it flows in the joint. When its cool, I slide the heat shrink over the joint and then use either a heat gun or a long butane lighter to shrink the tubing tight over the joint.
Here are some pix of the web, they dont show the twist in the wire, but you get the idea. Twisting the wire gives the joint a better mechanical connection and makes it much easier to solder it since it won't move.
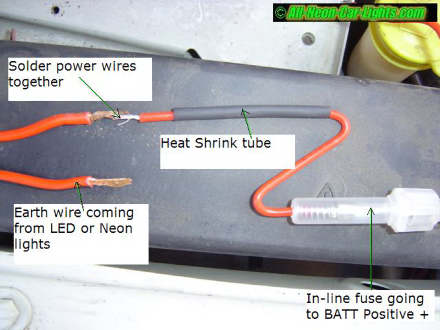
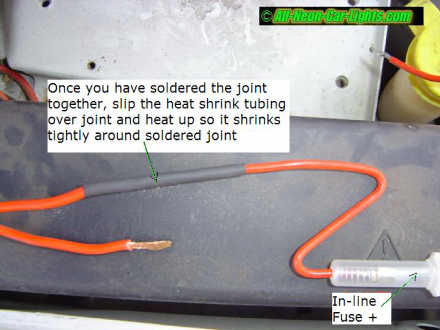
Senior Member
Joined: May 2012
Posts: 453
Likes: 12
C230
Looks good to me.............
I will get someone to do the soldering, as I have involuntary hand trembling when doing fine work. I am as steady as a rock until I get a screwdriver in my hand. Drives me bonkers.
I am still waiting for the aerial adapter to arrive, so it's almost over.
Thanks for all you help
I will get someone to do the soldering, as I have involuntary hand trembling when doing fine work. I am as steady as a rock until I get a screwdriver in my hand. Drives me bonkers.
I am still waiting for the aerial adapter to arrive, so it's almost over.
Thanks for all you help
Thread Starter
Senior Member
Joined: Jun 2012
Posts: 431
Likes: 44
From: Portsmouth, VA
2010 E350, Sold 1998 C230
Just and update on my little benz. Got the differential fluid changed last week. Had to buy a 14mm hex and all the other sizes that came with it. Took a bit of work to break the plugs loose after 14 years, but they eventually came. I also took it over to that same indy shop in Norfolk, European Autowerks and let them do the transmission fluid change. By the time I would have paid for all the fluids and parts I would have been over 150 and they charged me 266 for the whole job which was fine by me. Still a bit tentative working on auto trannies. This was really for peace of mind, car just turned 69K and I'm trying to keep the drivetrain as trouble free as I can. Time will tell, but I think it shifts a little better. They also replaced one electrical plug on the tranny, said it was leaking a bit?
Also got the sunroof put back together but still not working 100%. Pulled the motor out and figured out which two wires are power to the motor, the two heaviest, go figure. If you swap polarity on them you change the direction of the motor. I remounted the motor and was able to manually open and close the roof, but putting it in the tilt up position and then reconnected it and "teaching" the cpu, only had it learn that limit till I tried it in the opposite direction. Guess I need to work that a bit more down the road, but at least the shade panel is back in.
Also got the sunroof put back together but still not working 100%. Pulled the motor out and figured out which two wires are power to the motor, the two heaviest, go figure. If you swap polarity on them you change the direction of the motor. I remounted the motor and was able to manually open and close the roof, but putting it in the tilt up position and then reconnected it and "teaching" the cpu, only had it learn that limit till I tried it in the opposite direction. Guess I need to work that a bit more down the road, but at least the shade panel is back in.
Thread Starter
Senior Member
Joined: Jun 2012
Posts: 431
Likes: 44
From: Portsmouth, VA
2010 E350, Sold 1998 C230
Picked up this oil extraction unit from the local Harbor Freight. Got it at the 129 - 20% for about 104 plus tax. Nicely built unit, all steel tank, holds 6 gals and comes with 4 different sized extraction probes, 2 plastic, 2 metal. Hooks up to a decent sized compressor and took about 10 mins to drain the sump on my car.
This was the first time I did the oil on this car. Filter housing was a bit stiff, though I managed to get it loose using a filter wrench which is apparently a no-no, but I didn't break anything either. I put in almost 6 quarts of mobil 1 0w-40. Best price on those was local walmart at 6 something a quart. Probably take about half the time next go around, now that I've done it once. Today's job is going to be an antifreeze change and flush. Going out to the store to pick up some flush, already have the zerex g05 antifreeze on hand.

This was the first time I did the oil on this car. Filter housing was a bit stiff, though I managed to get it loose using a filter wrench which is apparently a no-no, but I didn't break anything either. I put in almost 6 quarts of mobil 1 0w-40. Best price on those was local walmart at 6 something a quart. Probably take about half the time next go around, now that I've done it once. Today's job is going to be an antifreeze change and flush. Going out to the store to pick up some flush, already have the zerex g05 antifreeze on hand.


