
Removing bumper Saturday and want more tips!
 04-27-2006, 09:24 PM
#1
Member
Thread Starter

Join Date: Jan 2006
Location: Lexington, KY
Posts: 237
Likes: 0
Received 1 Like
on
1 Post
2006 C230WZ
Removing bumper Saturday and want more tips!
I am going to be following these instructions and i hope they are the same for my 06
http://www.mbklasse.com/forums/showt...&threadid=7385
and also
Buelwinkles's how to
1. Start with a few cold beers as it's a tedious job.
2. remove the 3 hex screws and about 6 push pins that hold the front part of the inner fenders and remove the inner fender from both sides of the car.
3. drink another beer
4. open the hood and remove the four hex screws that hold the grill to the car (2 in the center and 2 by the edges) 5. drink another beer
6. disconnect the fog lights, side marker lights and temp sensor probe.
7. yes, one more beer
8. remove the 2 hex screws by the fog lights
9. Ok, you had enough beers for now so take a nap
10. remove the push pins on the inner fender closest to the front inner fender you just removed and push it back to look inside and you'll see a 6" long clip that holds the bumper and fender together. Remove the torx screw that holds that in and pry out the clip.
12. now pull the bumper cover out as straight and evenly as possible. Caution, there's a clip at the front of the fender that will pop out when you do this, make sure you don't scratch the fender/bumper with that metal clip.
13. You are done, make sure you rest the bumper on a blanket, you don't want to scratch it up.
I am going to tape upe my fender and bumper as well. I wanted to see if anyone had anymore tips for me!
These are the lights I am installing
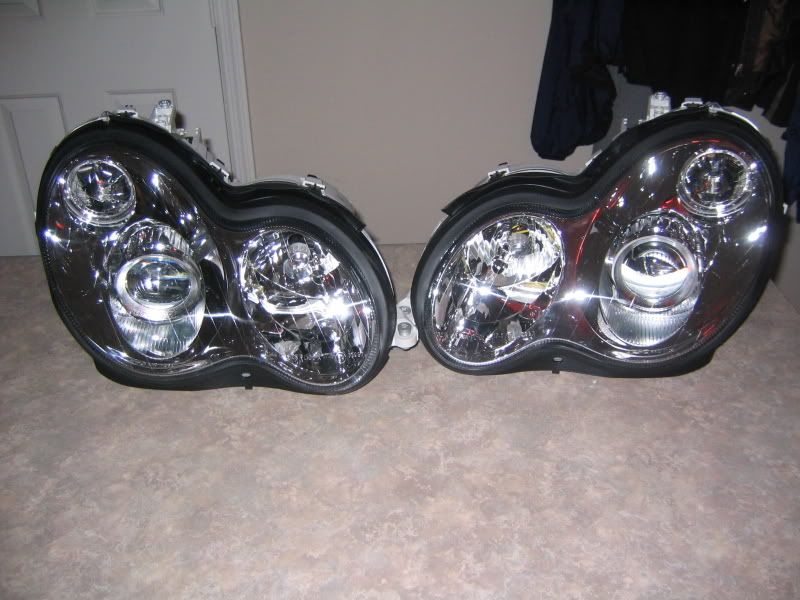
Thanks for any help!
http://www.mbklasse.com/forums/showt...&threadid=7385
and also
Buelwinkles's how to
1. Start with a few cold beers as it's a tedious job.
2. remove the 3 hex screws and about 6 push pins that hold the front part of the inner fenders and remove the inner fender from both sides of the car.
3. drink another beer
4. open the hood and remove the four hex screws that hold the grill to the car (2 in the center and 2 by the edges) 5. drink another beer
6. disconnect the fog lights, side marker lights and temp sensor probe.
7. yes, one more beer
8. remove the 2 hex screws by the fog lights
9. Ok, you had enough beers for now so take a nap
10. remove the push pins on the inner fender closest to the front inner fender you just removed and push it back to look inside and you'll see a 6" long clip that holds the bumper and fender together. Remove the torx screw that holds that in and pry out the clip.
12. now pull the bumper cover out as straight and evenly as possible. Caution, there's a clip at the front of the fender that will pop out when you do this, make sure you don't scratch the fender/bumper with that metal clip.
13. You are done, make sure you rest the bumper on a blanket, you don't want to scratch it up.
I am going to tape upe my fender and bumper as well. I wanted to see if anyone had anymore tips for me!
These are the lights I am installing
Thanks for any help!
 04-27-2006, 10:18 PM
#2
It is not that difficult for me to remove the bumper as a first-timer ..
In my opinion, the hardest part is taking out 6" clip from the inner fender but the rest is as simple as one two step .
.
Btw, nice-looking BIX !!
In my opinion, the hardest part is taking out 6" clip from the inner fender but the rest is as simple as one two step
.Btw, nice-looking BIX !!
04-27-2006, 10:43 PM
#3
MBWorld Fanatic!

Join Date: Oct 2004
Location: NJ, NYC
Posts: 4,152
Likes: 0
Received 57 Likes
on
46 Posts
Something Slow
actuall u don't have to complete remove the bumper u can loosen up one side at a time i did mines in 45 mins by myself no help but those instrustion will help but they are more for 2dr coupe
i borrowed some pictures hopefully i don't get in trouble
see picture attach
1. remove the bolts shown in the pic1 and pic 2
2. then on one side remove the panel in the wheel well right below the foglights pic 3
3. then u will see the Clip show in pic 4 remove that... then the bumper cover is basically loose u can pull it forward a little to get to the side bolt of the headlight
4. remove all headlights bolts disconnect headlight install NEw bi-xenon put everything back together do the same thing on the other side and u all done
Last edited by WaveyKat; 05-17-2010 at 09:03 AM.
04-28-2006, 08:52 AM
#4
Member
Thread Starter
Join Date: Jan 2006
Location: Lexington, KY
Posts: 237
Likes: 0
Received 1 Like
on
1 Post
2006 C230WZ
so you did not have to flex the bumper much to get to the headlight bolt? I had to have it repainted two months ago and i do not want to risk cracking the paint, but i will be doing this solo so it would be great if it did not have to come all the way off. Thanks for the great write up with pics!
04-28-2006, 09:46 AM
#5
Step #10 is the most tedious... especially the reinstall of the clips.
You do not have to remove the bumper completely to install headlight assemblies. Just drop one side at a time, change out the lights, re-fit everything, then go to the other side. This way, there is no need to disconnect fogs, etc.
You do not have to remove the bumper completely to install headlight assemblies. Just drop one side at a time, change out the lights, re-fit everything, then go to the other side. This way, there is no need to disconnect fogs, etc.
04-29-2006, 12:55 PM
#6
Member
Thread Starter
Join Date: Jan 2006
Location: Lexington, KY
Posts: 237
Likes: 0
Received 1 Like
on
1 Post
2006 C230WZ
Got the lights on with no problems except for a slight gash in my hand. The bumper did not have to come all the way off but the push clips and 6 in clips are a pain. I highly recommend taping up everything so you do not scratch the paint. The first light was slow but the second was cake! Thanks for every one suggestions!
Special thanks to Waveykat who offered to walk me through it on the phone.

Special thanks to Waveykat who offered to walk me through it on the phone.

Trending Topics
04-29-2006, 05:48 PM
#8
Super Member
Join Date: Dec 2002
Location: Los Angeles
Posts: 597
Likes: 0
Received 0 Likes
on
0 Posts
2014 Audi S5 Cabriolet 3.0T
Congrats...I am looking into the same project, but I have HIDs now and would just need the housings. Is this what you did? Where did you buy these? Thanks.
 04-29-2006, 08:00 PM
#12
Member
Thread Starter
Join Date: Jan 2006
Location: Lexington, KY
Posts: 237
Likes: 0
Received 1 Like
on
1 Post
2006 C230WZ
It said that when I ordered I called and they had ten pair in stock. One thing I had to do though was bend the stock wires harness some to get a better fit, just so you know. Good Luck!


